Oblique Illumination -
or why knocking the mirror or condenser
out of alignment sometimes helps!
by Dave Walker
A brief survey of the benefits of
using off-axis lighting to view some subjects, and how it can be easily
accomplished without cost for most microscopes. Also a look at some rather
bizarre 19th century microscopes which took the use of oblique illumination
a bit too far!
If, like the author, you own a microscope with a mirror
for external lighting, you may well have accidentally discovered the benefit
of oblique illumination for studying some subjects. Microscope mirrors
are occasionally knocked out of alignment at some stage during viewing,
with the result that the subject is lit with an off-axis light source.
This oblique illumination is in fact a useful way of improving the visibility
of some low contrast subjects like protozoa and the details on diatoms.
Essentially oblique illumination works by accentuating
any phase gradients within a transparent specimen. It's an easy form of
lighting to achieve up to medium powers (e.g. 40x objectives) with most
microscopes with or without a mirror, and is a 'cheap and cheerful' technique
the amateur can use to improve visibility when studying low contrast subjects,
especially if you're not fortunate enough to possess phase contrast or
high power dark field illumination.
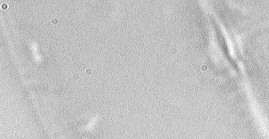 To
illustrate its effect, the image right shows part of the classic diatom
Pleurosigma angulatum using a 40x achromatic objective (Russian,
NA 0.65 dry). This is one of the cheapest 40x objectives you can buy, but
is perfectly capable of resolving the dots i.e. the fine detail on the
silica shell, but in normal brightfield this detail is quite difficult
to see. Only the central 'raphe' (on the right of the image) and an edge
of the diatom frustule at the left can be made out.
To
illustrate its effect, the image right shows part of the classic diatom
Pleurosigma angulatum using a 40x achromatic objective (Russian,
NA 0.65 dry). This is one of the cheapest 40x objectives you can buy, but
is perfectly capable of resolving the dots i.e. the fine detail on the
silica shell, but in normal brightfield this detail is quite difficult
to see. Only the central 'raphe' (on the right of the image) and an edge
of the diatom frustule at the left can be made out.
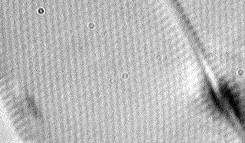 It's
not resolution that's the problem, it's contrast. If the diatom is studied
with an oblique patch stop in the filter tray (see below) the image right
is seen. The dots which are fine markings on the diatom frustule are now
clearly seen. (Incidentally I have to push my ancient image capture
card to the limit to capture these sort of images, so they are a lot less
convincing than the visual image down the microscope).
It's
not resolution that's the problem, it's contrast. If the diatom is studied
with an oblique patch stop in the filter tray (see below) the image right
is seen. The dots which are fine markings on the diatom frustule are now
clearly seen. (Incidentally I have to push my ancient image capture
card to the limit to capture these sort of images, so they are a lot less
convincing than the visual image down the microscope).
It's also possible to resolve the dots under dark-field with this objective,
but I have never found using home-made patch stops for a 40X dry objective
very easy and have achieved less than successful dark-field, so oblique
illumination is an easier alternative to improve contrast.
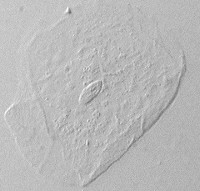
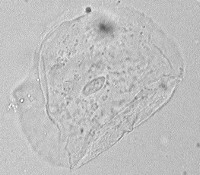 In
a second example, the image left and right shows the classic epithelial
cells taken by scraping the inside of the cheek lightly with the finger
nail and mounting the saliva under a cover slip (again using the 40x dry
objective). The image left is in brightfield with the iris stopped down
more than normal to improve contrast - it's an acceptable image but rather
flat. The same view with the oblique patch stop gives a very pleasing depth
to the cell especially the nucleus, cell granules and folding of the cell
(again, the visual image is a lot clearer than in the captured image).
In
a second example, the image left and right shows the classic epithelial
cells taken by scraping the inside of the cheek lightly with the finger
nail and mounting the saliva under a cover slip (again using the 40x dry
objective). The image left is in brightfield with the iris stopped down
more than normal to improve contrast - it's an acceptable image but rather
flat. The same view with the oblique patch stop gives a very pleasing depth
to the cell especially the nucleus, cell granules and folding of the cell
(again, the visual image is a lot clearer than in the captured image).
Oblique illumination also works well on single cells such as protozoa.
One book I referred to (ref. 1) illustrates that the internal vacuoles
are particularly distinctive in this sort of illumination.
If you haven't tried the technique, how can it be achieved? A
few methods are given below.
Knock the mirror!
As commented above, if you have a microscope with a mirror, moving the
mirror (plane side) so that light is shone off-axis can achieve the effect.
This one of the few techniques for improving contrast that the owner of
a simple microscope without a condenser can achieve i.e. unlike dark-field
or phase contrast. I first spotted the effect myself as a ten year old
with a no-frills toy microscope, and I got into the habit
of rocking the mirror on its axis when studying transparent live pond-life
to see if more details were revealed.
Simple stop for the condenser filter tray
 If
you have a condenser and filter tray, a simple stop can be made as shown
left. Just cut out a piece of opaque card to fit the filter tray and experiment
with various sizes of sector cut out of the disc for a given objective
to allow light from an angle to reach the subject. Normal axial illumination
should be setup first. As for dark field, the condenser iris should be
fully open and the condenser focus adjusted to get the best effect.
If
you have a condenser and filter tray, a simple stop can be made as shown
left. Just cut out a piece of opaque card to fit the filter tray and experiment
with various sizes of sector cut out of the disc for a given objective
to allow light from an angle to reach the subject. Normal axial illumination
should be setup first. As for dark field, the condenser iris should be
fully open and the condenser focus adjusted to get the best effect.
You may need to experiment with the size of the notch for a given objective.
The orientation of the notch with respect to the subject should also be
changed to see what achieves the best effect. If you have a rotating stage
this is easier than rotating the patch stop in the filter tray. If the
filter tray is a swing out type, also experiment with the extent the filter
is swung in, as well as varying the orientation of the notch in the filter
tray.
Condenser with oblique illumination
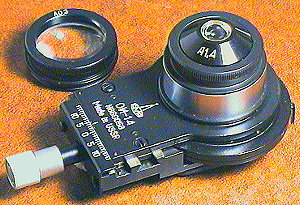 Buying
a condenser specifically for oblique illumination is probably not justified,
but this is a feature found in some condensers. My Russian Biolam microscope
is supplied with a modest Abbe condenser, but for critical work I use the
better quality Russian aplanatic condenser (N.A. 1.4). As a bonus this
also has an oblique illumination feature, see image right. (Supplementary
low power lens N.A. 0.3 also shown).
Buying
a condenser specifically for oblique illumination is probably not justified,
but this is a feature found in some condensers. My Russian Biolam microscope
is supplied with a modest Abbe condenser, but for critical work I use the
better quality Russian aplanatic condenser (N.A. 1.4). As a bonus this
also has an oblique illumination feature, see image right. (Supplementary
low power lens N.A. 0.3 also shown).
The iris can be moved up to 10mm off-axis in opposite directions, which
also rotates in the mount to change the orientation of the light to the
subject. The latter feature, as mentioned above for the oblique patch stop,
is important as the off-axis lighting often works best in a specific orientation
to a subject e.g. for non-symmetric diatoms like Pleurosigma.
Historical footnote
In the late19th century but before the advent of high numerical aperture
objectives, oblique illumination was quite popular and some makers developed
microscopes especially to exploit the benefits of the technique. One of
the first models was shown by Zentmayer of Philadelphia in 1876 at an Exposition
in this city. It had a swinging substage, i.e. the whole substage assembly
swung about an axis in the same plane as the stage. An image of this microscope
is in the Moody Medical
Library On-line (item 1.028 in catalogue). (This site illustrates a
wonderful selection of historical microscopes from the famous Moody collection,
most makers are represented).
Some makers designed microscopes that took oblique illumination to rather
extreme limits. The classic example is the Ross Radial microscope built
by the famous English maker Ross to a design by Wenham. This is a superb
example of quality engineering and optics by a respected maker, but a rather
bizarre microscope nevertheless. Almost every conceivable plane and axis
of the microscope limb, body and substage has the facility to be tilted
or rotated (see ref. 2 or similar history of microscopes where this model
is often illustrated). An image of this microscope is also in the Moody
Medical Library On-line (item 1.031 in catalogue).
The technique fell out of favour towards the end of the 19th century
as high numerical aperture objectives became available with the ability
to resolve the fine detail of diatoms etc. with good axial illumination.
A firmer understanding of the requirements for a critical image with axial
illumination were also realised.
I wasn't sure how well the technique is used nowadays given the many
other ways of improving contrast. However, a web search for 'oblique illumination'
shows that some of the mainstream microscope makers mention this form of
lighting as a feature in some of their models (particularly metallurgical),
so presumably it does still have a worthwhile role. The oblique patch stop
is certainly a cheap and cheerful way for the amateur to improve contrast
for some subjects, especially at medium powers where patch stops for dark-field
get trickier to make.
I was also intrigued to see that at least one manufacturer, 'Edge',
market a microscope with 'patented Multiple Obliquetm
Illumination' which apparently gives 3D images. Visit the Edge
web site for details and read the theory
behind the technique for 3D imaging.
Comments on the article to the author Dave
Walker welcomed.
References
1) 'Under the Microscope' by A. Curry, R. F. Grayson and G. R.
Hosey, (Blandford Press, UK, 1982), Chapter 8. Now out of print, but worth
looking out for in second-hand bookshops as it gives clear explanations
of many techniques and principles, especially the use of polarised light.
2) 'The Microscope Past and Present' by S. Bradbury. Pergamon
Press, UK, 1968, pp. 180-183. A compact but thorough overview of the history
of the microscope and it's development. Illustrates and discusses the Ross
Radial and Ross / Zentmayer microscope and the fad for oblique illumination.
Text and images © David Walker.
© Onview.net Ltd, Microscopy-UK, and all contributors 1995 onwards. All rights
reserved. Main site is at www.microscopy-uk.org.uk with full mirror at www.microscopy-uk.net.