![]()
Welcome to this new monthly series which encourages you to explore in close-up the everyday things around your home, garden and garage.
What do you need? - each subject covered in this series will have an icon to show what you will need to study an object.
![]() can be viewed with
a 10X hand lens or similar magnifying glass.
can be viewed with
a 10X hand lens or similar magnifying glass.
![]() use a low power stereo
microscope 10X-40X for a clearer look
use a low power stereo
microscope 10X-40X for a clearer look
![]() requires a compound microscope with magnifications 30X
up to 200X
requires a compound microscope with magnifications 30X
up to 200X
Who is the series designed for? We've tried to make it of interest to both the novice and more experienced microscopist. Each topic will have a brief description with images to illustrate the fascinating things you can find to look at. But there will be a click here prompt for many topics which will provide more background information and suggestions for further study.
This can be an exploratory journey together, because the author admits he rarely looks at everyday things under a microscope .... so why not join me to explore the fascinating world in close-up around your home!
Each month we will cover one particular theme and will include tours around each room to look at the TV, computer, hi-fi as well as food, clothes, printing and any plants or insects found along the way. It's amazing how household items we all take for granted become fascinating when examined more closely.
Each image shows a scale bar in fractions of a millimetre to make it easier to judge the scale at which an image is viewed.
Computer monitor and
TV screen
![]()
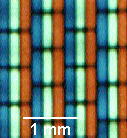
 So, where do we start? What better place than the
computer monitor screen you are probably looking at. Go on take a
closer look, if you get really close you should see the coarse
detail of the phosphor stripes (or dots) applied to the back of
the screen which generates the colours when electrons strike
them. But to really appreciate how the colours are generated look
at this red, blue and green text with a 10X lens to see how the coloured stripes
change in relative intensity as you move from the coloured text
to the white background.
So, where do we start? What better place than the
computer monitor screen you are probably looking at. Go on take a
closer look, if you get really close you should see the coarse
detail of the phosphor stripes (or dots) applied to the back of
the screen which generates the colours when electrons strike
them. But to really appreciate how the colours are generated look
at this red, blue and green text with a 10X lens to see how the coloured stripes
change in relative intensity as you move from the coloured text
to the white background.
The image on the right is my best attempt to photograph my monitor screen with a 35mm camera using macro facilities. But because most monitors have a fine 'dot pitch' of 0.26-0.28mm it doesn't show the phosphor detail well.
 To really
understand how the phosphor builds up colours, have a look at a
TV screen with the 10X lens (turn the TV on but turn down the
brightness to reduce glare). An image of the screen is shown on
the left. It is immediately apparent even with the naked eye that
the phosphor stripes are much coarser.
To really
understand how the phosphor builds up colours, have a look at a
TV screen with the 10X lens (turn the TV on but turn down the
brightness to reduce glare). An image of the screen is shown on
the left. It is immediately apparent even with the naked eye that
the phosphor stripes are much coarser.
Compact discs and
LP records - 'looking' at analogue and digital information
![]()
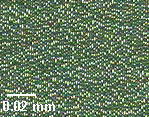 How many times
have you played a music CD or loaded one on your computer CD
drive, but have you ever looked at the digital information? You
can actually see the digital information on a CD disc with a
microscope. The digital information is encoded on the disc in the
form of a spiral track of pits which are 'read' by the laser
which scans the disc. The pits can be seen under a 20X objective
on a compound microscope if you shine an intense beam of light on
the CD below the objective. They are just visible in the image
right but will be easier to see if you try looking at them
yourself with the 20X objective and 10X eyepiece.
How many times
have you played a music CD or loaded one on your computer CD
drive, but have you ever looked at the digital information? You
can actually see the digital information on a CD disc with a
microscope. The digital information is encoded on the disc in the
form of a spiral track of pits which are 'read' by the laser
which scans the disc. The pits can be seen under a 20X objective
on a compound microscope if you shine an intense beam of light on
the CD below the objective. They are just visible in the image
right but will be easier to see if you try looking at them
yourself with the 20X objective and 10X eyepiece.
Records -
remember them ?
![]()
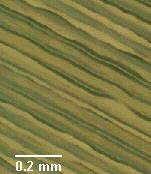 If you have an LP or 'singles' record, try viewing the
record under a stereo microscope to see how the musical
information is stored in an analogue form rather than the digital
form on a CD. You will need an intense source of light to reflect
light off the record to see the record grooves. Try shining the
light at different angles to get the best effect. If like me, you
were able to find a transparent record, you could also try using
transmitted light. The image left below is taken by reflected
light and the one on the right by transmitted light.
If you have an LP or 'singles' record, try viewing the
record under a stereo microscope to see how the musical
information is stored in an analogue form rather than the digital
form on a CD. You will need an intense source of light to reflect
light off the record to see the record grooves. Try shining the
light at different angles to get the best effect. If like me, you
were able to find a transparent record, you could also try using
transmitted light. The image left below is taken by reflected
light and the one on the right by transmitted light.
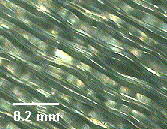 Unlike the digital
information on a CD, you can gain some idea of the type of music
being played by looking at the analogue information. In louder
passages of music the left and right walls of the groove wave
side to side more intensely than on a quieter track, and the
'frequency' of the wave provides an indication of whether a
predominantly low or high note is being played.
Unlike the digital
information on a CD, you can gain some idea of the type of music
being played by looking at the analogue information. In louder
passages of music the left and right walls of the groove wave
side to side more intensely than on a quieter track, and the
'frequency' of the wave provides an indication of whether a
predominantly low or high note is being played.
Record stylus
![]()
 While on the subject of LP records, it is also worth
looking at the record stylus or 'needle'. In most modern record
players the stylus is part of a module that is designed to be
safely removed from the cartridge attached to the playing arm.
(If you're a young reader, check with your parents about removing
the stylus module as they are easy to damage!)
While on the subject of LP records, it is also worth
looking at the record stylus or 'needle'. In most modern record
players the stylus is part of a module that is designed to be
safely removed from the cartridge attached to the playing arm.
(If you're a young reader, check with your parents about removing
the stylus module as they are easy to damage!)
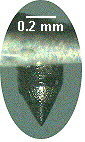
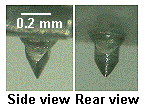 Use either the
10X hand lens or stereo microscope to study the structure of the
stylus. The one on the right above is from a relatively cheap
cartridge because the needle is large and has a simple cone
shape. Compare this with the more expensive stylus shown on the
left taken at the same magnification. The needle is smaller and
more precisely made, and is probably made from industrial
diamond. Notice that it is elliptical at the point, ie it is
wider viewed from behind than when viewed from the side. The long
axis of the ellipse sits at right angles to the direction of the
groove.
Use either the
10X hand lens or stereo microscope to study the structure of the
stylus. The one on the right above is from a relatively cheap
cartridge because the needle is large and has a simple cone
shape. Compare this with the more expensive stylus shown on the
left taken at the same magnification. The needle is smaller and
more precisely made, and is probably made from industrial
diamond. Notice that it is elliptical at the point, ie it is
wider viewed from behind than when viewed from the side. The long
axis of the ellipse sits at right angles to the direction of the
groove.
Cassette
player record/playback head
![]() The record/playback head in a
cassette recorder is usually difficult to get a good look at
because it is hard to access and should not be removed or touched
with a metal object. Although shining a torch on the playback
head while the cassette loader is open should give you a
reasonable view.
The record/playback head in a
cassette recorder is usually difficult to get a good look at
because it is hard to access and should not be removed or touched
with a metal object. Although shining a torch on the playback
head while the cassette loader is open should give you a
reasonable view.
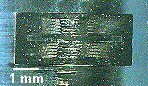
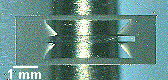 My brother was replacing the
cassette head on his cassette player so I took the opportunity to
have a closer look at it. I was also able to compare a high
quality and lower quality cassette head to see if there were
noticeable differences. Compare these two shown left and right,
which are at the same magnification and are views of the part of
the head that contacts the tape as it moves past. Which one do
you think is the higher quality component.
My brother was replacing the
cassette head on his cassette player so I took the opportunity to
have a closer look at it. I was also able to compare a high
quality and lower quality cassette head to see if there were
noticeable differences. Compare these two shown left and right,
which are at the same magnification and are views of the part of
the head that contacts the tape as it moves past. Which one do
you think is the higher quality component.
Important note to younger readers
The author is not encouraging you to dismantle electrical or
other equipment in this series as it is potentially dangerous and
could also damage the equipment. But if something is being
repaired or being taken apart by experienced people why not ask
if it is safe to take a closer look and also ask how it works.
Disclaimer: all the information in this series is given in good faith. However, no responsibility is accepted for damage to property or injury to persons as a result of readers investigating the subjects described. It is up to the reader to judge whether the subjects can be safely viewed in their own home. Younger readers should consult their parents or teacher as appropriate before examining either their own or somebody else's property.