

Although many microscopes are fitted with a polariser/analyser, they tend to be more expensive models, leaving novices and beginners purchasing their first instrument unable to view slides through polarised light. I recently purchased some inexpensive polarising material from Mike Samworth (fig. D). For a nominal fee I received 2 disks of rigid material (a resin base, bonded with polarising film). The disks can be used by themselves by placing one disk below the specimen slide, ideally close to the light source, and the other above the specimen slide - but also in the light train.
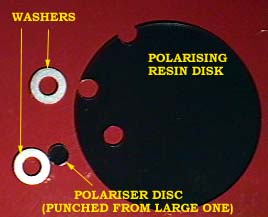
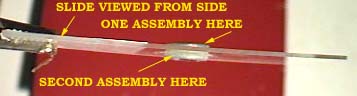
I wondered how difficult it would be to produce specimen slides with ready made polarisers actually built into the slides themselves (figs. A & B). If this was possible to do fairly cheaply, a set of slides could be made and distributed to people owning microscopes without polariser capability.
After a few experiments, I have
managed to find a technique to add a very miniature polariser/analyser
to a specimen slide (figs.
A & B)
with an additional cost incurred of only a few pennies - albeit, considerable
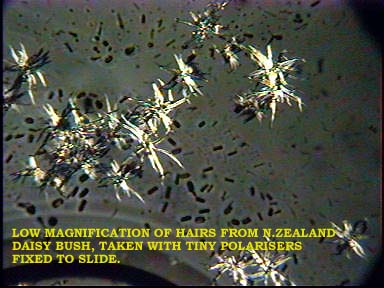
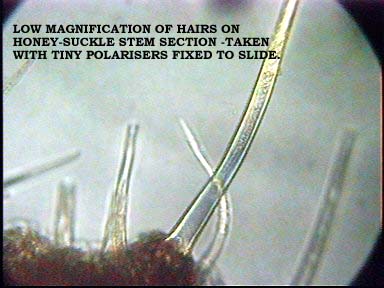
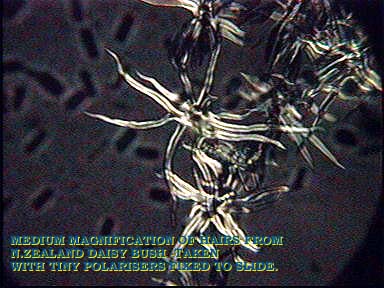
time and effort is involved. The resulting slide does not allow for full
extinction, yet 'does' produce a good enough effect to reveal previously
invisible detail. The slides, when complete, make beautiful and mysterious
objects which beckon to be viewed as you can see from this picture.
Maybe you would like to have a
go at producing some? If so, make sure to practice on one of your existing
slides which - if you mess up the process - you can afford to have destroyed.
I lost several slides experimenting before I realised how to overcome certain
problems with bonding the miniature polarisers in place. Here's how to
do it.
Materials needed:-
Glass Specimen slide (to receive
the treatment)
Glue (from Art shop)
Clear Nail Varnish (from Boots)
A four hole punch (the type used
for punching holes in paper)
A rigid disk of resin bonded polariser
(from Mike Samworth)
Washers (size:4.8mm aperture from
B&Q or similar DIY shop)
A small artists paint brush (from
art shop)
A nail file (borrow the wife's).
A scalpel from an art shop
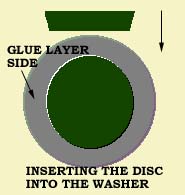
Making the polariser
We are going to make polarisers
from the washers (fig.
C). This involves punching out tiny discs
from the large disc of polariser material, and then bonding them to the
washers such that one face of the disc is flush with the one face of the
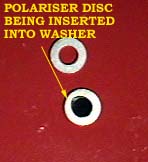
washer. The technique secures the polariser disc inside the washer's aperture
(fig. E)
in such a way so as to prevent it from easily falling out and to enable
the unit to be bonded to a glass slide without any of the bonding medium
seeping onto the polarising material.
1)Cutting the polarising material
Use the 4 hole punch to punch out
a few disks from the larger one. Try each of the punches in the four hole
punch and see which one produces the cleanest edge. It is likely that your
tiny discs made this way will have one or two slight burrs around their
edges but we will deal with this in a moment. The disc size is determined
by the punch but you should be producing discs that are just the faintest
tad greater in diameter than the aperture of the washer (fig.
F). This is a very close thing: if you
took one of your discs and placed it against a washer aperture, you would
be able to force it into the hole, by pressing it down hard with a small
coin. You don't actually want to do this though because it produces stress
marks in the polariser material, rendering it useless for viewing through.
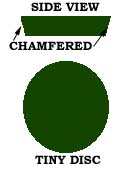
2)Smoothing and shaping the material
Select one of the tiny discs. Holding
it carefully between finger and thumb, start to chamfer the edge with the
nail file. As you work, move the disc around and around, working the nail
file as carefully as possible around the circumference, ensuring the disc
remains circular in shape. What you are doing is reducing the diameter
of the disc on 1 face yet retaining the original diameter on the opposite
face (fig.
E). You are creating a circular wedge.
Try and keep the nail file at a constant angle so that the edge of the
disc is chamfered evenly all the way round. Imagine the disc as the base
of a cone because this is what you are shaping it to.
3)Checking the 'fit'
After going around the disc with
the file a few times, offer the disc up to the washer aperture. The disc
is ready when you can insert the smaller disc face into the washer aperture
such that slight pressure gets it in, but it will not pass through completely
(fig. F).
This is a trial & error thing... a little practice and you will get
the feel for it. When ready, remove the disc from the washer and wipe both
it and the washer with a clean dry rag then put them aside for now as a
matched pair. Prepare a few more 'pairs' before moving on to the next stage.
4)Bonding the washer and
polariser
To bond the polariser inside the
washer: dampen an artists brush, dip it into the acrylic glue, and
paint around one surface of the washer, such that the inside edge of the
washer (around the aperture) gets coated too. It is best to place the washer
on a piece of glass first to make things a bit easier in a moment. Try
to keep the extremely thin film an even thickness on the face of the washer!
Repeat the process on the other washer and leave them both to dry.
When dry, use a scalpel to cut around the inside of the aperture. The idea here is to leave any overspill on the glass, and to keep a fine layer of dried glue on the washer face and the inside edge of the washer aperture, when you lift the washer from the glass. Free the washer taking care not to lose the thin skin of glue from the metal surfaces.
5) Fitting the polariser disc
into the washer.
Offer the smaller diameter face
of the disc up to the aperture of the washer (fig.
F). You are going to insert the chamfered
disk into the washer from the side with the glue on. It is best to put
several spare washers beneath the one you are working on so that when you
press home the polariser disc, there is a gap beneath the washer to allow
the disc to pass almost completely through the aperture. Working on a flat
surface, place a slip of paper over the assembly, put a coin on the paper,
and press down hard - forcing the polariser disc tightly into the aperture.
Remove the coin and paper, and ensure the polariser material and the washer
surface are flush with each other. The glue on the inside edge of the washer
(around the aperture) helps to form a friction fit! Check the other side
of the assembly and use the scalpel to carefully pare away any dried glue
thread which may have been pushed through to the clean, untouched, surface.
Repeat this procedure for the other washer / polariser pair!
6) Preparing the slide to take
the assemblies
Paint a thin film of glue on the
slide's cover slip in the precise position where you will shortly place
the washer. The glue should form the same shape and diameter as that of
the washer. The easiest way of doing this is to lay the slide on top of
a spare washer and trace the glue onto the surface of the slide. Be sure
to leave the area clear where the washer aperture will eventually
be placed: this should be located over the part of the specimen you
wish to study! Leave it to dry and then paint on another thin layer.
When dry, turn the slide over and do the same the over side. You must be very careful here to ensure you paint the glue film precisely over the layer now dried on the over side of the slide. Leave it to dry.
7) Fitting the first polariser
to the slide.
Take one of the polariser/washer
assemblies and - after carefully lining it up with the circle of dried
glue on the cover-slip - gently place it down onto the slide. Apply gentle
pressure so the layer of dried glue on the slide (cover-slip) and the layer
on the washer come into firm even contact.
Use the nail varnish and place a few drops onto the washer such that the drops fall off the outer edge onto the slide. Do this gently so as not to disturb the position of the washer on the slide. Let the varnish drops dry!
Paint a ring of varnish around the edge of the washer such that the washer's outer edge is sealed to the glass beneath. The varnish should not 'bleed' under the washer because of the seal formed by the layers of flexible glue on the washer and slide. When dry, give it another coat of varnish to strengthen the fixing (figs. A). No varnish must touch the polarising material!
8) Fitting the second polariser
to the slide.
The process here is exactly the
same as for (7) above but
first of all you need to position the polariser/washer assembly such that
it will extinguish light passing through the other assembly (of the other
side of the slide). To do this...
Place the slide under a microscope with the fixed washer/polariser assembly downwards. Focus on the specimen and then - holding the free polariser/washer assembly in a pair of tweezers - introduce it into the light train and hold it just above the specimen slide. Rotate it until it extinguishes the maximum light and gently place it on top of the slide at a point as close as possible to sitting on top of the fixed washer assembly on the other side. This is very fiddly! You may need to use fine needles to push and finely rotate the free assembly so that it is lined up with the washer assembly on the underside of the slide and is rotated properly to extinguish light. Trail and error will enable you to get it right.
Remove the slide without disturbing
the position of the free washer/polariser assembly and then fix it using
nail varnish as before - see (7) above.
9) Perfection
Fix a pair of self-adhesive pads
to the underside of the slide. These can be purchased in sheets from DIY
stores. The pads will prevent the assembly from fouling the microscope
stage when the slide is in use. Enamel paint (cellulose based) like the
paint used to glue model planes together can be painted onto the washer
and glass to form a more robust bond.
Terms, jargon and glossary:- Go to Top of Page.
Polariser
/ Analyser
Properly called an optical
or light polariser. It 'blocks' incoherent light causing only light waves
to be pass through in such a way that the light waves travel in a
parallel train and axis. As used to filter light in the lenses of quality
sunglasses. Further explanations.
The analyser is a similar
device. It is used in association with the polariser, by turning it within
the light train - this selectively extinguishes coherent light. A polariser
and analyser, when used as a pair with one rotated fully should extinguish
(block) nearly all light in the train.