HOME MADE HAND
MICROTOMES
Two practical approaches by Mike
Dingley and Quentin Saville
Making a Hand Microtome 1
by Quentin Saville (Australia)
Most of us, doubtless, have periodically wished for a microtome but couldn't afford or make one. True, a cotton reel and razor blade will do a perfectly good job but they have their problems, especially modern reels, with no solid ends. The following device works quite well, is capable of fine adjustment and depending on the size of the hole, will handle larger specimens such as frozen meat or delicate/flexible material embedded in wax or firm gelatin. Moreover the materials are readily available, inexpensive and if someone as ham-fisted as I am can make one anyone can. You don't need to be a machinist to do this.
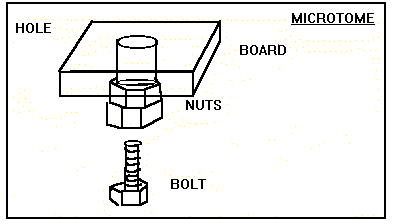
The core of the device is a 4" (100mm) long X 3/8th" (9.6mm) diameter bolt with two or three nuts, depending on the desired amount of travel, on it and a 11/4" (30mm) thick bit of scrap M.D.F board.
A bit of 2" (50mm) by 4" (100mm) and any largish threaded rod would do as well.
Wanting a fair bit of travel I used three nuts on the bolt (and discovered that they need a thin spacer between each nut or they lock up). Heavy paper or thin card works fine making sure that the bolt travelled through all three easily. I then carefully glued the nuts together using epoxy glue, making sure no glue touched the threads. Once that had started to dry I drilled an 8 mm hole through the board and then epoxied the nuts to the board with the holes in line. The bolt was then screwed in and the microtome is essentially complete. Drop in a bit of dowel and the sample, screw the bolt in cut to form a flat surface, screw in a bit more, cut and there's your section all ready for mounting. The purpose of the dowel is to form a traveller which forces the sample up the hole. For a small sample a longer piece of dowel is used than for a large sample.
PARTS LIST EQUIPMENT LIST
One long bolt. Two or three nuts.
A piece of thick board.
A length of dowel (to fit hole)
Drill with suitable bit.
Epoxy cement.
Small saw (to cut dowel).
Sand paper (to smooth dowel).
SIMPLE ENHANCEMENTS
Some locksmith's graphite or ground up lead pencil on the bolt will smooth things up. This warning shouldn't be necessary but be VERY careful with graphite.
The stains are practically indelible.
A thin sheet of metal (eg; a drink can) could be epoxied to the wood before drilling, this will:
a. give a smoother surface for the razor to slide over.
b. protect the wood .
Be very sure the metal is glued on flat though, a paper wrapped brick placed on top should do the trick.
A metal or plastic tube can be glued into the hole in the wood, this will protect the wood from damp specimens and give a smooth surface for the dowel to travel on. It just occurred to me that varnish would do the same job.
The bolt head can be fixed to a stand and the nut/cutting surface rotated instead, I can't see any great advantage to this but it would stop the unit falling over if put down a bit carelessly.
The unit works, takes about an hour to make (most of which is drying time) and renders you the envy of your microtome-less friends.
For the chronically lazy or short of materials, a coach bolt with it's point cut off, screwed in to a slightly oversize hole and worked until it turns easily should do a decent job.
Making a Hand Microtome 2
by Mike Dingley (Australia)
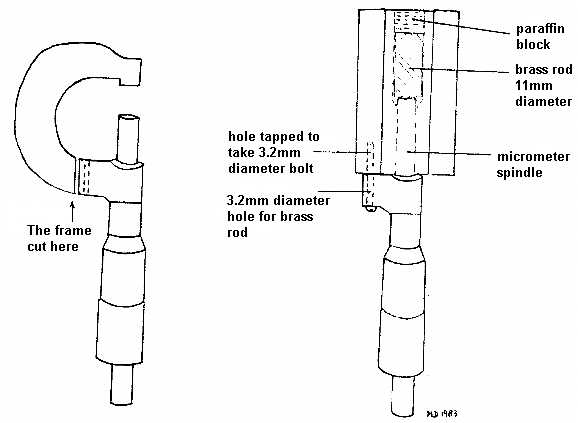
One of my earlier interests in microscopical 'things' was looking at the cellular structure of plant material, namely roots, stems and leaves in cross section and longitudinal section. At university I was shown how to cut sections of roots and stems using a razor blade in one hand and holding the specimen in the other. Slicing was not as easy as you think and my sections were either too thick, oblique or were so thin that they tore to pieces. I was really interested in taking photographs of my specimens and this technique wasn't suitable. Having limited funds to buy equipment, I decided to make my own microtome. I first thought of using a bolt with a fine thread and a nut into which my plant material would be contained. I by-passed this idea when I thought about using a metal workers' micrometer as this would give me a small traverse but would also allow me to read the thickness of my slices. (I will call them slices as they are not good enough to be called sections).
I needed a micrometer and some brass to make the cutting surface as well as something to raise the specimens up and down. I pestered a local brass supplier for some off-cuts and looked around for the best price for a new micrometer which in fact cost me $30 (which was about 1/6th the price of a brand microtome).
Materials.
1 piece of hexagonal section brass rod 44mm diameter and 60mm long.
1 piece of 11mm diameter, 30mm long brass rod.
1 25-50mm micrometer (any brand)
1 brass bolt 3.2mm diameter, 25mm long.
Method.
I am fortunate to have access to a metal working lathe which I used to make a 6.4mm hole centrally through the length of the hexagonal brass rod. The diameter of the hole was to allow the spindle of the micrometer to pass through. The micrometer was then cut (see diagram) to remove the horse-shoe shaped piece and a hole was drilled to take the 3.2mm bolt. A corresponding hole, slightly smaller in diameter, was drilled in to the end of the hexagonal rod so that it could be tapped to accommodate the 3.2mm bolt. This would enable the micrometer to be fixed firmly to the hexagonal rod. As the micrometer spindle would not give me a large enough diameter embedding block I drilled an 11mm hole from the other end (top, cutting surface) to accommodate a short length of 11mm brass rod. The depth of the hole or length of brass rod was dependant upon the length of the spindle and hexagonal rod. In this case I made it 30mm long which left a minimum of 10mm from the top which was an ideal size of paraffin block. Although not restricted to using paraffin embedded specimens you can also cut carrot, polystyrene, elder pith or potato to the required diameter using a cork borer and mount the specimens such as botanical stems, roots and leaves in this.
My specimens are embedded in paraffin contained in cardboard mould. These were made by wrapping thin cardboard around the 11mm diameter rod and taped using sticky tape. The bases are folded over and taped to prevent leakage. When the block has cooled, it is pushed into the shaft and the surface is trimmed prior to slicing. By rotating the micrometer thimble the specimen is raised in known increments.
All in all it took about 5 hours to make this instrument using the machinery and tools at hand but it has provided me with a relatively cheap microtome by which I can make reasonably thin slices.
Please report any Web problems
or offer general comments to the Micscape Editor,
via the contact on current Micscape Index.
Micscape is the on-line monthly
magazine of the Microscopy UK web
site at Microscopy-UK