Photomicrography has been developed for many years. Recently there has been a very strong tendency to replace traditional silver halide photographic film images with digital imaging techniques.
Digital images are both much easier to obtain and much easier to store than silver halide film images. The development of CDROMs provides a rather stable way for safe long term storage, especially when duplicate CDROMs are produced.
The Computer and Software
Many computer operating systems are available today. Operating systems that are more or less compliant to the so called "POSIX" standard are not deliberately designed to be difficult to program. Because of this it is MUCH easier to write complex programs for them, and programmers can concentrate on making the programs functional rather than trying to program around the deliberate obstacles placed in their path to prevent their writing programs! Examples of POSIX type operating systems include Solaris, the three BSD distributions, and the multitude of Linux distributions. These, and most of the software that run on them, are all free and can be simply downloaded from the Internet. All of the programs discussed here are available free by simply downloading them from the Internet. Some image processing algorithms require substantial calculation and thus work best on fast systems such as Athlon64s. There is somewhat less choice in operating system for 64 bit Athlon processors. Of the Linux distributions, Fedora seems to support them best.
One can also purchase commercial programs to do most of the things described here.
The Image obtaining Devices:
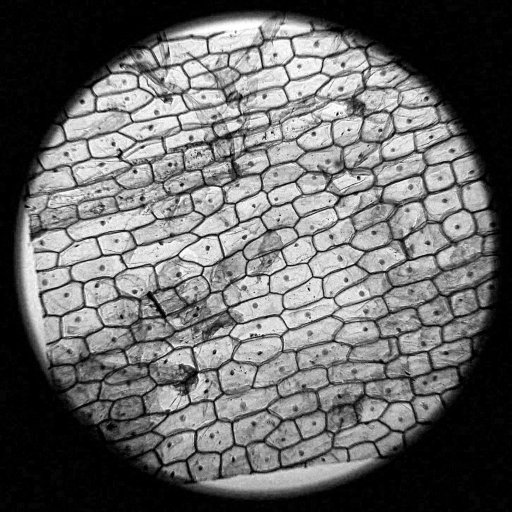
Most digital cameras do not have replaceable lenses, so using them requires attaching the camera somehow to the microscope ocular. This can produce very good results. Some cameras work much better than others, and the variable is not so much the price of the camera, but how well the camera's optical system links with the microscope ocular. Of course, the images are almost always round when this technique is used. Although there are special oculars available for this purpose, they are rather expensive, and the results with them are often inferior to using ordinary oculars. It is not too difficult to fabricate cameras holder for doing this using machine shop equipment.
The image below shows a stained plant section taken this way:
Images obtained with traditional silver halide photographic techniques can be converted to digital images using film scanners. These wonderful devices are available of converting both colour slides and colour negatives into digital images. Unfortunately these scanners must be built to very high precision, and consequently, they are all rather expensive. Many people make the serious mistake of using ultra high speed colour negative film for about every standard photographic image that they take. The images from this type of film are extremely grainy, and the colour rendition is generally very inferior to slower film.
Whether the digital images are obtained directly as digital images, or whether they be obtained by scanning photographic slides or negatives, image processing techniques can often improve the images dramatically.
Most USB digital cameras can be mounted as drives to download their images directly to POSIX compliant devices. Many dedicated microscope cameras work best with POSIX operating systems, especially Linux systems. They often, however, require some sort of kernel module.
There are available microscope imaging attachments that send a continuous stream of images through the USB port, these usually are fairly low resolution, usually 640x480 pixels. When these cameras are being used, the images can be captured at any point using the ImageMagick "import" utility. These cameras are very sensitive to dim light, and image rate is quite rapid, so that one can capture images of moving organisms very easily, often producing images that are surprisingly spectacular. (One particularly inexpensive one is sold as the "DCM35". A linux kernel module called spca5xx is available which permits its use with late version Linux kernels.)
Scanners generally will work well on POSIX systems when the xsane system has been installed. Most scanners can simply be plugged into the USB port, and the xsane program will recognise them.
Digital Images and their Modification
Digital images can almost always be improved by image processing techniques. Computers replace darkrooms!
Image processing, like virtually all other computer tasks, can utilise either commercial or open source programs. The same situation obtains to image processing as obtains to all other areas, namely, the most bug free and stable programs are generally the free open source ones that have been in use for several years. The worst ones tend to be new free open source ones, and the (generally rather expensive) commercial ones lie somewhere in between. The commercial programs are usually, but certainly not always, better documented and are also often somewhat less user hostile, but they also generally have less capabilities. The latter is surprising to many--after all one would think that if one would have to pay for something one would naturally think it would have more capabilities than a free program that does the same thing.
The BSD, Linux, and other free Unix clones have a more or less standard interface called the POSIX standard, and all of these operating systems can use the basically free Xwindow system. X users have an enormous choice of Xwindow managers that provide dramatically different capabilities.
There are three free extraordinarily good image processing software packages for POSIX operating systems:
- 1. netpbm This is an enormous set of command line programs that can be used to interconvert virtually any common image formats, and can also perform certain image processing functions. This package has no provision for viewing images.
- 2. Image Magick This package can read many image formats, and perform several types of image processing functions. It has a very useful image display program called "display." It can read and write formats that have 16 bits/colour. There are at least two separate versions of this package being maintained at this point.
- 3. GIMP This program has been around for several years and is very stable. It has many extraordinary capabilities. Unfortunately it cannot read formats with more than 8 bits/colour. It takes "plug ins" that can add more capabilities than it already has. It is somewhat user hostile, and the documentation is not as great as it could be.
No matter how the image is obtained, it is best to have the primary image have as many bits per colour as possible. Although few, if any people can tell the difference between an image with 8 bits/colour from one with 16 bits/colour, images with more bits/colour contain more information that can be used by image processing programs when the final images are produced. When images with too few bits/colour are modified to stretch contrast, one may find that the images are highly unacceptable with no intermediate shades between quite bright and black! (Or no intermediate shades between quite dim and white.) Xsane normally can produce files in jpeg or pnm. The latter is GREATLY preferred, because saving images as jpeg results in some loss of original digital information, and may introduce unacceptable artifacts when image processing techniques are applied to the images. Most programs that produce and save jpeg images ask for a "quality" number. If you must use jpeg, use a "quality" near 100%.
Microscope images differ from images taken of most other subjects in a very important way, namely, the most important image characteristic is that it provide the best possible display of structures on the original subject. Faithful production of colours and relative visual effect often are of little concern. After all the original subjects are not even visible to the naked eye at all, and optical techniques such as phase contrast and the like have already dramatically altered the image. For images taken with phase systems it is often best to use just the green image, or to use a green light source and monochrome film if using conventional photography. Images of slides stained with a single colour dye generally reveal the most detail when the image is recorded monochrome near the wavelength of maximum absorption of the dye. For images taken at high magnification images taken in blue light are noticeably sharper than those taken in red.
HOW TO DO IT!
The first step after obtaining a digital image, whether from scanning a negative or slide, or from a digital device, is to examine it very carefully and see if it be apparent that any kind of image processing technique might improve it. If the image have more than 8 bits/colour, you may have to use the ImageMagick display program to do this. One should look for the following:
- 1. Should this image be kept as a colour image? (If, for example, this be an image taken with a phase contrast system using green light, it makes no sense to keep it as a coloured image since only the green channel has any image anyway.)
- 2. Is the contrast correct?
- 3. Is the image too dim or too bright?
- 4. Is the colour balance correct. Examine both light and dark areas. Unlike conventional photography one can modify both the contrast and the intensity of the individual primary colours. (red, green, and blue.)
- 5. Is the image sharp? Amazingly enough out of focus images can be processed to make them sharp again, but this often introduces artifacts such as halos around objects, and artifacts already in the image tend to get multiplied.
- 6. Might the image be improved by processing techniques that make certain features more visible even though this may make the resulting image visually very different from the original?
Very often one may find that the netpbm utilities, the ImageMagick utilities, and Gimp may all three be required to produce a really first rate image. It is always best to use gimp LAST, especially when the original image has more than 8 bits/colour.
It is good practise to store the original images on CDROMs and to store the final images separately. Before trying to modify the image, copy it to a working directory. If it be not in pnm format, it is probably best to convert it to this format first.
When it be apparent that a monochrome image would be better than a colour one, it is best to convert the image to monochrome before doing anything else. Generally it is best to use just one of the three colour channels. This requires that you separate the three colour channels that are in the original image file. The netpbm program "pamchannel" is supposed to do this, but it produces output only in pam format, and it does not seem to work properly with 64 bit linux. Unlike the other netpbm utilities, it is also needlessly user hostile. I could not find a program to decompose the standard ppm "P6" format to the standard pgm "P5" format that worked the way I wanted it to, so I wrote one myself, pnmdecompose. Click here to download it. You can compile it by simply typing "cc -o pnmdecompose pnmdecompose.c" It does not require any special libraries at all. After it is compiled, you can move the executable to /usr/local/bin. If you simply type pnmdecompose myfile.pnm it will produce three grey image files, one red, one green, and another blue. Do not attempt to use this program with an old computer using 64K segments, as it loads the entire image into memory. (My program can handle 16 bits/colour images.)
The image below shows the original image captured with a pcm35 imaging attachment. (cheek epithelial cells)
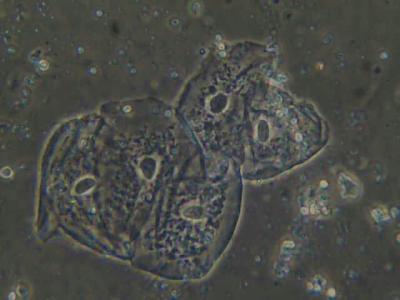
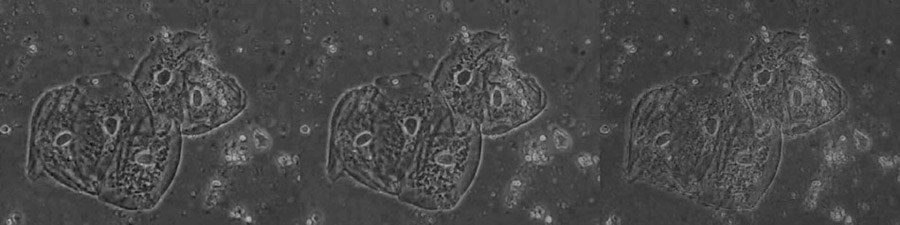
It is a phase contrast image, and there is not much colour in the image at all. Decomposing it with pnmdecompose produced the following results, red is to the left, green is in the centre, and blue is on the right.
In many cases the original image will have be one with more than 8 bits/colour. The gimp program is NOT capable of handling these images without first converting them to 8 bits/colour. This conversion can result in a very substantial loss of pictorial information that can have very adverse effects on the final image. For that reason it is best to manipulate the program with the netpbm programs and the ImageMagick utilities first.
Many images have very low contrast. It generally makes sense to run the netpbm program, "pnmnorm" on them. (When monochrome images are being used, it is especially important to decompose them into individual colour channels before doing this.) "pnmnorm" will adjust the image so that the pixel values range from 0 to the pnm image's specified maximum. Often this image modification alone makes an otherwise poor image into a spectacular one. Microscope images tend to benefit from using the pnmnorm program much more than other types of images.
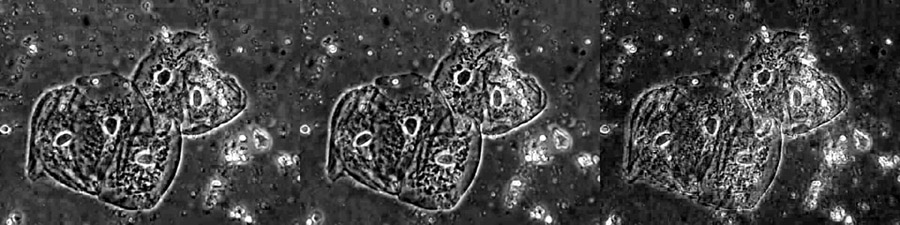
The image below shows the result of running pnmnorm on each of the three images from above:
Become familiar with the netpbm utilities. It generally makes sense to try these first. All of the netpbm programs are command line utilities, so the exact effect of the program will only be apparent after the program has been run and the image is viewed with another program such as ImageMagick "display". (Many common display programs are incapable of displaying images with more than 8 bits/colour, but "display" handles them with ease.)
After the possibilities from netpbm have been exhausted, it is time to try to determine if any of the modifications that can be made using the ImageMagick programs are going to be worthwhile. Several of its commands can dramatically improve many images. The sharpen, saturation, gamma, and brightness commands are often all that is required to convert an image into a spectacular one. It is important to save the image whenever it looks really great before trying anything else. Although there is an undo command, it is best to be safe! ImageMagick has an "emboss" command. This will give the image a 3D quality. This can dramatically enhance visibility of otherwise faint features, the result is rather similar to Nomarski contrast. The ImageMagick emboss command provides somewhat different results than the one from gimp. The ImageMagick one is much easier to use, however.
After all of ImageMagick's possibilities have been exhausted, it is time to try to see if any of the gimp program could further improve the image. Again, Gimp will only accept images with a maximum of 8 bits/colour. If the image have more than this, one can save them in an 8 bit format from the display program or use the provided netpbm utility to reduce the colours to 255. Again avoid converting to jpeg, though png is fine.
Gimp has a bewildering array of possibilities, and many more plug ins are available from the gimp web site. Users who are familiar with it can rapidly modify images with spectacular results. It is very easy to click on its buttons and drag its cursors around to create spectacular effects. It is also very easy to make dreadful ones too, however!
Gimp has a "layers" menu. A rather different "embossed" image can be obtained by splitting an image into two layers, and then running the emboss command on one of the layers. The program allows different algorithms to be used to combine the original image with the embossed one and to adjust the proportion of each image that goes into making the final image. A rather greater variety of effects is possible than with the ImageMagick display program's emboss command. The colours command under the layer's menu allows adjusting the response curves in a complex way for each of the three primary colours and for the overall intensity. If gimp accepted more than 8 bits/colour this command would be more useful than it is. There is a plugging available for adaptive contrast. Unfortunately the power of this technique is dramatically reduced because of the 8 bit/colour limitation of gimp. A command line version of this same program with 16 bits/colour capability is also available, it is called pnmace. Unfortunately it is difficult to compile, however, the source code contains a compiled version that will run with some versions of Linux. A few similar programs are also available from Internet sources.
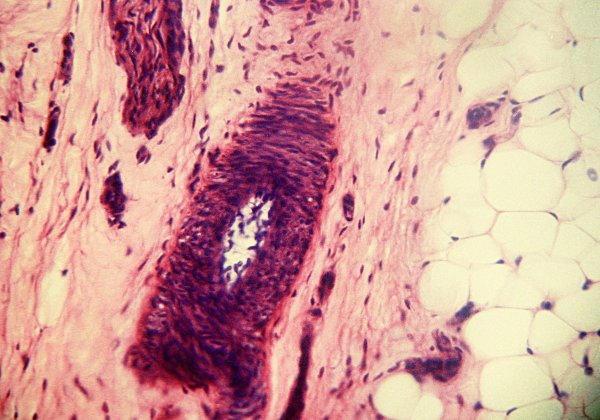
The image below of a stained slide of a section of skin tissue was originally captured using ASA 200 colour negative film in a dedicated microscope camera. The original colour negative was scanned using a Nikon 35mm slide scanner and was directly converted into a positive image. Some "image processing" is done during the setup for the scan process. The scanned image below was converted directly from its original pnm format to jpeg:
The image below shows the same image after being modified by separating it into two layers, embossing one of the layers, and then combining the two layers:
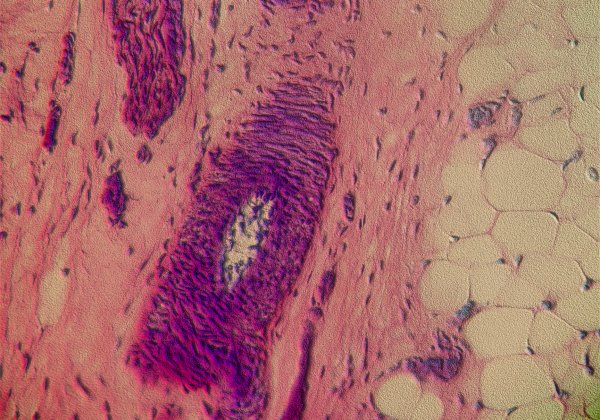
The modified image shows emphasises many fine details. Even with ASA 200 colour negative film the film grain is quite apparent in the modified image. With film much faster than this grain becomes unacceptable. ASA 100 film is really best.
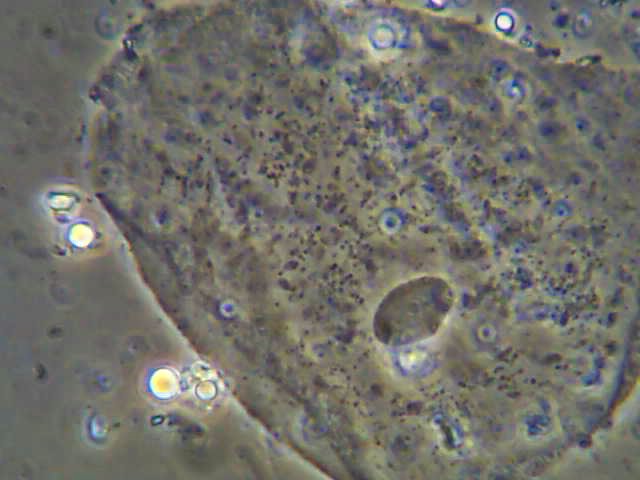
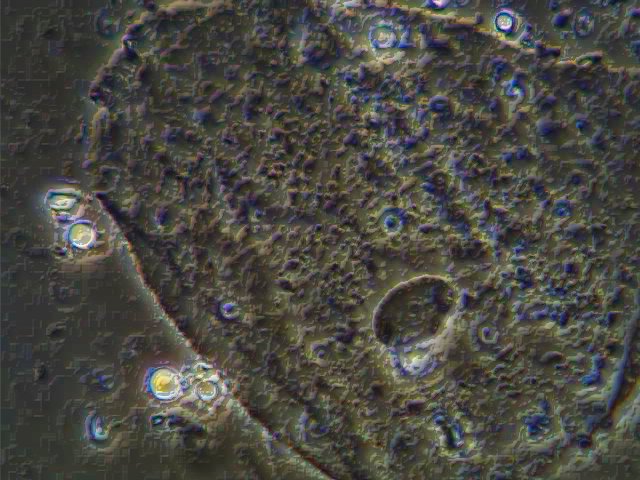
The image below was obtained using a Wild 100X phase contrast objective and the DCM35 640x480 resolution usb microscope camera. Illumination was supplied by a 3 watt light emitting diode illuminator. Once again this is an image of an unstained epithelial cell. At this magnification only part of the cell could fit into the field of view at a time. As in all images taken at the limit of visible light resolution, there is a slight peculiar colour fringing that results from the red image having substantially lower resolution than the blue. This image is the unmodified image as it was captured by the ImageMagick "import" program:
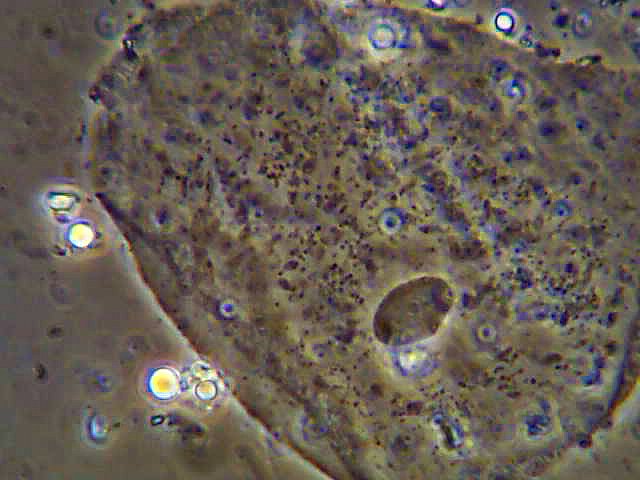
Considering the extreme magnification, the above image is surprisingly good and a lot of cellular detail is evident. The image below shows the result of taking the above image and executing the ImageMagick display program's sharpen command, followed by its "normalise" command. The resulting image is more striking, and details are more obvious. Some image artifacts are also enhanced by this process.
The image below was obtained from the original image by utilising both ImageMagick and gimp. The original image was saved as a png file from the ImageMagick "display" program. The image was then converted to grey scale, and then subjected to the "emboss" command. The embossed image was also saved as a png image. Both of these images were loaded into gimp. (Unlike ImageMagick display gimp can display many images at once.) The layer dialogue was opened on the original image, and the image duplicated as a second layer. The embossed image was copied into the layered image, and the top layer was replaced with the embossed image. The relative contributions of the two layers was adjusted, and when the image looked right, the "merge down" command was applied. The result is rather dramatic! Many fine details are emphasised. Unfortunately once again close inspection reveals that the visibility of some artifacts is also enhanced. Still the image is quite striking.
It makes some sense to store the final processed images as jpeg images, because they are compact and the small defects that this format introduces are not usually apparent even with careful inspection. Many image processing algorithms, however, make them stand out! That is why the image should be kept out of the jpeg format until it is in its final form! However, one should remember that the png format compresses image data strongly and does not result in loss of image data like jpeg does. Unfortunately png files are usually much bigger than jpeg. Consequently, it makes sense to store large images in jpeg format and small ones in png.
There are a great many things that can be done to improve various aspects of images using these (and other) computer programs. The pnm format is simple enough so that people skilled in C programming can easily write programs to manipulate images themselves.
Note: all of the pnm images on this page have been converted to jpeg so that they can be read properly be web browsers.