|
The inner epidermis of the onion bulb’s cataphylls (the onion skin) Easy and not so easy methods to work with
Walter Dioni - Cancún, México First part – preparing the epidermis, live cell structure, fixing and staining with iodine
JUSTIFICATION This work started as an attempt to make a preparation of onion skin without the annoying air bubbles that almost always bother the observation. You can work with them under your objective, but this is annoying, isn’t it? I was then guided well beyond my initial purpose, by a concatenation of suggestions dictated by studying the material in itself, my memory... and Internet. Although, at a certain point, work seemed to show a very serious unbalance in the "cost in time / benefit" quotient, but the intrinsic fun generated by this "light” research, that even drove me on joyful journeys through the Web for many days, tempted me to continue. I believe that at the end I had a lot of fun, I learnt several things, and in between there were registered several points which may be of interest to other amateur microscopists, biology students, or even biology teachers. WARNING! Those who start reading this long series of articles must be advised that they will be subject to the viewing of very similar images, with no artistic or novelty pretentions. These are just witnesses of the use, on the same plant tissue, of many different techniques. So, what is important, is the comparison between otherwise very similar images, to verify (as long as a digital testimony can allow) the result of the different treatments. Most pictures have been taken with a Canon Powershot A75 camera, handheld over the 10x ocular of my microscope. The 4x objective of the microscope plus the camera system gives, depending on the intensity of illumination, a central hot spot (which is not evident visually) even with the most carefully adjusted Köhler style illumination. Due to vignetting*, images have 2Mpx out of the native 3.2 Mpx of the sensor. Most of the time I crop a 1024 x 768 px image, which for sake of better reading in the published article I reduce to 900x 600 px. If necessary for publication, I adjust the size additionally. My only interest is to better show which I consider a significant testimony of the action of the reagents. *Vignetting can be eliminated using the optical zoom of the camera. But I work until now with a power supply, and in this configuration the camera does not admit its use.
INTRODUCTION As part of 'another project' I’m working on, I needed a few onion-skin preparations. Who does not need them some times? But of what onion-skin (epidermis) are we talking about? For me it was clear that the onion bulb offers us, for our observations at least, 3 or 4 different types of epidermis. To define and select the one to work with, was the subject of the article “How many onion skins are there?” (MICSCAPE, February 2011). And ... seeing the results, I asked myself who, when, and why, the epidermis, specifically the innermost of one of the scales in the onion bulb, a modest food ingredient, was proposed as a successful model of plant tissue, and unbeatable elementary demonstration of the organization of a cell. Of course these are not big existential problems. This violent world in which we live will not be better because I found an answer; but I surrendered to my curiosity, and this was the starting point of the article “Who invented the 'onion skin' biology lab?” (MICSCAPE, March 2011) which retells the long history of this practice, now inevitable in any course on elementary biology. I recommend reading these two preliminary articles before trying this one. So, after that “divertissement”, I elected to work with the, for more than a century, favorite inner epidermis of the middle of the package of scales that made an onion, and try to work out a technique satisfactory for me, and possibly useful to others, for not to have to endure the uncomfortable and unsightly air bubbles.
THE FIRST OF MANY POSSIBLE WET MOUNTS OF AN ONION SKIN For the first mounts I made, I followed, with some adjustments, the standard method, a thousand times described on the Internet and in any elementary biology book, exactly as recommended in 1890, or any of several modifications tirelessly repeated by all those who, like me, want to take advantage of the facilities offered by this material. Everyone who uses this technique must face the first problem: in the majority of onions the epidermis is very thin, and when you manipulate it, it folds in capricious forms, or screws up as a tube. The use of needles and tweezers, recommended many times to extend it, is difficult, tedious, and can be ineffective, or cause a disaster in the thin membrane. Manipulation, folds, the type of mounting medium, and other details, make up nasty preparations. The following technique, although laborious, helped me to solve this problem. I don't recommend it, I describe it. And of course it also has its own limitations.
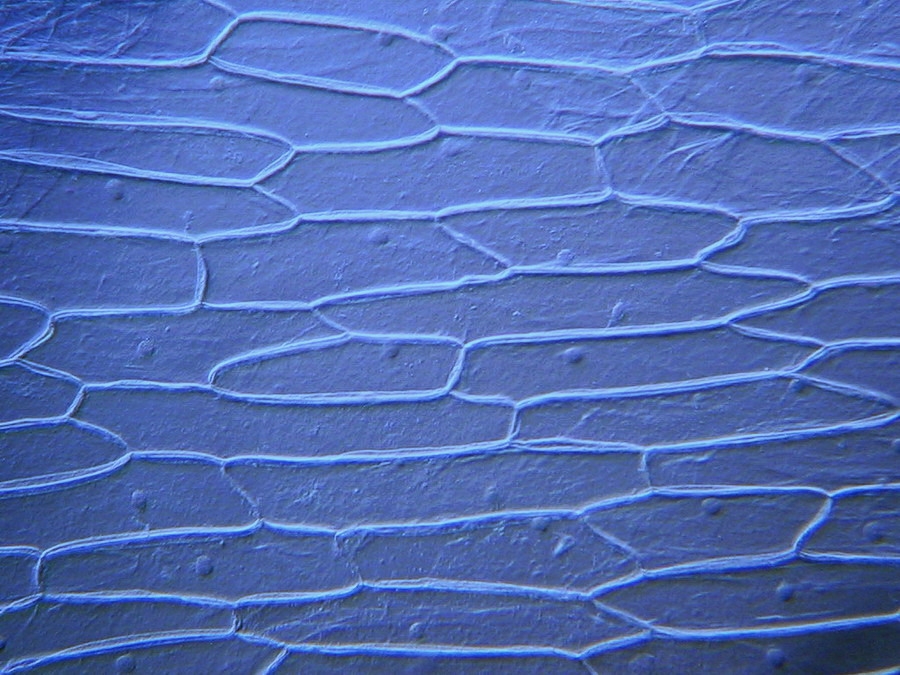
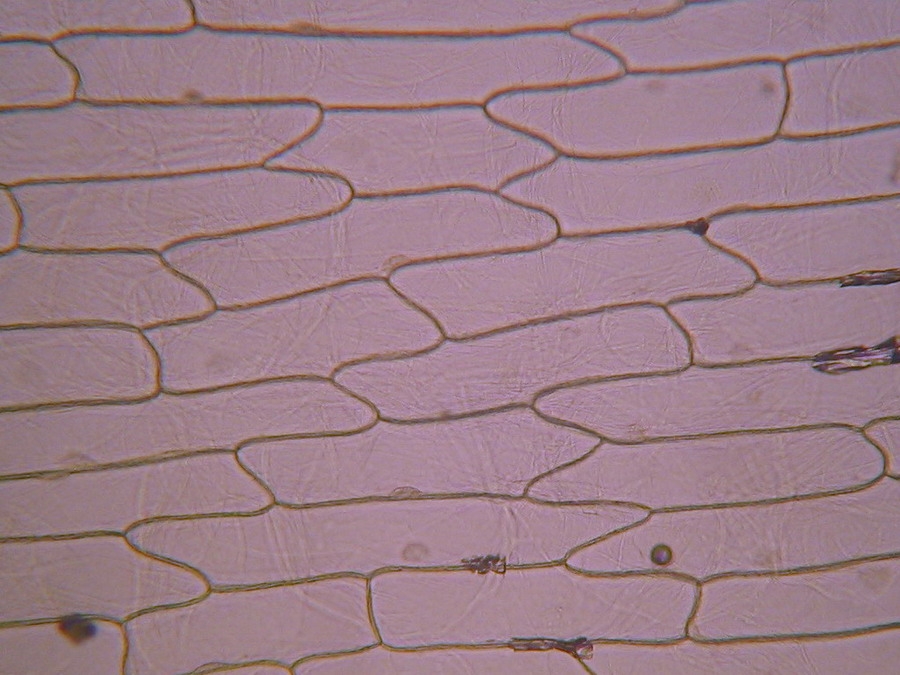
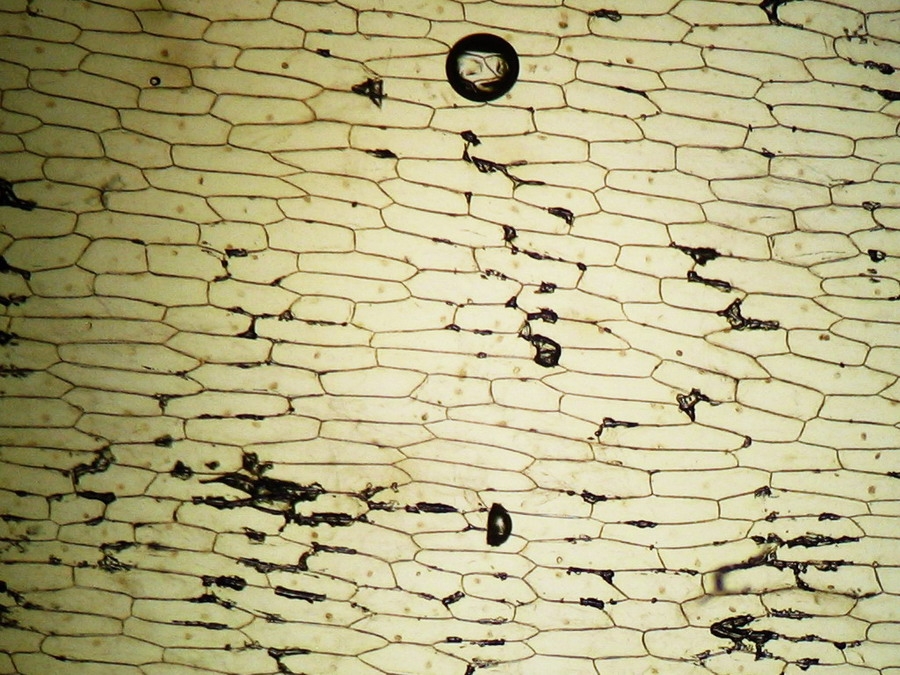
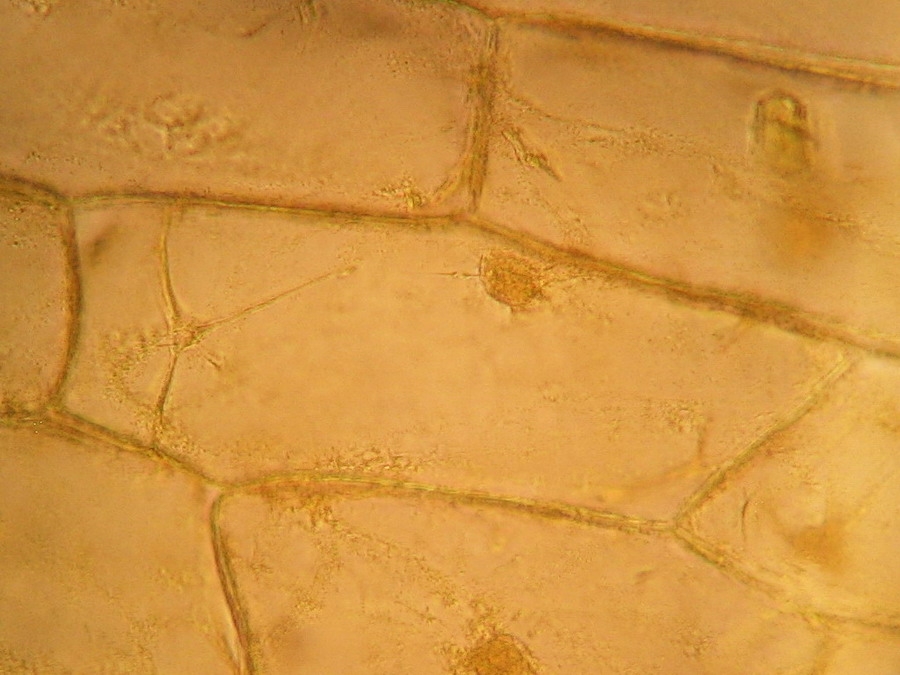
Fig. 2 – A classic preparation, 10x objective, oblique illumination, electronic colouration. Living cells. The boxes made up by the cell walls enclose the textured cytoplasm with small granulations and the discoid nucleus near the cell wall. Some of them in the upper layer, some on the bottom one, due to the difference in focus.
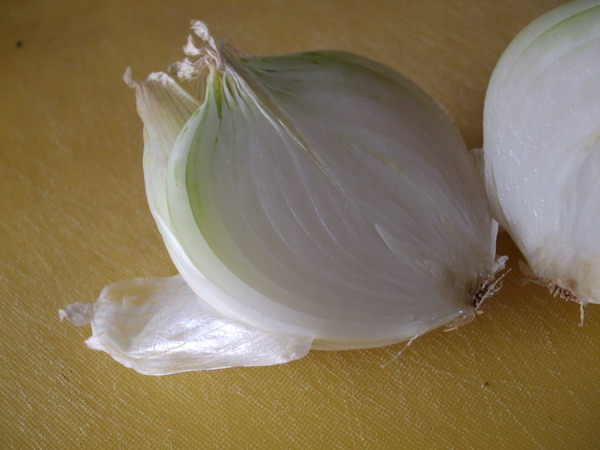
Picking up the fresh onion epidermis I take an onion bulb, I cut it in halves, and if it is large, into quarters. I work immediately, because if the scales dry, even slightly, the epidermis breaks off with thin layers of mesophyll adhered to its surface, which then prevents the preparation being flat enough; and which, if dyes were used, would be coloured, making useless much of the surface of the used “peeling".
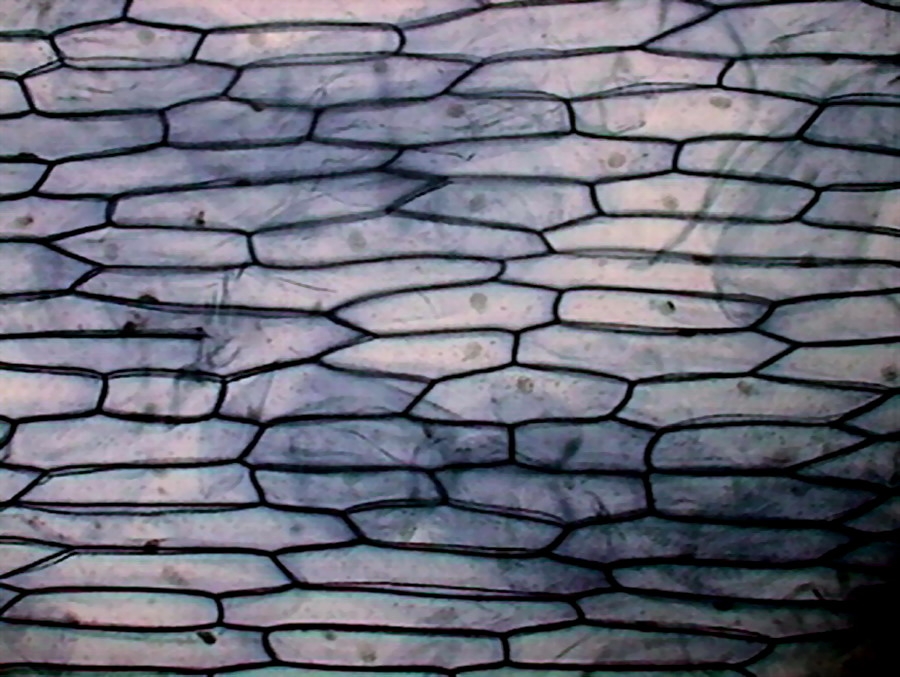
Fig 3 – This is a stained peeling showing the stained mesophyll under the epithelium.
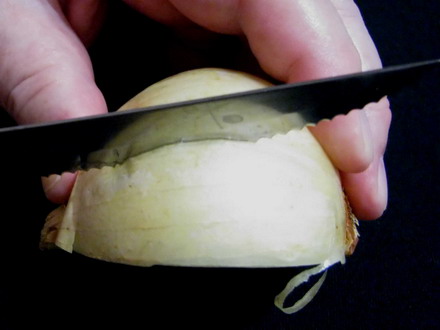
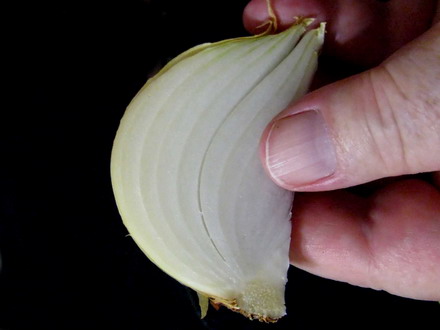
I cut a piece of scale (cataphyll) (usually the third or fourth from the outside of the bulb, to have a thickness which facilitates manipulation) of 1 to 1.5 cm wide (to fit comfortably on the slide) all the length of the scale, and do a cross cut from edge to edge, on the convex side of the cataphyll, 2 cm from one end.
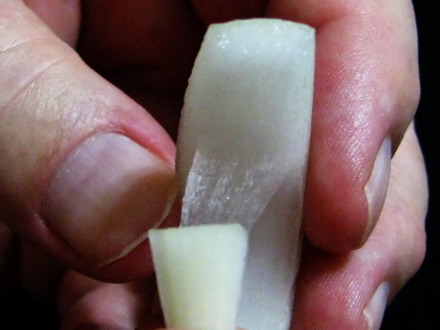
Foto 4 a,b,c,d– cutting the wedge, selecting a middle cataphyll, cutting dorsal epidermis I break the piece, and with a slight effort I break loose a sheet of epidermis, which has the width of the piece, which I give a length of about 2 or 3 cm at least. Folding over the piece, with care, and cutting off the excess, I reject the intermediate piece of scale (now without the inner epidermis) and cut the other end of the cataphyll piece to have a length of other 1.5 or 2 cm. It’s necessary to work with care but it is not difficult. Only needed is a more or less sharp scalpel, or similar cutting tool.
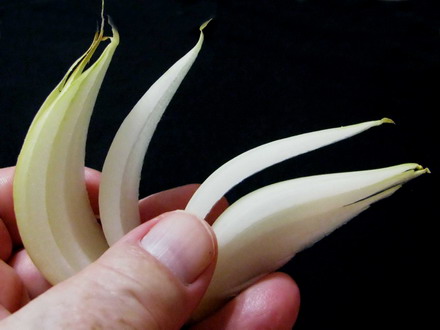
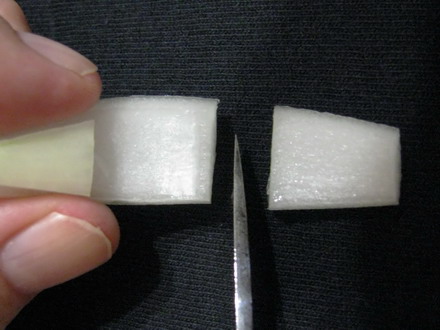
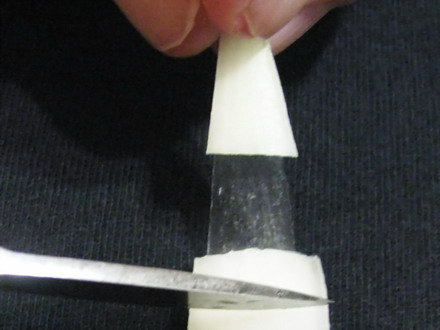
Foto 5a,b,c,d breaking the slice, peeling the epidermis, discarding the peeled portion, cutting the second bar. The piece of skin is now supported at both ends by two scale "bars". With fine pointed tweezers I can take one of the handles and manipulate the piece, which will be extended by the weight of the other "bar". At first I cut the cataphyll “handles” of only 0.5 cm, and this worked with some fluids. But I learned that their weight was not enough with other liquids, so I decided to use the big pieces which guarantee an easy manipulation in all cases.
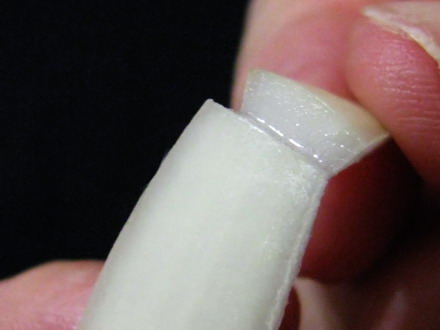
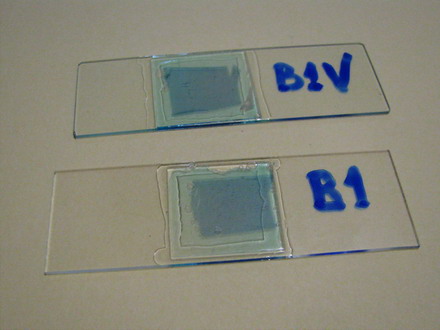
Fig. 6a – finished piece, ready to be fixed or wet mounted, Fig. 6b two prepared slides, each with a typical piece of epidermis, fixed and stained. The epidermis, subtended between the two pieces of scale, can be moved and safely transferred between several reagents, if necessary, holding one of the bars with tweezers. When I finish working with a piece, I mount it over a slide and cut out the bars. Perhaps this will be not a technique to propose for use in classroom practices, but allows me to try comfortably different working techniques of my interest.
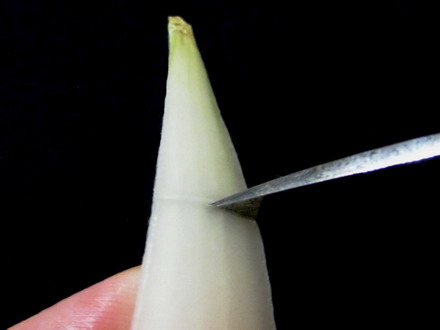
Making the simplest onion peel mounting I make wettable a perfectly clean slide (pass it through the flame of a spirit lamp, or a Bunsen burner, a couple of times on both sides) put a drop of water (or stain) in the center, and lay on it my sample, if possible with the face that was attached to the mesophyll downwards. It's a little tricky, but, with care, you can do it. With high powers this assures a more clear focus of the epidermic cells. Add a small drop of water (or stain) so that it does not dry out. Holding one bar with my tweezers, I use a Gillette or a sharp scalpel to cut with care next to the bar, freeing that end of the peel. Turn slide and repeat the maneuver. The result is a peeling of a very good size which is also extended almost without pleats (usually the cut edges bend a little). Carefully apply the coverslip with common precautions and if it seems necessary, absorb a little liquid so that the weight of the coverslip flattens the epidermis. This is the first of many types of wet mounts I can apply to my peel and it provides a good square or rectangular piece of epidermis, usually more than 1.5 cm wide x 2 cm long, without any chemical modifiers applied, if I so wish. Of course I got, as so often in more than 60 years of attempts, epidermis peels mounted in water or diluted Glycerin, strewn with air bubbles (some more, some less, but all with bubbles). You must seek and select fields which have the minimum amount of bubbles. It can be almost impossible with the 4x, and, depending on luck, also with the 10x. It is only easy using high magnifications (400x for example). Fig. 7 - 4x Obj. fresh peeling mounted in water. No staining. This and the following images had been subjected to a contrast enhancement, to make more visible the structural details. As most of all living tissues the fresh onion skin is very transparent, as you know.
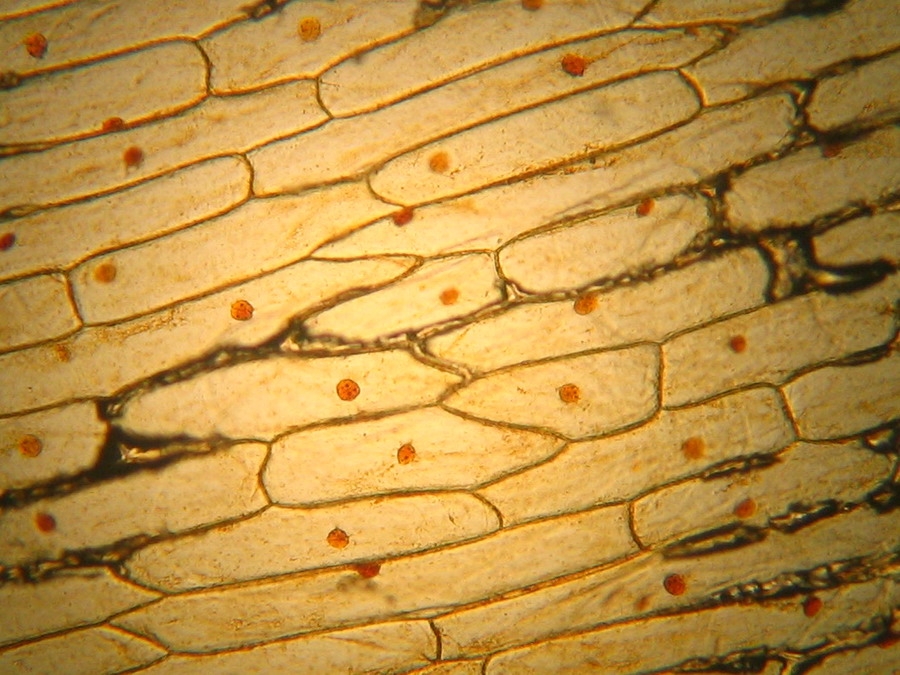
Fig. 8 - 10x obj. Phantom nuclei. No staining. Colours were a not programmed, unexpected bonus, from the illumination and the recording camera set up.
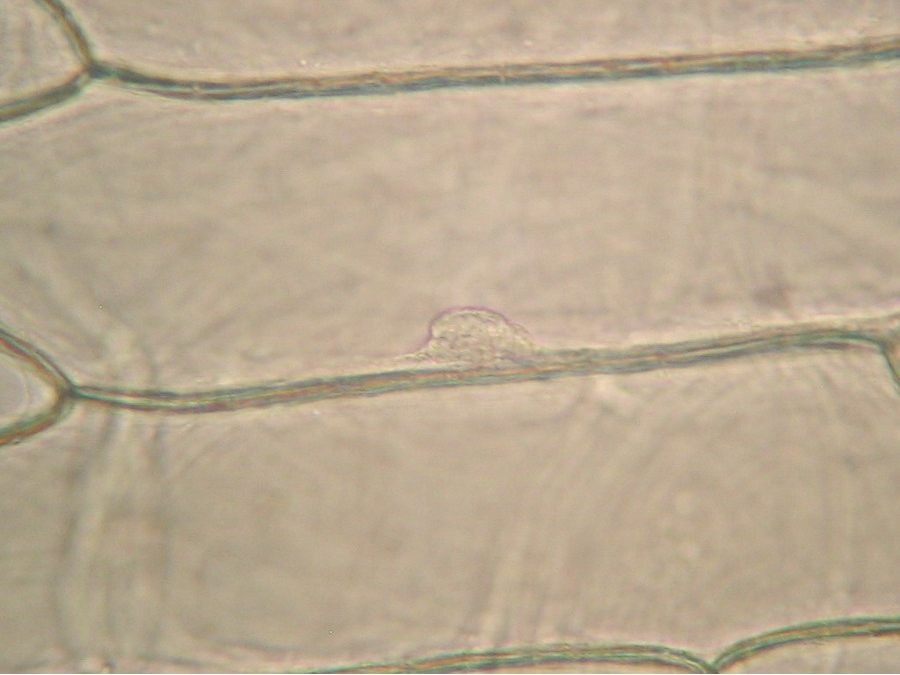
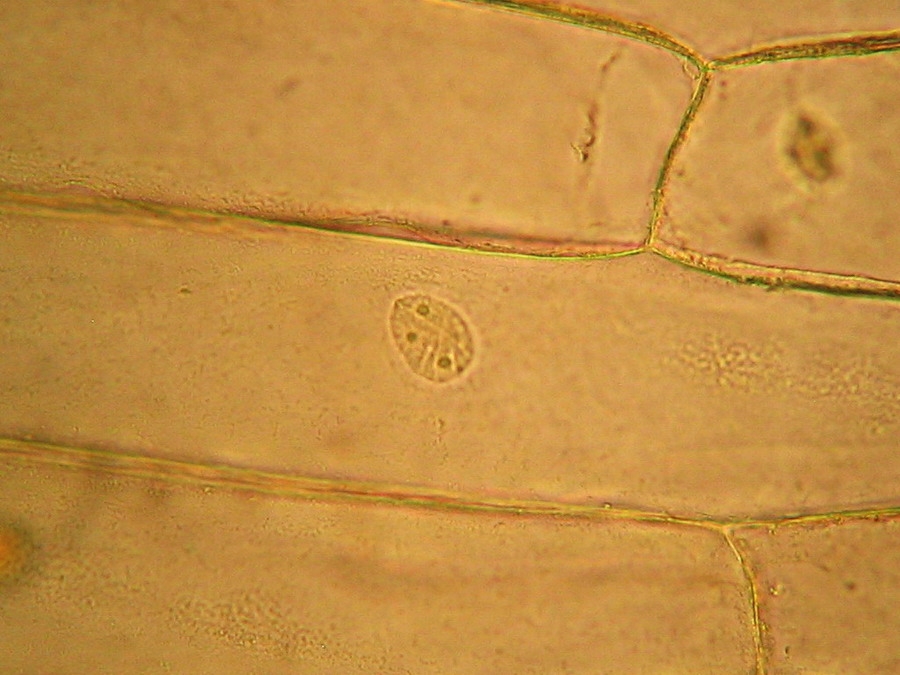
Fig. 9 - 40x obj. A nucleus attached to the lateral wall of the cell.
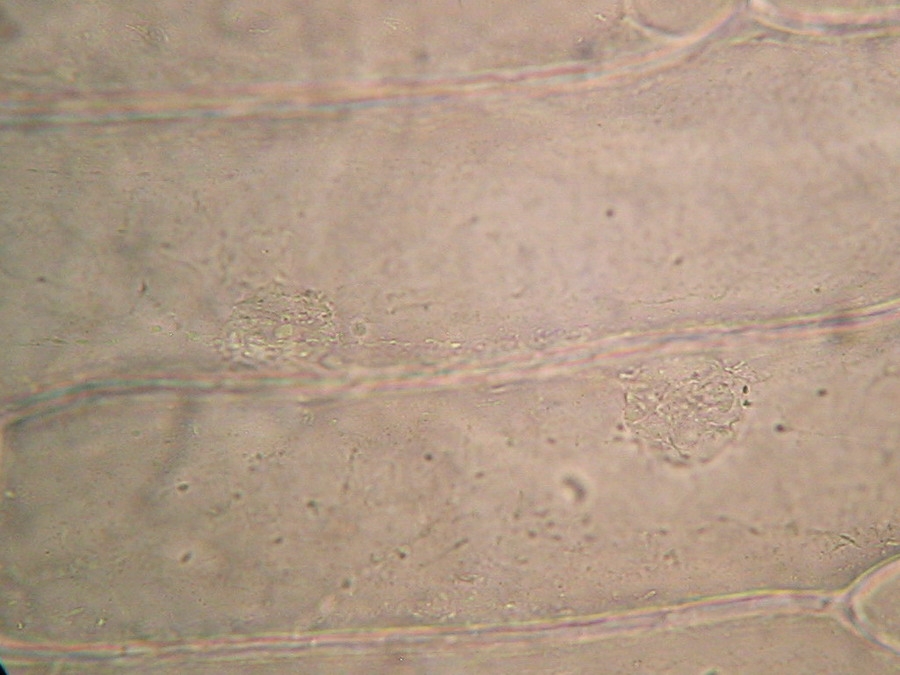
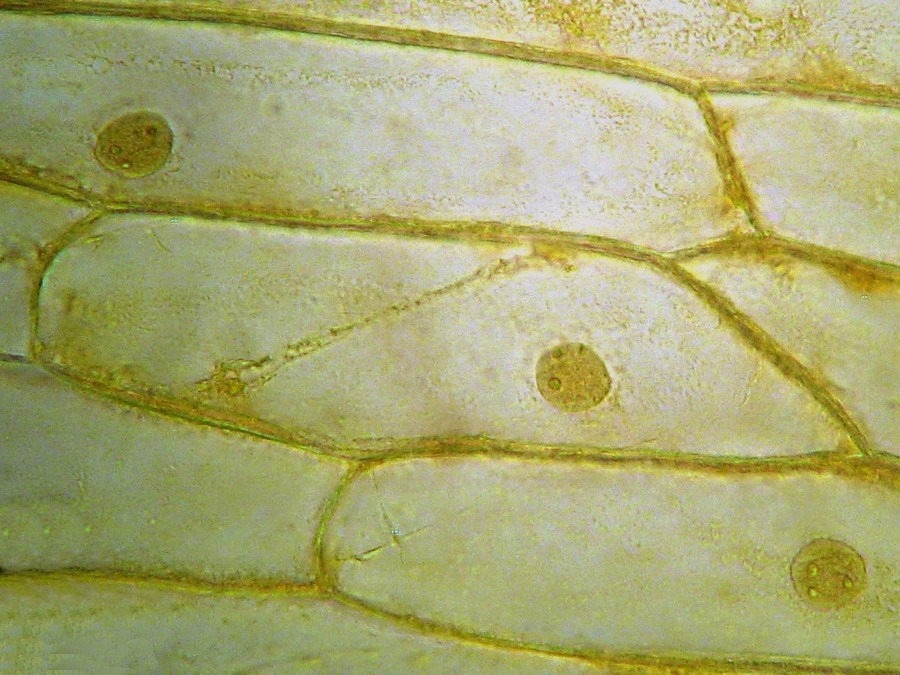
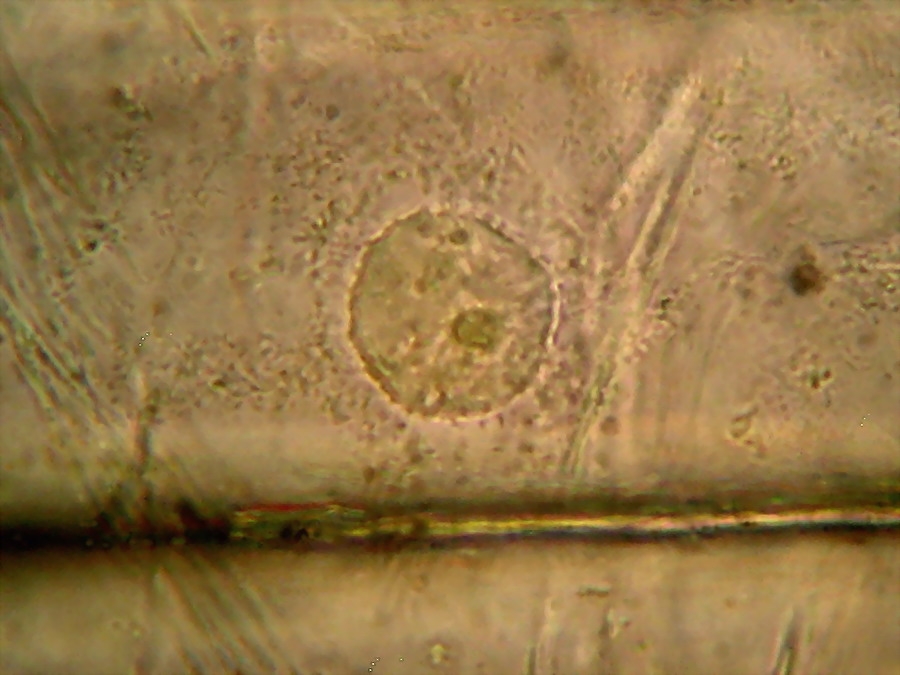
Fig. 10 - 40x obj. A frontal view of two nuclei, surely embedded in the upper layer of the cytoplasm. You can even see a nucleolus in the upper one. Strips of cytoplasm and included mitochondria are visible. With difficulty, you see in these fresh preparations, that the cytoplasm is arranged in a delicate layer applied to the cell wall, with many granulations included, which are mostly mitochondria. This you can discern at least at 400x by slowly focusing through the depth of the cell, going from the upper cytoplasm layer, through the sap of the central vacuole to the lower cytoplasm layer. Included in one of the cytosol layers you find the nucleus, visible in frontal view as a disk, or in lateral view, when applied to the lateral wall, as a shallow dome. An accumulation of cytosol and mitochondria is discerned around the nuclei. And bands and strips of cytosol link the nucleus through the central vacuole to other parts of the cell. If you persevere in your efforts to optimise your illumination, focus with care, and study many cells, you could discern all these details. Of course your work would be facilitated if you have a phase contrast system, and would be almost perfect if you have DIC. But the loose structure of the cytoplasm and its layers and strips can be visualized even with the 10x objective, using a dark background stop (fig 11).
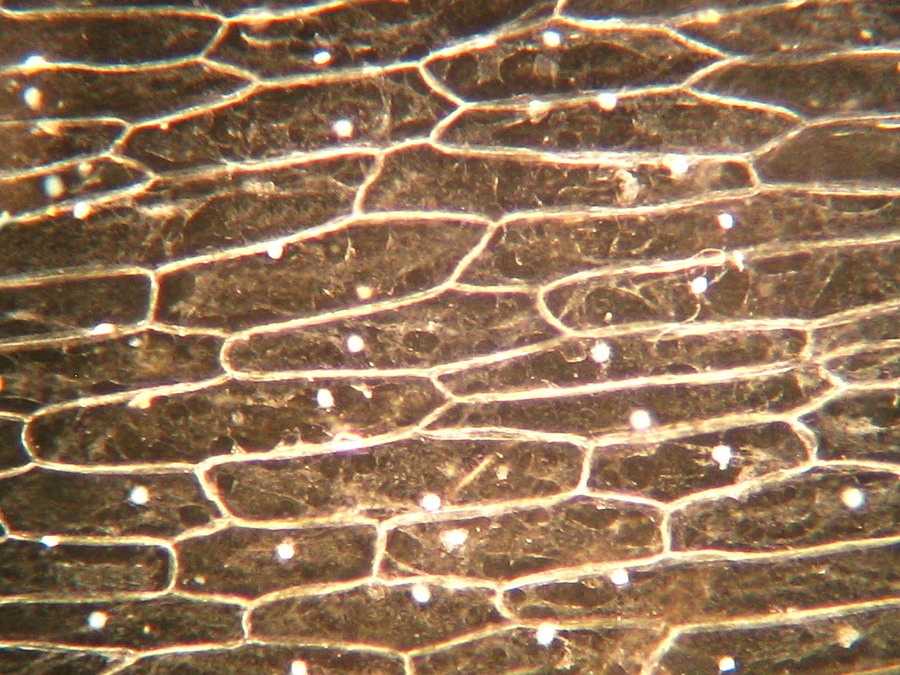
Fig. 11 – Darkfield (a technique easy to install in any modest microscope). Fresh onion skin, 10x Obj. Search the MICSCAPE library for technical suggestions on easy and cheap darkfield installations.
Fig.12 – the spongy tri-dimensional structure of cytoplasm is better seen in this resized image of the cells. On YouTube there is an amazing video of the mitochondria streaming through the living cytosol. See it, because is very difficult to have this experience oneself. http://www.youtube.com/watch?v=VXbQpRpUDmQ The fresh preparation we have reviewed is our reference. It shows what the live cell structure is. Remember this.
Staining the “peeling” But it is normal to recommend adding some reagent to stain cell nuclei and make more visible the cytosol, its inclusions, and cell membranes. The most recommended colouration, the more ancient, the most simple, and the cheapest, is a drop of a diluted pharmaceutical iodine-iodide solution (black iodine, iodine tincture) Note: One of the black iodine solutions sold in Cancun denounce on its label this formula, but can be diluted 5 or more times its volume for use. Metallic Iodine 2.0 g Potassium iodide 2.5 g Water c.s.p. 100 ml Beware! The iodine solution stains indelibly many fabrics ... and skin, for a long period! In a small capsule I mix 2 drops iodine solution, and 10 drops water, put 1 drop of this mix over the slide, apply the epidermal strip, one more drop of the solution, and a cover. Allow 1 or 2 minutes for the colour to develop, absorb any excess solution, and see the result. As commercial solutions could be different, dilute your own solution until it is a beautiful, transparent yellow colour. Darker solutions stain nuclei dark, and obscure its texture. Make some trials. Iodine precipitates the proteins of the protoplasm, and stains them a light brown colour, the nucleus in a more intense colour, and nucleoli even darker, as well as cell walls. Take care, use a new, or a relatively fresh bottle of reagent. Active Iodine concentration drop with time. If possible, if yours is like mine, don’t use Iodopovidone (iodine-polyvinylpyrrolidone). It is a pharmaceutical aqueous solution at 10-11%, equivalent to 1% of iodine. The stains that it can produce are washable. It's the favorite of homemakers. But, in my experience, it is dissolved in a dense vehicle that causes plasmolysis in my preparations.
Fig 13 - Typical iodine mount 4x, many (and this is a carefully selected area) air bubbles. Are they not a nuisance?
Fig. 14 - Iodine mount 10x. Well delineated cell walls, nucleus with two to four nucleoli, air bubbles!
Fig 15 - Cytoplasm streaming freezed by iodine. A stack of 3 Canon handheld pictures combined with CombineZP Roll mouse over image above for labels.
Fig. 16 - Iodine mount, 40x. The folds and grooves, that indent the nucleus, are seen in this image. They are channels of endoplasmic reticulum which some times tunnel through the entire nucleus. See http://www.sciencedaily.com/releases/2001/06/010614064109.htm Cytosol nicely fixed, see the strips of mitochondria. Cell walls well evident. Net image of nucleoli
Fig. 17 - A good iodine fixed and stained preparation . 40x Obj.
18 - Cytoplasm streaming freezed by the iodine – a stack of 3 Canon handheld pictures combined with CombineZP.
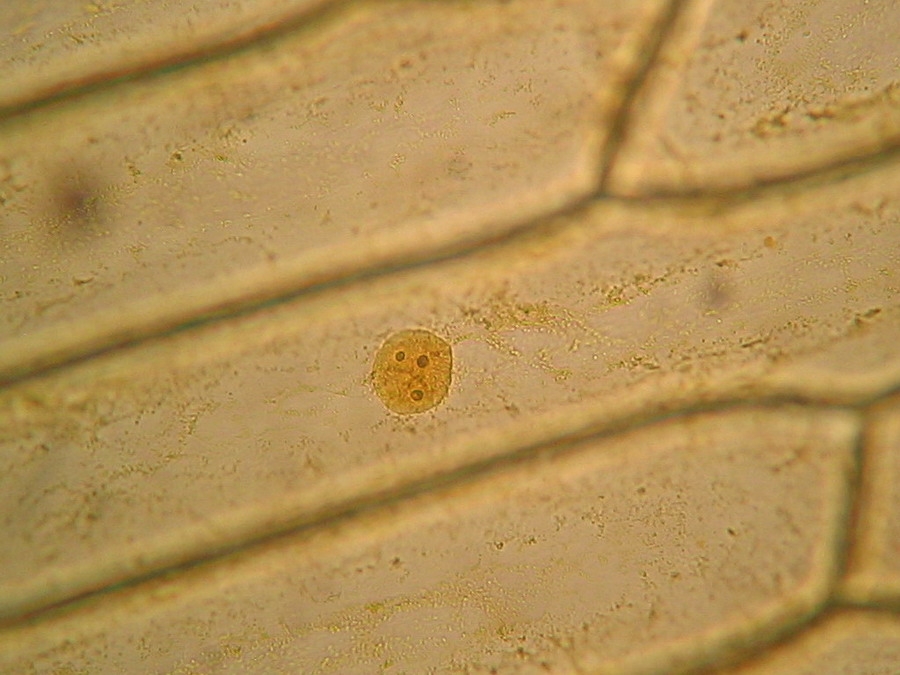
Fig 19 - Fresh mount, 100x. A typical nucleus, with one nucleolus. The image shows what is normal: the cytosol, evidenced by his charge of mitochondria, is concentrated around the nucleus. Which seems strange to me is the nucleolus clearly divided in four parts. The image is a stack of four original ones, combined in CombineZ.
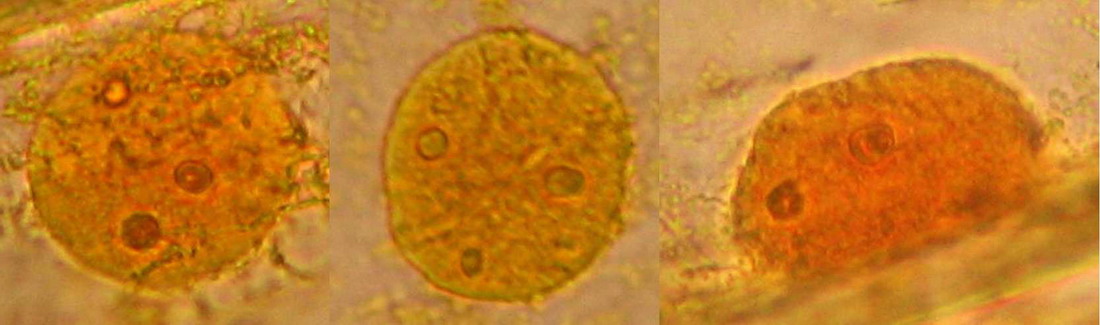
Fig 20 - Three nuclei from the same epidermis (Obj. x 100) some are fairly circular, but many have folded surfaces. The third one is a lateral view of one included in the cytosol layer adhered to the cell wall.
I think it was fortunate that the iodine solutions have been used since the 19th century. Certainly it was used in a much diluted form to detect starch (which iodine stains blue), but it was soon found that both protein precipitation and their strong colouration, which not only detects the cytosol, but also their inclusions, as leucoplasts and mitochondria, made it ideal for staining the onion epidermis temporarily. In the words of Bastin (1877) "Iodine solution also rapidly kills protoplasm without dissolving it, and is therefore useful as a fixing agent". Even if I could not find clear statements about this, it seems iodine is useless for permanent preparations because, exposed to light, it finally fades. I must say, loud and clear, that, apart from the nasty bubbles that I hate, and which really are very unsightly, as you have seen, the preparation, exploited to its full potential, can fulfill its task: To show with very little effort, to elementary biology students, with a very simple and very cheap technique, what a plant cell is, and all their components even in very good detail! Giving them a polite apology for the bubbles, of course! Most teachers use this technique, and it is a good practice, of course.
But to eliminate the bubbles was the original goal of this effort... wasn’t it? Not yet fulfilled, of course. More efforts, next month. I promise that my next articles will be shorter than this one.
|