Human Histology for Amateur Microscopists
Gregor T. Overney, Ph.D., Sunnyvale, California,
USA
Introduction
Human histology, or microscopic anatomy of human
tissue, is a fascinating topic. A quarter century ago, while attending
high school in Switzerland, I was starting to get interested in the shapes
and sizes of peripheral blood cells (blood morphology). I made my own slides
of blood smear using the Pappenheim stain [1]. (Wright
and Giemsa stain are more commonly used today.) Decades later, as an amateur
microscopist using compound microscopes, I decided to reinvestigate this
marvelous field. - I found a very nice introduction in hematology for amateur
microscopists by Potter et al. [2] and therefore decided
not to include hematology in this paper.
For medical students, students of histotechnology,
or other health care professionals, I want to stress the fact that this
paper is written by an amateur microscopist for amateur microscopists.
I welcome suggestions to improve this paper and I am thankful for all corrections
the reader might have. But this is most certainly not an introduction into
histology. With this paper, I want to wake up an interest in histology
that does not require the lengthy study of this subject but will provide
a reasonable starting block for future explorations in microscopic anatomy
of the human tissue. What resources and tools can we use and where do we
start? These are the main topics of this paper.
What Resources and Tools?
We need a microscope. I assume that the reader does
not just have a scope but also knows very well how to operate it. Plan
achromats are fine, but I prefer plan semi-apochromats (also called fluor,
fluorites, or flourites). My favorite lens for observing histological structures
is a Nikon Plan Fluor objective 40x with NA 0.75 and a convenient working
distance of 0.72 mm. This "large" working distance allows me to quickly
browse through many slides without having to use oil immersion or adjust
for changes in coverslip thickness. Between image quality, ease of use
and price, the semi-apochromats are my favorites for this kind of application.
If we want to make our own human histology slides,
we will be most likely limited to blood smears. In the USA, due to FDA
regulations regarding the handling of biohazardous materials, it is not
easily possible for private individuals to buy fresh organ sections (see
http://www.fda.gov/).
Furthermore, most of the stains used for histology slide preparation are
not easily obtainable. Except for human blood smears, the amateur microscopist's
study of human histology is therefore "limited" to already prepared, permanent
slides. However, even having access to tissues and all equipment necessary,
the preparation of good histology slides remains an art that is difficult
to master for most of us. No wonder, it requires over two years to gather
the expertise of a certified histotechnician. I have used the following
two suppliers of histology slides:
-
Carolina Biological Supply Company, 2700 York Road,
Burlington, NC 27215 (http://www.carolina.com)
-
Ward's Natural Science Establishment, POB 92912,
Rochester, N.Y. 14642
I have also been recommended Triarch Inc., POB 98,
Ripon, Wisconsin 54971-0098. All their slides are of excellent quality
and perfectly suitable for educational purposes and for satisfying the
curiosity of the amateur microscopist.
Other resources about histology are books and
information obtained from the World Wide Web. I frequently use the following
books:
-
B. Young, J. W. Heath, Wheater's Functional Histology,
4th Edition, Churchill Livingstone, London (2001); and B. Young, Picture
Tests in Histology, Churchill Livingstone, London (2001).
-
R. C. Curran and J. Crocker, Curran's Atlas of Histopathology,
4th Edition, Harvey Miller Publishers, London & Oxford University Press,
Oxford (2000).
-
Erik Undritz, Hämatologische Tafeln, Sandoz
AG Basel, 2nd Edition, Frobenius AG Basel, Switzerland (1972).
-
Maxwell M. Wintrobe et al., Clinical Hematology,
7th Edition, Lea & Febiger, Philadelphia (1975).
I also heard about a new learning system in histology
published by Oxford University Press [4]. - Today,
most of us have access to the World Wide Web using sophisticated browser
technology. With this technology, we have multiple search engines at our
disposal that quickly provide access to thousands of resources. We can
"browse" through the huge field of histology. I found web-based resources
a useful addition after I picked up some basics from a decent textbook.
- My favorite search engine is the advanced search engine Google (http://www.google.com/advanced_search).
At time of writing this paper, entering "Histology" as search criterion
returns 240,000 hits. "Hematology" returns 368,000. And even the lesser-known
field of "Hemopathology" (deals with blood diseases) returns 153 hits.
A wealth of information is just at our fingertips. To save time in browsing
through many of those sites, I decided to list a few links that provide
also information for beginners. (Although, it is mostly assumed that the
beginners are medical students or other healthcare professionals.) The
following table is by no means complete.
Where to Start?
Assuming, we have absorbed enough knowledge about
histology, setup our microscope accordingly, and bought plenty of histology
slides, where do we start? Of course, we could just peek at these slides
and experience the satisfaction of looking at interesting structures. But
this might only satisfy our short-term desire to explore the wonderful
world of microscopic anatomy. We need to methodologically investigate histology
slides. With other words, we need to try to identify components, which
we expect to find and which we are able to easily recognize. I usually
start by trying to identify epithelial tissue and muscle tissue. Then I
try to locate blood vessels, fat cells (unstained larger objects), and
collagen fibers. Once most of these components are identified, a good histology
atlas (such as [5]) works wonders. But the reader has
to keep in mind that there is no substitute for looking directly through
a microscope when trying to identify histological samples. Just taking
a photograph and try to compare it with pictures from a histology atlas
is not enough. I found it sometimes difficult to understand the labels
in a photograph without studying the corresponding histology slide. In
the next few paragraphs, I present a little "crash course" in histology.
Following this "crash course", I introduce some histology slides of the
human skin, kidney, and lung.
The building blocks of life are cells. Cells form
tissues, tissues form organs, organs form organ-systems, and organ-systems
form an entire living and breathing organism (see the following table).
| Atoms form simple molecules |
Such as short peptides. |
| Simple molecules form macromolecules |
Such as proteins (long, amino-acid polymers). |
| Macromolecules form membranes |
Such as lipid bilayers. |
| Membranes form organelles |
Parts of a eukaryotic cell, such as mitochondria. |
| Organelles form cells |
These cells are eukaryotic cells. That's where we definitely know that
life starts. We can study these cells inside a living organism (in vivo)
or outside (in vitro), for instance in a cell culture. |
| Cells form tissues |
Four basic tissue types exist: epithelial tissue, connective tissue
(for example blood and bones), muscle tissue, and nervous tissue. |
| Tissues form organs |
Organs are made out of different tissue types. Examples are liver,
kidney, skin, heart, lung, brain. |
| Organs form organ-systems |
Examples of systems are digestive system, cardio-vascular system, respiratory
system. |
| Organ-systems form a complex living body |
Such as humans. |
Cells are structural units that make up plants,
animals and single cell organisms. The cells of single cell organisms are
called prokaryotic cells (prokaryotes). A prokaryotic cell does not have
a membrane around its nuclear region (for example a bacterium). It has
a cell wall, plasma membrane, nucleoid (region of DNA), and cytoplasm with
ribosomes. Cells that make up plants and animals (including us!) are called
eukaryotic cells (eukaryotes). This type of cell contains cell organelles.
The parts that make up a eukaryotic cell are Golgi bodies (secretory systems),
endoplasmic reticulum (transport system within the cell), nucleus, nucleolus,
microtubule organizing centers (MTOC), mitochondria (the cell's powerhouses),
ribosomes (small organelles that synthesize proteins), and a cell membrane.
The term "eukaryote" comes from Greek and means "true nut".
Tissues are groups of cells that lie together
to accomplish a common function. They are the basic building blocks of
organs. Tissues are divided into four groups (epithelial tissue, connective
tissue, muscle tissue, and nervous tissue). These groups are further subdivided
into many subgroups. As an example, the epithelial tissue is subdivided
into covering and lining epithelia (outer layer of skin, inner surface
of heart and blood vessels, inner surface of respiratory cavities, etc.)
and glandular epithelia (most of the glands in the body). One of the major
tasks in histology is to clearly identify the various tissues when looking
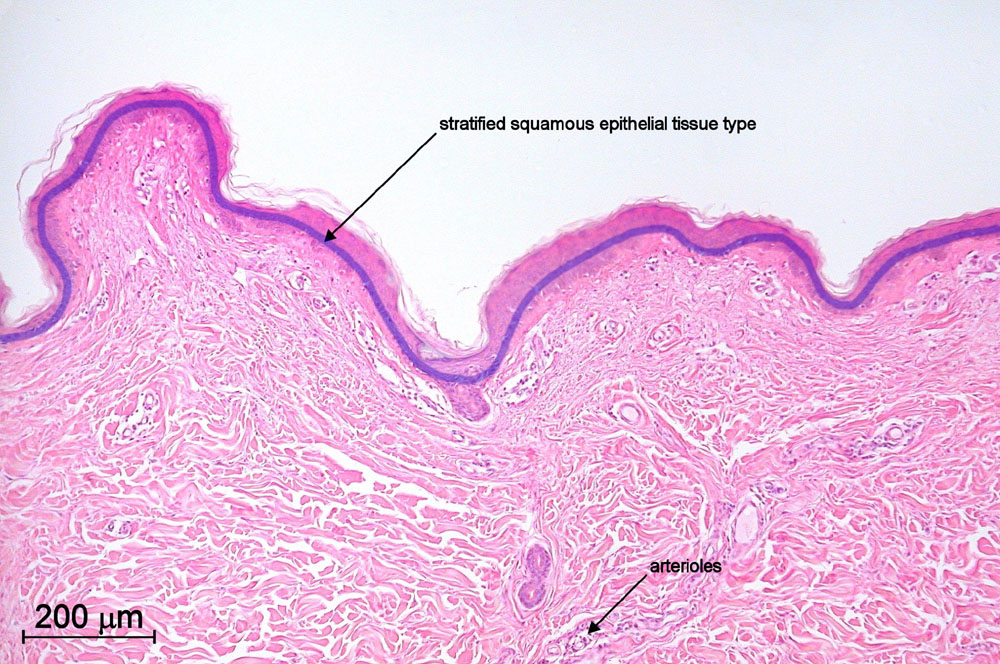
at a thin section. For instance, looking at a histology slide of healthy
nonpigmented, human skin (slide number 31-4522 from histopathology of disease
set 31-6986 [3]), we find at moderate magnification
(objective 10x) many cells close to each other with little extracellular
material between them. See Fig. 1. These epithelial
tissue cells are arranged in a shape known as "stratified squamous". This
kind of cell arrangement offers the most protection to the underlying tissue.
These cells form the epithelium of our skin. As seen in Fig 1, the epidermal
ridge, which is given by corrugation of the epithelium (indicated by a
thick, blue line), is rather flat or less prominent, suggesting that this
portion of skin is less subjected to high shearing forces. Since skin is
an organ that consists of various tissues, it is no surprise that we find
other tissues in Fig. 1, such as connective tissue.
There is a "free surface", which is exposed. It is called the apical surface.
The lower surface of the epithelium (called basal surface) rests on layers
of non-living, adhesive material that has been secreted by the epithelium
and the underlying connective tissue (called dermis). These layers form
the basement membrane. This membrane can be thought of as a sticky layer
to keep the epithelial cells attached to the tissue that underlies them.
When going to a higher magnification (see Fig. 2),
we clearly see the cell-nucleus of cells forming the epithelium. We can
also see clearly the cornified layer that forms the top of the thin epidermis.
But we cannot find any blood vessels within the epithelium layer. - A good
histology slide contains a lot of information. With a good histology atlas,
such as [5], we are able to gradually recognize more
and more components. Suddenly, a "nice looking" histology slide is telling
us an entire story - a story about ourselves.
To round up this small "crash-course", we should
know how such wonderful slides are made and what contrast methods are used
to help us to identify various tissues as well as to understand more about
their condition. (I will neither talk about phase-contrast methods nor
other purely optical contrast methods, but limit myself to staining methods
to enhance contrast.)
I tried to "simplify" this rather lengthy process
of making histology slides by drawing a flowchart. In Fig.
3, I illustrate the workflow for making histology slides with H&E
staining and with a thickness of a few microns (3 to 10 microns usually).
- Of course, there are many other special staining procedures available,
which might require different dehydration and fixation steps. Two good
web sites about staining techniques are 'StainsFile' (located at http://stainsfile.info/)
and 'The Histology Page' (located at http://home.primus.com.
au/royellis/histo.html). An example of a different famous staining
technique is the Masson's trichrome technique. It is used to emphasize
supporting tissue elements, principally collagen. Several modifications
of Masson's trichrome are in use, such as the one used by a company called
MICR-O-SLIDE. This company produces various slide sets for hobby microscopists.
I got set number 59-5550 "Healthy Human Tissue II". Although the slides
are informative, the sections are rather thick and the stains used are
uncommon, which makes the interpretation of these slides quite difficult.
However, there is a small booklet included in each of these sets. To illustrate
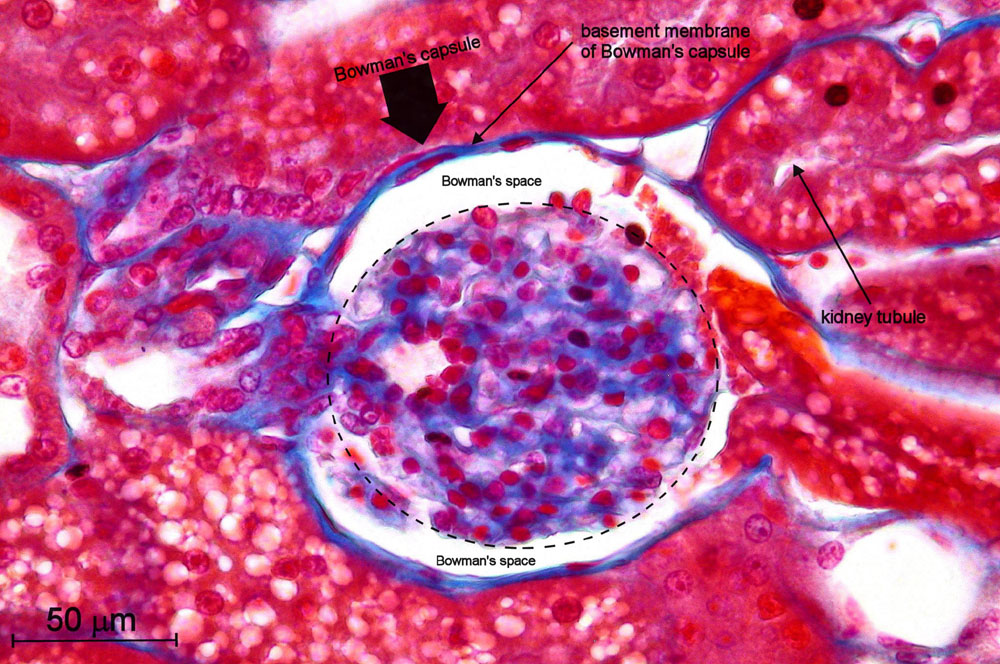
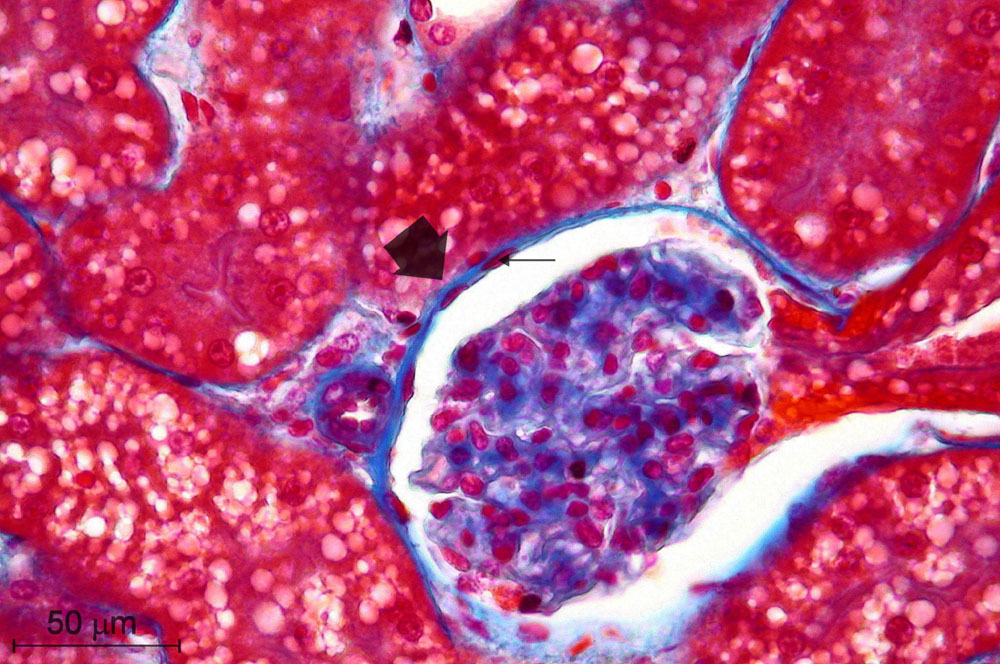
this, I present 59-5550/10 from this collection called "Human kidney, t.s.
of cortical zone". (The cortical zone is the outer zone of the kidney and
"t.s." stands for tangential section.) See Fig. 4.
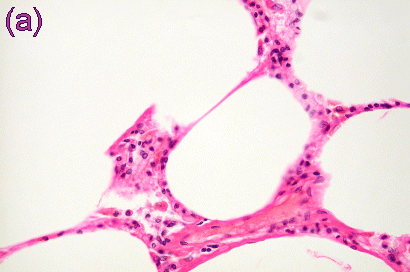
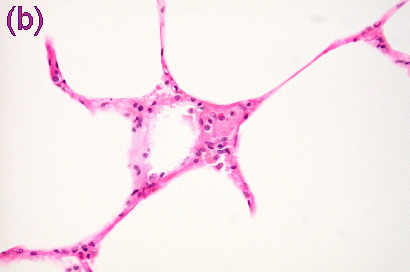
Fig.
4a and 4b show an image of a section through a
renal corpuscle. While in Fig. 4a I emphasize important
parts that make up a renal corpuscle, in Fig. 4b I
am investigating the kind of epithelial tissue that can be found inside
a renal corpuscle.
Our Lung - Take a Deep Breath
Let us look at a thin section of a different organ,
the lung. Before trying to understand the microscopic anatomy of this section,
we must first understand the anatomy of the lung. We know it belongs to
the respiratory system. We need our lung to move oxygen into our blood
stream and get the carbon dioxide out of our system. Let me very briefly
summarize the basic anatomy of this organ. The windpipe (trachea) branches
off into two bronchi (left bronchus and right bronchus). The bronchi continue
to divide in smaller branches until the smallest airways end in small,
thin air sacs (called alveoli), which are arranged in clusters. Many blood
vessels surround each of the alveoli. The defense of the lung is primarily
given by little hairs in the airways (cilia) that move mucus and dirt up
where it can be expelled by coughing, as well as by macrophages, which
are mobile cells that eat up toxins in airways and lung. Chronic bronchitis,
emphysema and asthma are the most common lung diseases. Chronic bronchitis
(inflammation of bronchi, which causes excessive production of mucus and
swelling of the bronchial walls) and emphysema (damage to the alveoli)
can be detected in histology slides of thin sections of the lung and bronchi.
A huge amount of information about the lung is available in [6]
or can be found on the World Wide Web.
When looking at a histology slide, we must keep
in mind that we are most likely looking at various tissue types that form
part of the organ under investigation, in this case the lung. Recognizing
the tissues will be our first task. We should not attempt to understand
a "fancy" feature that might just be an artifact of the process used to
make this slide or a cut through a well-known portion at a somewhat unconventional
angle. As I have already mentioned, I start by identifying components I
am more familiar with, such as epithelial tissue. (BTW, I found the tutorial
at
http://www.pathguy.com/histo/000.htm
very helpful.)
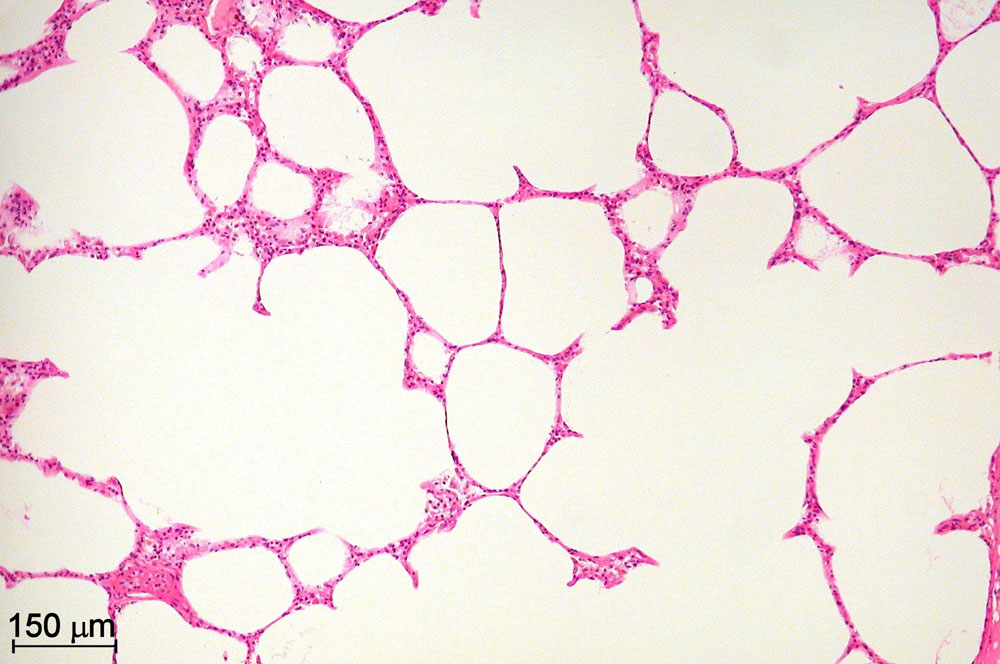
Let us look at a section of the healthy human
lung. The slide is from [3] (slide number 31-5670).
At lower magnification (objective 10x), we see a section of the respiratory
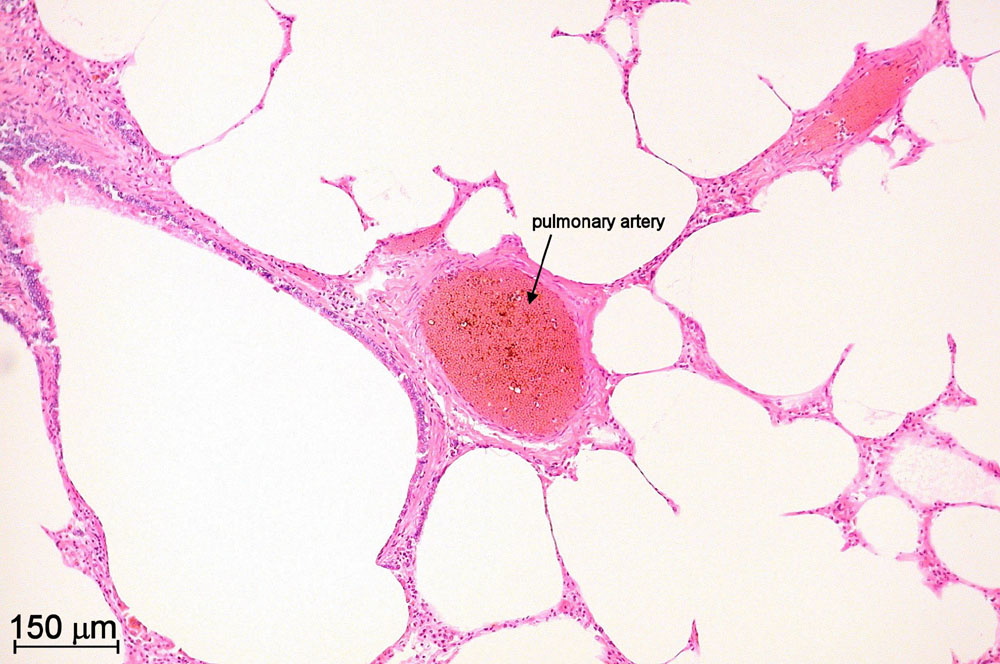
alveoli (see Fig. 5a and 5b). Fig.
5a shows a very nice network of simple cubiodal epithelial tissue that
covers the airspaces in the lung. Fig. 5b shows a beautiful
pulmonary artery, which has a thin wall compared to its diameter. At a
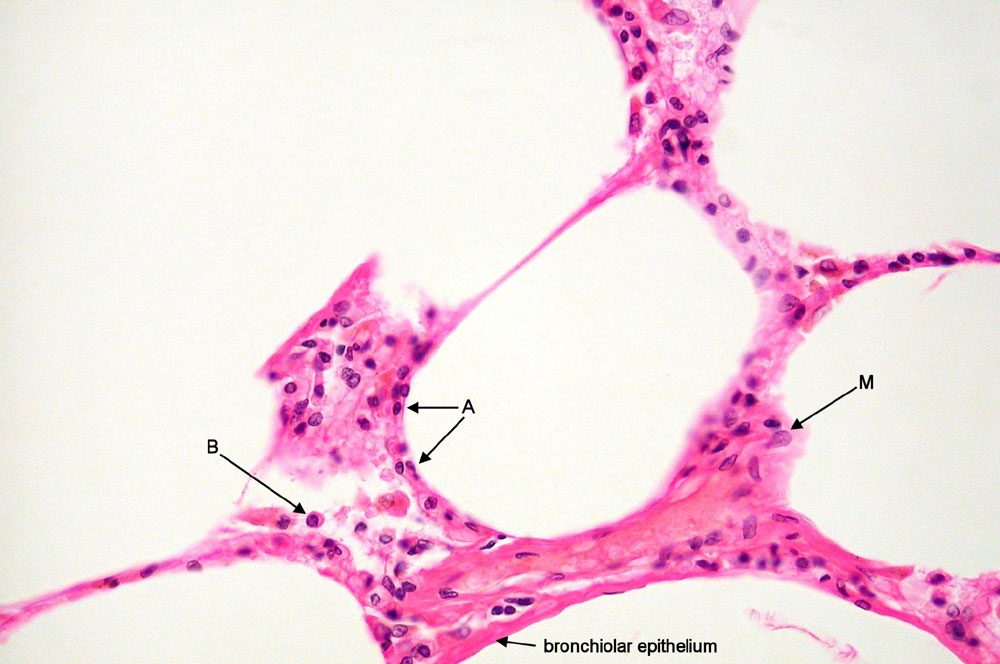
higher magnification (objective 40x), we can identify various different
cell types. We can find two cell types that make up the epithelium, which
provides a continuous lining to each alveolus. These are the large, elongated,
squamous cells (alveolar lining cells or type I pneumocytes) and cells
that are round in shape (type II pneumocytes) (see Fig.
6a). The diffusion of oxygen happens through the larger type I pneumocytes,
while the type II cells secrete a surface-active material called surfactant,
which reduces surface tension and avoids that the alveoli collapse during
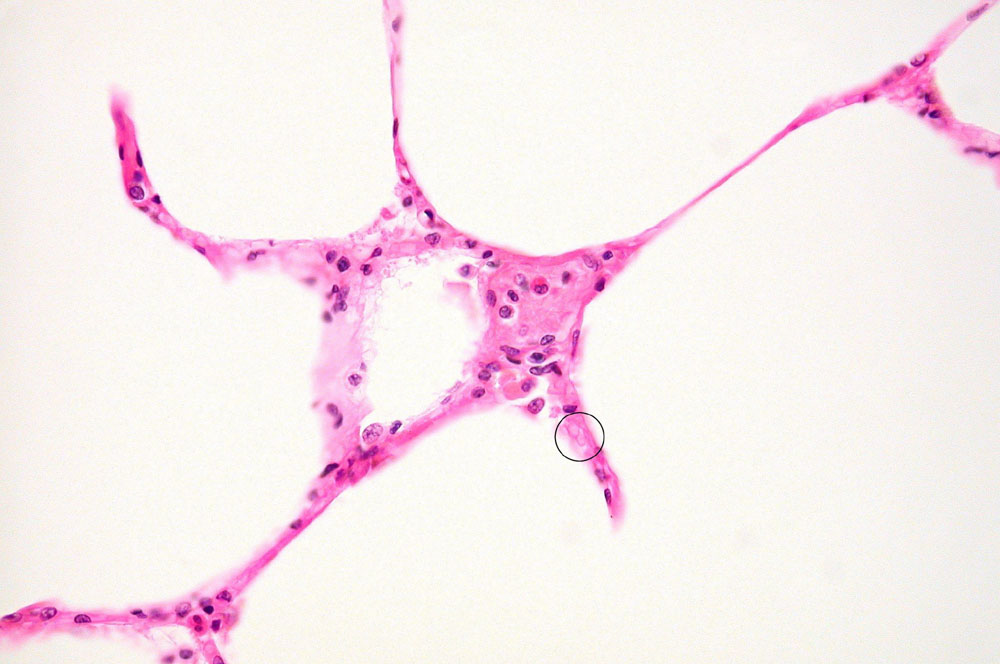
expiration. - We can also find alveolar macrophages. In Fig.
6b, we find a clearly visible blood vessel. This is a capillary, 7
to 10 micrometer in diameter, which contains deformed erythrocytes. The
erythrocytes must deform to be able to squeeze through such tiny capillaries.
I hope the reader can see the thin membrane that separates the blood cells
from the actual airspace. Such a thin separation is very important to allow
oxygen diffusion to take place easily.
Summary and Acknowledgements
To better tackle the task of interpreting histology
slides, the reader should familiarize himself with anatomy and function
of the organ under investigation followed by trying to identify what he
is expecting to find. A histology atlas is an indispensable tool.
I hope the reader enjoyed reading this simple
introduction into a rather complex field. Hopefully this paper is not oversimplifying
the challenges ahead but proves to be useful for the reader starting to
learn about microscopic anatomy of the human tissue. I want to thank Drs.
Fei Liu and Jerry Dowell for stimulating discussions.
Comments to the author, Gregor
Overney, are welcomed.
References
[1] Erik Undritz, Hämatologische
Tafeln, Sandoz AG Basel, 2nd Edition, Frobenius AG Basel, Switzerland (1972).
[2] A. Potter and M. Smith,
A
Summary Study of Blood, Micscape Magazine, England, November 1995.
[3] Carolina Biological Supply
Company, 2700 York Road, Burlington, NC 27215 (http://www.carolina.com).
[4] Deborah W. Vaughan, A Learning
System in Histology, Oxford University Press, Oxford (2002).
[5] B. Young, J. W. Heath,
Wheater's Functional Histology, 4th Edition, Churchill Livingstone, London
(2001).
[6] Herbert Spencer, Pathology
of the Lung (2 Volumes), 3rd Edition, Pergamon Press, Oxford (1977).
Figure Captions and Figures
The setup for photomicrography was as follows:
Nikon Eclipse E200-F with Köhler illumination, Nikon CFI60 E-Plan
Achromat 10x and Plan Fluor 40x objectives, Nikon Coolpix 995 digital camera,
and a Nikon MDC relay lens. All photomicrographs were image processed:
a filter to sharpen the image was applied and background subtraction was
performed to increase contrast. Text and graphics objects (such as arrows
and dashed lines) were added using Paint Shop Pro 7 from JASC (see http://www.jasc.com/).
Fig. 1: Section through
nonpigmented, thin human skin (objective 10x). Looking at the enlarged
image (click on small image to get larger version), the thick, blue line
goes through the epithelium to indicate the epidermal ridge system (this
line is not part of the stained sample). Arterioles are found at the bottom
of this picture. (Click on image for larger version.)

Fig. 2: Section through
nonpigmented, thin human skin (objective 40x). (Click on image for larger
version.)
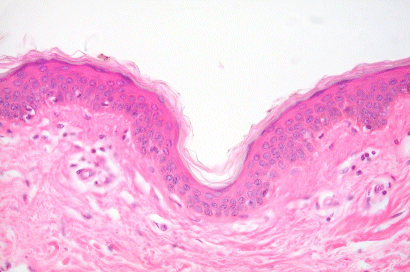
Fig. 3: Flowchart of
standard techniques for processing tissues using H&E staining. At two
points in this flowchart, a diamond-shaped box represents a decision with
a 'yes/no' outcome. (Click on image for larger version.)

Fig. 4: Sections through
renal corpuscles of cortical zone (objective 40x). In Fig. 4a, the dashed
line surrounds tuft of blood vessels (glomerulus). (Since this is a thicker
section, the kidney tubules are not easily identified.) Fig. 4b, a thick
arrow indicates simple squamous epithelial tissue type and a thin arrow
indicates a nucleus of a squamous cell. (Click on images for larger
versions.)
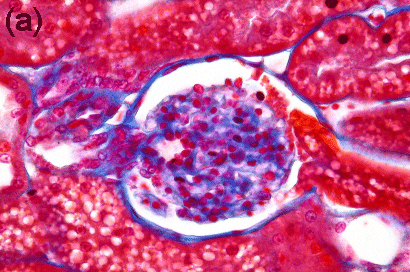
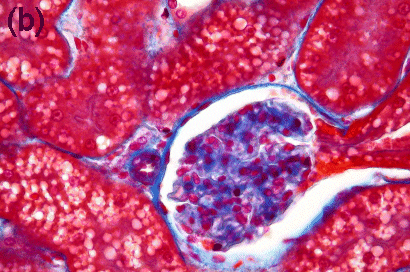
Fig. 5: Section through
human lung, showing the space of respiratory alveoli (objective 10x). In
Fig. 5a, the network of the respiratory alveoli is clearly visible. Fig.
5b shows a pulmonary artery, which is filled up with red blood cells (called
erythrocytes). (Click on images for larger versions.)
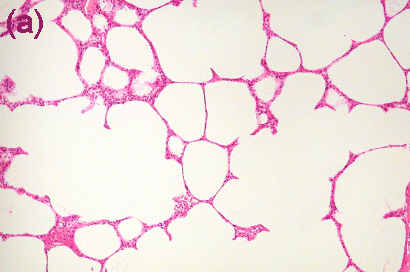
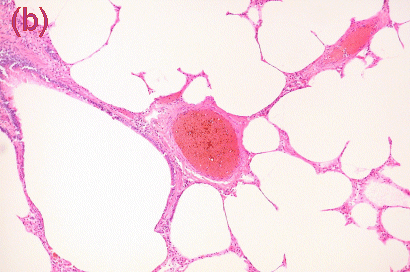
Fig. 6: Section through
human lung, showing the space of respiratory alveoli (objective 40x). Fig.
6a shows two different types of epithelial cells. These cell types are
called type I and type II pneumocytes and are indicated by the label 'A'
and 'B', respectively. An alveolar macrophage can be found at location
indicated by 'M'. Fig. 6b shows a tiny blood vessel (indicated by a small
circle). (Click on images for larger versions.)
© Microscopy UK or their contributors.
Published in the August 2002
edition of Micscape Magazine.
Please report any Web problems or
offer general comments to the
Micscape
Editor,
via the contact on current Micscape Index.
Micscape is the on-line monthly magazine
of the Microscopy UK web
site at Microscopy-UK.
WIDTH=1
© Onview.net Ltd, Microscopy-UK, and all contributors 1995 onwards. All rights
reserved. Main site is at www.microscopy-uk.org.uk with full mirror at www.microscopy-uk.net.