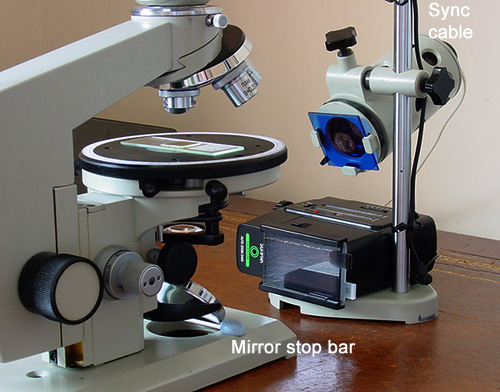
Setup aligned for flash using diffuser and ND4 filter. Mirror stop bar allows quick flick of mirror to flash.
Sync cable goes to camera on microscope.
Topical Tips 16
Cheap
'n cheerful flash / tungsten lighting combo for a LOMO
or similar microscope
with a mirror
by David Walker, UK
I
was recently trying simple ways of using a flash gun for photomicrography with
my LOMO Biolam without altering the existing external tungsten lighting. Below
is one way that worked well for a microscope like mine which simply exploits a quick change of mirror angle to switch from tungsten
to flash. It's probably not an original approach.
Setup
aligned for flash using diffuser and ND4 filter. Mirror stop bar allows quick flick of mirror to flash.
Sync cable goes to camera on microscope.
The
vertical arrangement of flash gun and tungsten lighting can be laid out to suit but is
shown here for a LOMO OI-19 lamp and an ageing Sunpak 2400. This and similar
models are very
versatile flashguns which can be picked up for a few dollars on eBay. It has
flat sides so just sits on the lamp base pointing at the mirror with no
fittings at all. A few blobs of plasticine just hold it in place.
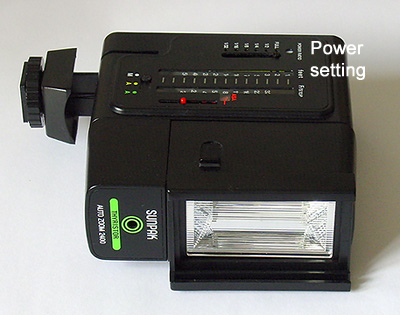
SunPak
AutoZoom 2400
It has six
power settings from full to 1/32 and a filter holder for an optional filter
pack which included two diffusers and neutral density filter, giving plenty
of leeway for getting the optimum intensity and evenness of lighting. (A flash
gun with the large head design could sit on its top or lay flat as used in some
other flash photomicroscopy set-ups described by enthusiasts.)
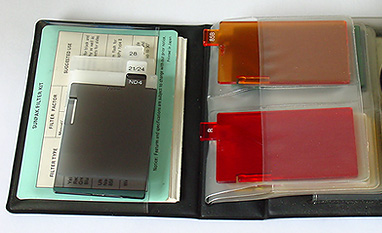
Optional
filter pack.
The
tungsten lamp is set higher up the stand than is perhaps normal so points down
and the mirror is tilted up more. This will be the normal lighting position
for visual work. When flash lighting is required the mirror is simply tilted
down to line up with the flash gun. A simple stop for the mirror can be devised
so that it moves down to the aligned flash position. I just used a plastic bar
behind the mirror as a stop, with the bar held in place with plasticine.
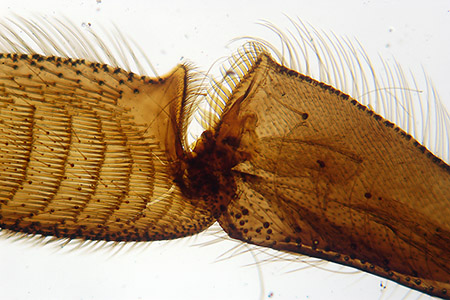
Honey
bee worker, third leg detail. LOMO 3.5x planachro, with flashgun
lighting
and diffuser. As a flash gun lamp is large, more even lighting can
often
be achieved compared with tungsten, especially at low mags.
When the flash is required for subjects that aren't moving, a leisurely approach may all that be needed. In my case, after aligning the mirror I set the camera shutter to a second and when I hear the shutter open it's easy enough to manually fire the gun with the button on the back. The flash gun can off course be readily synced to the shutter by a method appropriate to the camera e.g. extension leads to camera hotshoe or sync point if available. It takes less than a second to switch mirror position while firing a cable release on a camera synced to flash so photography of e.g. live pond life is possible.
So that's it. No flash gun was harmed during the course of preparing this article or DIY skills stretched.
Comments to the author David Walker are welcomed.
Safety notice - syncing external flashgun with digital cameras: Digital camera manuals frequently advise to only use the maker's recommended external flashguns to avoid potential damage. A recommended way of safely syncing other flashguns (especially older ones like the author's) is to use one of the special hotshoes eg 'Wein Safe Sync' which interfaces between DSLR and flashgun. (The voltage measured on the sync port of the SunPak 2400 when charged is ca. 250V.)
Published in the August 2005 edition of Micscape.
Please report any Web problems or offer general comments to the Micscape Editor .
Micscape is the on-line monthly magazine of the Microscopy UK web site at Microscopy-UK
© Onview.net Ltd, Microscopy-UK, and all contributors 1995
onwards. All rights reserved.
Main site is
at www.microscopy-uk.org.uk
with full mirror
at www.microscopy-uk.net
.