 |
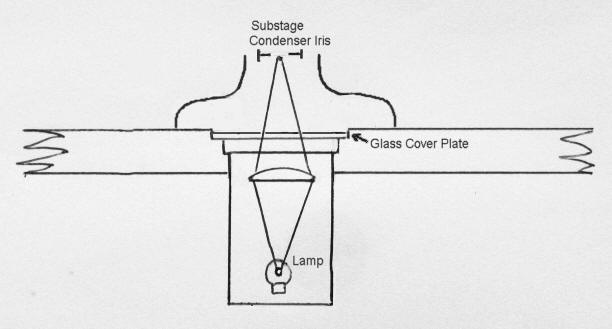
| Principal of sub bench mounted Köhler light source which is not to scale |
| Sub-Bench Illumination An underside universal illuminator for multi purpose use By Paul James |
Many of the older stands with fixed horizontal stages in the 1940's and 1950's had small illuminators added which emitted diffuse lighting and therefore replacing the substage mirror. These units were adequate for low powers but not for high power work. My particular reasons for an interest in an underside illuminator were to provide a Köhler/Critical vertical light source which some of the older stands lack, because there is no room under the substage, and to rid the work surface of any wiring. If anyone is in possession of a stand of the fixed horizontal stage type, or simply requires a universal illuminator for all seasons and purposes then the following notes might be of interest.
The only single drawback is the thought that the illuminator will be potentially in the way of the knees! In practice I don't find this a problem as either the illuminator is well back from the front edge and will be between the knees anyway. If the protrusion of this device below the bench might be a problem during periods of rest from microscopy then a magnetically attached unit will prove to be indispensable and easily constructed.
|
| Principal of sub bench mounted Köhler light source which is not to scale |
The beauty of such a system is that you can tailor the illumination unit to suit your particular requirements, which might include variable focus to accomodate any microscope's substage condenser height etc.,
Of course this will not suit everyone for any number of reasons, but it does have some advantages:-
1) Allows true Köhler/Critical lighting for some of the older horizontal staged stands.
2) Simplifies optical path to the condenser thereby reducing misalignments.
3) Can be adapted for low power stereo or dissection platforms.
4) Rids the bench surface of any external lamphouse and wiring etc..
Decisions
Even if you think the idea might suit your needs, the boring of a hole in your work surface is not an operation to be taken lightly, but once you toy with this idea and its specific benefits, it seems not so unconventional as initially imagined.
First decide on the type of illuminator you'll want. It can be a standard type from any 'scope which can be adapted to be housed beneath the work surface. An old desktop microscope illuminator will do nicely with suitable modification, as might an old 35mm photographic enlarging head with some tailoring.
Whatever lighting unit is used it must be capable of focusing the light source's image onto the plane of the iris diaphragm of the substage condenser if you intend to install the Köhler system, or strongly diffused for low power stereo dissection etc..
There are two important points which need careful consideration. The first is the siting of the aperture on the work surface, regarding the distance from the front edge of the bench and its lateral location too. Once you have decided where the best position is for your 'scope, the point where the hole is to be drilled can be marked off. With stands having the limb towards the observer the hole will be in the same position away from the bench edge as with the more conventional configuration.
The Pre- Boring Bit
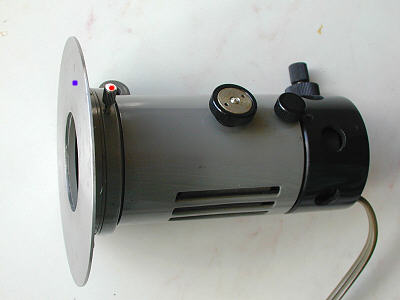 |
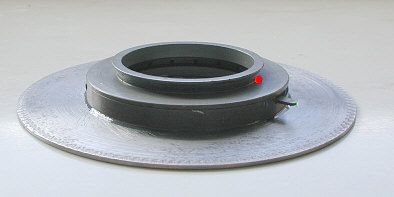
Do consider some alternate arrangements of supporting the lighting module, which in turn will affect the way it can be finely centered etc.. I have opted to support the whole unit ( Olympus bench lamphouse/illuminator ) with 8 high flux miniature Nyobium magnets embedded in the undersurface of the bench. By attaching a steel plate to the illuminator I can easily install and remove the unit in seconds if need be, AND very importantly be able to accurately centre it too without the need of complex adjusters etc.. This method has the very desirable advantage of having its mechanical axis at 90 deg to the work surface, and therefore by default the optical axis is too with a little adjustment within the lamphouse. Additional facility of decoupling comes as a dovetail ring adding some adaptability. The steel disc was originally a circular saw blade being rigid yet lightish, and was bonded to the Olympus illuminator with Araldite epoxy resin.
 |
I also advise anyone to fit a thickish glass plate so that it's upper surface is about 1mm below that of the bench's. Its presence will be appreciated for a number of obvious reasons not least of which might be the spilling of water onto the bench?
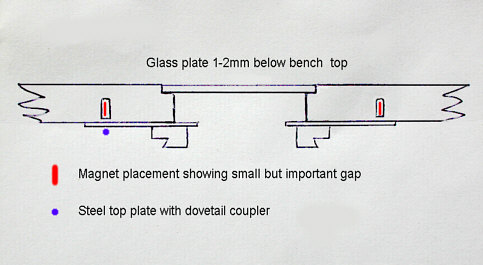 |
In a nutshell it pays to think the whole project through before deciding whether you want to magnetically or mechanically attach the unit to the undersurface of the bench. The distinct advantage of the magnetically supported method is that it dispenses with any contrivance you might need to make to enable the unit to be centered, and works on the same principal as the field lens of the Wild M20 but with the desirable facility of having the whole lamphouse unit centered without distortion.
The Real Boring Bit
Once confident of the position of the vertical light source you can drill or bore the hole, which should be large enough to provide a little sway each side of the true axis of the microscope's optical system. The rebate for the glass plate can be drilled with the larger hole saw from one side, and the main hole for the illuminator from the other: each sharing the same pilot hole to ensure concentricity. If the working of glass is a problem then perspex or other plastic type transparent sheet can be worked into circular form with more ease.
Methodology of use
Roughly align illuminator into the middle of aperture of workbench by observation from above, then close down the illuminator's field iris. Move 'scope over aperture and with a x10 objective in place focussed on a dusty slide and with the condenser in normal position, tweak the stand's position until the field iris is centered in the field of view. Adjust illuminator's focus and bulb alignment etc for normal Köhler or Critical illumination.
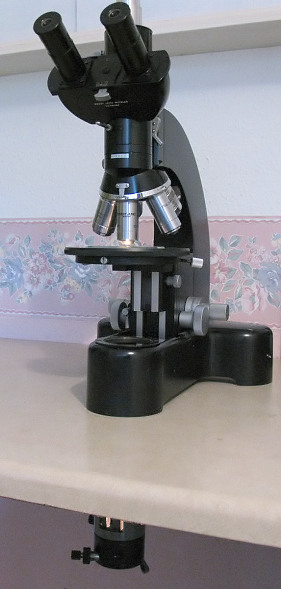 |
Magnetically supported illuminator used during the modification of a bare stand on an uncluttered work surface! The whole business of setting up can be accomplished in half a minute and stays that way. In case of accidental knocking of the illuminator, I attached a 'keep' cord to the underside of the bench and to the circular plate so that its fall is limited. The quick release dovetail ring is a bonus if the illuminator needs to be removed without upsetting its placement under the 'scope.
| All comments welcome by the author Paul James |
Microscopy
UK Front Page
Micscape
Magazine
Article
Library
Please report any Web problems or offer general comments to the Micscape Editor.
Micscape is the on-line monthly magazine of the Microscopy
UK web
site at Microscopy-UK