Machining Microscope Parts
By Robert Pavlis, USA
It is often possible to obtain older microscopes that are still in fantastic condition that lack certain components at prices that are a tiny fraction of newer instruments. It is often difficult or impossible, however, to obtain replacements for the missing components. It is very often quite easy to fabricate replacement parts from brass and aluminium metal stock using machine shop techniques and equipment. Microscope users also frequently need specialised accessories to use with their instruments, machine shop equipment makes it possible to fabricate a great many such accessories without any difficulty. (Of course the same machines and techniques can be used to built precision parts for telescopes, clocks, etc.)
There really are just three essential machine shop machines: (a) band saws, (b) lathes, and (c) milling machines. All three of these types of machines are available in sizes not much larger than a small sewing machine to ones the size of railroad cars! Small ones not only are adequate for making parts for small instruments, they are the best alternative.
Presently there are not very many different manufacturers of small lathes and milling machines. The Sieg machines described below are rather inexpensive, but have serious flaws that will be discussed below. The Praxxon machines from Germany are extremely expensive, but are known for extreme quality. There are also a few other manufacturers of equipment of this type, but many of the other manufacturers make machines that are either slightly too small or too large.
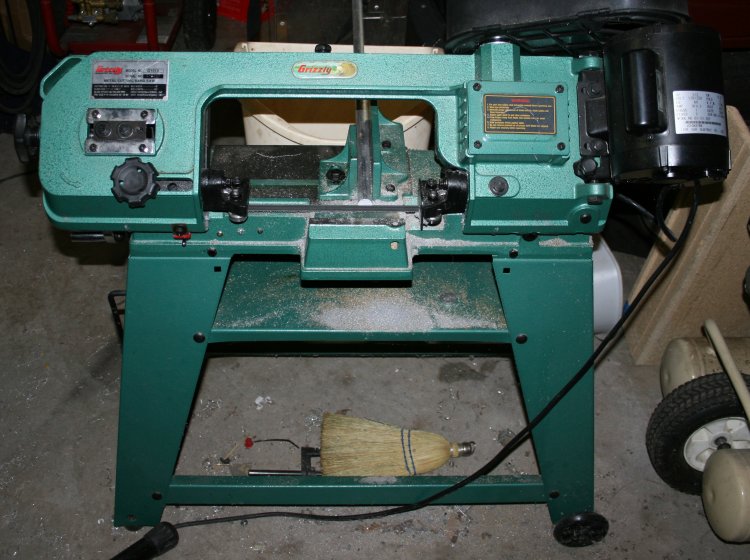
Band Saws
A metal cutting band saw is an essential piece of equipment. It permits cutting pieces of metal stock into pieces small enough to be machined. There are a quite a few different models available. There is one model that is produced in Taiwan that is sold under many brand names throughout the world that is particularly suitable for the small machine shop. These are generally sold as "4x6" band saws in the USA. These machines will cut small pieces of metal stock fairly rapidly, and always very cleanly. The quality of these machines is quite high. In the USA the price is usually a bit over $200.
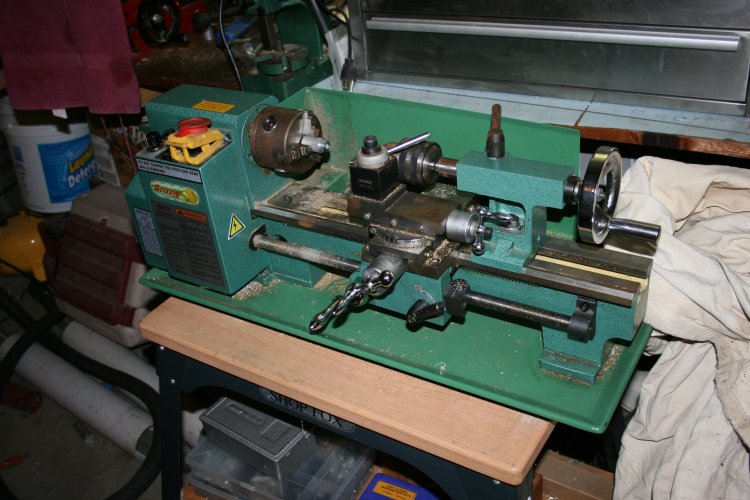
Lathes
The Sieg company in China produces mini lathes that are sold under a huge number of names throughout the world. Unfortunately the ones sold in the USA are generally equipped with an "inches" lead screw. The only way to cut millimetre threads with an "inches" lead screw is to use a gear train that contains a gear with 127 teeth. However, there is not enough room in the gear compartment to contain a gear of this sort, so this means that the purchaser of such a lathe needs to replace the lead screw before doing much work with microscopes, since almost all microscopes made in the past 50 or 60 years use metric threads. These lead screws are generally fairly easy to obtain and, in the USA, cost about $40. These lathes themselves usually sell for about $500 in the USA.
The Sieg lathes have several faults. In the first place the hand wheels are made of plastic, or at least they were on the one that I obtained. It was warped and quickly became unusable. When I discovered an extremely inexpensive source for metal ones, I replaced all of the plastic hand wheels on the machine. Some people who use these machines find that they have difficulty with the internal drive gears stripping. Replacing these gears is a fairly involved procedure. Now metal replacement gears are available. Sleeve bearings are used in many places where ball bearings would be more appropriate. Although nylon is usually a poor material for gears, the use of nylon gears in the gear train that drives the lead screw is probably a good thing, though it introduces a lot of undesirable back lash in the gear train. The good thing about this is that if, for some reason, the lead screw cannot advance, it will strip these gears rather than damage major parts!
Fortunately the dove tail fittings are all adjustable, so backlash in them can be eliminated by adjusting them properly.
Milling Machines
The Sieg company also makes mini milling machines. Often the companies that sell Sieg lathes sell their milling machines as well, often for the same price! The ones sold in the USA contain feed screws that need to be replaced and DISCARDED! Forget about using these machines in inches! The problem is that they are graduated in both fractional and thousandths of an inch. One finds that one cannot make anything even using inch measurements without a calculator or a lot of long division and multiplication. i.e. one would have the move the carriage amounts like 3 3/16" + 0.012"! Kits to convert these to standard metric units are generally available, these kits are somewhat more expensive than the ones for the lathe, because they contain more parts. Unfortunately replacing these feed screws is a more complex job than replacing the lead screw on the lathe. It takes a couple of hours to accomplish. It is truly bizarre that these machines are made this way in the first place!
These milling machines are available with R8 spindles and Morse Taper. The R8 spindle models are generally more practical because there seems to be more accessories available in this size.
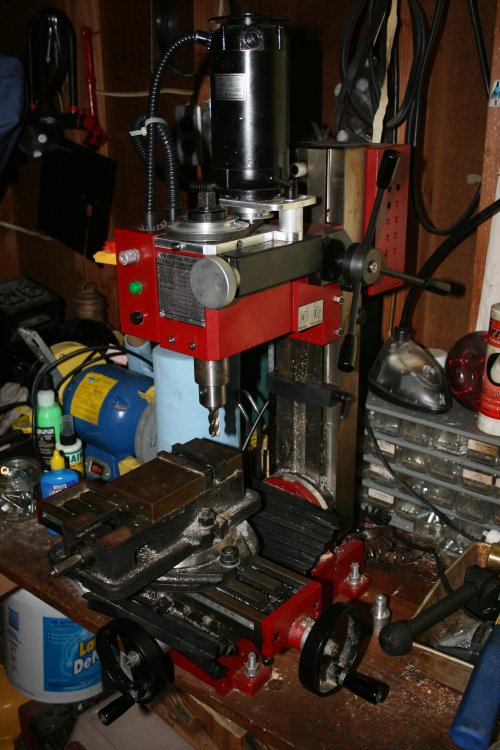
In addition to the idiotic confused units on the "inches" machines, these milling machines have a VERY serious mechanical problem! They are driven by a 600 watt motor using the same nylon gear train used in the Sieg lathe. Almost everyone who uses these machines much at all quickly finds that these nylon gears strip. Again metal replacements are available. A better solution, however, is to discard the gear train entirely and replace it with a belt drive. There are instructions for machining such a belt drive system on the Internet in various places, and belt drive replacements are available commercially. Because a milling machine is required to make such a belt drive, one must anticipate the problem and make the belt drive system before failure has a chance to occur! (I did not--and I had to purchase a belt drive after mine failed.) The image below this text shows the belt drive modification in place.
Still, a Sieg Mill equipped with metric feed screws and a belt drive is fairly robust. I have used mine a lot for several years.
Accessories
Both lathes and milling machines require tooling. There are many accessories available that make the labour of fabricating things easier. Most of these accessories are optional. A good set of metric micrometers, however, is essential.
Some Easily Fabricated Microscope Parts
Just about anything made of metal can be fabricated with these machines! The difficulty of fabrication varies from trivial to extraordinarily involved. Fortunately, the former is more common than the latter. Ten examples include:
Choosing the Right Metal
Although plastics can be machined, it is generally a very poor idea to machine another piece of plastic junk to replace broken plastic parts! An exception to this, of course, is electrical parts which must be made of non-conducting material.
Almost all microscope parts are best fabricated from either brass or aluminium alloys. Brass is an alloy made from Cu and Zn and commonly at least one other metal. The brass designed as "360 brass" is extremely useful for machining precision parts. It contains from 60 to 63% Cu, about 35% Zn, about 0.35% Fe, and from 2.5 to 3.7% Pb. The lead serves as a lubricant so this alloy tends not to stick to tools. It has almost ideal machining properties.
Aluminium alloys can be difficult to machine. Some alloys are MUCH better than others. The alloy designated as 2011-T3 is better than most. It contains from 91.2 to 94.6% Al, from 0.2 to 0.6% Bi, from 5 to 6% Cu, less than 0.7% Fe, from 2.1 to 2.9% Mg, from 0.2 to 0.6% Pb, and less than 0.4% Si.
Brass alloys are much more expensive than aluminium. However, because most microscope parts are small the metal cost tends to be insignificant relative to the amount of labour required to produce the part. Brass alloys are, however, very dense, and where mass is a factor aluminium may be superior. Brass, surprisingly, is a much poorer conductor of both heat and electricity than aluminium. Thus aluminium is a better material for making adapters for replacing tungsten filament lamps with light emitting diodes that require heat sinks.
Steel is inexpensive. Many alloys can be machined well. However, it tends to rust badly in many applications.
When all things are considered, 360 brass is usually the material of choice for fabricating small new or replacement parts for microscopes. The high cost of brass may lead one to consider the use of aluminium for larger parts.
Safety Hints
Never even think about using metal working equipment without wearing safety glasses.
Never wear loose clothing around this equipment, especially neck ties.
Be very careful! Even though metal working equipment is probably a bit less hazardous than wood working equipment, band saws, lathes, and milling machines can cause severe injuries if used carelessly. Always think about what you are doing and remain alert!
Using Band Saws
Always mount the metal stock being cut very securely. Check to see that the blade has the correct tension before connecting it to the electrical power supply. Check to see that the blade is not damaged.
If cutting thin metal one must use very fine toothed saw blades or the high pressure on the narrow point of contact will rip the teeth from the blade, destroying it in a few seconds.
Be sure that the blade and item being cut are properly lubricated during the cutting operation.
When the blades become worn it will take a long time to make a cut, and the blades will tend to cut so that the end of the cut is at an angle.
Be sure to disconnect the band saw before doing any adjustments!
Using Lathes
For most lathe operations the metal stock can be mounted in a classic three jaw chuck. Longer pieces of metal stock will require using a centre drill to drill a special hole to hold a live or a dead centre that is held by the lathe tail stock so that the work piece is mounted between centres. (A live centre rotates, a dead centre is stationary.)
Lathe tools are available at machine supply shops. One can re sharpen them with a grinding wheel. They tend to last quite a while when used only on brass and aluminium.
When turning parts with a lathe remember that when you measure parts with a micrometer you are measuring diameters, but when you adjust lathe tools, you are changing the cutting radius! It is easy for beginners to forget this and, as a result, make a cut that turns a part to too small a diameter. Remember it is easy to take off metal with a lathe, but it is not possible to use a lathe to put metal back on again!!!! It is best to take many shallow cuts rather than a few deep ones.
Making curved surfaces is easiest done by lathe filing. In this operation a file is pressed against the rapidly rotating part. This can be very dangerous. One MUST be very careful to hold files for this very securely, and not apply too much pressure.
Sometimes knurled surfaces are required on lathe produced parts. Both straight and diamond pattern knurling tools are available. Because fairly strong force is applied to the piece during the knurling operating, even fairly short pieces should be mounted between centres when doing this.
Small holes can be bored in pieces by putting a drill chuck in the tail stock and using the tail stock hand wheel to push the bit into the piece. It is best to start with a small diameter drill and go to larger and larger ones until the desired diameter is reached. Larger holes will require boring. To do this, first make a small pilot hole in the piece as described above, and then attach the boring tool and put it into the pilot hole. It is particularly easy to bore out holes too large this way. Once again, boring tools can not be used to put metal back on again!
When large diameter threads are required they can be produced by using special lathe tools and the lathe feed mechanism. Small diameter threads should be produced using standard taps and dies. Many machinists place dies in drill chucks and manually turn the lathe chuck while applying pressure with the tail stock to ensure that the threads are cut straight. It is very important to disconnect the power when doing this to avoid accidently turning on the power and breaking the tap off in the piece!
Cutting threads using the lathe feed mechanism is somewhat difficult. When doing this be SURE that the gearing is set correctly, or you may end up with a part with threads that are unique and will fit on nothing! It is often best to turn the lathe chuck by hand while making the cut. It is also best to make many shallow cuts rather than a few deep ones. Of course one must not remove the part during the thread cutting operation, because it is practically impossible to get it aligned correctly again.
Metal Milling
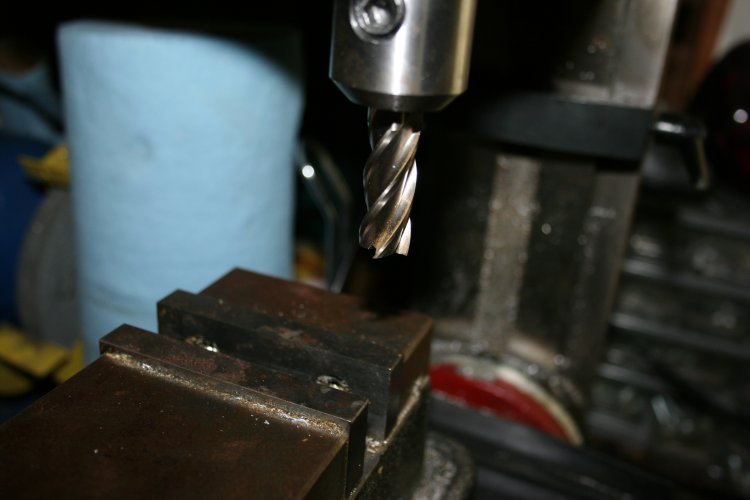
Always check the milling machine carefully before use. Be sure there are no loose parts and that the milling table is in good condition. Mount the part to be milled on the milling table with a milling vice or other technique. Be sure it is VERY secure! Parts must be very secure or they will not be shaped properly!!! Poorly attached parts can also introduce a safety hazard. Remember also that end mills are extremely sharp and cause serious injury.
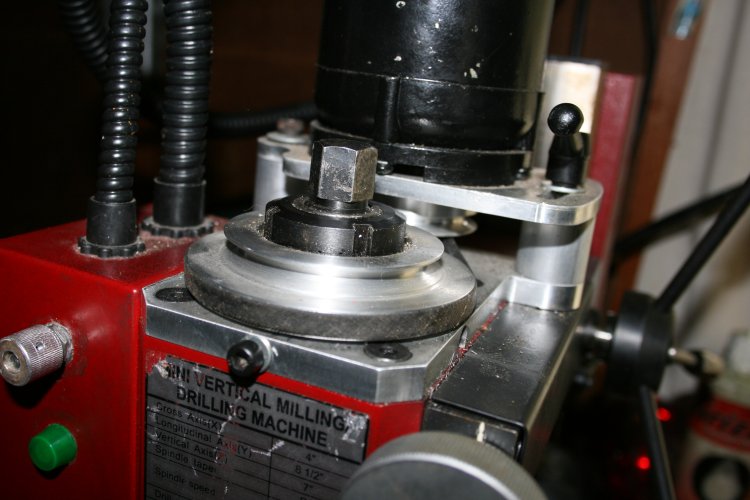
Install an appropriate end mill in the milling machine. The image below shows an end mill installed on the milling machine.
In up milling the work piece is fed into the cutter opposite to the cutters direction of rotation. The cutting force tends to push the work away. In down milling the work piece is fed the opposite direction. Avoid down milling! In down milling the cutter encounters the maximum metal thickness at the very start of each cut. This puts great strain on both the end mill and the milling machine itself. If you look at a piece being milled, the end mill will appear to be rotating clockwise. Thus if milling a surface with the work piece to the left of the mill, the mill table should move AWAY from the operator during the cut.
As with lathes, it is best to make many shallow cuts rather than a very few deep ones.
Because milling machine tables can be moved with great precision that are superior to drill presses for boring holes in precise locations. This will obviously require installing a drill chuck in place of the mill holders. Hint: it is best to start precision location holes with a lathe centre drill because they are much more rigid than ordinary drill bits! When boring holes that are to be threaded with taps be sure to use the correct size drill. It is also wise to disconnect the power and mount the tap in the drill chuck, and manually turn the tap into the bore being threaded. Be sure to disconnect the power, or accidently turning it on will result in a broken tap and present serious problems removing the broken off tap from the work piece!
Square and Hexagonal holes
Occasionally it is necessary to have work pieces with square or hexagonal holes. Although there actually are special drill bits that drill square holes, they are only for fairly large sized holes. The reasonable technique for microscope parts that require these is to drill a pilot hole with a regular drill and press a square (or for hexagonal holes, hexagonal) broach into the part with a small mechanical or hydraulic press. An arbor press works very well for this. (An arbor is an axle, in most countries it is spelled differently than arbour which refers to trees.)
I have used broaches to produce square holes for the special phase ring adjusting tools for Leitz microscopes and the special objective adjusting tools for Nikon polarising microscopes. However, it is much easier to obtain winding keys for antique watches of the appropriate width, remove the handles and then fabricate handles similar to those on screwdrivers. This is described in some detail in the March 2007 edition of Micscape.
Making Focussing and other Knobs
As mentioned earlier microscope manufacturers and manufacturers of just about any item with knobs tend to use low grade plastic for knobs. It is amazing (and disgusting) how many items suffer from having these worthless pieces of plastic trash fail!
A majority of the knobs on microscopes are cheap pieces of plastic that fit over a simple round shaft. Brass is really the most appropriate material for most of these applications. To make brass replacements, mount a piece of brass rod of appropriate diameter in the lathe, knurl the outside surface, and then cut off a slab slightly wider than the final knob needs to be. Place the resulting thin cylinder in the lathe chuck and face both ends. You might want to use a file in the rotating lathe to round the otherwise sharp corners. Carefully measure the diameter of the shaft and drill a hole through the cylinder using a drill mounted in the lathe tail stock. The best way to secure the new knob to the instrument is to mount it in a milling vice and drill a hole with a 2.6mm bit in the edge clear to the centre. Use a 3 mm tap to thread this hole, and secure it with a short 3mm diameter Allen set screw. (You can buy these in bulk very inexpensively.) Simply place the resulting knob over the shaft and tighten down the Allen screw with the appropriate Allen drive tool.
Some knobs are really large thumb screws. One way to deal with knobs that originally had threaded shafts is to make the knob as described above, and then drill and tap a hole for the appropriate sized threaded rod. For some applications, however, it makes more sense to start with a longer brass rod. First knurl one end, and then turn down the rod the rest of the way to the diameter required for the threads, and then use a die to thread the rod.
Some instruments may require strangely shaped knobs. It is generally quite easy to duplicate them in a lathe.
Finally it is not uncommon to find knobs that fit over square or hexagonal shafts. These will, of course, require the use of square or hexagonal broaches.
Many instruments that use plastic knobs use shafts that are circular but with one side partly milled away. To make a metal knob that duplicated the shape of the original would again require a special broach. HOWEVER, making an ordinary knob with a round hole can usually work very satisfactorily without all this trouble. Instead of attaching it to the shaft with a 3mm set screw, it often requires a 4mm or 5mm one to hold the knob on satisfactorily. The need to replace broken plastic knobs is certainly not restricted to microscopes. Recently the speed control knob on the Sieg lathe described here broke in half! If you look at the picture of the Sieg belt drive system shown earlier in this article, you will notice that above the green power indicator on the left side of the picture there is an aluminium replacement for a plastic knob that, as usual, split rendering it useless. Note the small threaded hole in the knob that holds the set screw that holds it onto the shaft.
Final Hints:
Be sure to remove swarf (the pieces of metal removed by the machining process) after each project, or when too much of it accumulates. Allowing it to accumulate can cause it to get into slides, etc. of the machines.
Be sure to keep all metal working machines well lubricated. Consider spraying their bare metal surfaces with a thin coating of oil after each use if you live in an extremely humid area.
Keep the dove tail slide mechanisms properly adjusted, or serious backlash will be introduced.
All comments to the authors Robert Pavlis are welcomed.
Microscopy UK Front Page
Micscape Magazine
Article Library
Published in the August 2009 edition of Micscape Magazine.
Please report any Web problems or offer general comments to the Micscape Editor.
Micscape is the on-line monthly magazine of the Microscopy UK website at Microscopy-UK
© Onview.net Ltd, Microscopy-UK, and all contributors 1995 onwards. All rights reserved. Main site is at www.microscopy-uk.org.uk .