|
|
|
||||
| Christmas is coming soon: it's a time when children (and perhaps adults!) become particularly fascinated by microscopes. I remember some months ago; the five year old child of my wife's cousin was looking at my video monitor which showed a picture of living rotifers, and this prompted the comment to his father 'I want one!' (A microscope of course). |
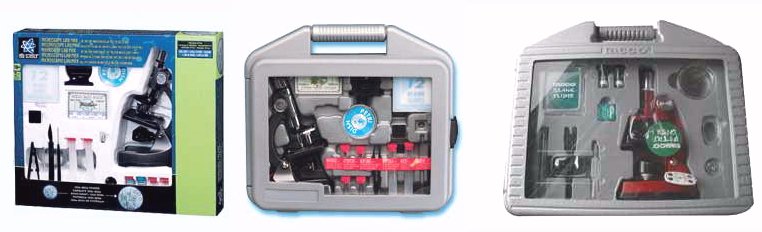
| It's not difficult to find microscopes in toy shops with prices between $25-40. Maybe you have bought one of them. They are toy microscopes and nowadays their quality is poorer than 10 years ago, but they are usable for low power magnification. Don't forget that the best pictures are obtained between 60 to 100 times. (Magnifications over 200 or 300 times are difficult to use with these simple products). Some of them have a device which projects an image onto a small screen. The image is not very bright but can be seen by several children at a time. If you can, choose a microscope with a more rigid metallic body. (Below are some examples of microscopes for children). | |
|
|
|
| Unfortunately microscopes are often sold as they are, with only a few notes describing parts and without giving examples of things to see. It's even more true if you buy a used microscope. It's a frustrating situation for a child and the purpose of this little article is to give some ideas to beginners in microscopy, about the things to study immediately and in particular how to prepare them for best observation. |
| The first reflex of children
(and often true for parents as well) is to try to observe hair - which
is not a spectacular object(!), but you can identify the bulb.
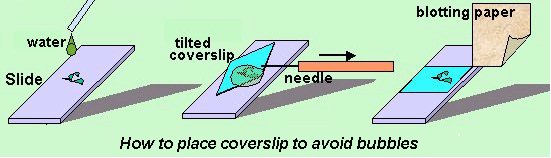
Main point: Don't try to view things as they are. Some (very) little preparation is needed; for microscopes to see through the subjects, they must be as flat and as transparent as possible. You must improve transparency by putting the subject into a liquid; either water or a solution obtained by mixing 1/3 water - 1/3 alcohol - 1/3 glycerine. (This solution is useful if you want to conserve the slide for some days without it drying out, or for use with objects difficult to wet like insect wings). Put only a small drop on the object and place a coverslip on it. If liquid seeps from the coverslip, remove excess with blotting paper. |
 |
| Second point: Always start with the low power objective to identify more interesting areas of the subject to view, then this area is centered in the field of view by moving the slide. You can change the objective for another with higher magnification, but be careful when you adjust the focus, because the objective is nearer the slide and you risk breaking it if the objective is focussed down too quickly. |
| Some suggestions of things to see: | ||
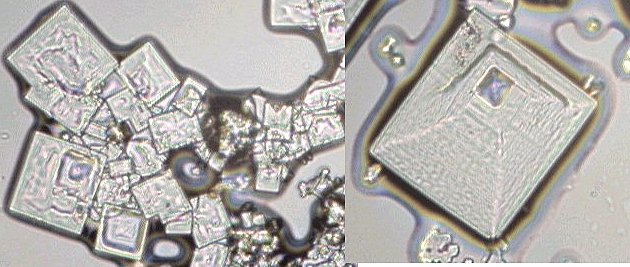
| Salt crystals (sodium chloride) - but don't look at crystals straight from your saltcellar because they are broken: Melt half a teaspoonful of salt into a half a glass of tepid water, take a drop, put it on the slide and allow to evaporate. Beautiful cubic crystals will grow on your slide. The crystals will be larger if evaporation is slower; if you put the slide in a warm place, crystals appear more quickly. Also try with baking soda (sodium bicarbonate), salicylic acid (aspirin), and vitamin C if you have this medication. (Observe the crystals WITHOUT using a coverslip). | ||
 |
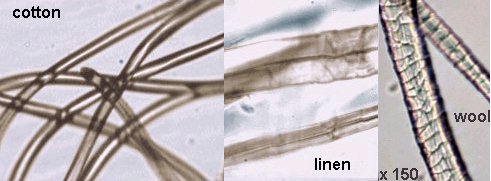
| Tissue fibers: Take some fibers from various clothes (but don't make a hole!). Also collect them inside clothes, (near sewing for example). Wool has some 'scales' on the fibers, linen is flat, cotton or synthetic fibers are easy to identify: now you can play 'detectives'! | |
 |
| Cells from the mouth:
Scrape gently the inside your cheek with a small spoon and you will collect
some epithelial cells. Dilute in a drop of water: You can see the nucleus
and you can stain them with eosin for example.
Vegetable cells: Go to the refrigerator and see if you have an onion, leek or garlic. With small forceps peel off a piece of fine 'skin' from inside the leaves and you can see elongated cells under the microscope. The nucleus can be stained with eosin or methylene blue. If you take a piece of epidermis near the green leaves, you can also study stomata. (The pictures on the left and right below show rounded nuclei stained with methylene blue). (Note: A tiny drop of very dilute red or blue fountain pen ink can be used as a substitute for eosin and methylene blue stains respectively). |
 |
| Maybe a guest has brought some flowers: Collect some pollen grains, mount them in water under a coverslip and observe them at a magnification of at least 100 times ... |
 |
|
|
|
Microscopy
UK Front Page
All drawings and photographs © Jean-Marie Cavanihac 2001 Published in the December 2001 edition of Micscape Magazine. Please report any Web problems or offer general comments
to the Micscape
Editor,
Micscape is the on-line monthly magazine of the Microscopy
UK web
|