Zeiss Axiostar Universal Digital Camera Adapter.
A personal review by Ian Walker. UK.
Introduction.
The Zeiss Universal Digital Camera Adapter for the Axiostar and similar microscopes [d30 M37/52x0.75 adapter] part number 426126-0000-000 allows connection to a number of consumer digital cameras which have threaded or bayonet lens barrels. Connecting to the Zeiss is either through using the manufacturer's own conversion tubes or buying from Zeiss but this works out much more expensive. My Canon made G6 58mm adapter suitable for connecting Canon's close-up lens or telephoto attachments is also suitable to connect to the Zeiss photo adapter by the use of a 58mm to 52mm reduction ring and cost around Ł15 inc. VAT. Compare this to a Zeiss price of Ł75 + VAT [UK] for the G3/G5 ring [purchased in error and returned to Zeiss] which turns out to be made by Soligor bought in by Zeiss and sold-on. The Canon G6 lens assembly is based on the G3/G5 with improved coatings but Canon increased the size of the adapter tube now flaring out from the camera end at 52mm to 58mm for attaching filters etc and also changed the bayonet fit surrounding the lens, so anybody thinking they can upgrade from a G5 to a G6 and keep their old adapter is in for more expense, they are NOT compatible. The photo-adapter can be bought directly from the Zeiss Shop on the Internet, construction is sturdy with a nice 'weighty' feel to it and the finish is good looking like a matt powder coating but using the supplied Allen nut to clamp the tubes could damage the finish. The built-in optical elements introduce a 0.75x multiplying factor.
As well as the Canon digicam range, including the 'A' series, you can use the adapter with the Sony 'S' range including the S75/S85, this actually looks slightly neater because the Sony made adapter is straight and shorter than the Canon and integrates well with the photo-tube without accessory step-up or down rings. Tests with my brother's S75 show better linearity than the Canon in the same tests done below but the habit of the Sony turning itself off when running on batteries after three minutes precludes it from use as far as I am concerned.
Zeiss provide a tiny Allen bolt both to tighten up the adapter on the eyepiece tube and for the sliding tube assembly to provide even illumination seen on the camera LCD [the instruction leaflet supplied suggests this is adjusted for minimum vignetting]. Together with the two Allen bolts and Allen key is a small nylon thumb screw to allow the eyepiece Allen bolt to be removed and fit this instead, preventing scratching of the eyepiece tube and allow quick removal of the adapter. However I have left the eyepiece Allen bolt in place and loose to allow rotation of the camera for best presentation of the image and used the thumb screw on the tube assembly allowing quick adjustments to the height of the tube which I find very useful for optimum illumination. The adapter fits snugly in the eyepiece tube and the balance of the Canon G6 camera is sufficiently good to prevent self-rotation.
Finally, on their website Zeiss suggest for the best imaging you use the trinocular head and its dedicated photo-tube but the price of this combination is way out of my price bracket!
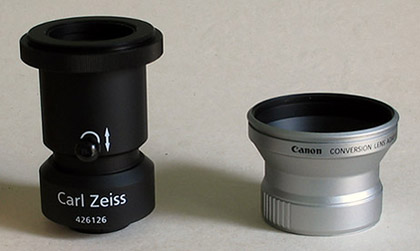
Zeiss universal digital camera adapter plus Canon conversion lens adapter, not shown is the 58mm to 52mm reduction ring to allow the two to be connected together, the Canon G3/G5 would not need this since Canon used a 52mm wide adapter tube on these cameras. The plastic 30mm eyepiece section can be remove from the bottom of the assembly - this is the same ribbed design as found on the 10/18 eyepieces and works well being a good fit in the eyepiece tube on the Axiostar.
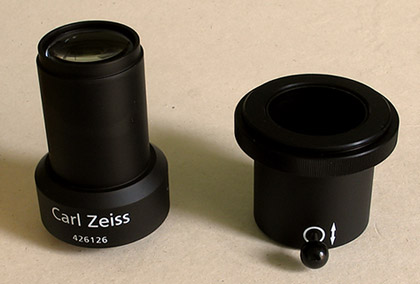
Zeiss adapter in two sections showing lens and neat nylon thumb screw to clamp the two sections; an Allen bolt would normally clamp them together but I have removed this and used the thumb screw instead to allow easy experimentation with tube height. It is important that the adapter is pushed fully home on the microscope eyepiece tube for best results, once or twice I found that I hadn't pushed it down far enough which can happen if you are pushing down on the adapter at a slight angle.
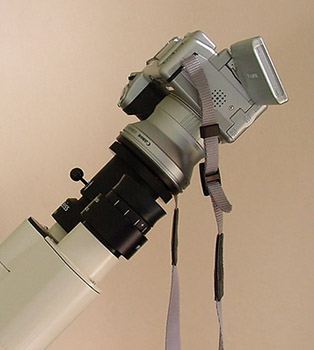
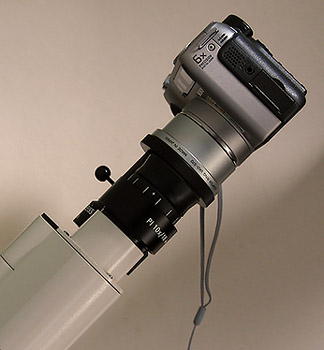
Zeiss digital camera adapter together with the Canon G6 on the left and brother's Sony S75 on the right connected to the Axiostar, note the swivel LCD on the Canon.
Tests carried out to ascertain linearity of adapter plus Canon G6.
Medium zoom settings.
[Note that no sharpening was used in re-sizing the images and only modest brightness adjustments were made to some of them in Photoshop Elements to provide a reasonably uniform set of images].
The objectives used for the tests were the Zeiss 5x and 10x CP-Achromats and 20x Ph2 A-Plan. Before I did the tests I observed the graticule grid under normal binocular view to ascertain any problems with the objectives themselves in terms of colour aberrations and linearity. Zeiss sell the CP-Achromats as relatively cheap introductory objectives with reasonable flatness of field and the images I have seen show good contrast and acceptable flatness of field for most subjects, but the fall off in sharpness at the edges can be seen when the centre part of the grids have been focused in the images. Below however there are a few other problems be it colour or linearity. The A-Plan is more expensive and shows improved sharpness at the edge of the field.
The images in the first group Figs 1-3. are: on the left, using the Zeiss universal digicam adapter with the Canon G6 set to 15cm and manual focus; in the centre, the G6 set to infinity, manual focus; and on the right using the Canon Ixus 400 hand held through one of the Zeiss 10/18 eyepieces. It can be seen that using the Zeiss recommendation of setting the camera to infinity results in quite noticeable pin-cushion distortion and when I first saw this I was not amused! Having done many experiments with different focus settings I arrived at the 15cm setting in manual focus to be acceptable. Note the edge definition is not quite as good but the linearity is improved and rather annoying however is that the Canon Ixus 400 hand held at one of the eyepieces gives a very linear and crisp image as seen in the right hand images. It should be taken into account that I don't think Zeiss ever intended to use the adapter at this type of zoom setting. However I find a partial or full circular image to be aesthetically pleasing especially since the appearance mimics the view down the microscope and looks good against a black background like in this article. The field of view using the standard eyepiece and the Canon Ixus is not as wide as the adapter so the linearity would probably be slightly better. The graticule is not unfortunately etched into the slide itself it is from an eyepiece so I haven't done any tests on the 40x objective due to the extra thickness the graticule presents sitting on the slide.
Any of the grids shown in Figs 1-6. can be seen in more detail by clicking on the images, the grid spacing on the graticule is 0.2mm.
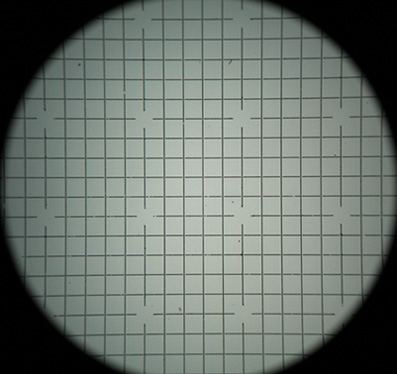

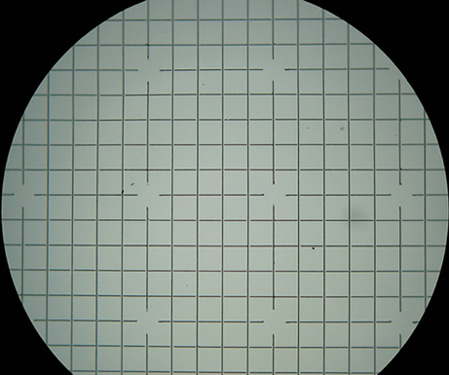
Fig 1. 5x objective.
Left, focus distance set to 15cm, centre at infinity and right Canon Ixus using eyepiece.
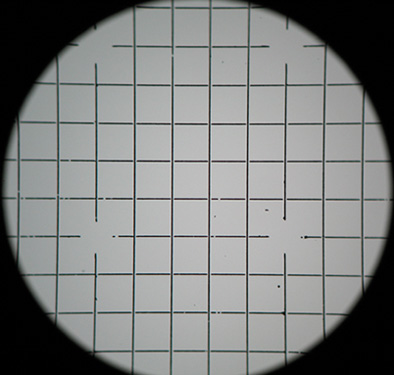
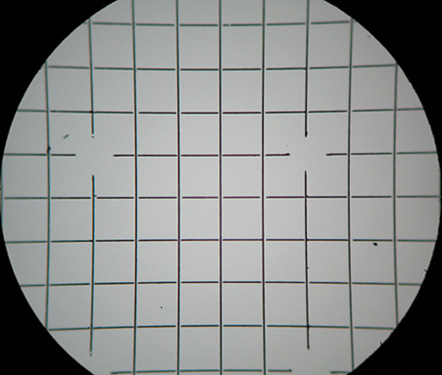

Fig 2. 10x objective.
Left, focus distance set to 15cm, centre at infinity and right Canon Ixus using eyepiece.
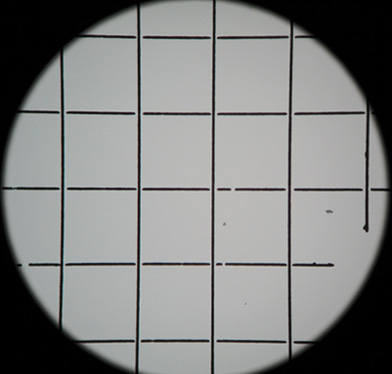
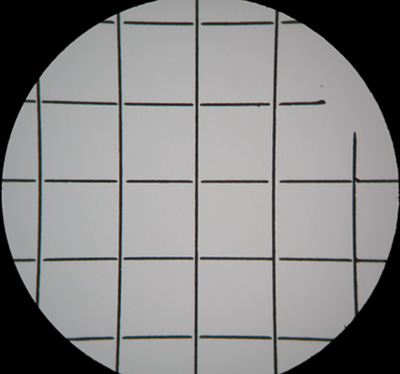
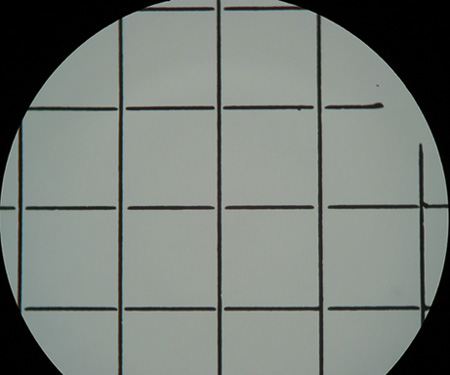
Fig 3. 20x objective.
An interesting point to note is the tube length should be individually optimised for both the mid-zoom and full zoom positions on the camera to provide the most even lighting. Some of the test shots were not optimised because of the number of images I was taking and it is fairly clear that some suffer from none uniform lighting but note that except for a minor field of view difference between the two settings the linearity does not change significantly. It is possible to compare visually the image from the adapter to one of the eyepieces and the field of view is larger but the actual image from the lens [appears to be a simple but well coated doublet] looks well corrected for aberrations and doesn’t suffer from any appreciable pin-cushion or barrel distortions. This suggests the Canon G6 is introducing some distortion from its lens which ties in with my tests with macro and even more distant shots. This also explains why the Sony S75 seems better with respect to the above anomalies. So, even though Zeiss call it a universal adapter, different cameras will behave differently when connected to it.
The images below are now with the Canon G6 in full zoom, manual focus. It is quite obvious that the 15cm focus position in the left hand images are much more linear than with the camera set to infinity as suggested by Zeiss seen in the right hand images, the pin-cushion distortion does not really improve until the camera distance setting is below 50cm in the manual focus mode. The Canon G6 has a super-macro mode if the macro button is held down for a few seconds allowing focus distances to be reduced to around 4-5 cm, although this provided good linearity I think the actual image looks more corrupted so I have not gone any further with this mode.
Full zoom setting.
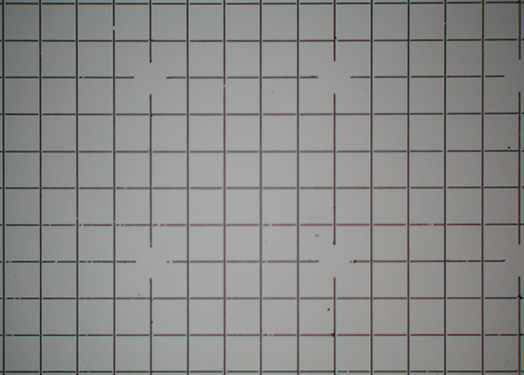
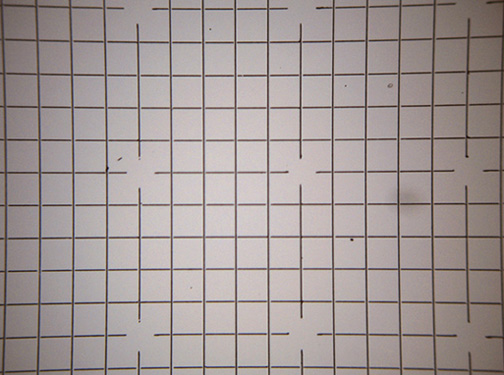
Fig 4. 5x objective.
Left focus distance set to 15cm, right infinity.

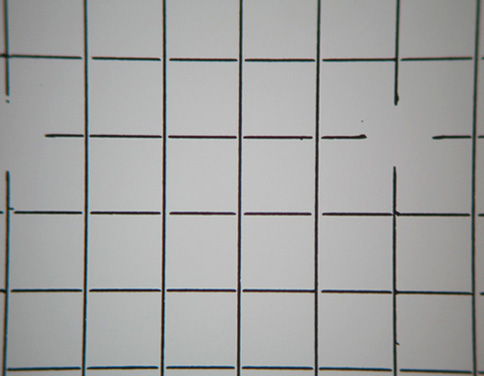
Fig 5. 10x objective.
Left focus distance set to 15cm, right infinity.
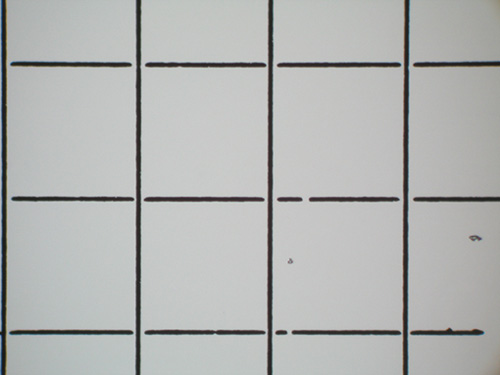
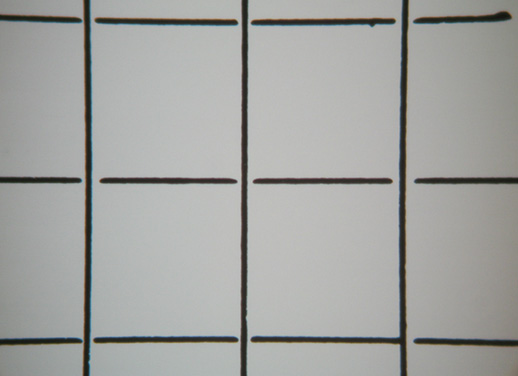
Fig 6. 20x objective.
Final camera settings.
[The following settings I have found to give acceptable results using the Canon G6]:
|
Camera. |
Setting. |
Notes. |
|
Focus |
15cm in manual focus mode. |
Excellent magnified central portion of the image seen on LCD helps greatly in focusing difficult subjects. The magnified view can be toggled on and off after the manual focus distance is entered without loosing this setting by repeatedly pressing the 'MF' manual focus button. |
|
Mode |
Aperture priority. |
|
|
Aperture setting |
Wide open. |
Works out about f2.5 for medium zoom and f3 at maximum zoom. |
|
Auto power down LCD power down |
Off. maximum of 3 minutes |
Prevents unwanted camera power down. This feature cannot be de-activated completely unfortunately. |
|
Flash |
Off. |
Don't need it. |
|
White balance |
User preference |
I set 'auto' for quick experimental imaging and 'custom' for more demanding photomicrography. |
|
Self timer |
On, set to 10 seconds |
Essential to prevent vibrations from manually releasing the shutter, or use infrared controller on the G6. |
The settings shown above can be saved in either the custom 1 [C1] or custom 2 [C2] memory positions provided by Canon on the mode dial at the rear of the camera so you can have a dedicated photomicrography position say selected in C2 as I have, this is achieved by saving the settings in the very last menu choice in the record menu table. There are two very useful choices provided by Canon at the click of the omni-selector on the rear of the camera which on some other manufacturers are buried in menu tables and that is exposure compensation and white balance. The exposure compensation once selected gives an excellent range clearly shown on the LCD panel and has been used several times already especially for dark-field and polarization and can be adjusted whilst watching your subject without losing other settings. The swivel LCD is extremely useful since it can open right out from the camera and twist for optimum contrast for your viewing angle, a different approach from the Nikon 4500 rotating body design but still an elegant solution for difficult macro-photography.
As an alternative to using the manual focus mode you can use aperture priority with the camera using auto-focus either in or out of macro mode, you get a crisp outline on medium zoom settings and provided the subject is accurately focused on the LCD screen using the microscope fine focus the images are good, you can use the digital zoom feature to help in focusing then zoom out again to your desired setting. One thing I did notice is if using the manual focus method the LCD power off feature corrupts the manual focus setting so if you set it to infinity or 15cm it seems to power up at about the 10m mark, I don't think you can get round this so you have to reset back to your preferred setting.
A few sample pictures using different contrast and lighting techniques.
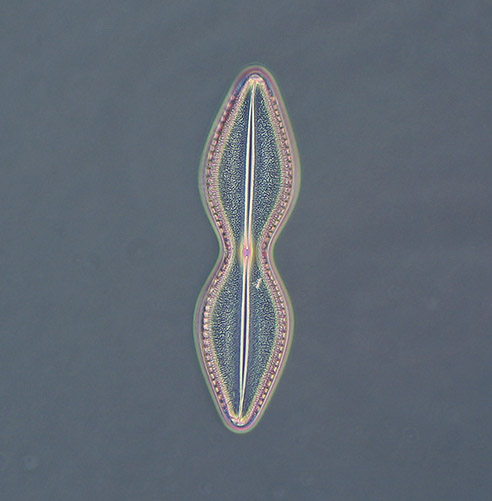
Dictyoneis diatom, E.C.P. Bone. Zeiss CP-Achromat 40x NA 0.65 Ph2 objective, camera on medium zoom setting and cropped.
Once the photo-adapter tube length is set correctly it provides good even illumination as seen here captured on the G6, except for resizing this image has had minimal post editing.
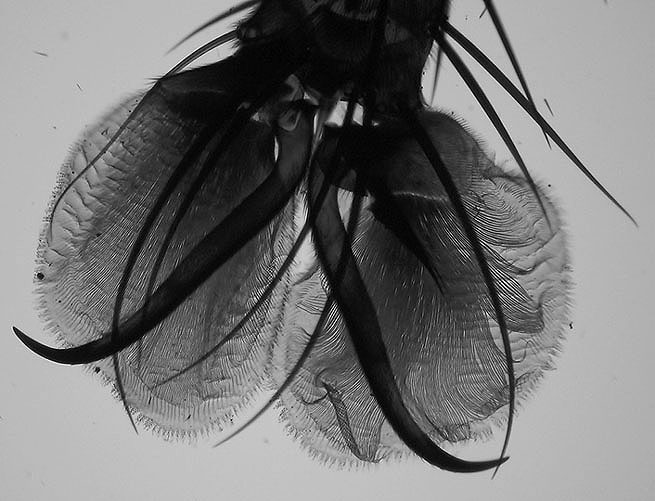
Foot of blowfly, bright-field illumination, colour image converted to B & W. C.M. Topping. Zeiss CP-Achromat 10x NA 0.25 objective, full zoom.
I looked at this in colour and black and white and preferred the latter, again good even background illumination.
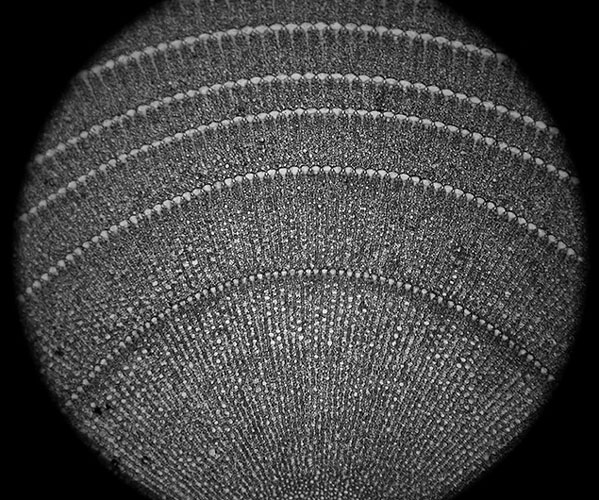
Spine of Echinus [sea urchin], bright-field illumination, colour image converted to B & W. Norman. Zeiss CP-Achromat 5x NA 0.12 objective, medium zoom.
A tough test for the cheap, non-plan CP-Achromat.
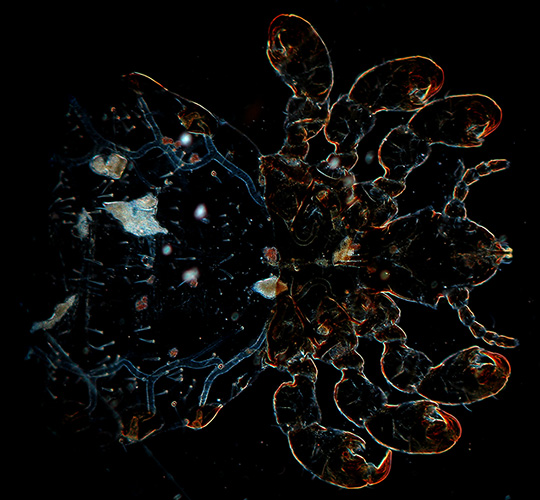
The 'ghostly' outline of an Ox parasite using home made dark-field attachments. Unknown mounter. Zeiss CP-Achromat 5x NA 0.12 objective, medium zoom.
You can clearly see part of the network of tubes in the abdomen making up the breathing apparatus.
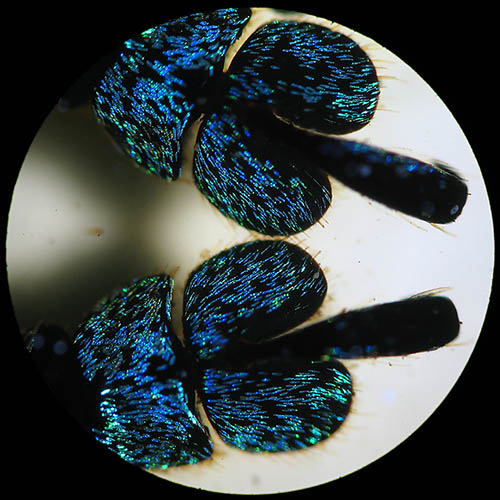
The gorgeous little feet of the Eupholus schoenherri beetle from New Guinea. Unknown mounter, very old 'paper covered' slide.
A difficult image to capture due to the thickness of the subject, mountant discolouration and coverslip reflections here using experimental LED top lighting. Zeiss CP-Achromat 5x NA 0.12 objective, medium zoom.
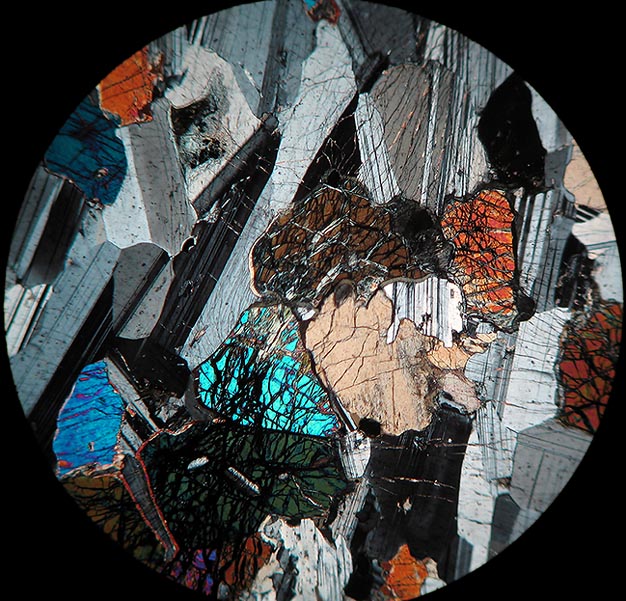
Gabbro under home made cross-polar attachments, OU 260 slide. Zeiss CP-Achromat 5x NA 0.12 objective, medium zoom.
The non-plan characteristics of the CP-Achromat quite clearly evident in a subject like this.
Conclusion.
Is it worth buying this adapter?
I would say this very much depends on the camera and what your own definition of acceptable results are, I was hoping for better images from the G6, it is interesting that some tests done with the Sony S75 plus a 30 year old Nikon reversed 50mm f1.8 lens gave some excellent images in terms of linearity and minimal artifacts when held directly to one of the eyepiece tubes. I think it is even more annoying that my Canon Ixus 400 fully auto digicam looking down one of the eyepieces gives a very bright crisp image with excellent linearity across the field but its back to fiddling around with home made adapter tubes and because the camera is at 45 degrees it makes balancing the camera on its mount difficult compared to sitting horizontally on a trinocular attachment say.
However, there is the convenience point to be taken into account in the fact that the camera is held rigidly and exactly parallel to the optics leaving both hands free to make adjustments to the microscope or slide plus the self timer can be used or remote operation from the infrared controller on the G6. This together with the magnified central portion of the image in manual focus mode on the G6 [which is excellent] compensates somewhat.
the end.
Comments to the author, Ian Walker, are welcomed.
Published in the December 2004 edition of Micscape.
Please report any Web problems or offer general comments to the Micscape Editor.
Micscape is the on-line
monthly magazine of the Microscopy UK web
site at
Microscopy-UK
© Onview.net Ltd, Microscopy-UK, and all contributors 1995 onwards. All rights reserved. Main site is at www.microscopy-uk.org.uk with full mirror at www.microscopy-uk.net .