Wild M20-EB Microscope.
An overview of a well regarded marque.
by Ian Walker. UK.
Introduction.
I have recently acquired a Wild M20-EB [Extended Base] microscope, this article is about the differences between the standard Wild M20 and this variant plus some of the simple accessories I have made for it. Paul James some time ago wrote an excellent article for Micscape on the Wild M20 with details of the objective ranges, main features and design so I will try and not duplicate too much what Paul has already said. The standard Wild M20 has been written about and discussed in many discussion groups, forums etc so this article is designed as an overview for readers to see a late version of one of the all-time classic microscopes. Many words have been said about the Wild M20 being one of, if not the best microscope ever made... there is no doubt it is an extremely well made stand with an excellent range of accessories from an era when engineering quality was a high priority especially from a country renowned for their engineering excellence, but I think the accolade may be challenged by followers of good designs from Reichert, Leitz and Zeiss.
The stand.
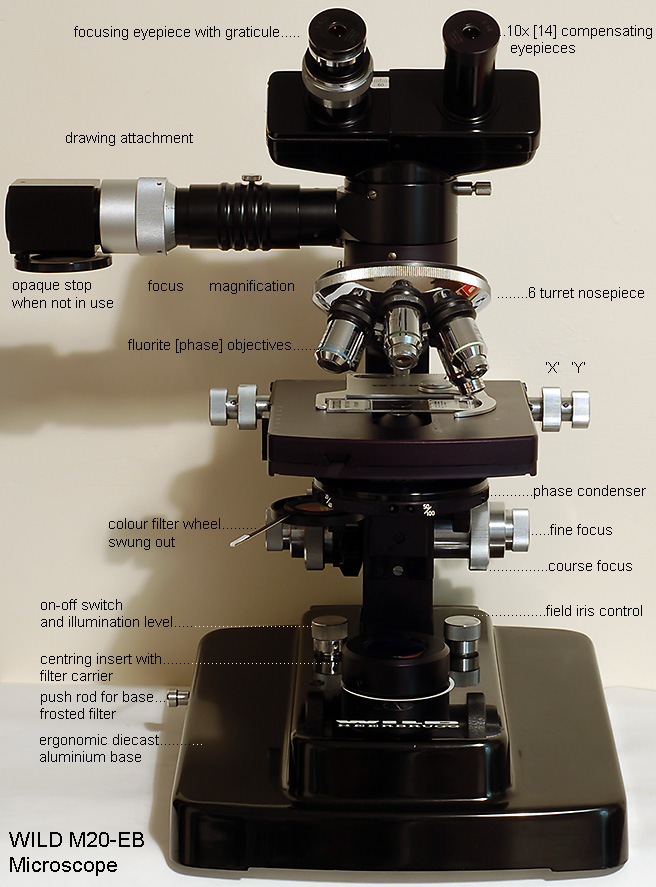
My stand has the six turret ball-bearing nosepiece fitted with four fluorite phase objectives and a basic 4x NA 0.1 achromat. The NA 0.90 phase condenser has a nice feature, the condenser uses two integrated spring loaded adjusters for the individual phase stops...no tools to lose. Wild went all out for numerical aperture on the fluorite objectives, however the flatness of field even with the 10x [F.N.14] compensating eyepieces is modest. For visual observation this is not such a problem since I am drawn to the crisp centre field, however photography is a different matter but I have an idea to get round this problem and I shall be working on this in the future. The stand also came with a versatile drawing attachment which allows comfortable drawings to be made where the paper is illuminated from a table lamp rather than relying on the microscope illumination. The relative brightness between subject seen through the microscope and the drawing is achieved by neutral density filters placed on the centring insert, adjusting illuminating intensity or varying the brightness of the table lamp to allow a superimposed image of the subject to stand out on the paper. The subject is the right way up on the paper and the magnifying power and focus of the attachment can be set for optimum results, there is also an optional intermediate lens to increase the magnification of small objects by 2.5x. Even with all this help I don't find it that easy to use since my drawing skills have considerably deteriorated over the years and it will need a lot of practice to obtain even modest results. However someone with drawing skills much better than mine would find it very useful for scaling and relative dimensions.
Fig 1
Wild M20-EB microscope with drawing attachment, click on image for a large version with text overlays.
[Original photograph by David Walker].
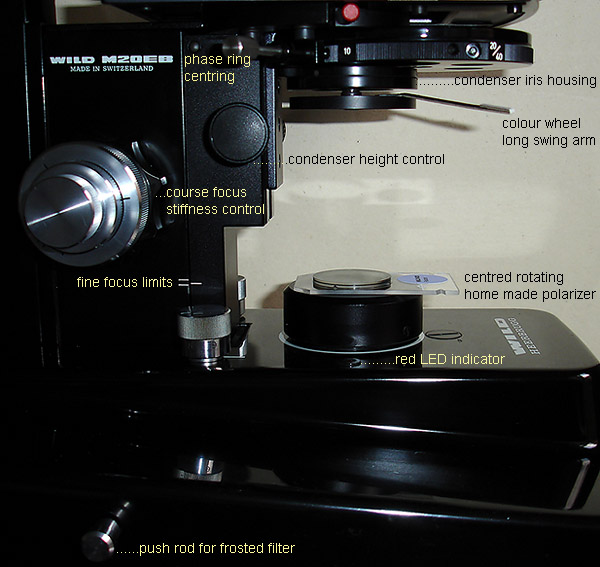
Fig 2
Wild M20-EB, some details of home made accessories and main microscope components.
General comments found in use.
The illumination is adequate using the phase condenser which has no flip top lens to improve its versatility, there is a slightly brighter centre to the image in brightfield using the 10x objective which would be easily picked up on a digicam, the 4x objective needs a frosted filter placed beneath the condenser to achieve full illumination of the field in brightfield whilst the 40x objective can run with the base frosted filter removed to improve brightness and can therefore run in true Koehler illumination. The condenser is marked NA 0.90 but I find it is only just adequate when using the 40x NA 0.75 objective with the condenser iris set to 80% of its full numerical aperture. All the objectives provide crisp bright images but the 10x NA 0.45 although suggesting a marked improvement over a 10x NA 0.25 achromat is not always that obvious with say botanical sections but it does provide highly detailed images when using it in its native phase mode with typical pond specimens. The 20x NA 0.60 gives superb results in brightfield or phase contrast and the 40x NA 0.75 is certainly an improvement over the 40x NA 0.65 Zeiss infinity on the Axiostar. A pleasure to use are most of the controls which work with watchlike precision, especially the beautifully engraved coarse and fine focus controls; if you find a stand that has not been abused and serviced regularly through its life [preferably not stored for any length of time] the controls work extremely well. The only part I have cleaned and relubricated is the 'Y' motion on the stage which was stiff, otherwise a gentle clean with a damp cloth is all the maintenance I have carried out. Dismantling the stage allowed me to look at the plastic gears used in part of the mechanism and I was relieved to see they look 'as new' with no damage to the teeth or cracking. In overall materials little has changed from the M20 to M20-EB although may be a little cost cutting changing the knurled metal controls for condenser height to ones made from plastic.
The base.
Here is where the main differences lie between the M20 and M20-EB, Wild made the centreable 6 Volt 20 Watt halogen light source an integral part of the base [although the lamp housing can easily be removed for replacement of the lamp or other servicing]. This compares to the M20 with its removable tubular filament lamp housing protruding from the side of the microscope. The base is substantially heavier and larger than the M20 giving the stand great stability and also has ergonomic hand support aided by a sloping base design...a fore-runner to the later Leica microscopes.
Click the images Fig 2 to Fig 8 below to see larger versions with text overlays.
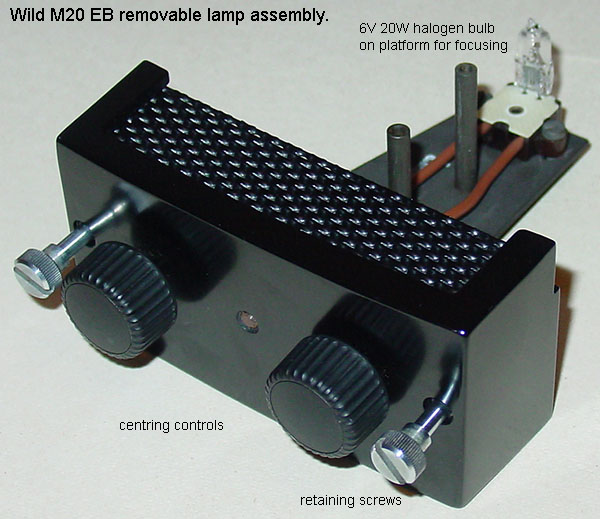
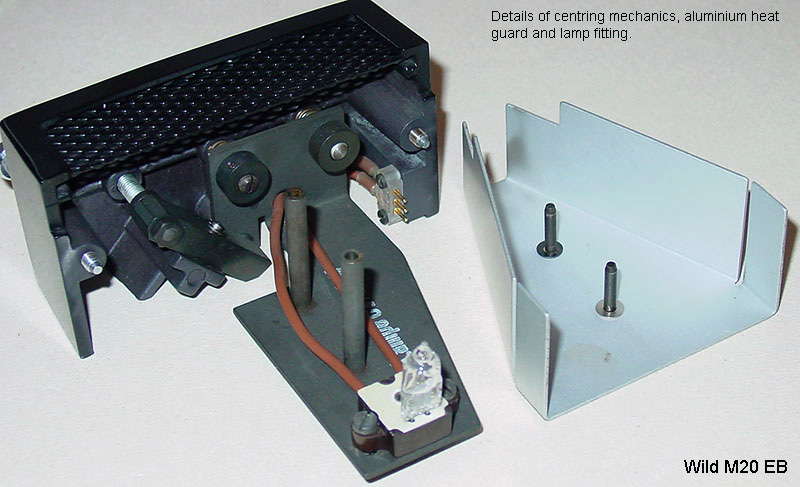
Fig 3 and Fig 4
Shown in Fig 3, the centring controls for the lamp, whilst Fig 4 shows the mechanics of the arrangement and heat shield.
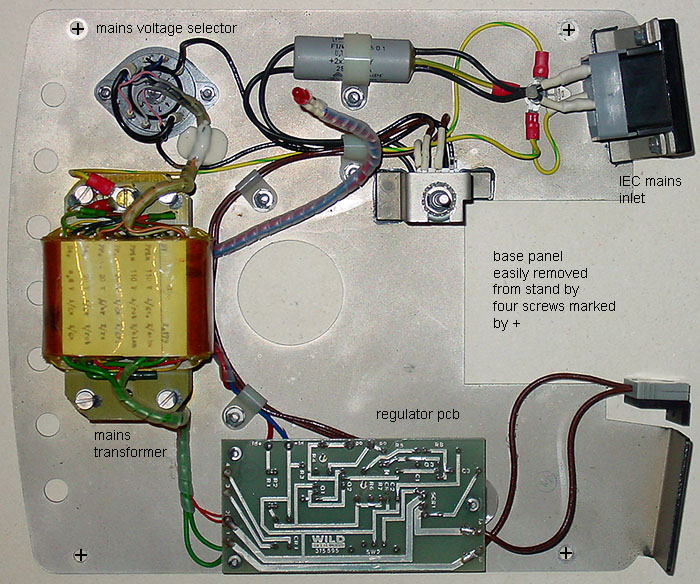
Fig 5
Electrical parts of the Wild M20-EB connected to the base panel showing all the major components, four screws allow removal from the stand.
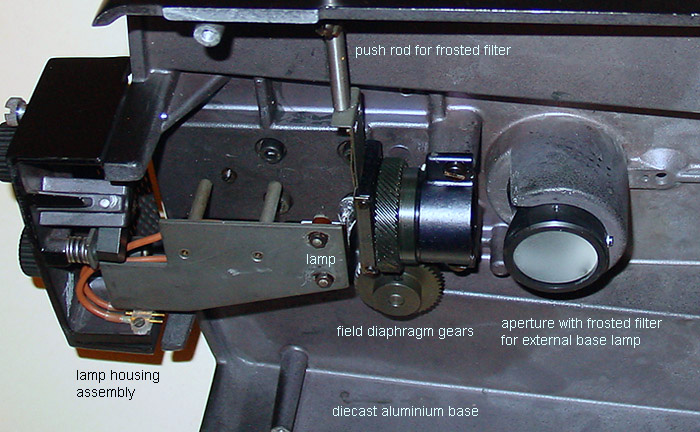
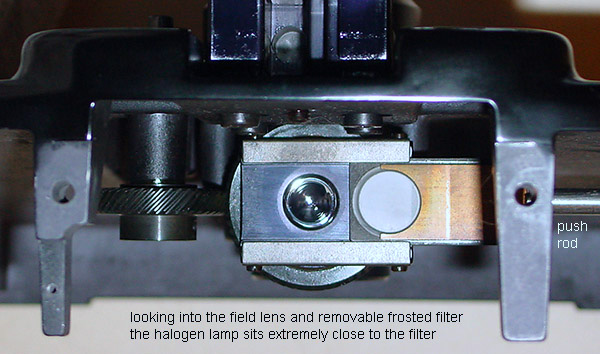
Fig 6 and Fig 7
Fig 6 shows the lamp housing in situ screwed to the base by large aluminium 'finger' screws and Fig 7 is looking into the halogen lamp lens and frosted filter on a push rod, presently pulled out. Focus of the filament is achieved by small adjustments on the bulb platform which is held by two screws to the main lamp housing assembly, when adjusted for correct focus the lamp sits very close to the frosted filter. The focus and centring of the filament can be adjusted by reducing illumination, stopping down the field iris to minimum and observing a piece of paper placed beneath the filter tray, the focusing is not easy to achieve accurately requiring an external variable power supply connected to the relevant terminals on the lamp housing by 'flying leads' and crocodile clips since its own illumination electrics have been removed from the base but I considered this adjustment worthwhile since as found this was not set correctly probably due to a different body design of a replacement halogen lamp. A slower alternative is in the assembled mode, removing and replacing the lamp assembly a number of times and adjusting the focus of the lamp until correct.
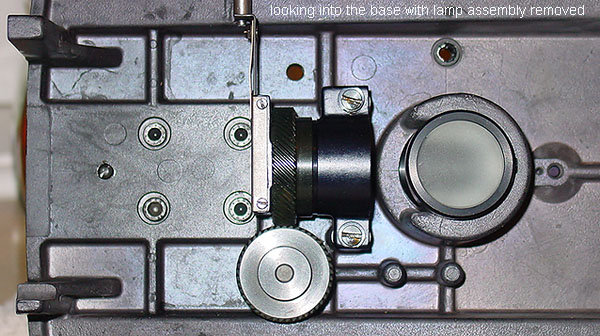
Fig 8
With the lamp housing and base panel holding the electrics removed shown in Fig 8 only the gears for the field iris, push rod frosted filter, lens for the halogen lamp and auxiliary base illumination frosted filter remain, [field iris adjustment is accessed from the top by a knurled metal control], all of the mechanics are substantial and well engineered capable of lasting many years of hard use.
Line up.
I noted one or two problems when I had been using the M20-EB for a short period, the first is the centring insert could not be moved sufficiently on its magnetic mount with one or two of the objectives for the field iris to be centred, I fixed this by centring the lamp and centring insert first and checking each objective in turn, they were not as par central as my Zeiss Axiostar which is near perfect. I traced the problem to a combination of the tiny adjustable limit pin in Fig 9 for the sliding dovetail on the stand for the nosepiece, the fixing screw for this could not be turned so I have left about 0.25mm gap and tightened the quick release lever. The other is the position of the ball bearing assembly shown in Fig 10 which 'click-stops' the nosepiece, further loosening of the two retaining screws [on my stand these were not tight suggesting it was possible the assembly had moved] allows alignment to be carried out and I'm talking less than 0.5mm left or right to make a significant impact on alignment. After completion the centring insert requires only a modest movement to keep the field iris centred with all five objectives and the focus either side of optimum on a diatom test slide under different contrast techniques for each objective suggests the alignment is excellent. The phase condenser is held in a fixed position since the holder has no centring screws.
Please note: this is my solution for solving the above problem, there may be more logical and superior alignment methods but without the relevant information from Wild service manuals it suffices for my requirements, no information is given on this matter in my copy of the rather poor multi-language user manual.

Fig 9
Limit pin for the nosepiece, to the left of the pin is a small aluminium disk to butt up to.
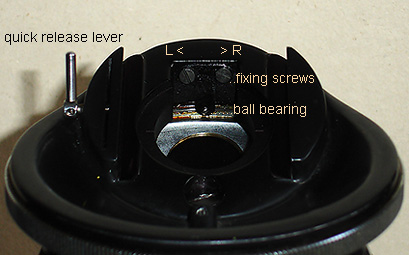
Fig 10
Details of nosepiece 'click-stop' assembly using a ball-bearing.
Home made accessories for the Wild M20-EB.
There is plenty of space between the filter holder beneath the condenser and the centring insert on the base [see Fig 2] allowing various attachments to be made, more importantly there is a gap between the bottom of the condenser iris housing and the filter holder [also see Fig 2] on the phase condenser allowing stacked attachments like a darkfield stop together with colour filters like Rheinberg. One feature I like is the fact that there is a tiny step in the bottom of the filter holder which means a darkfield stop can be centred and placed in the bottom step and not be effected by a colour filter wheel rotating above it running at a slightly larger diameter. I particularly like the Zeiss Axiostar slider system for ease of use for home made attachments but the layout and particular combination of features make the Wild M20/M20-EB an excellent microscope to make cheap accessories for. A problem with many designs using the swing-in filter tray is that manufacturers don't leave sufficient gap between the condenser iris and filter tray making adjustments to home made accessories almost impossible, the worst case are designs having the filter tray absolutely flush with the bottom of the condenser iris housing.
It has been a pleasure building some home made accessories for the M20-EB since they are so easy to make and work very well, I include some pictures below.
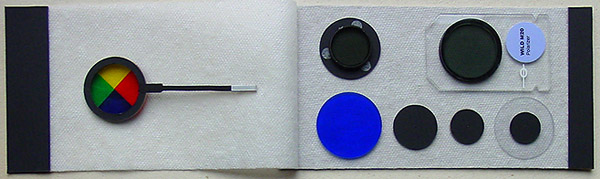
Fig 11
Some simple accessories for the Wild M20-EB, including darkfield stops for 4x-40x objectives, polarizer-analyzer, frosted blue filter for the 4x objective and rotatable colour filter wheel.
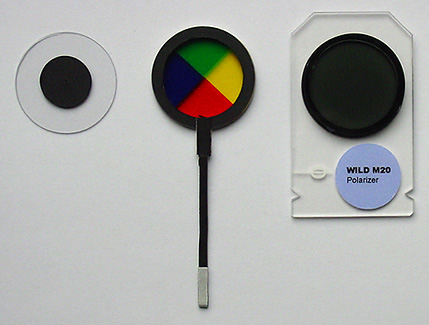
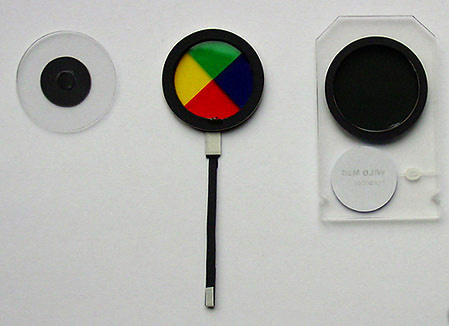
Fig 12 and Fig 13
Fig 12 shows close-up top views of a darkfield stop, colour filter wheel and polarizer, Fig 13 the underneath.
Darkfield stops.
Wild provide information in their darkfield equipment brochure giving sizes for their ready made stops so I used this as a basis for my home made ones. These are made from thin card cut with a circular cutter with a plastic centring piece stuck on the underside. This is made from thin plastic punched out from a standard hole punch, it also covers the tiny hole left by the point of the circular cutter, the benefit of this is that one accurately made acetate base can take all three stops. If built well the stops 'snap' into position in the hole cut by a drill into the acetate base, you can just see the small plastic centring piece in Fig 13 above.
Darkfield stop size recommended by Wild are 15mm, 18mm, 23mm and 26mm, no specific objectives are given to match sizes but I have found that the 15mm works with 4x NA 0.1 and 10x NA 0.45, 18mm works with the 20x NA 0.60 and the 23mm, 40x NA 0.75, the 26mm has not been used. All the stops are being used with the NA 0.90 phase condenser and nominal height adjustment to the condenser is required for each darkfield stop to facilitate optimum illumination.
Colour filters.
I discussed making colour filters recently in another article [see references]. I have added a long arm to the standard design colour wheel so I can adjust the relative colour angles whilst viewing in darkfield or polarization. Some excellent effects have been achieved and because I have added a polished piece of tape to the underside near the ring edge seen in Fig 13 the colour wheel turns very smoothly in the filter holder. What cannot be seen though is another layer of card added to the underside of the long arm forming a step where the polished tape finishes this accurately centres the colour wheel whilst turning in the filter holder and prevents jumping. I have shown one design for a colour wheel but any design is possible including of course the designs based on the classic Rheinberg principle enhanced with more complex colours to make the most of rotation. The white tape at the end of the arm is intentional since everything is black on the M20-EB the white patch stands out and I know whereabouts the arm is located. The colour wheel cannot be turned completely through 360 degrees because of the microscope limb, about 270 degrees is achievable. Superb darkfield plus colour wheel and crossed [or semi-crossed] polars plus colour wheel effects can be achieved and due to Wild providing a tiny step in the filter holder the thin acetate darkfield carrier remains stationary as the slightly larger diameter colour filter wheel turns, of course with crossed-polars the polarizer is on the base. An added bonus of having an arm attached is the ease of use of inserting and removing the filter from the holder without fingers touching colour acetates as possible with just a disk.
Some very satisfying visual effects with the 10x and 20x objectives can be seen with darkfield and a colour wheel, even with very simple subjects like the spicules of a sponge, the effect is quite beautiful as two different colours pick up on each side of the spicule these varying with intensity and colours as the wheel is rotated, a similar effect can be seen with larger diatoms and radiolaria preparations.
Polarization filters.
Modifying one of my home made Zeiss Axiostar Perspex sliders works well with the Wild M20-EB. The addition of a card ring to accurately fit the filter holder on the centring insert allows smooth rotation by hand without the slider falling or jumping off the centring insert cut-out. The black ring that centres the polarizer attachment can be seen in Fig 13 above. A Letraset white line through a circle shown in Fig 11 reminds me of the polarization angle setup on the attachment.
The analyzer fits into the 32mm diameter well provided by Wild in the nosepiece for this purpose.
References, Acknowledgements and Links.
Paul James Micscape article on the Wild M20
One of my previous articles, making colour filters for microscopes Colour Magic
Thanks go to Mike Samworth for providing me with an excellent range of useful information on the standard Wild M20 and its accessories.
Thanks also to Jay Stanley for his excellent website dedicated to the Wild M20 and where he has compiled a wide range of resources including the Operating Instructions for the Wild M20-EB.
Yahoo Wild M20 group - a forum where owners and enthusiasts can share tips and queries. The photo database is valuable for identifying parts owned or sought after.
Conclusion.
The Wild M20-EB is a beautifully crafted microscope finished in heavy duty black paint with a highly polished chrome finish to the calibrated controls, these work with great precision, also being 160mm tube length it can accept a wide range of objectives if required and it is a pleasure to use with an open design allowing accessories to be attached with ease and is ultra-stable in operation thanks to the heavy base. All in all a great design.
the end.
Comments to the author, Ian Walker, are welcomed.
Published in the December 2005 edition of Micscape.
Please report any Web problems or offer general comments to the Micscape Editor .
Micscape is the on-line monthly magazine of the Microscopy UK web site at Microscopy-UK
© Onview.net Ltd, Microscopy-UK, and all contributors 1995
onwards. All rights reserved.
Main site is
at www.microscopy-uk.org.uk
with full mirror
at www.microscopy-uk.net
.