Making your own squash slides @ home
by Yvan Lindekens, Belgium
There have been some articles in Micscape on mitosis in plant tissues.
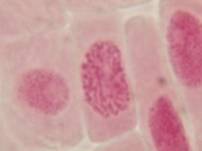
This attractive phenomenon is usually demonstrated in sections of onion root tips or root tips from other members of the Lilliaceae as in the pictures below:
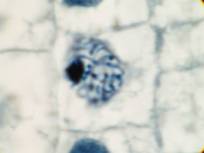
Garlic root tip, homemade slide. Duboscq-Brasil, paraffin section 5 µm, Heidenhain’s iron haematoxylin.
Zeiss Jena apochromat 90/1,30, projektiv PK 6,3x, dSLR Olympus E300
Paraffin sections of root tips are not that difficult to make but you need equipment, chemicals and some spare time to do so.
I’m currently working on an illustrated step-by-step guide to make paraffin sections at home. In the meanwhile I would like to suggest studying mitosis and meiosis in plant tissues using squash slides.
The squash technique is rather straightforward and you only need a few unproblematic chemicals. Your slides will be ready in about an hour. It’s possible to make those slides permanent.
There are some disadvantages too: poor fixation of cytoplasmatic structures apart from nuclei and chromosomes, the relation between cells is lost, making permanent slides is more difficult than in other methods (e.g. sections), the acids used are dangerous: you need a hood or you should make your slides outside. By the way: you should look up the MSDS sheets of the chemicals involved and act according to the safety instructions!
This is a more sophisticated method than the classical “put a root tip on a slide and boil it gently in acetocarmine for a few minutes, squash and observe”. In my experience that’s a very fast but crude technique, often giving rather poor results.
I. Making the slides
You need a specimen (I have used garlic and shallot root tips to make the pictures), clean slides and coverslips, some dissecting materials (razor blade or scalpel, dissecting needles, pair of fine tweezers…) and some chemicals. You should find most of them in pharmacies (all chemicals mentioned here), paint factories (all chemicals mentioned here) or dry cleaners (they use high quality ethyl alcohol to remove certain stains, chlorophyll, for example).
The specimen
Just put a few garlic toes, an onion or shallot in some water to let them root. The roots will appear in a few days. It’s as simple as that.
Every fast growing plant part can be used to make slides from.
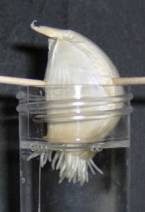
Garlic toe after a few days in water at room temperature
The chemicals
Ethyl alcohol 90-95%
You don’t need the highest degree of purity for this kind of work. Ethyl alcohol sold by pharmacists for disinfecting purposes, containing a few percents of diethyl ether, methylethylketone or acetone to make it undrinkable, thus avoiding high taxes, is entirely satisfactory. Or try dry cleaners, they use this kind of ethyl alcohol too as indicated above.
Keep away from “technical” or “crude” ethyl alcohol containing methyl alcohol, pyridine and the like. Those mixtures, sold in DIY shops, are generally speaking unusable for microtechnique! By the way: methyl alcohol and pyridine are severe poisons!
Acetic acid glacial
It’s still possible around here to order acetic acid glacial “pro photo” through the pharmacist. In classical black and white photography diluted acetic acid is used as a “stop bath” between developing and fixation of both B&W films and prints. Paint factories use lots of glacial acetic acid.
Hydrochloric acid 25 – 30%
Technical hydrochloric acid, about 25-30%, as it’s sold in DIY shops is entirely satisfactory for this application.
Carmine
Carmine is together with Haematoxylin one of those few natural dyes that really can’t be missed in micro technique. It’s still used by pharmacists to add color to some medicines, e.g. syrups. It’s rather expensive but you only need a few grams of it. Perhaps your pharmacist can order it for you if he doesn’t have it. Ask for carmine for microscopy or carmine “certified stain”. Its C.I. is 75470. I will start a series of experiments to extract it from raw cochineal in a few days.
Carnoy’s fixative (limited shelf life: prepare just before use)
Ethyl alcohol, about 90%-95% 3 parts by volume
Acetic acid, glacial 1 part by volume
Hydrochloric acid – ethyl alcohol maceration fluid (limited shelf life: prepare just before use)
Ethyl alcohol, about 90%-95% 1-2 parts by volume
Hydrochloric acid about 25%-30% 1 part by volume
Acetic acid rinsing fluid (keeps indefinitely)
Acetic acid, glacial 45 ml
Distilled (or deïnonised) water 55 ml
Acetocarmine (keeps indefinitely)
Acetic acid, glacial 45 ml
Distilled (or deïnonised) water 55 ml
Bring to the boil in a flask or a beaker on a hotplate (do this outside or under a hood!)
Add:
Carmine 0,5 gm – 2gms
Let simmer for a few minutes. Cool down and filter. Filtering will take some time. Keep the filtrate in the dark. Any residue left on the filter paper can be dried and used again to make a new batch of the staining solution. You can also buy acetocarmine ready-made.
Step 1: only use the last few millimeters of the roots to make the slides, cut the last centimeter or so off with a razor blade or a scalpel
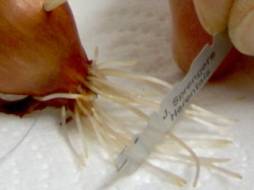
Step 2: fix the root tips in Carnoy’s fixative at room temperature for 10 – 15 minutes
Step 3: bring the root tips without washing from the fixative in the hydrochloric acid – ethyl alcohol mixture at room temperature for 5 – 10 minutes. The time has to be determined by trial. Usually five minutes gives good results
Step 4: rinse in several changes of tap water for at least 15 minutes. Every trace of the maceration fluid has to be removed. Inadequate removal results in poor staining
Step 5: bring the root tips in a test tube in a few ml of acetocarmine or on a slide in a few drops acetocarmine and warm gently above a small flame. A little alcohol burner is ideal for this purpose.
Alternatively, place the tube in a hotwater bath at around 60°C or place the tightly stoppered test tube for about an hour in an incubator at 60°C. Don’t let the staining solution dry out!
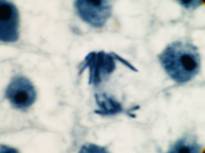
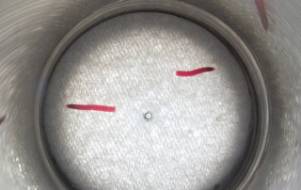
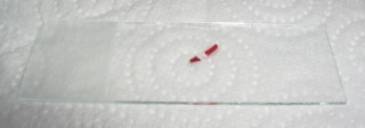
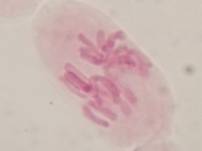
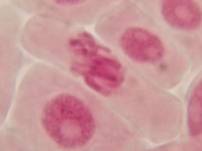
Step 6: rinse the root tip in a few drops of acetic acid 45%. The meristimatic region should be stained a deep brown red, the rest of the root tip a clear red:
Step 7: bring the meristematic part of the root tip on a clean slide in a drop of acetic acid 45%
Step 8: apply a large coverslip, e.g. 24 x 32 mm. Gently move the coverslip to and fro with a dissecting needle. You’ll see that individual cells and small cell clumps are spreading on the slide
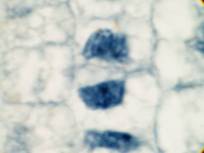
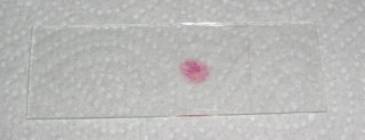
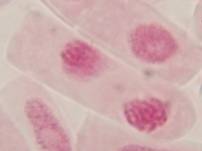
Step 9: put a few layers of toilet paper on the coverslip and press hard with your thumb on it. You shouldn’t move the coverslip sideways! When you do so, the slide is usually lost. The final slide should look something like this:
Step 10: seal the coverslip with nail varnish or vaspar (equal parts (by weight) of paraffin and Vaseline melted together at about 60°C) if you want to keep the slides for a few days.
That’s all. Some results:
II. Making the slides permanent
For these methods you need the usual chemicals to make permanent slides: ethyl alcohol, isopropyl alcohol, xylene or a xylene substitute, Canada Balsam.
Venetian Turpentine used in method IIB is still available from companies selling materials to painters such as Talens or Schmincke.
IIa. The freezing method
Step 1: spread a very thin layer of egg albumen on a clean slide and let dry
Step 2: make the squash slide using this freshly prepared slide (step 1 – step 9, see above)
Step 3: take a frozen freeze pack (the colder the better, the original method uses a block of dry ice or a jet of liquid carbon dioxide) from the deepfreezer and place the slide (coverslip up) on it until it’s thoroughly frozen
Step 4: slip a razor blade under one corner of the coverslip and chip it off. Most cells should be on the slide
Step 5: process slide and coverslip separatly through the following solutions, 5 minutes in each:
Ethylalcohol 90% - 95%
Ethylalcohol 90% - 95%
Isopropyl alcohol
Isopropyl alcohol
Isopropyl alcohol
Xylene or a substitute
Xylene or a substitute
Mount in numount, DePeX or whatever Canada Balsam you have. Use a new coverslip/slide thus giving 2 finished slides.
IIb. The vapor chamber method
Step 1: make the squash slide as in step 1 – step 9, see above
Step 2: Place the slide, coverslip up in a tightly closed jar on some toilet paper soaked in ethyl alcohol 90%- 95%. The atmosphere should be saturated with alcohol vapor but there should be as little alcohol as possible. In any case: the alcohol shouldn’t moisten the upper side of the slide.
A desiccator is perfect for this but if you don’t have one, you can use a tightly closed Tupperware box or something like that. The slide should remain there for about 24 hours
Step 3: run a few drops op isopropyl alcohol absolute under the coverslip
Step 4: apply a few drops of Venetian Turpentine dissolved in isopropyl alcohol (1:1 by volume) to two opposite edges of the coverslip and place the slide in another jar containing some toilet paper soaked in isopropyl alcohol. Leave the slide until the Venetian Turpentine has diffused into the cells under the coverslip.
Step 5: let the slide dry in a warm and dry place.
IIc. Still another method
Step 1: spread a very thin layer of egg albumen on a clean slide and let dry
Step 2: make the squash slide using this freshly prepared slide (step 1 – step 9, see above)
Step 3: bring the slide in a Petri dish, coverslip up in 10% acetic acid until the coverslip is loosened. Carefully chip the coverslip of from the slide and process it separately from the slide.
Step 4: run coverslip and slide through the following solutions, 5 minutes in each:
1 part (volume) ethyl alcohol 90% - 95% + 3 parts (volume) acetic acid 45%
1 part (volume) ethyl alcohol 90% - 95% + 1 part (volume) acetic acid 45%
1 part (volume) isopropyl alcohol absolute + 1 part (volume) glacial acetic acid
3 parts (volume) isopropyl alcohol absolute + 1 part (volume) glacial acetic acid
9 parts (volume) isopropyl alcohol absolute + 1 part (volume) glacial acetic acid
Isopropyl alcohol
Isopropyl alcohol
Xylene or a substitute
Xylene or a substitute
Mount in numount, DePeX or whatever Canada Balsam you have. Use a new coverslip/slide thus giving 2 finished slides.