Much has been written about digital photography and its application to microscopy. It is the purpose here to examine and discuss ideas related to the so called "raw" image formats that can be produced by many digital cameras.
For most non-scientific digital imaging the main goal of the digital photographic process is to produce an image on a computer screen or on a piece of paper that is a reasonable representation of a scene of one sort or another. The goal of scientific digital photography is generally quite differentit is to reveal structures in the best possible way. It is generally superfluous to attempt to process digital images to appear like they do when the microscope is used visually, because the visual impression is NOT "true to life" anyway, especially with biological specimens. Specimens typically are stained and often optical techniques such as phase contrast and the like are applied to them so that the visual impression already is far from being "true to life."
Image Formats
Human eyes are sensitive to electromagnetic energy having wavelengths between about 380 nm and about 800 nm, though the sensitivity is rather low at either end of the range. We have tri colour vision, that is we have separate sensors for the long wavelengths, the middle wavelengths, and the short wavelengths of this rangered, green, and blue respectively. (Other organisms with colour vision may have only bi colour vision. Some birds, however, have penta colour vision.) Producing colour images that approximate what human eyes see thus requires producing three images for each of the human colour sensing systems.
Digital images are made by dividing a scene into an array of several million points and recording light intensity at each of these points, generally at three wavelengths corresponding to each human colour vision sensor. Since computers utilise only binary numbers, these numbers are normally stored in binary format. The number of binary "bits" for each sensor required to store a visually pleasing image is about 8. This gives 2^8 or 256 different light intensities for each colour Since a computer byte is 8 bits, one byte can conveniently store the information for one colour at one point on an image.
Unfortunately an image with several million points (pixels) thus requires several million bytesmegabytes to store. Image formats have been developed that compress digital information. There are an extraordinarily large number of digital image formats. However, only a few make much sense for use with digital photomicrography. Some formats are "loss less" so that information is not lost when the file is created. Others are designed to make the information file smaller, and discard significant image information in the process.
The first few bytes of digital image files ordinarily contain a "magic number" that identifies the image file type. Most digital image files are also stored on storage devices with file names with an extension that also reveals to computer users the type of image. It is NOT uncommon, for these file extensions to be incorrect. For this reason, programs that view and manipulate image files almost always utilise the magic number at the beginning of the file instead of the file name to determine how to treat the file.
Commonly used file formats include jpeg, png, tiff, and pnm. Higher quality digital cameras also often produce a "raw" file that is generally specific to a manufacturer or even a specific camera. Some image formats such as the pnm and tiff formats allow images with 16 bits per colour instead of the standard 8.
Raw format files generally are at least 12 bits per colour, so converting these to any 8 bit format loses extremely important information. This information tends to be more important for microscope imaging than general photography!!!!
Jpeg files are compressed, the algorithm that compresses the information loses some digital information. The "quality" can be set when the image is written. Setting this higher results in less information being lost, but also makes a larger file. Jpeg is also an eight bit format.
png is an eight bit format that stores eight bit images without loss of digital information. (Of course converting images with more than 8 bits per colour into this format results in data loss too, but it does not produce imaging artifacts.)
Tiff is an older uncompressed format. Some cameras can produce tiff images, but there seem less and less of these as time passes.
pnm is actually a series of similar image formats, each with different magic numbers. pgm is for grey scale images. The ppm format is most often used for colour images. ppm and pgm can be used for up to 16 bit images. The pnm formats are simple. For ppm each point on the screen is represented by a series of bytes in the order red, green, blue. When ppm formats are used with 8 or less bits per colour images 3 bytes are used for each screen position, with they are used with 9 to 16 bits there are 6 bytes used for each screen position. The pnm images are very large, they are ordinarily used only for a format for digital processing and for storage of archive original image data. (Note that pgm, the grey scale image format, requires only 1/3 as much data storage.)
There are also several image formats available that provide more than 16 bits/colour. These will not be discussed here.
As implied earlier, the human eye seems incapable of differentiating the difference between 8 and 16 bits/colour images. HOWEVER, image processing techniques almost always spread apart intensity differences after image processing has occurred. Thus one can take a 16 bit image, manipulate the image until it reveals all the information that can be gleaned from the file, and then it can be converted to a standard 8 bit file like png or high quality jpeg for display. One should NEVER delete the original full information file for important studies, however!
Image Processing
Image processing involves manipulating the information contained in the original digital image produced by the camera. With most photography the goal of this is to produce an image that most closely approximates the original scene. As explained earlier, with microscope images that goal is generally to produce an image that reveals structures in the best possible manner.
When an 8 bit image is manipulated in this manner, the image can quickly be degraded since any mathematical manipulation of the numbers corresponding to the image is going to limit the number of numbers that are actually used to display the image. Digital cameras normally have sensors that record 12 or 14 bits/colour, that is numerical ranges between 4096 or 16384. The software in the camera normally reduces this to 8 bit256 numerical rangewhen it does its internal and automaticinitial image processing. The camera in doing this destroys a very large portion of the information its sensor originally recorded! Higher quality cameras with "RAW" storage capabilities thus can store the original data to avoid this highly undesirable loss of information.
An highly sensible way to manipulate images from digital cameras with raw mode is to map the original 12 bit or 14 bit image onto a 16 bit framework, and then do the mathematical manipulationdigital image processing on this 16 bit image. After all the mathematical manipulation is complete, this 16 bit image can be mapped back onto an 8 bit format for display.
It should be obvious from this discussion that digital image processing programs need to be able to manipulate 16 bit colour images to produce satisfactory results.
Image Processing Programs
Cameras that permit storage of raw images generally provide programs to manipulate these images. One approach to producing good digital images of microscope subjects is to use the camera utilities, generally Windows programs, first, and then "touch up" these images with other programs that work only in 8 bit mode.
More total control over the process, however, can be obtained by other methods. There is a C source code program called dcraw that is available free that is generally kept very much up to date and that is capable of converting almost all camera's raw images into the standard ppm format. It will produce by 8 bit and 16 bit ppm, the later is certainly the only useful one here. (This source code is easy to compile with about any C compiler for about any operating system.)
There are several programs available for manipulating digital images. The full version of the most famous commercial image processing program costs substantially more than a rather high quality computer at this point. It is so expensive, in fact, that one can purchase both a new computer AND a new fairly high quality digital single lens reflex with the money it costs! It is has great capabilities for its great price, however. There are many alternatives to it, the ones discussed here are a sampling, and all of them are free.
The GNU Image Manipulation Program, gimp, is one of the Free Software Foundation programs. It is available for Unix type operating systems, and now there is also a Windows version. Many people have the (highly incorrect) idea that free software is automatically poor software. It is very often BETTER than high priced commercial software, especially when the program has been in use for some time, as its open source nature permits users with computer ability to fix its "bugs" and submit corrections to the people who maintain the program. Gimp is fairly bug free at this point, its leading problem is that it only handles 8 bit images, and thus at this point it is rather worthless for many microscope imaging processing situations. (Gimp developers are presently engaged in converting it to operate on 16 bit images.)
The GNU software licence tends to lead to "forks" of programs which build on old programs to take the software into different realms than the original program did. There is a fork of gimp called "CinePaint" which does this. It has the ability to handle formats with greater than 8 bits per colour, and does this well. (Note though, that it lacks many of the advanced features of gimp.) The maintainers of CinePaint tend to keep it in a constant dynamic growing state rather than release periodic versions of the program. This fact has often tended to keep the compiled versions of the program out of Linux and BSD software repositories. It requires an enormous number of dynamic link libraries, so is thus very difficult to compile from source. The good news is that the CinePaint web site has scripts to build the program from source on Ubuntu systems. Its ability to manipulate 16 bit colour makes this program is extremely useful for manipulating digital microscope images. There have been Windows versions of the program too, but at present the Cinepaint web site describes it as "broken." This program, in spite of the difficulties getting it set up and running is excellent for manipulating 16 bit microscope images obtained from raw files.
The ImageMagick package is available for Unix type operating systems. It provides rudimentary image adjusting facilities with its display program, but it is most useful for resizing and image format conversion. Its great advantage is the large number of formats that it handles. It DOES, however, handle 16 bit images with ease. One can use it to get roughly the result desired and then transfer this to the 8 bit gimp for final "polishing."
Netpbm is an extraordinary collection of command line programs for manipulating pnm images and for converting other formats to and from these formats. It is available as Unix source code, and is usually in free software repositories like the one provided by Ubuntu. However, it is strictly command line, and one can not see the results until after the programs have modified them.
Some Special Considerations:
General Image Adjustment
Commercial image manipulation programs and programs like gimp and CinePaint, generally have the ability to "drag and drop" curves for overall brightness, red brightness, green brightness, and blue brightness. (With CinePaint go to Image->Colours->Curves.) Using this type of utility can often dramatically improve images.
Images of Stained Biological Specimens
Images of stained specimens are quite often fairly satisfactory without digital manipulation. They tend to require less correction than many other types of images, so utilising 16 bit colour more often than not absolutely necessary. Still, however, contrast and colour balance may need modification so using the raw format and keeping the extra digital information can make good images much better. Remember having 16 bit colour never is bad!
Most people seem to hate the idea of monochrome images. However, one must realise that a colour image is really THREE images, and it is possible to separate colour images into three separate monochrome ones each of which covers a different wavelength range. Very often structures are more distinct on these individual monochrome images. Gimp and other programs are capable of splitting an image into three images in this manner. I do this so often, however, that I wrote a C program that converts colour ppm images into three separate pgm monochrome images, because this is much faster than going through all the menus of programs. These individual monochrome images can be modified as desired to enhance the visibility of structures.
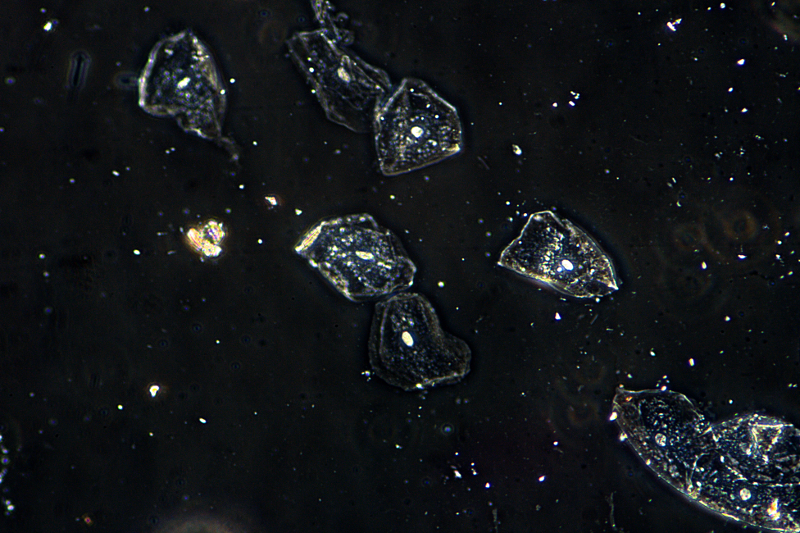
Biological Bright Contrast Phase Images
Biologists, for reasons that are difficult to understand, tend to under use bright contrast phase contrast. Bright contrast phase images are produced by enhancing image contrast by using constructive interference to produce the contrast rather than destructive, so that the light wave fronts are added rather than subtracted. In an extreme atrocity of misnaming something this is, absurdly, often called "Negative contrast!" The visual result of this is an uniform dark grey background with dramatic bright structural detail along phase boundaries.
Digital images using bright contrast phase can often reveal much more detail and by subtracting the intensity of the uniform grey background from the original image to make it near black. CinePaint can handle this very well. (Go to Image->Colours->Levels and adjust the slider under the graph until a good image is obtained.) When CinePaint has produced the desired image, one can save the program as a png image (or less desirably, as a jpeg image.)
It is also fairly easy to write C programs to do this.
The image shown below of cheek epithelial cells was produced using dcraw and Cinepaint as described above.
Biological Dark Contrast Phase Images and Dark Field Images
These images often benefit from spreading out the range of light intensities using programs like CinePaint. They may require colour balance adjustment. Because the phase effect is strongest in the green, it is often desirable to take the green component image as described above and use it only.
Images from Stereomicroscopes
When images are obtained through stereo microscopes, regardless of type of subject, it is generally desirable that the digital images resemble the visual impression, because here the object observed really DOES represent the actual appearance of the subject! Still, however, every effort needs to be made to have the image reveal details of the image as well as possible.
Here conventional adjustment of colour balance and contrast generally leads to the best images. However, it is STILL desirable to use 16 bit images from RAW camera modes to do this.
The Imaging Process!
The quality of the final image is highly dependent on the quality of the equipment used for obtaining the original image, and the care that was taken in doing this! As described earlier, having a camera with RAW mode, is highly desirable. Digital single lens reflex cameras, (DSLRs), generally have a RAW mode. They seem also to provide the best possible optical system as well when they are used with a special photo oculars with direct ocular projection onto the image plane. Because the sensors used on DSLR cameras are smaller than the sensitive surface of 35mm film, lower power photo oculars are needed. The ideal power seems to be around 2X to 3X. Locating 2X and 3X photo oculars can be a difficult thing, ones produced by Olympus seem to be most commonly available. Most DSLR cameras have manual mode. It is generally best to set exposure manually and do so by trial and error rather than use the metering system that the cameras provide. Many DSLR cameras have a remote shutter release system. It is also best to utilise this to avoid shaking the microscope and camera to avoid blur.
Proper exposure is extremely important. The brightest parts of the image must not be so bright as to have the photo sensitive device attempt to map a number onto a point greater than the maximum permitted by the image format! When this happens over more than tiny areas of an image the image is severely degraded. Thus overexposure is far worse for digital photography than for old fashioned silver halide photography! By the same token, under exposure leads to many points being recorded as 0 intensityand the image will again be seriously degraded.
Tungsten filament bulbs are VERY rich in infrared and red light and provide little blue. When they are used for both digital photography the red sensors tend to be overexposed whilst the blue ones tend to be underexposed. Image processing can partly correct this, but, it is impossible to provide digital information that was not collected during the exposure! In a worst case scenario it may be necessary to convert the image to grey scale to make it satisfactory. The solution is always to use a blue filter in the light path or convert the microscope to white light emitting diodes!
All comments to the authors via Robert Pavlis are welcomed.
Microscopy UK Front Page
Micscape Magazine
Article Library
Published in the December 2009 edition of Micscape Magazine.
Please report any Web problems or offer general comments to the Micscape Editor.
Micscape is the on-line monthly magazine of the Microscopy UK website at Microscopy-UK
© Onview.net Ltd, Microscopy-UK, and all contributors 1995 onwards. All rights reserved. Main site is at www.microscopy-uk.org.uk with full mirror at www.microscopy-uk.net .