 |
 |
Getting CLOSER in Macro Mode with Digicams
A brief insight into the use of supplementary lenses
By Paul James, UK
| The following information is based on experience derived from traditional photography over the years, and although the principles involved are much the same for digicam photography, I recognise the fact that some of the ideas described and illustrated below may not be in accord with proper optical procedures and practice. Amateur status knows no bounds nor limitations ! |
Most digicams have
some form of macro facility, but cameras of fixed focal lengths
produce results which can be disappointing, because their lenses
tend to be in the 'wide angle' region yielding smaller images
than expected.
If you have such a camera and would like to get nearer the subject, you can do so by using external supplementary lenses. In principle it is very simple, and requires a positive lens of about 5" to 1" focal length or so, to be placed between the subject and camera lens. You can experiment with anything from an uncorrected magnifying glass, elements from old camera lenses and eyepieces etc. If like me you have an assortment of similar lenses in 'stock' accumulated over the years, you shouldn't take long finding something suitable.
|
|
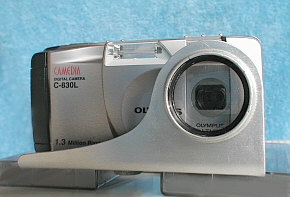
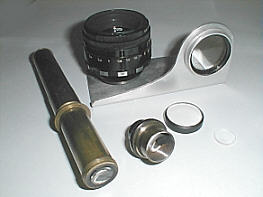
Here's a 'self portait' ( mirror ) of my Olympus 830L sporting the opera glass objective mounted in an L-shaped alloy holder, which can be used easily by hand or on tripod. Also shown is the group of lenses used to take the Gallery photo's below.
Supplementary Lenses
These have been in use for many years in standard cinematic and stills photography, and have similar advantages for the digicam.
The ideal supplementary lens would be achromatic, coated and physically wide enough to cover the lens of the camera with a good margin, and in so doing enable all the imaging light to fall through onto the CCD for complete coverage. Object lenses from old binoculars, opera glasses and the like are very suitable. I have used large single element lenses such as a magnifying glass with success, and only the extreme corners of the image are noticably colour fringed, although not always so. This hardly matters anyway since most subjects will be self contained such as flower heads etc.
With auto-focus and an LCD viewing screen the job becomes very straightforward and soon brings dividends. However a couple of points are worth mentioning:-
The supplementary lens must be placed as near to the camera lens as is physically possible in order to achieve maximum field coverage, and reduce distortion and chromatic errors, especially when using single elements. If you try 35mm camera lenses, you'll find the standard 50mm down to the 28mm wide angle useful, but much depends on your digicam and how far recessed its lens is in the camera. When using such auxiliary lenses expect vignetting at the corners or even totally circular fields. You might find these camera or enlarging lenses almost too long to fit between the subject and digicam !
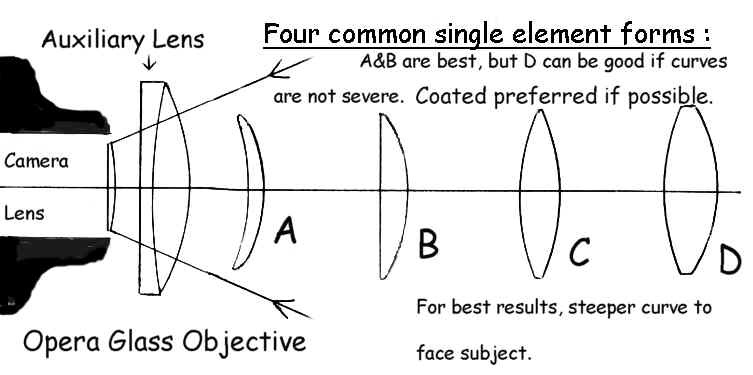 |
For best results all optics should be square and central to the optical axis of the digicam.
Initially I tried a few combinations by hand, taking great care with the optics, and found quite quickly the best two or three combinations for my purposes.
Mounting Supplementary lenses
Mounting lenses in front of the camera presents few problems for fixed focal length digicams. The L-shaped alloy plate idea shown above can house nearly all simple types. Smaller lenses must be attached closer to the cameras lens, so individual 'tailoring' applies here. Much depends on the size , shape of the lens, and owner's camera type. I prefer to use perforated double sided sticky tape for the very smallest lenses, the alloy plate mount for larger types, and use the largest lens I have freehand so I can make use of it speedily when required on my walks.
Those who possess cameras with zooms may have a problem with the motion of the lens barrel, but I suspect a single element auxiliary attached to the front of the lens barrel would do all that is required.
If you have not discovered this method of improving your macro performance, I'm certain that once you have found a suitable lens to 'play' with, your hard disk will soon fill with images from the fascinating extention into the macro world.
The following images were taken using :-
1) An achromatic opera glass objective of 4-5" focal length (fl.).
2) A single element bi-convex lens of 2" focal length, coated.
3) A single element bi-convex lens of about 1" focal length, coated and was the rear element from an old 50mm enlarging lens! This particular one was small enough to fit precisely over the camera lens housing. With this lens I get the biggest degree of image scale for a single element, at a working distance of about 2-2.5cm, and as yet I'm still hunting for a shorter fl. lens !
4) A Meopta orthoscopic eyepiece (10X). This is stretching the imagination a little, but it works very well and produces acceptable results!
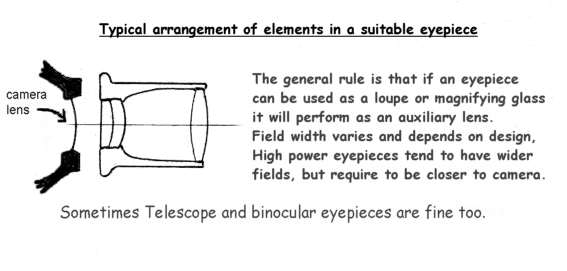 |
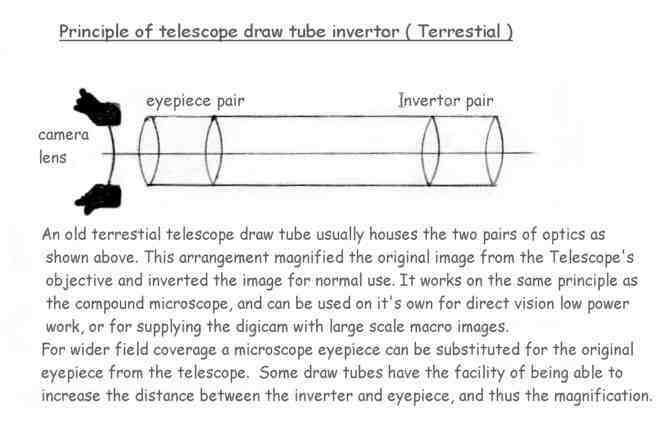
5) An old draw tube telescope eyepiece and invertor combination. This traditionally acts as a low-medium power magnifying combination of the telescope's image from the main objective. Makes a handy and portable 'field' microscope although never designed as such. With this I obtained the largest image scales, all without recourse to using the microscope proper.
 |
Gallery
The following images are offered as simple examples of what can be done without spending any money on supplementary lenses.
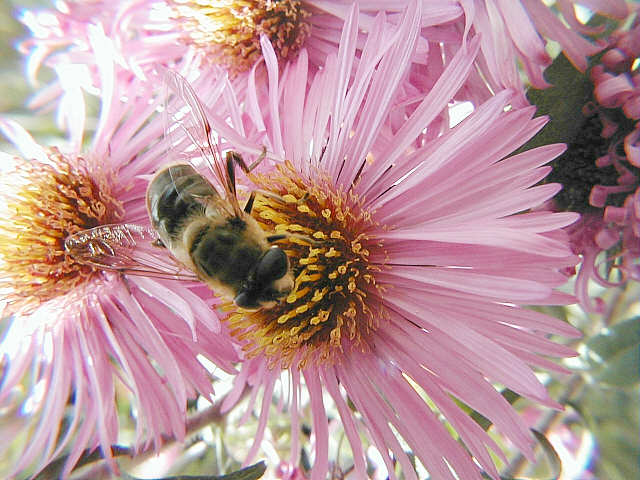 |
This 'visitor' on the Michaelmas daisy was caught with the 2" coated single element lens, during a sunny but frustratingly windy day. Notice fall off and colour fringes at edges, which would not be so apparent had I been able to position this lens closer to the camera body.
 |
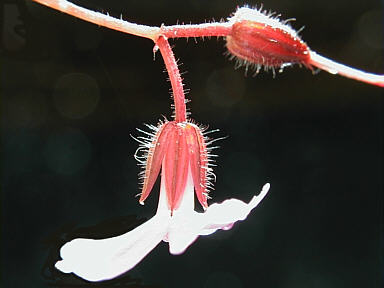 |
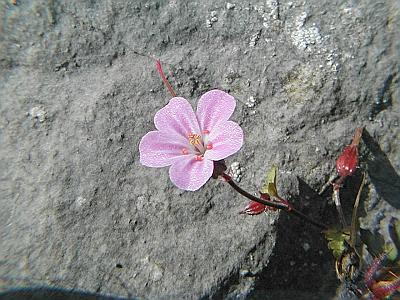
Herb Robert was taken with the coated 2", and on the right is the same flower's sepal hairs shown up against dark backdrop using 1" lens, which incidentally fits directly over the camera's tiny lens barrel as if it were made for this job !
 |
 |
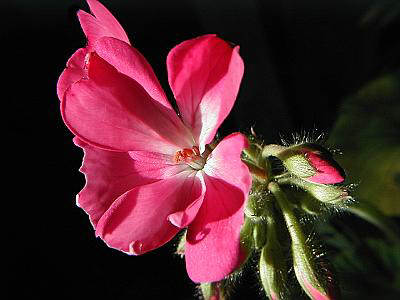
Here the 2" coated lens was used again, notice some blue bordering on left hand margin of a geranium petal. With the old objective only a little barrel distortion is present due in main to the exaggerated perspective of being close up.
 |
 |
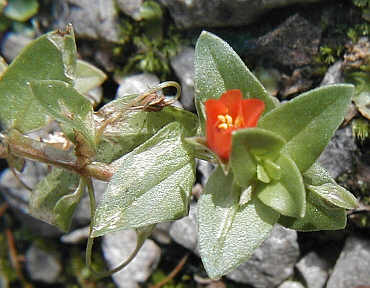
Scarlet pimpernel shot with 2" coated . A standard 50mm camera lens was used for the shot right, showing the restricted field of many complexly housed camera lenses.
 |
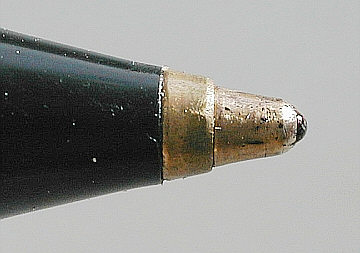 |
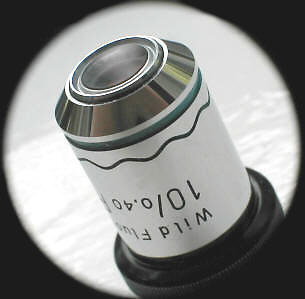
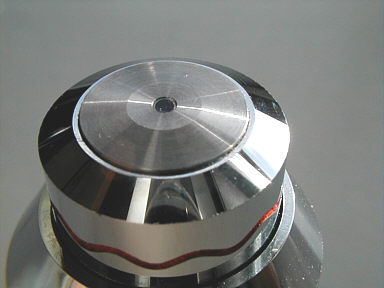
The oil immersion objective taken straight with the 1'' fl. lens, as was the biro tip on right too, but this image has been cropped from the resized 1280 by 960 image, and therefore gives a better realisation of the magnification factor of these images as they might be seen on your monitor 'unsized.'
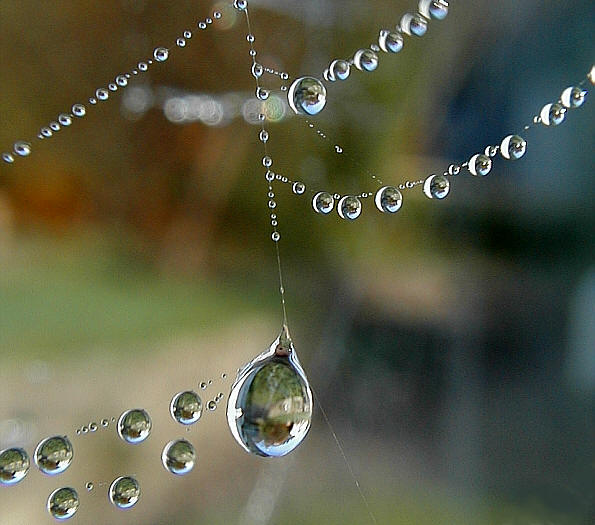 |
First autumn damp morning produced a maze of tiny dew drops on spiders webs. Caught here with 1" lens just about 1/2" from the web. Notice top right row of droplets trembling in delicate breezes.
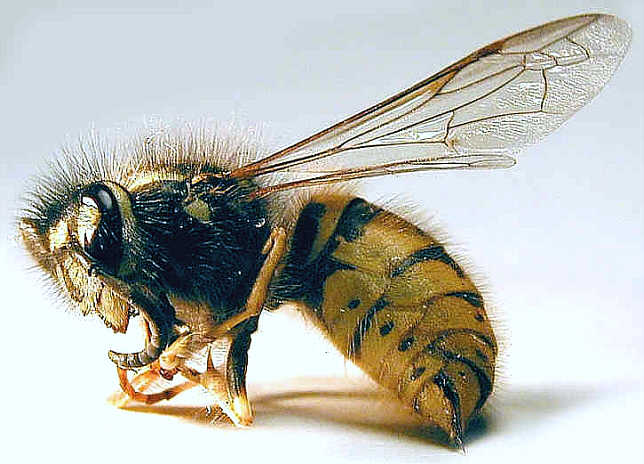 |
This view of a dead wasp was taken through a standard Meopta orthoscopic eyepiece! The field lens facing the subject.This eyepiece, unlike a Huygen is a positive one and clearly demonstrates the ability to produce a reasonable image from a camera and eyepiece never designed to be used in combination ! Cropped from 1280 by 960 file.
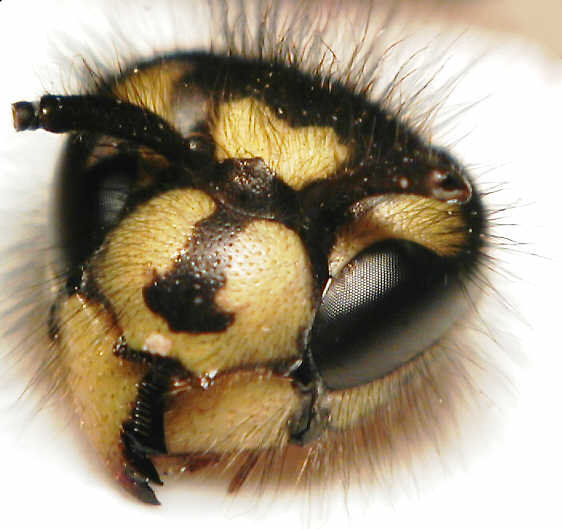 |
This close up of a wasp's head was taken using an old brass telescope's eyepiece and inverter (terrestial), the latter towards the subject. Although not in the same class as with the equivalent power on a low power stereo binocular, it nevertheless reveals some detail. The wasp's head covers only 1/3rd of the CCD array, the rest was vignetted by the field stop of the eyepiece and was resized to 1027 by 780 pixels and then cropped.
My experiments are based on the one camera, the Olympus 830L which has no zoom, and its lens moves during focusing within the outer housing, so eliminating any contact problems and potential damage to any external supplementary lenses.
If you have not tried this method as yet, and have a lens in your digicam that protrudes and therefore moves either when focusing or zooming you'll have to be careful not to harm your camera's mechanism or lens etc...
Comments welcomed to Paul James. |
Published in the December 1999 edition of Micscape Magazine.
Please report any Web problems
or offer general comments to the Micscape Editor,
via the contact on current Micscape Index.
Micscape is the on-line monthly
magazine of the Microscopy UK web
site at Microscopy-UK