A rural farmer turned atmospheric
scientist Wilson A. Bentley first photographed snowflakes.
Working alone and with relatively simple equipment he was
able to document a number of atmospheric phenomena including
raindrops, dust and of course snowflakes. Dover Publishing
still has a collection of Bentley's photographs in a book.
There has just been a biography of Wilson published and it is
very good (see the reference at the end of this article).
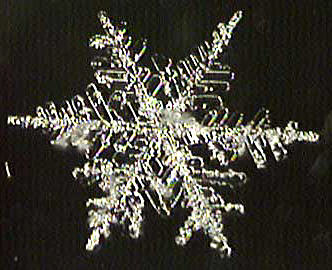
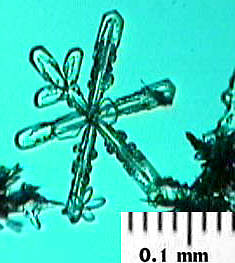
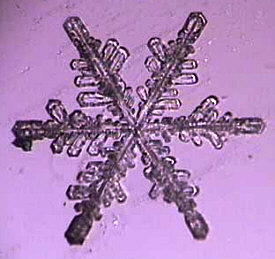
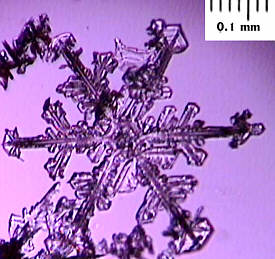
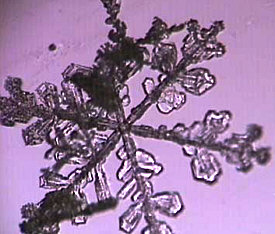
Snowflakes are characterized into ten different types. These
types range from plates, stellars, and columns, to hail. The
most desirable crystals are the plates.
There are a number of ways to record the patterns and size of snowflakes including plastic casts and varnish outlines. (See Micscape Article - Preserving Snowflakes by James Benko). My experiments with these techniques have been less than satisfactory. For the curious reader, the appendix of the 'Peterson's Field Guide To The Atmosphere' covers the procedures for the above mentioned techniques.
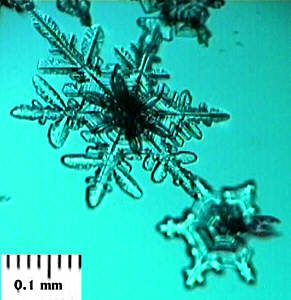
My success is in recording snowflake patterns through the use of photomicrography. Snowflakes range in size from 0.5mm up to 4 mm giants. I first did experiments with snowflakes some 10 years ago. I first started to record snowflake images with a 35mm camera and a set-up to yield 10x magnification on the film. Since I like using polarized light the exposure was never constant. Without going to an expensive focal plane exposure system my results were trial and error at best.
This past year I decided to return to the snowflake problem using some of the more modern equipment at my disposal. I decided to use a video camera with a 0.33 inch CCD and attached a 1x macro lens to the camera. This allowed me to get the correct magnification without the exposure problems that are associated with film. The resolution of the CCD array is only 640 x 480 which is small compared to film resolution. Since the end use of the images would be a computer, the CCD solution would work fine.
I hooked the CCD camera's NTSC cable through a video monitor, then into a Snappy frame grabber that has been set up in time-lapse mode. The frame grabber will automatically record an image from the video camera every 20 seconds. This allows me to go outside and use the video monitor to achieve focus and framing. As long as a good crystal is held in place for 20 seconds, there will be at least one image recorded on the computer in the house. The resulting images are stored in a file and edited at my leisure when my feet have had a chance to warm up. This set-up works quite nicely and I do not have to have the computer out in the cold.
My set-up uses a fiber optic microscope illuminator shining in the vertical plane. A polarizer is placed over the cable's end to supply polarized light for illumination. I use a polarization filter with a built-in phase corrector. The phase corrector allows me to change the color of the background and still get the polarized light effects. Many of the snowflakes are too small to have enough optical thickness to show the color effects usually seen with polarized light and ice. The fiber optic cable also filters out the infrared heat radiation that can melt an ice crystal.
The stage is a sheet of 5mm thick clear plastic kept at a fixed height. A hole is drilled in the plastic just at the focal point of the lens. This aids in both the adjustments of the light source as well as holding markings as to where to find the snowflakes.
Instead of using standard microscope slides, I cut window glass so that it is 100mm by 250mm. These slides are moved by hand on top of the plastic stage.
To start an experiment, six or more of the glass sheets are placed in a sealed plastic bag placed in the freezer. The optical assembly is placed outside (protected from the snow) and allowed to cool to the outside temperature. The glass plates are sealed in a bag to keep them from condensing water vapor when they are taken out of the freezer and transported through the house. This might seem like an odd procedure, but I have found that I get the best results when the glass plate is several degrees below the outside temperature. This is most important when photographing in conditions just a few degrees below freezing. At much lower temperatures keeping the plates in the freezer is not necessary.
Snowflakes are collected by either letting them fall on the glass plates, or by letting them fall on a large sheet of dark fabric. The flakes are lifted off the sheet with an artists paint brush and placed on the large glass slide. The bigger snowflakes are easy to see with the naked eye and can be sorted out for the best shape.
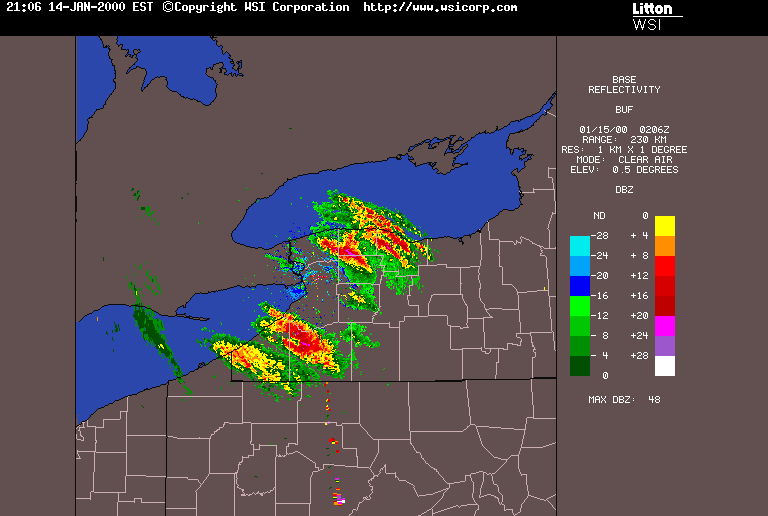
When recording snowflakes, also
record the temperature and weather conditions. This has been
greatly simplified by the use of the Internet to save weather
maps and local condition reports. I like to save the latest
Doppler radar image when I record snowflakes. See below (used
with permission of the weather service)
References:
'The Snowflake Man - A biography
of Wilson A Bentley' by Duncan C. Blanchard.
The McDonald & Woodward Publishing Company. Blacksburg,
Virginia 1998
ISBN 0-939923-71-8
The Peterson Field Guide Series: 'A
Field Guide To The Atmosphere', by
Vincent Schaefer & John Day, ISBN 0-395-33033-5. (See the
appendix sections in this book for experiments and snow
types)
Comments to the author Ed Kinsman welcomed.
Editor's note: a web
site showing some of Bentley's snowflake illustrations, his
articles on photomicrography and background on Bentley is at http://snowflakebentley.com.
Image gallery by the author.
|
|
|
|
|
|