 |
"Tweakings" (Part 1) Aligning the M20's Phase Condenser etc.. Basic notes for those needing assistance By Paul James |
I'm sure every M20 that left Wild's Heerbrugg assembly line many years ago was very well collimated, and if yours isn't now then obviously something is amiss. As with all really high class stands of this period, there were basic centering facilities to enable collimation to be carried during manufacture. These include the binocular head, in part the objective changer, the substage condenser, and within limits the illumination source. The field lens, magnetically captive is designed to ensure a little tweaking of alignment: an insurance of sorts to provide the guilding of the lily. Despite all this, an old example of the M20 will in all likelihood be found wanting of internal optical alignment, even if only the substage condenser's centration, which normally would be the most frequently adjusted user-friendly device on a stand, is on the M20 absent.....though not entirely.
True, there is an adjustable insert housing for the substage condenser which is held captive by 4 screws, but these cannot be accessed whilst most condensers are in situ. The proverbial Catch 22. Neverthless there is some latitude of adjustment when these 4 screws are eased slightly, but the problem of tightening them up after the condenser is trued up on axis is virtually impossible, because the condenser has to be removed before these screws can be nipped tight..........and as you can imagine by the time you have removed the condenser carefully this insert will have moved somewhat. So if you find your example of the Wild M20's condenser askew then in all probability its previous owner attempted to resolve the riddle.
Fundamental Methodology
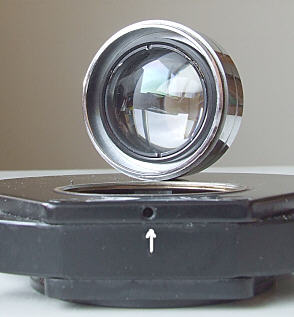
By removing the central optical sleeve from the lower condenser's body we can dispense with the obstructive phase housing, which is the culprit that blocks off the access to the 4 screws around the condenser retaining ring. Removing the chromed optical unit may prove to be a task indeed, since it will have been put on with some force, and then locked with a fine screw thread:-
|
The locking screw is located in the hole as shown above. Its removal requires careful handling of a quality watchmaker's screwdriver as the delicate screw slot might prise open with an unsuitably ground blade and cause a jam-up. Removing the chromed barrel of optics may require considerable force ( normal right hand thread), but its thick tubular housing will stand up to firm handling provided clamping is evenly distributed around the barrel and is protected from marking. The coarse thread is very robust, yet care must be exercised since the chromed unit can become dislocated within 360 degrees of turning, so once you have loosened it take care not to let it slip from your fingers.
The Tools
Since the 4 retaining screws can only be accessed from below and given that there is not a lot of room between the foot and the screw heads, the need for a short screwdriver is unavoidable. Trying to nip up or undo these delicate screw heads with an angled screwdriver will 'chew' up their respective slots, beside which the screws will not be nipped up evenly with the subtle prerequisite force needed. It will pay dividends to either acquire a suitable screwdriver or modifying an existing one to suit the circumstances. A thicker body than usually found with watchmaker's screwdrivers allows a more delicate feel when nipping the screws up.
The aligning processes would be greatly simplified if you own a phase telescope, but it is not entirely necessary, and so I'll get on with the method which works quite well without a phase 'scope.
Starting From Scratch
Assuming you are not even certain that the lamphouse condenser is aligned properly, then go through the following ritual which I find easy and fairly accurate for those not possessing a phase telescope.
Remove the field lens on the stand's base by simply loosening partially the 3 screws around its periphery.....you may have to remove one. Also remove an objective from the turret so we have an unobstructed view from the eyepiece right through to the illumination source. Turn the lamp on and shut down the lamphouse iris diaphragm to minimum. Looking through the eyepiece without the objective, substage condenser and field lens, alter the position of the lamphouse so that its light intensity is greatest. You should also be able to see a narrow dark zone around the circle of light in the eyepiece's field of view if you are using Wild's x10 widefield. This method can achieve fair alignment accuracy.
The next step assumes that your lamphouse is coincident with the optical axis of your 'scope
Centering the condenser housing ring
Loosen the 4 screws that retain the adjustable insert in the substage condenser housing just sufficiently so that the insert can be moved about slightly. Indeed satisfy yourself that there is some intrinsic play available when the screws are loosened a little. The trick is to put just enough bite in each of the screwheads to cause enough friction to hold the ring when the condenser optic is aligned, but not too much to make the process difficult causing 'lumpy' adjustments rather than the smooth lateral movement necessary for accurate centering.
Insert the Abbe optic barrel fully into the slightly free substage insert ring in the substage condenser housing . With the field lens still out of its location focus a x 10 objective onto any slide, then remove the latter. Close down the lamphouse iris so that it enters the field of view and also focus the substage condenser optic so the edge of the field iris can be inspected. The altitude setting of the substage condenser will be a little different from its normal setting but that doesn't matter. The eyepiece will reveal quite a lot of information about the state of your 'scope's optical alignment. By altering the intensity of the light source from low to standard, the ease with which the various circular zones that can be seen within the eyepiece's field can be optimised, and importantly compared with each other for concentricity.
 |
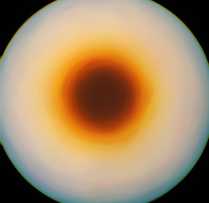
The field you see through the eyepiece should theoretically be similar to that above: ie., it should show the lamphouse iris within the field of view. If not then try adjusting the lateral position of the substage condenser. When you have brought the lamphouse iris into the centre of the field by lateral adjustment of the substage condenser alone, bring the x40 objective into play and optimise the centering of the shutdown lamphouse iris till it resembles that shown above. Now rack the substge condenser optic up and down whilst observing the effect through the eyepiece. If all is well then the expansion of the iris and its halo of colours should display symmetry within the field boundary of the eyepiece. Another indication that all is well stems from the consistency of the colours around the lamphouse iris, which like that one shown above should be a uniform in hue and intensity all around the iris's edge.
Before nipping up the 4 screws for the substage condenser's retaining ring, put the field lens back in position on the base and perform one more simple test: Slide the field lens carefully in a circular motion around its seating and note how the lamphouse iris in the field of view behaves. It should also move around the field in a circular fashion, but importantly its range should be symmetrical about the field's centre, or nearly so. Ideally each objective you perform this simple test with will exhibit some variation from that seen with the x40. This is perfectly normal, and is why I think the x40 should be the one to align the optics with in the first place, since it is more sensitive to slight misalignment than the others. This is why Wild implemented the adjustable field lens so the slight variations of par centricity could be tweaked into truth. Once you align your 'scope accurately, the field lens is a sort of icing on the cake........its a nice refinement!
Having established some semblance of success you can nip the 4 screws beneath the stage tightish, and put the substage condenser back together again.
 |
 |
Another final revelation of accurate alignment can be demonstrated with the phase condenser set with the x10 or x20 annulus in place and viewing through the x 40 non phase objective as if performing phase contrast observation. Notice the central shadows thrown into the field centre when the substage condenser is raised and lowered above and below its ideal phase position with a closed down lamphouse iris. You might have to tweak the annulus mechanically into dead centre, but the overal views of soft shadows and colours should be concentric like those shown above. This is a critical test of your efforts so far.
Strictly speaking these methods above rely on the presence of symmetry in a properly collimated microscope, both in geometrical terms and also of tones and or colours too. Fortunately the keen observer soon picks up on this, and subconsciously applies the principals during general microscopy when changing illumination methods.
Next month's article takes a broader look at aligning the optics of a microscope with the emphasis on the use of the phase telescope.
| All comments welcome by the author Paul James |
Microscopy UK Front Page
Micscape
Magazine
Article
Library
Please report any Web problems or offer general comments to the Micscape Editor.
Micscape is the on-line monthly
magazine of the Microscopy UK web
site at
Microscopy-UK