 |
DIY Wild M20/Zeiss Lamp fitments Some practical ideas concerning more economical illumination replacement sources By Paul James |
The sourcing of specific lighting bulbs for microscope lamphouses can often lead to expensive replacements which almost equals the frustration of not finding any replacement at all. Yet the simple fact is that all brightfield Kohler/Critical illuminated 'scopes have several things in common which with a little effort can result in an economically satisfying solution.
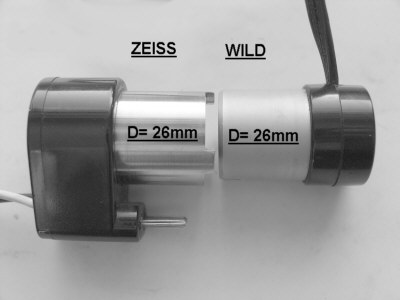
Just recently my Wild M20's light bulb popped and so ended what must have been a very long filament life. My problem was to reinstate the source of lighting and so I poked about in one of my many boxes of spares looking for some inspiration. During this episode of trying to conjure up a bulb which could be adapted to fit the Wild's lampholder, I noticed the coincidental similarity between the Zeiss Photomic's lampholder and Wild M20's. I soon realised to my great surprise that the Zeiss version slipped perfectly and smoothly into the Wild's lamphouse holder. Not only this but that the actual lamp itself in the Zeiss lampholder raised perfect Kohler illumination after adjusting its lateral distance from the M20's lamphouse condenser.
|
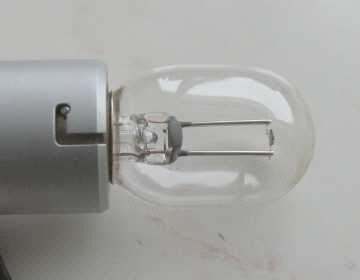
In the image above you can see that the diameter of both their sleeves is visually identical @ 26mm each. There is a very slight difference of around 0.054mm ( 0.002") between them, but both lampholders easily accommodate themselves into their opposite numbers and can be nipped firmly by their respective sleeve clamps. The Zeiss lamphouse is however decidedly longer than Wild's so fitting the Wild M20's lampholder into the Zeiss lamphousing did not raise a fully illuminated field.
So for a while at least I can carry on using the M20 thanks to this convenient coincidence. I've mentioned this because some readers might have a Wild M20 stand bereft of a lampholder, so they could source the 26mm Zeiss equivalent as an alternative if having no luck finding a Wild replacement.
Or of course you can adapt a 'new' more economically priced 15mm socket diameter bulb into the original Wild lampholder.
Practical considerations when replacing the original Wild bulb with another
There is of course a little more to all this than just 15mm lamp holder diameters. The bulb's filament needs to ideally coincide with the focus of the lamphouse condenser, and also that the bulb's glass capsule suits the inner dimensions of the lamphouse assembly.
 |
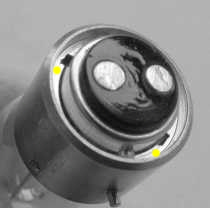
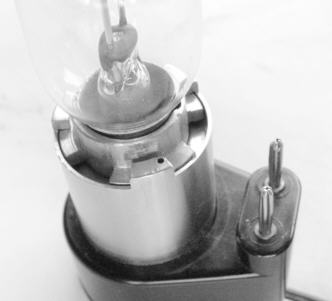
This image above shows the 'new' Olympus bulb (TB-1 6v 5a 30watts) fitted into the brass collar which housed the original Wild bulb. It works perfectly well raising identical Kohler illumination as did the original Wild bulb. Although the glass capsule is much bigger its diameter is well within the internal limits of the original Wild lamphouse, and the filament gets close enough to the lamphouse condenser to raise a full even field. Note the locating pin, and also 2 of the 3 grub screws used for filament centration.
Fortunately the Olympus bulb with its 15mm sleeve diameter fitted perfectly into the redundant brass collar which originally housed the Wild M20's lamp. Once removed from the original bulb, the collar's dual purpose to support the bulb firmly and align it so the filament centres onto the axis of the substage illumination train, can again be utilised for the new bulb. After removing this collar from the spent bulb it was modified slightly to allow the pins of the Olympus bulb to pass through by cutting 2 grooves with a junior hacksaw as shown below :-
 |
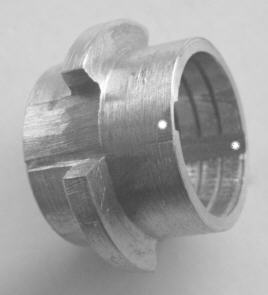
This image below shows the circular rebate that was cut in the lathe which allows the pins to be turned/positioned away from the slots, and importantly too so that the 2 electrical contacts align with the Wild lampholders's spring loaded plunger contacts. If you have no access to a lathe then filing the collar's base a little shorter will allow the pins to be just protrude on the rim to secure the bulb in lace.
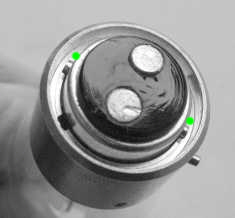 |
The 3 120 degree spaced grub screws, one of which is shown below, must be so adjusted as to not only nip the bulb in place, but to ensure that its filament is centred on the optical axis providing an evenly lit field. This adjustment is enabled by angular leverage between the bottom of the 15mm bulb socket against the 3 grub screws, so allowing a small but adequate adjustment for centering.
 |
When first attempting to insert the newly contrived bulb and its collar into the lampholder, be mindful of several parameters.
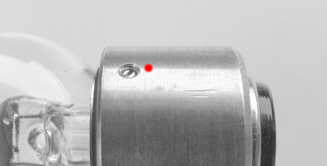
Firstly that the bulb/collar combination can be fully plunged into the lampholder socket without too much force so the single pin on the collar's outer face can be turned into its proper position as shown below :-
 |
In all probability your first attempt will demonstrate the need for some adjustments to bring this about. I had to file down the 2 'lead' contact stubs of the bulb in order to achieve this. Much depends on the actual physical variations from standard each replacement bulb exhibits.
It is essential to be aware of the juxtapositioning of the contacts of the bulb and lampholder with respect to the locating pin of the collar, so that when fitted properly the pin and contacts are where they should be, and that the spring effect from the lampholder's internal electrical contact pins exert a little pressure on the base of the bulb to keep the whole bulb fixture from rattling about.
In addition I had to finely frost a small central patch of the top of the bulb's glass capping in order to enable the field to be perfectly even. The light intensity's reduction as a result was of no consequence, and so the microscope's performance was exactly as before using the original Wild M20 bulb.
Replacement of a Zeiss bulb
 |
The image above shows a similar style replacement using the same type of 15mm socket width Olympus bulb on the Zeiss Photomic's lampholder. The only difference was that the 'collar' used to marry the lamp and lampholder was a bayonet fashioned from an oddment of brass the details of which can be seen below. The roughed out 3 flanged socket holder that is peculiar to the Zeiss lampholder was fashioned in a similar way to the original that supported the old Zeiss bulb. The white spots show the grooves cut out to let the socket pins pass in an identical fashion to that used for the Wild M20 replacement shown above. The 3 flanges were filed out so that the socket holder would be able to be inserted and locked in place by turning. The whole procedure was very similar to that used for the Wild M20 again using the natural spring loading within the lamp holder to secure by simple friction the 3 flanged bayonet in place with the electrical contacts mating accurately.
 |
 |
Of course there are other ways subtley different from those used above, but frankly I see no point in making any bulb replacement fixture more complex than it needs to be, nor sporting a fine finish. Its ability to put the filament into the correct position and hold it there is all that matters. The simpler the method the better, so long as the bulb does not move even through wide temperture variations during its use no problems will arise.
| All comments welcome by the author Paul James |
Microscopy UK Front Page
Micscape
Magazine
Article
Library
Published in the February 2010 edition of Micscape.
Please report any Web problems or offer general comments to the Micscape Editor.
Micscape is the on-line monthly
magazine of the Microscopy UK web
site at
Microscopy-UK