| A Closer Peep At The
Titanium Implantation Procedure
A Patient's Perspective By Paul James |
Not so very long ago it was discovered that bone had a tendency to engulf non organic materials rather than reject them. Perhaps this is one reason why the use of inert metal struts and pins during surgical procedures in cases of complex bone damage can been entirely successful, so long as these supports are removed at the appropriate time to allow the bones to knit together more completely than perhaps they otherwise would do. In dental surgery this same basic property of bone has been advantageously utilised over a period of about 30 years to replace a decayed or damaged tooth with an artificial one. The main advantage of this technique is that the artificial tooth's anchorage is very similar to its predessor's, and so it can directly support a 'post and cap' which will become naturally encircled by gum, and therefore have the appearance of a normal tooth. Pure Titanium metal is used for the implant as it is inert and is strong enough for the task, and is readily integrated into the bone of the jaw. Thus the benign implant, which supports the artificial tooth is robustly held in situ by the jaw bone and is more than capable of coping with the normal stresses involved in chewing . Therefore both the cosmetic and mechanical aspects of the new 'tooth' are successfully realised in this intriguing implantation process.
I thought I'd make a brief report of my personal experiences regarding this implantation technique as a patient, as well as including some macro imagery taken during the various stages by Robert Jones the Dental Surgeon who performed the implantation process.
The Problem
In my particular case I had a pair of premolars in the upper jaw who's useful future seemed relatively short lived as one had endured many years with mercury amalgam filling, but had fragmented : the other had a post and cap but the appearance of an infection at the root tip looked ominous.
 |
Whilst both would be receptive to more conventional treatment, the long term outlook was bleak. It was decided to replace both with titanium implants : an entirely novel procedure to me.
Implantation Timetable
The whole basic process took approximately 4-5 months for completion, from initial extraction of the old tooth to the ultimate capping of the implant. More speedy implantation procedures incurring a much shorter time span are performed both here and abroad, but whether the overall risk of implant rejection, ( about 5%) is higher, remains to be seen.
Stage 1
Before the 2 teeth were extracted, an impression of both upper and lower jaw was taken so that a physical replica of my mouth's 'bite' was made. This was essential for the dental laboratory work, for it gives all the physical information necessary to prepare the caps for both teeth and also to construct the jig which accurately guides the reaming operation of both tooth sockets for reception of the titanium implants.
Stage 2
The teeth were extracted. Then followed a period of approximately 3 weeks or so during which time the gums settled down and any infection subsided.
Stage 3
Next, under local anaesthetic came the critical procedure of 'reaming' the old sockets using the laboratory's jig which was fitted into the mouth. Employing a purpose made drill/reamer the Dentist then pre-shaped each of the original tooth sockets to receive the titanium inserts, which were threaded on the exterior surface helping to ensure secure anchorage in the bone. The inserts were then carefully screwed into the jaw bone using a miniature precision torque wrench until the upper surface of each implant was more or less flush with the jaw bone.
 |
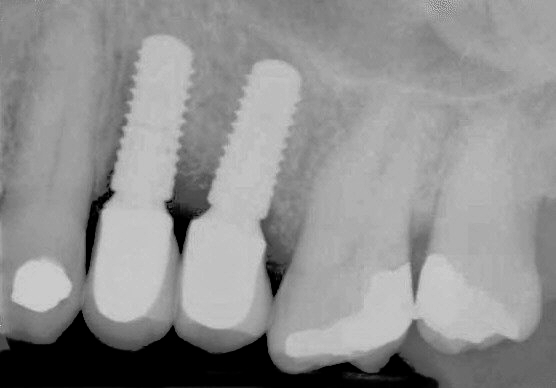
The x-ray above shows the 2 titanium inserts a few minutes after implantation. Note their juxtapositioning between existing teeth and that they are flush with the bone's surface below the gum. This session was concluded with the screwing in of a temporary cover cap into each implant which kept not only the gum from growing over the top of the implants but also to encourage it to settle into a circular aperture of similar diameter to that of the final collar support beneath the post and cap :-
 |
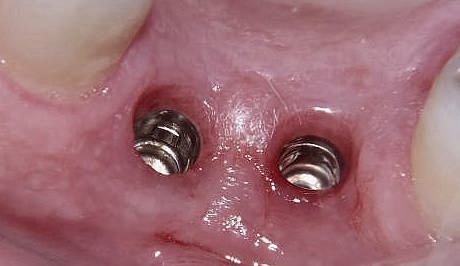
Stage 4
Another interim time period was required to allow both the bone to settle down around the inserts, as well as the gum around the temporary capping, after which further 'gum training' seemed in order by employing larger caps, which when removed after a couple of weeks or so revealed perfectly shaped gum apertures ready for the final installation of the posts and crowns :-
 |
Stage 5
And so the final fitting of the posts and caps came to mark the end of the 4-5 month sequence.
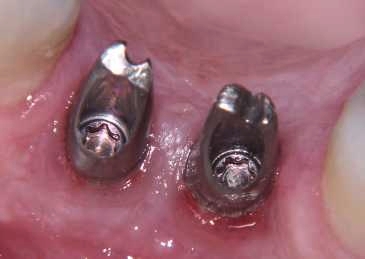 |
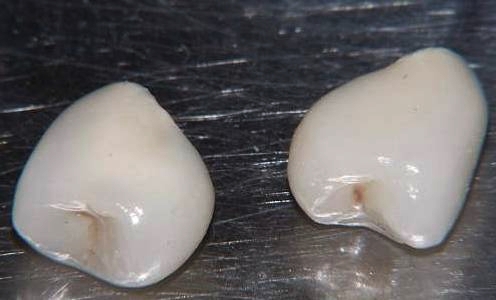
The permanent posts were then screwed in as shown above, prior to fitting their respective ceramic caps shown below :-
 |
Finally below........the last x-ray image showing the finished job taken soon after completion. Note the tapered collar between the titanium inserts and upper post which fits comfortably into the apertures of the 'pre-trained' gum.
 |
The actual fitting of the caps was an exacting task but soon accomplished by the dentist who deftly honed the ceramic caps supplied by the dental laboratory into place.
Within a few days my inquisitive tongue was convinced I had a pair of normal teeth, and now over 3 years later as I write this I am happy to report that no adverse side effects or even minor issues have arisen.
| All comments welcome by the author Paul James |