
by David Walker
The first part of this article (now in the Micscape Library) introduced the technique of using polarised light in microscopy and suggested where to obtain polarising filters. I hope the attractive images of crystals under polarised light in the last article encouraged those unfamiliar with the technique to try it.
In this second article, we look at some general techniques on how to prepare temporary crystal mounts and suggest materials available to the amateur which are worth studying. An emphasis is again placed on the practical aspects, because most textbooks on optical microscopy will describe why crystals and other materials create the effects observed under this form of lighting.
Join a microscopy club!
 A strange remark to start this
article? No not at all. I believe the best advice to a novice is
to join a microscopy club. Many of the 'tricks of the trade'
which are not often found in textbooks, can be picked up by
talking to fellow enthusiasts, many with a lifetime's experience
of amateur microscopy. If you can't attend the meetings, most
clubs have informative magazines or newsletters.
A strange remark to start this
article? No not at all. I believe the best advice to a novice is
to join a microscopy club. Many of the 'tricks of the trade'
which are not often found in textbooks, can be picked up by
talking to fellow enthusiasts, many with a lifetime's experience
of amateur microscopy. If you can't attend the meetings, most
clubs have informative magazines or newsletters.
Looking through the past ten years of magazines from three UK clubs the author belongs to, shows many tips for how to prepare crystal mounts, what chemicals are worth trying and how to make home-made gadgets such as simple light-bulb based heaters for drying or heating slides.
Crystals
The crystals of chemicals are probably the most popular subject
for polarised light microscopy. There are two basic techniques
for preparing the slide of the chemical for study .... a melt and
by preparing a solution using a suitable solvent and allowing the
solvent to evaporate. (Note that the preparation of thin sections
of rocks and minerals is a specialist technique and will not be
discussed).
Whichever technique you try, use low magnifications (i.e.. objectives 3X-10X) on a compound microscope with the polariser and analyser filter. Scan the slide thoroughly at a low magnification and regularly rotate the analyser filter to create the different colours. Very often there may be a small section of a slide with a particularly attractive crystal arrangement or colour pattern ... record this if possible by photography or video.
The effects created largely depend on how the chemicals recrystallise i.e. the thickness, orientation and size of the crystals.
Melt
A melt is used mainly for organic chemicals which melt at
relatively low temperatures, but it can also be used for
inorganic crystals which 'contain' water (so-called water of
crystallisation). The essence of the technique is very simple.
Choose a safe means of heating in a well ventilated area a small
amount of the powdered chemical on a microscope slide until it
melts (don't overheat) and allow to cool.
 A lot of trial and
error is required to judge how to obtain the best slides for
viewing. The rate of cooling, scratching/tapping the slide,
introducing impurities or mixing two chemicals can all create
different effects. With experience, some of these factors you can
control to some extent, but every slide you make will be
different, which is part of the fun! If you don't like the
result, remelt it and try again. It's a good idea to prepare a
number of slides using the same chemical, and experiment with
different heating and cooling regimes to see which combination
gives the best effects under polarised light.
A lot of trial and
error is required to judge how to obtain the best slides for
viewing. The rate of cooling, scratching/tapping the slide,
introducing impurities or mixing two chemicals can all create
different effects. With experience, some of these factors you can
control to some extent, but every slide you make will be
different, which is part of the fun! If you don't like the
result, remelt it and try again. It's a good idea to prepare a
number of slides using the same chemical, and experiment with
different heating and cooling regimes to see which combination
gives the best effects under polarised light.
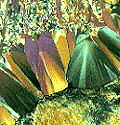
Don't forget to view some slides while they are crystallising under the microscope. The often rapid passage of colourful crystals across the field of view is well worth watching, and can be a challenge to video if you have the facilities.
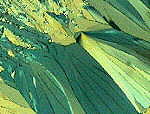
Northern Biological Supplies (NBS) in the UK can supply a prepared slide of santonin, an organic chemical which can be melted and crystallised repeatedly to view under cross polars. Two images of a santonin slide from NBS is shown at the head of this article and above right.
Evaporation
 This technique is often used for
inorganic chemicals that dissolve in water or with organic
chemicals that dissolve in a solvent available to the amateur
slide maker such as isopropanol and xylene. Essentially a small
amount of the saturated or nearly saturated solution of the
chemical dissolved in the solvent is prepared. A few drops of the
solution are spread with e.g. a glass rod on the microscope slide
(or prepare solution on the slide) and the solvent allowed to
evaporate, either by gently heating or at room temperature. As
with the melt technique above .... experiment! The drying rate
and solvent are additional parameters to vary.
This technique is often used for
inorganic chemicals that dissolve in water or with organic
chemicals that dissolve in a solvent available to the amateur
slide maker such as isopropanol and xylene. Essentially a small
amount of the saturated or nearly saturated solution of the
chemical dissolved in the solvent is prepared. A few drops of the
solution are spread with e.g. a glass rod on the microscope slide
(or prepare solution on the slide) and the solvent allowed to
evaporate, either by gently heating or at room temperature. As
with the melt technique above .... experiment! The drying rate
and solvent are additional parameters to vary.
With both the melt and evaporation technique it is worth preparing slides with and without a coverslip in place. With a cover slip the crystals will probably grow more slowly from the edges and maintain a thinner sheet of crystals, and it is fascinating to watch this growth as it occurs under the microscope.
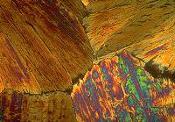
The crystals shown left above were prepared by Mike Samworth (a Micscape contributor) by dissolving a paracetamol tablet in methanol and evaporating to dryness.
What chemicals to try
A number of the early Victorian microscope slides of crystals for
polarised light use chemicals that are now hard for the amateur
to obtain, and in many cases use toxic or harmful chemicals such
as thallium, barium, mercury and lead salts. Although the old
prepared slides are worth seeking out on the second-hand market,
the author does not recommend that the amateur attempts to
procure these chemicals to make their own slides.
However, there a number of safer chemicals that are accessible e.g. from your local pharmacist (drugstore) or supermarket in the small quantities required and which can be tried with the appropriate care. But the watchword is, always find out the safety hazard data on an unfamiliar chemical, adopt the usual precautions of skin and if necessary eye protection, don't ingest, store away from food etc. ... and if in doubt, seek advice.
A few suggestions for chemicals to try are as follows. Chemical solutions prepared from tablets may require filtering before allowing to crystallise.
1) Tartaric acid, citric acid - (evaporate from solution in
water).
2) Vitamin C (ascorbic acid) - try health food shops for tablets
and dissolve in water. Vitamin C is a particular favourite with
the experts, and can give impressive results.
3) Sodium thiosulphate - photographic film/paper fixative (use
melt since contains water of crystallisation or evaporate from
solution in water).
4) Potassium nitrate or ammonium nitrate - in fertiliser
(evaporate from solution in water)
5) Try cooking salt (sodium chloride) - do you get any colours,
if not why?
6) Headache tablets - try dissolving in water, filtering if
necessary and evaporate to dryness.
7) Medicinal salts such as Epsom salts (magnesium sulphate),
Glaubers salt (sodium sulphate), Smelling salts (ammonium
chloride) - dissolve in water and evaporate to dryness.
8) Other pharmaceutical chemicals you may be to obtain such as
urea, potassium bromide, salts of citric acid, tartaric acid etc.
Not all chemicals will give colourful patterns under cross polars and at least one of the above won't. Try and find out why! Most of the introductory books on optical microscopy should have a section on using polarised light and a little basic crystallography.
But is it art .... ?
Many of the images of crystals under polarised light can be
aesthetically very pleasing. Many microscopists are so taken with
the effects that can be achieved, that they use the technique to
create works of art. For example, with the right choice of
crystals and preparation techniques, images of surreal landscapes
can be achieved.
The Quekett Microscopical Club publications have a number of articles discussing the aesthetics and methods of this aspect of polarised light microscopy (see Further Reading).
Next month, in the final part of this series of articles we will look at the types of biological and other subjects that are worth viewing under polarised light.
Acknowledgement: Thanks to Christopher Redding for loaning me his selection of Victorian slides from which some of the above images were taken.
Further Reading
1) Under the Microscope by A Curry, R F Grayson & G R Hosey. Blandford Press, Poole, UK 1982. Now out of print but may be available in libraries or second-hand. An excellent introduction to the practical and theoretical aspects of microscopy (including polarised light) at a level suitable for the beginner. Includes a chapter on rocks, crystals and minerals.
2) 'The Hidden Landscapes of Crystals' by G Thurgood. Microscopy Bulletin (Newsletter of the Quekett Microscopical Club), 1992, 20, p12-14.
3) ''Landscapes' in microscopy as an art form' by G Thurgood, Quekett Journal of Microscopy, 1995, 37 (6), p455-466.
Both the Quekett Journal and Bulletin are received by members world-wide of the Quekett Microscopical Club twice yearly. Learn more about the QMC.
Please report any Web problems
or offer general comments to the Micscape Editor,
via the contact on current Micscape Index.
Micscape is the on-line monthly
magazine of the Microscopy UK web
site at Microscopy-UK