Using your Camcorder as a Microscope
Article 1 : by Maurice Smith - June 1996
Microscopy
At an amateur level, microscopy is really just about taking a
look at our world a bit closer than normal. Probably the best way
of doing this is by purchasing a proper microscope and using it
as an aid to observation. However, many people may not be
inclined to purchase an instrument for one reason or another, yet
still find the idea of observing living forms close-up an
attractive pursuit. One way of doing this without purchasing
anything new - perhaps a lazy way into the field of amateur study
- is to use the family video camera!
The Camcorder
Most camcorders (popular term for video cameras) are now
sophisticated enough to contain Zoom capability of 10x to 16x
magnification and many are (or can be) fitted with macro lenses
for enhanced close-up work. An additional advantage is that many
homes already possess such a camera, which is only dragged out of
the closet once every summer, so here's a few ideas on making
more of quite an expensive and under-used resource.
No fancy stuff
My own camera has special capabilities allowing me to convert it
into a powerful 100x microscope - which then enables live filming
of all those little creatures in the garden where their habits
and behaviour can be studied in their preferred environment.
Let's assume though that your camcorder is not fitted with
anything like this but has 3 basic features: a zoom, a shutter
speed adjustment, and hopefully - a manual over-ride of the auto
focus system.
The Zoom
When you were taking your home-movies you probably over-used this
feature most of all so you don't really need me to tell you how
it works. You merely hit the button to move in closer without
actually having to walk towards the subject. This is a key
feature if you want to use the camera for looking at tiny
creatures especially flies and other 'nervous' insects. Did you
ever try to sneak up on a fly? They really see you coming, don't
they? Armed with your 'Zooming' camcorder, you can get really
close and the little darlings just don't see you coming!
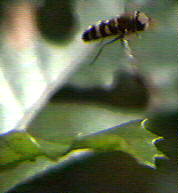 For example, take
this image of a hover fly taking off from a leaf. I was standing
quite a way off when filming this, so far in fact, that I had to
wait for it to decide to take flight rather than get 'spooked' by
my presence. I might just advise you that the original image is a
great deal sharper than what you are seeing here but to keep the
file size down, and thus reduce the download time for you to see
it now, I reduced the image resolution quite extensively!
For example, take
this image of a hover fly taking off from a leaf. I was standing
quite a way off when filming this, so far in fact, that I had to
wait for it to decide to take flight rather than get 'spooked' by
my presence. I might just advise you that the original image is a
great deal sharper than what you are seeing here but to keep the
file size down, and thus reduce the download time for you to see
it now, I reduced the image resolution quite extensively!
You should also realize that I have also captured the frames
just before and after this precise moment which provide me with a
lot of first-hand detail about how this tiny insect prepares and
launches itself into flight. What is being achieved here can, of
course, be done for a variety of study subjects just as simply
and inexpensively! Want to know more..? Then read on!
The Shutter Speed
Mmm..? This is a bit more complicated to explain. I bet if you
used your camera for home movies only, you never even got to use
this feature. Why not dig out your camera's manual and take a
good look at this feature and how to use it: it is something
extremely useful when filming anything that moves?
In simple terms you simply increase the shutter speed to film
fast-moving objects (or subjects). The faster the 'thing' moves -
the greater the shutter speed should be set to if you want to
film it. When you increase the shutter speed, two things happen:
everything in the picture goes darker and the resulting film
footage looks kind of jerky when you play it back.
The trick here is to make sure the 'thing' filmed is in really
bright light so that when the shutter speed is set high
(typically 1000x or 4000x per sec), the light level is still
sufficient to record a good image. When filming insects in my
garden, I take out a couple of mirrors with me. This way, if they
are messing around in a shady spot, I can prop the mirrors up to
reflect some sunlight into the area - permitting me to continue
filming at high shutter speeds. If your camera has a feature for
manually controlling the light-level, it can be employed to
increase the amount of light received through the lens; thereby
compensating for the darkening effect of using high shutter
speeds.
Why use high shutter speeds?
Let me show you what happens when you use a normal shutter
speed (typically 50x) when filming a fly taking-off from a
leaf...
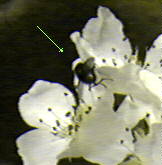
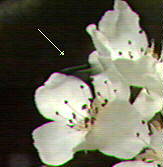
Now you see it, now you don't!
The left hand image shows the fly just before taking flight. The
right hand one shows what happens a split second later. In both
pictures, the arrow marks the position of the fly. Not a lot to
see in the second picture, is there? Without increasing the
shutter speed, all you will film is a 'blur' of motion, when what
you need to do is freeze the action; your camera's
shutter speed is designed to allow you to get sharp frames of
rapidly moving subjects!
Manual over-ride of the auto-focus
Unfortunately, many new camcorders have auto-focus only. You will
need a type which allows you to over-ride this feature so that
you can manually set the focus level. My camera for example has a
button which toggles the camera between auto-focus and manual
operation. You will see why manual focus is required in a moment
when I explain one way of using a camcorder for real
microscopical study.
Studying Insect movement Studying insects under an
optical microscope normally requires the specimen to be killed,
broken up into its various parts, cleaned, stained, and then
preserved in a solution before ending up sandwiched between a
glass cover slip and the glass slide itself; most insects are too
big to be seen 'whole' in a compound microscope.
I always think it defeats the objective of studying life
to kill something first before examining it. Surely, a lot can be
learned by studying life while it is is still actually alive!
A good example of what I mean is in the area of insect
movement and habits. We can use the camcorder to good effect in
studying these attributes. Perhaps the best way of demonstrating
this is by example, so I have an image here that I wish to show
you....
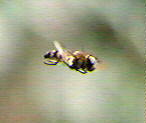 This hoverfly was
filmed in full flight from about 1.5 metres away (4.5 feet). I
managed to obtain quite a long sequence with the camcorder set to
a very fast shutter speed. I can play the video back to study the
wing movements and body posture frame-by-frame - extremely useful
in understanding how the hoverfly manages to maintain a
stationary position in the air. Other interesting subjects to
study are wasps, bees, flies, beetles, butterflies, moths, and
dragonflies. I'm sure you can think of a few more.
This hoverfly was
filmed in full flight from about 1.5 metres away (4.5 feet). I
managed to obtain quite a long sequence with the camcorder set to
a very fast shutter speed. I can play the video back to study the
wing movements and body posture frame-by-frame - extremely useful
in understanding how the hoverfly manages to maintain a
stationary position in the air. Other interesting subjects to
study are wasps, bees, flies, beetles, butterflies, moths, and
dragonflies. I'm sure you can think of a few more.
How it was done
The trick is to find a nice bright spot for filming. The hoverfly
sequence was taken in a small sunlit spot amongst some trees on a
local common. The darker background of the out-of-focus foliage
in shadow helps to provide contrast. I found several hoverflies
'sunning' themselves and carefully moved up as close as possible
without disturbing them.
It is better not to use a tripod to steady the camera because
one needs complete flexibility to control the camera quickly to
keep up with the moving subject. The camera should be set to a
fast shutter speed and then aimed at a brightly lit object,
preferably the area which you are going to film. If the light
level is too low, you will need to reduce the shutter speed to
obtain an acceptable quality of image but this will also limit
your capability of 'freezing' fast moving subjects.
To get a tiny subject like the hoverfly in focus, you start by
having your zoom set to zero, that is - no zoom! Aim the
camcorder at the area where the fly is hovering and turn off the
auto-focus (manual focus on). Look carefully through the
view-finder and hod the camera as steady as possible. The
hoverfly is probably too small to see initially against the
background. Zoom in a little closer and manually reset the focus
as you go. It is best to keep your fingers on the focus ring
because you are going to be twiddling this a lot in a moment.
Each time you zoom in a little closer, you need to wind the
focus ring back and forth to try and locate the moving hoverfly.
Start by focusing on the main background objects and then turn
the focus ring until the background blurs out. Keep an eye out
for the sudden appearance of a blurred moving speck - this is
your hoverfly! You repeat this process (zooming a bit, focusing
in and out) until you detect the moving subject. If you end up on
full zoom without actually focused on the hoverfly (or other
specimen) then pull the zoom back to zero and start the hunt
again.
With a bit of practice, you will soon learn how to focus the
camcorder onto the flying insect. As soon as you locate it, zoom
closer to it but just before it moves completely out of focus due
to the zooming motion, manually adjust the focus ring to keep the
hoverfly sharp. Keep repeating this process (zoom a bit, refocus,
zoom a bit more etc.) will until you have the camera at maximum
zoom and sharply focused on the hoverfly. Now hit the record
button and film it.
Keep the camera as steady as possible (hold your breath?), and
to keep the moving fly central in the frame. You can either sway
back and forth a bit to maintain focus as the insect moves closer
or further from the plane of focus, or alternatively - you can
gently twitch the focus ring of the camera.
You should not expect to get very long sequences containing
sharp images. The hoverfly will be moving around a lot and 90% of
your film will have a blurred image of it. But the 10% sequences
when edited onto another tape will be more than enough to show
great detail and will provide serious study footage for showing
colleagues, friends, and students.
If you are fortunate enough to own a video-grabbing board, you
will be able to sample some frames from your film and process
them further on your computer. You can even use various
image-processing software packages to produce some dramatic
effects. For example, you could 'cut' the hoverfly (or other
subject) out from a set of frames and 'paste' them into a single
image to show the various wing positions during flight.
 Better still - you
can use software to assemble a few frames into a mini-movie that
can be played back on your PC. I have created my own small movie
of the hoverfly sequence so you can see the effect. My little
effort can be greatly out-done if you have more a powerful
computer and more expensive software. Take a
look at the hoverfly movie?
Better still - you
can use software to assemble a few frames into a mini-movie that
can be played back on your PC. I have created my own small movie
of the hoverfly sequence so you can see the effect. My little
effort can be greatly out-done if you have more a powerful
computer and more expensive software. Take a
look at the hoverfly movie?
A few tips
Higher quality sequences can be obtained by planning and setting
up a filming session. For example, you can select a flower in
your garden which looks like it might be a good candidate for a
visit by a pollen-hunting bee, and set your camera on a tripod
focused onto the pollen area. All you need now is a bit of
patience as you wait for the bee to come to you. I cheat: I
place a few drops of a suitable essential oil (perfume) into the
flower. On a hot sunny day the fragrance can be detected from
far away, and it doesn't take long before a willing subject
dances before the camera to become an unwitting star!
If your camera has 'macro' features, these can be used to
obtain even closer film sequences of your chosen subject.
If you have a go at video-filming insects or
other subjects of interest to the amateur microscopist, why not
send us a copy of your film and let us show some of your frames
and images to the world. Email the editor below to find out where
to send your films to. by Maurice Smith. (Happy hunting!)
© Microscopy UK or their
contributors.
Please report any Web problems
or offer general comments to the Micscape Editor,
via the contact on current Micscape Index.
Micscape is the on-line monthly
magazine of the Microscopy UK web
site at Microscopy-UK
WIDTH=1
© Onview.net Ltd, Microscopy-UK, and all contributors 1995 onwards. All rights
reserved. Main site is at www.microscopy-uk.org.uk with full mirror at www.microscopy-uk.net.