Do-It-Yourself Illuminator Upgrade

by Rosemarie Arbur, Oregon, US


Among other nice things, my new microscope has a built-in halogen illuminator with a variable brightness control. I like 
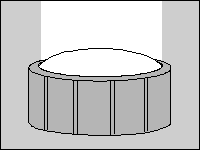
that, partly because at full brightness, my home-made dark-field stop for the 40x objective works consistently, proving that I made it correctly and that my old illuminator, aimed at the mirror, just couldn't deliver enough light. Hurray for built-in halogen. But then I noticed, as I dimmed the illumination, that the color of the light became increasing "warm"— dim a little bit, and it was yellowish; dim a lot, and it 
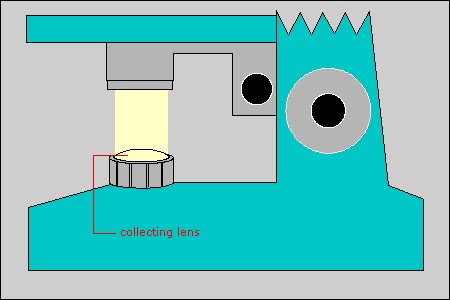
became almost brownish. I removed the collecting lens from the base of the scope and looked—there was no blue filter in back of the collecting lens, as there is in my old illuminator. Thus I knew what would solve my 
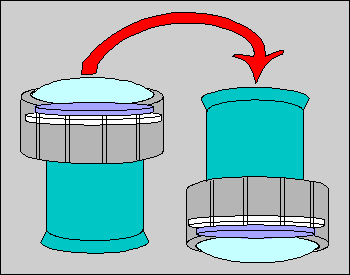
problem. But if I put a blue filter in the filter holder, where would I put the dark-field stop? I tried balancing the filter on top of the collecting lens: yes, it changed the yellowish light to white, but it tended to fall off whenever I touched it, and I found myself clumsily touching it whenever I adjusted the mechanical stage or the iris diaphragm. Surely, I'd grow less clumsy with practice, but having a filter balanced so insecurely seemed kind of primitive.

microscope illuminator


The solution to my problem was simple, and so satisfactory that I wanted to pass it along to others whose built-in illuminators produce light that's too yellowish: a styrofoam ring (cut from the bottom of a styrofoam cup) the outer diameter of which fits snugly inside the collecting-lens holder and the inner diameter of which is just smaller than that of a standard blue filter. Needless to say, this simple solution didn't occur to me right away, and I'll spare you the extra steps I took before I found that just the styrofoam ring (no other clutter) would do the job.
filter and ring Cutting the ring is the trickiest part. Use a narrow-blade scalpel for the inside cut, shave off less than you think you should on the outside of the ring, and take your time reducing the ring to the correct diameter. If you have to work fast, start off with several styrofoam cup-bottoms.
Next, find a spool of thread or a prescription-drug container the diameter of which is about the same as the filter's. Get some "super glue" of the sort that will dry fast and fill in tiny crevices. Then clean the underside of the collecting lens and one side of your blue filter with obsessive care (the other side of the filter can be re-cleaned once everything is done).


Put the styrofoam ring on the spool, and then center the blue filter on the styrofoam ring, and then position the collecting-lens holder firmly over them. Now you have the filter centered against the collecting lens.

on thread spool

turning it over Turn everything upside down carefully to get the filter and styrofoam ring to stay in place without help.


Make sure the filter and styrofoam ring are tight against the collecting lens before removing the spool.
Now, tilt everything slightly (here's where the snugness of the ring is necessary) and apply a small drop of glue where the styrofoam ring and the collecting-lens holder meet. Repeat 180° from the first drop. Keeping the unit upside down, let the glue dry.

tilt and glue


Finally, after those two drops of glue are well dried and holding, apply more glue all around the circle so that the glue joins the styrofoam to the collecting-lens holder and almost covers the styrofoam. This last is to protect the styrofoam from the heat of the illuminator. Without the extra glue the styrofoam in time will curl downward and deform and eventually let go of the filter. With the extra glue, even if the styrofoam deforms, it won't deform downward —it will shrink a little laterally but still hold your blue filter in position,


whiter light

 
    ... to give you whiter light.  


Comments to the author Rosemarie Arbur arbur@wizzards.net welcomed.
(If your web browser isn't set-up for e-mailing by clicking the above, just highlight and copy the address into your standard e-mail software).

Micscape Safety note: Styrofoam should be fine for microscope base lamps that don't get excessively hot at the condenser e.g. <90°C. If higher temps. are a possibility, a suitable heat resistant support is recommended (and a glass rather than gelatin/plastic blue filter should be used in either case).

Author's postscript: A more heat-resistant supporting ring could be made (less easily) of the plastic dish used for frozen microwavable entrees, the rolled edge of the aluminum foil tray used for frozen TV dinners, or a length of #12 or thicker insulated electric wire.

Microscopy UK Front Page
Micscape Magazine
Article Library


© Microscopy UK or their contributors.

Published in the January 2001 edition of Micscape Magazine.

Please report any Web problems or offer general comments to the Micscape Editor,
via the contact on current Micscape Index.

Micscape is the on-line monthly magazine of the Microscopy UK web
site at Microscopy-UK

WIDTH=1


© Onview.net Ltd, Microscopy-UK, and all contributors 1995 onwards. All rights reserved. Main site is at www.microscopy-uk.org.uk with full mirror at www.microscopy-uk.net.