|
. . . you want to build a what ? by Michael Stubbs-Race, Australia |
Optically speaking, a telescope and a microscope are essentially the same piece of kit. It just depends upon which end you choose to look through. And of course the object size differs somewhat, so construction and layout has to decide which application is chosen.
Now Amateur Telescope Makers (ATMs) abound worldwide, but seldom if ever do we hear of Amateur Microscope Makers (AMMs). I wont question the reasons here, but even if AMMs have difficulty building, they can certainly assemble a microscope from spare parts which are often available in great abundance.
My reasons for building a microscope were simply that I expected to end up with an instrument far superior than anything I could afford to buy new or even second hand, as well as being more versatile than the usual cheaper offerings. This indeed proved to be the case. True, my 'scope is fifty years old or more, but capable of all sorts of modes and even expansion; it isn't likely to wear out or need replacement. In truth, it all began when I bought an old stand just as an experimental piece, in order that I should not interfere with the set-up of my principle instrument. It was here that I soon realised the experimental rig was far better quality than my main instrument, which I later sold off in order to buy more parts.
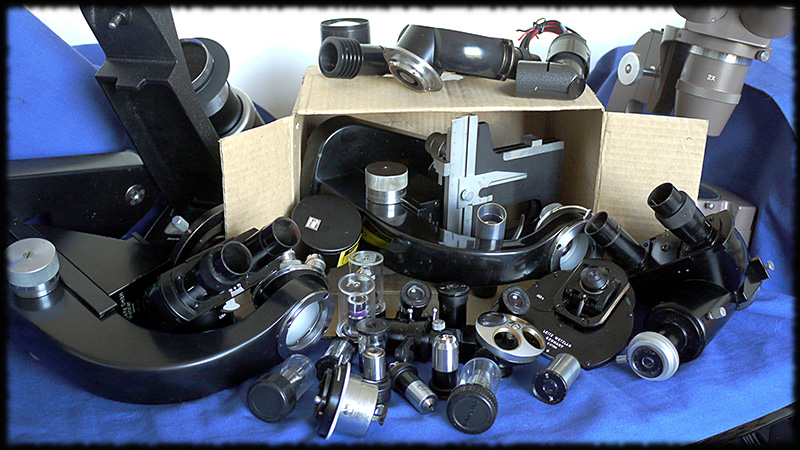
Where to begin. Obviously, one should have a good knowledge of the workings of a microscope and it's various modalities, as well as being familiar with the various parts, and their variants. Loads of literature is available through Micscape, Molecular Expressions, and on-line sites like Microbe Hunter, Yahoo group etc. Parts are gathered from second hand shops, eBay, and similar sources. Just make sure you don't pay too much for something that is really not usable. If you buy from eBay, ensure you know the commonly expected price for the piece based on past sales. Enlarge any photos and scrutinise them thoroughly, ask the seller searching questions regarding condition, and perhaps request additional pictures, especially if the price is likely to be high. Don't be in a hurry, there will always be another one for sale somewhere or some when. That's one problem with building a microscope this way, it is not going to be a quick job. Also frustrating, is when two parts you want are advertised, but only one can be afforded at the time.
What's next? Well think about it. An unbranded or re-badged Asian made microscope is unlikely to have much in the way of spare parts or accessories. It is usually intended to fulfil a single purpose, say clinical or school, and not much else. These 'scopes do indeed fulfil their intended purpose very well, but that's all. So pick a top brand. They will have been making microscopes for fifty years or more, there are thousands of spare parts and accessories, heaps of information and are so well made they just don't wear out even with abnormal use. As they get older, their prices may fall, unless it's a fine lacquered brass job, then you are up against the collectors. All too frequently, the ancient optics in these brass microscopes don't survive years of poor storage conditions, especially in the warmer humid climates. I would not consider buying optics which predate say, 1960, other than as an ornament.
Some brands to consider would be Leitz, Lomo, Olympus, Vickers, Zeiss etc. There are many other highly esteemed makers, but these names seem to be present in the bulk of parts currently offered for sale, by what I have seen. Since I live in a remote mountain area, my only source is eBay and the local post office for delivery. Now I know we frequently learn of bad buys or even dodgy dealers, so the risk cannot be ignored, hence my stressing the need to examine pictures thoroughly, ask questions and know the expected price range for your chosen part. My experience (or just luck) is that I usually get what I expected from the advertiser and his proffered information. I do admit to a couple of bad buys, but they went back on sale with an honest description: a nuisance but not a total loss.
Next I suggest a trawl through bookshops, and Internet in order to locate as much information about your chosen brand of microscope. Download and print out whatever you can find, and study it well. When a given stand is offered for sale make sure you know all it's attributes and what it was originally intended to do. Buying the stand, of course, clinches your choice, and then the various parts need to be found, making sure they are going to fit. Check dimensions of mating dovetails, barrel diameters, clearance above stage, changes with different models etc.; best go for DIN objectives and oculars. Incidentally, a little mould or feint scratches on optics isn't necessarily a disaster*. True we all like crystal clear lenses, but a less than perfect optic may well be quite usable, and should reflect a more modest price. Chipped or cracked glass should definitely be avoided. When seeking objectives, stay with the 160mm and don't make the mistake of bidding on an infinity corrected lens; it wont work unless your whole system has this correction. Most older Leitz stands used 170mm objectives, often of 37mm correction, but 160mm is acceptable in these stands. Not the reverse though.
Read the specification of any advertised objective because they have been made for tube lengths of 235mm, 200mm, 190mm, 170mm, 160mm, 150mm and infinity,. I would stay with 160mm, which is actually by far the more common. Most are termed 45mm*, although some older ones are 37mm or less. Not usually a problem. To ensure your objectives are going to be parfocal, you need to either buy them as a set, or make sure what you buy is the same make and of a similar series. Of course, having objectives which are not parfocal, certainly isn't a disaster; just a little less convenient to use. You can quickly get used to them.
If you are reading this, you almost certainly know what is required. I started with a stand which actually arrived with head, stage and oculars. I chose to look for a trinocular head, and some kind of light source. I also wanted a phase condenser, as I already had a set of phase objectives, and wanted to make use of them. This latter was by far the most costly part of the whole instrument, but it had two phase annuli and three oblique masks, so has since proved to be a very good purchase.
Cleaning the parts as they arrive is always necessary, so a few fine hand tools should be available. Buy good quality tools, as they are less likely to cause damage, and will last a long time. Things to watch out for when dismantling a part might be:-
left handed threads (a real trap for the newcomer),
threads locked by a tiny concealed set screw (another trap),
corrosion causing a threaded piece to jam, bent or misaligned piece,
hardened grease,
cross threaded screws, etc.
Incidentally, left hand focus knobs sometimes have left hand screw threads, as do some rotary stages, on their left hand side. When dismantling, always lay out the pieces in the order which they were removed, and ensure they are the correct orientation. Keep screws in their groups, noting that some may be of differing length. Make close-up photos of the various stages of dismantling can be worth a thousand words!
I always work on a tea tray covered with kitchen paper as a working space. I work low to the surface, so that anything dropped, does not bounce out of the tray and down to the floor where it will deliberately hide from your view. Good lighting and clean spectacles are most important; preferably with no one else around, except perhaps the dog and/or cat, who will not keep asking why you are doing this!
Objective turrets and mechanical stages frequently use ball bearings betwixt moving surfaces. They part easily, but the ball bearings are not caged and so are quite likely to travel further than planned. They are also very tiny. So a small magnet and some light grease will help in containing these little fellows.
Never dismantle a binocular head; the prisms are set by tiny jacking screws, almost all of which are interdependent for each prism. Only the maker will know the correct order of alignment. Clean up what you can get at, but leave everything else intact. If it's producing a double image, then it's almost certainly been dropped: get another one. However, should the double image appear as one above the other, then it is possible that the beam splitter has turned slightly (not all brands). If you can locate the two or three fine adjustment screws, a solution may be possible. With two screws, remember that one has to be backed off first, before the other can be run in. No more than half a turn should be made, and repeatedly check through the head to see which way the double image is moving. If it doesn't move, you probably have the wrong screws !
Eyepiece tubes often get squashed or dented, and make the insertion of the eyepiece difficult or impossible, without undue force. Most tubes are brass secured to the head with four small screws, or may well screw directly into the head plate. Remove the damaged tube to your workshop and, if you have a socket set, try to find a socket or extension bar to use a as mandrel, which is close to the eyepiece diameter (0.96). This mandrel should be as close a fit as possible. Press the bar/socket into the eyepiece tube, wrap the tube with a piece of thin leather or cardboard, and using a light weight hammer, tap around the tube until the dent or distortion is reduced or even removed. No socket set? Then get a friend to turn up a piece of hardwood with the required diameter. The mandrel must be steel or hardwood; not an old eyepiece.
Objectives should not be dismantled unless you are prepared to call it a write-off. You may learn something by dismantling, and you may even be able to clean it. But moulds usually etch the glass surfaces and cannot be cleaned. An iris diaphragm is always a test of patience and skill to get back together again. It comes apart quite easily. If yours has been lubricated by some clown in the past, I find a light penetrating oil cleans out quite well. Close the iris, and gently dab off the surplus oil. Do this many times until the iris looks almost dry and moves easily. You many not need to test your patience after all.
I bought a universal (Zernike) condenser, but as is all too common, no centring keys. A visit to the clock maker, found he had sets of watch winding keys and the number 3 fits very well for Leitz. It will need a short extension tube fitting, but that's something to be attended to further down the track.
I have changed my light sources to LEDs. They need colour correcting, and a diffuser, but run quite cool and no longer require hefty transformers for power. In some I have built the LED into an old lamp base. This way, the original lamp housing is not destroyed, and all the fine adjustments for the incandescent lamp are still usable for the LED. With the later 1 watt and 3 watt LED modules, a collimating lens is available which, at 15°, obviates the need for lenses before the main condenser: a diaphragm is always handy though. I find the 1 watt modules more than adequate for all my microscope needs including phase and polar.
You'll doubtless notice that I have not mentioned cleaning lenses. Well here I would refer you to the excellent article in Molecular Expressions which covers this subject better than any I have seen.
My first microscope took around four months to complete and cost about half the price of similar new non-branded jobs. There are many more parts and accessories available to fit it, but the limit is cost, so further building will be slowed, but certainly not stopped. For the AMM there is always another part needed, or a new contrast, or a . . . . . .
* These two figures, 37mm and 45mm are termed the adjustment length. It is in fact the designed distance from the shoulder of the threaded portion of the objective, to the top surface of the slide or cover slip. It is not the physical length of the objective itself.
* My test rig microscope at around 60 years old, has mould and figuring in all the optics. It is in regular use, produces good images and will be usable for many more years yet.
Comments to the author are welcomed.
Microscopy UK Front Page
Micscape Magazine
Article Library
© Microscopy UK or their contributors.
Published in the January 2011 edition of Micscape Magazine.
Please report any Web problems or offer general comments to the Micscape Editor,
via the contact on current Micscape Index.Micscape is the on-line monthly magazine of the Microscopy UK web
site at Microscopy-UK
© Onview.net Ltd, Microscopy-UK, and all contributors 1995 onwards. All rights reserved. Main site is at www.microscopy-uk.org.uk .