| Embracing an Old Inverted
Microscope A Saga of Refurbishment and Thought By Paul James
|
| Embracing an Old Inverted
Microscope A Saga of Refurbishment and Thought By Paul James
|
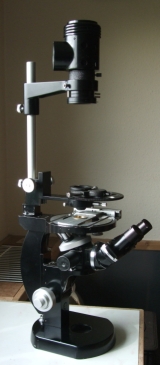
Initially, I harboured the erroneous concept that Inverted Microscopes were principally designed to let the observer view their quarry through the bottom of Petri dishes and the like. I took that generality at face value and didn't pursue the inverted scope scene until I eventually realised that some portable field 'scopes were, in principal, 'inverted 'scopes'. This sharpened my attention, and so I soon envisaged a scenario in which specimens were observed in an open waterproof cell on the stage of an inverted stand which had a 1.5-1.7mm coverslip bottom pane. After considering this, it seemed a much better method of observing pond life without the stressful inclusion of the upper coverslip in traditional microscopy. It also guaranteed ideal working distances between critters and objectives. Having absorbed the basics of Inverted Microscope design, I elected to acquire an old Nikon inverted stand which needed some attention. Despite its untainted cosmetic appearance, the fine focussing was caput, and the stage was bereft of its mechanical refinery and water cell. Its binocular head and eyepieces were fine, but there were no objectives, nor condenser..... However, neither was a problem, as I had spares. Luckily its quartz halogen fired illumination was nigh perfect. Last be not least : It had a photo port. In all, the sort of bundle I enjoy refurbishing.
Alternative Fine Focusing
Though the coarse focus mechanism was sound, the original epicyclic style fine focus was well beyond repair. So I gave considerable thought to the problem, then decided to devise a fine focussing system that directly raised and lowered the limb, leaving the coarse focus as it is. Since I'd be employing parfocal objectives, which reduced the focussing tolerance between objective/cell to sub millimetre levels, the actual vertical range required of the fine focus would be no more than about (+-)2 mm at most. However in case of unforeseen issues later on I elected to provide an increased range : (+-)4-5 mm. Fortunately, the lower part of the limb had a flat horizontal heel, with some clearance between it and the stand's base. Therefore some sort of fine focussing screw mechanism could conceivably function there. Of course this essential facility was only feasible if the limb itself slid smoothly, and importantly with very little friction . So I was very relieved to discover that the limb had a ball race interfaced slide, which guaranteed free silky motion of the limb both ways: upwards by virtue of a screw mechanism, and downwards by courtesy of gravity!! which also guaranteed no backlash.....nice and simple.
|
|
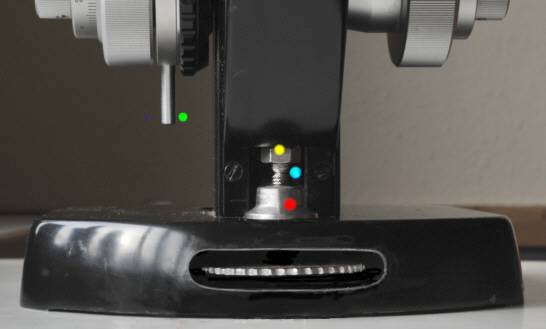
The location of the axis of the fine focus screw thread was determined by the location of the central point of the heel of the limb. Thus the screw thread was subsequently housed in a solid threaded pillar, which was located in a circular rebate on the upper face of the base. As luck would have it, the required diameter of the finger wheel was such that it neither fouled the interior bolt heads that held the main upstand, nor protruded excessively beyond the rear facing of the stand's base. I had of course to cut an elongated aperture into the rear alloy skirting of the base to facilitate this. The underfacing of the limb's heel already had a suitably sized hole in which I easily tapped another screw thread .The finger wheel, a simple serrated disc of metal, was nipped firmly onto the internal threaded spindle with two opposing nuts. The top of the spindle's thread was tapered so it could revolve in a small central recess in the lower face of the upper adjustment thread that is housed in the limb. This secondary screw thread is of a length that allows some vertical adjustment within the heel of the limb, and is prevented from turning by a lock-nut. This flexible arrangement allows the finger wheel's vertical position to be fine tuned so it can be altered if need be. For the present set of parfocal objectives the finger wheel remains half way up its vertical travel, which allows more than adequate focussing scope for the cell I'll be using.
I'm pleased with this fine screw focus mechanism: It works very well, and though its inherent friction is slightly higher than I'd expected, gravity automatically takes up any slack. It is also very stable, holding accurate focus for the duration.
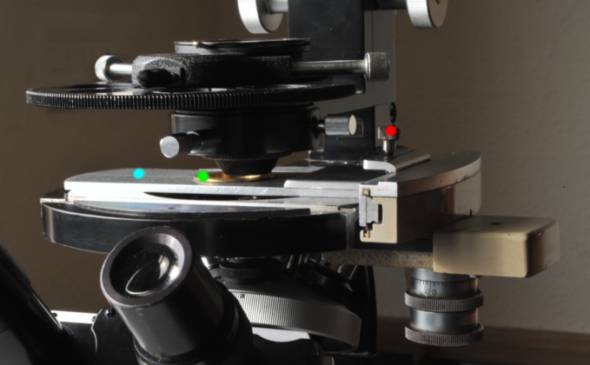
This lever's purpose is to lock the stage and all the paraphernalia up top in high elevation when needing to access the understage.......and objectives etc...by the coarse focus knobs: a feature that rarely gets used once the objectives have been installed. However it was a boon throughout the entire adaptation process.
The Water Cell.The next task on the agenda was fashioning a water cell, as well as imparting horizontal motion to it on the stage. Since the stand still sported its original hand controlled 'drop bar' which transmitted motion to the original water cell; I was tempted to re-employ it. And so I did just that. Yet having succeeded in this task, a flaw soon became apparent. Whilst my eyes were 'glued' to the eyepieces, my right hand, which adjusted the cell's position with the drop bar, soon became a nuisance by accidentally disturbing the drop bar's position as an when I fumbled for the controls above the stage. Though I'd devised a simple but very efficient 'hand motioned plate/water cell' its use was hampered by human error ?!?!. What a pity. I agonised over this for a day or two, then realised that the problem wasn't going to go away.
Though I really enjoyed the simplicity of the drop bar control, I had to fall back on the familiar traditional mechanical stage. The only surplus example I had, which came off a Vickers Patholette 'scope, ultimately proved to be ideal in every way. Attaching it required that I cut a portion off the Nikon's circular platform to allow its accurate registration, as well enabling its full motion and scope. It fitted well, by virtue of three small bolts. Some reshaping of its under-side was necessary so that all the objectives could be rotated into position without incurring damage to their delicate top optics.
|
|
The next task, that of modifying and attaching the original alloy/cell specimen plate I'd made for the mechanical stage couldn't have been easier. I simply doubled the thickness of the plate at the attachment end by simply bonding a small alloy segment on top with epoxy adhesive. Then all I had to do was drill an appropriately sized hole which coincided with the thumb screw of the mechanical stage. This single pin descends somewhat into the cell plate, which locks the latter to the driven face of the mechanical stage without any shake or slack on both axes. The concentric controls of the Patholette's mechanical stage are ideally placed, and smooth in operation, reminding me of other quality mechanical stages on conventional stands. Now my right hand does not interfere with the action !
The Condenser: The standard Nikon condenser retaining ring had to be bored out on the lathe to enable my condensers to fit. The quartz lit Köhler illumination was tweaked of course, and I employed an old Cooke phase condenser to raise a range of illumination variants....DF, BF, phase contrast and COL. I used my Wild objective achromats x10 and x 20, and Wild phase Fluotars x10 and x20, all 4 together on the turret below the stage. The basic work was now done.
The Illumination: The quartz halogen lamphouse and its attendant condenser worked flawlessly. The adjustments for both were easily accessed and were suitably stable. Setting up either Köhler or Critical illumination was straightforward, and having no heat problems nor physically constraints 'below stage' was much appreciated !!
The Trials Begin: Getting accustomed to this instrument involved resting my left forearm on the bench, with the hand curled round rear of the limb so that my finger could rotate the fine focus wheel. This seemed a perfectly natural technique, easily acquired, and felt very comfortable over extensive periods of observation. The mechanical stage's concentric drop controls were easily found too by my formerly errant right hand.
Naturally I started observing as soon as I had finished the essential repairs and modifications. In no time at all I was peering at my favourite critters from the silt in rain gutters, and the like. But before deciding whether I'd wasted my time and money on this project, I let myself get on with observing, rather than nit-picking at the first excuse. Indeed the 'scope did take some time to get accustomed to, and I found myself both praising and criticising the instrument at times; which I suspect is normal. In short time however, the minor issues of having to adapt to this tall 'scope passed by as I gradually became an ardent fan of the genre.
Cell size sensibility: I knew from the start that the first water cell I'd make should be a modest affair........about 20 mm across in fact. I didn't want a shallow lake and tidal waves lashing onto the stage from occasional subconscious twirls of the mechanical stage's controls. So I chose a very modest sized cell and started from there. It worked well enough when the water level was such that its surface was marginally higher than the cell wall; in which the natural forces of surface tension could be relied upon to keep the contents safely confined. So far so good.
Condenser immersion? However, the very first problem I encountered was the tendency of the water in the cell to tremble at the slightest provocation. Trembling water tends to disturb the pond life of course, and so I decided to proceed with the front element of the condenser very slightly immersed. The effect was a decisive one: absolute stability, and no surface oscillations to cause disturbance below. Tranquility reigned throughout the miniature 'pond'! However I soon realised that to raise exquisite Dark Field imagery, the condenser had to be lowered even further to bring the crossover point of the light beam to the level where the quarry was located. This brought about another problem concerning the circular wall of the water cell which hindered the lateral scope of the condenser's front element. I therefore machined another brass cell identical to the first one, but shallower, so it did not hinder the condenser's front element. Again, so far so good.
Miscellaneous Issues: The differences in the angular splaying of the condenser's light output are actually of no serious consequence below water. A peek through the phase telescope will support this premise when employing annular rings as in Phase contrast and COL illumination. The very slight overlapping of the annular pairs in the former did not seem to spoil the phase contrast effects. A far more serious impediment to fine imagery in the inverted 'scope stems from its principal of design. Debris and algal matting, if present in excess will play havoc with some forms of illumination. There is no way round this but to try to fill the cell with less light blocking matter.
Of course the most important element in microscopy is image quality. Here the inverted 'scope has in theory the potential edge over the upright 'scope when viewing aquatic life freely moving in relatively 'deep' water. The reason is that most critters will hover just over, or actually on the top surface of the 0.15-0.17 mm coverslip at the bottom of the water cell. That puts a large proportion of the pond life fraternity into the ideal place, allowing the objectives to perform at their best. To compete with the inverted 'scope in this situation, the upright 'scope's coverslip's lower face must lie virtually in contact with the observed specimen This is not easily realised in practice because of problems with debris, which is present in a typical pond water sample. However, the fact is that the inverted 'scope is on average more likely to realise a slightly higher standard of imagery when observing more naturally disposed samples of critters in a typical pond water sample.
Other Points:
It comes as no surprise that the inverted 'scope can be acquired in various forms: From the complex to the opposite extreme. This Nikon stand I've revamped has the simplest optical light path to the eyepiece that can be contrived. It has but a single surface aluminised plane mirror which directs the imaging output from the back of the objective to the binocular head, or the photo port for that matter. The sparkling imagery it outputs is exquisite, which speaks volumes about simplicity of design. At the other end of the design spectrum, there are inverted 'scopes that sport a more compact stand, which requires a complex array of internal optics. In one such example, I estimated that it had approximately 28 air/balsam/glass interfacings! These stands are more compact of course and offer more facilities at a price.
All inverted 'scopes produce imagery that is sourced from beneath the 'water cell'. This means that the whole scene of water life is 'upside down/ inside out?? A moot point perhaps? But there is a distinct advantage here because it means that amoebae for instance, will be viewed from the underside with their cell in a flat plane as they motion across the coverslip's surface. Using the x20 NA O.65 fluorite with a wide annulus generated by the Cooke phase condenser to emulate high NA COL, raised the soil amoeba's renditioning in truly exquisite form. The flowing, tumbling particulates within the cell were so obvious and very crisp to the eye. The water bear however finds frustration when trying to traverse the cover slip's super smooth surface: Like an ice skater's first attempts at moving across the ice!
The photo port on the Nikon stand I've revamped seems solid and stable, and therefore can support a digital camera. My next task is to mount a camera there.
Last Thoughts: I'm glad that I have had this experience with one of Nikon's early Inverted Microscopes. The darkfield imagery it outputs of freely living water life, is a sight for sore eyes indeed. The stand however is admittedly 'vertically awkward' but nevertheless surprisingly stable. The bottom line at this juncture for me, is that I cannot imagine being without the inverted 'scope: its compass may be restricted, but it is addictive!!
_________________________________________________________________________________
All comments to the author Paul James are welcomed.
Related Micscape Articles:
Inverted microscopes (July 1998) - David Goldstein (USA) discussed the pros and cons of the inverted design using his Olympus CK2 as an example.
Microscopy UK Front
Page
Micscape
Magazine
Article
Library
Published in the January 2016 edition of Micscape Magazine.
Please report any Web problems or offer general comments to the Micscape Editor .
Micscape is the on-line monthly magazine of the Microscopy UK website at Microscopy-UK .
©
Onview.net Ltd, Microscopy-UK, and all contributors 1995
onwards. All rights reserved.
Main site is at
www.microscopy-uk.org.uk .