 Many
Chinese amateur microscopists couldn't afford a real microscope (e.g. in
1970). So, they often designed a small portable microscope and made a microscope
for themselves. These were very easy to make and use and could be taken
in the open air. Today, I also like to make them and I can make many different
magnifications, even up to 200x and 330x.
Many
Chinese amateur microscopists couldn't afford a real microscope (e.g. in
1970). So, they often designed a small portable microscope and made a microscope
for themselves. These were very easy to make and use and could be taken
in the open air. Today, I also like to make them and I can make many different
magnifications, even up to 200x and 330x.
If you would like to make one, it will take you a whole afternoon. The materials required are as follows:
A plastic bottle with a threaded cap.
Some glass fibre. If you don't have any, this can be made by heating the middle of a glass rod in a flame until it softens, then pull it to make a thin fibre.
Circular discs of thick card (see image right).
Method
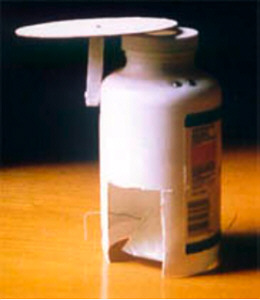
(1) Remove the bottom of the bottle and cut a hole in its side at the base to allow light to enter. Support a small mirror in the bottle so that it can rotate. Then, drill a hole in the bottle cap in line with the mirror so that light can illuminate the subject.
 (2)
Make the lens of the microscope; this is the most important step. You
must be very careful or let a glassblower help you.
(2)
Make the lens of the microscope; this is the most important step. You
must be very careful or let a glassblower help you.
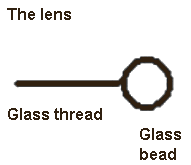
Hold the glass fibre to the flame and you will see the end fuse to form a small glass bead. Stop heating it at this point. Then detach the glass bead but leave a short glass thread attached (shown right). You will use the thread to hold the bead until it is mounted.
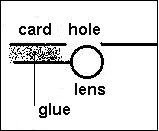 (
3 ) Use a needle to make a small hole in the thick card. Clean the lens,
then push the lens tightly into the hole so that the thread lies along
the card and is out of the field of view (see image right). Use a little
glue on the thread away from the bead to hold it in place. You can mount
many lenses in the card like this. Then centrally mount the card on a suitable
support attached to the bottle (see above), so that you can rotate it easily
and find the best lens magnification to observe the subject. OK, now you
are finished!
(
3 ) Use a needle to make a small hole in the thick card. Clean the lens,
then push the lens tightly into the hole so that the thread lies along
the card and is out of the field of view (see image right). Use a little
glue on the thread away from the bead to hold it in place. You can mount
many lenses in the card like this. Then centrally mount the card on a suitable
support attached to the bottle (see above), so that you can rotate it easily
and find the best lens magnification to observe the subject. OK, now you
are finished!
In Use
Lay the specimen across the hole in the cap beneath the lens. Twist the threaded bottle cap to focus and observe. Maybe you will find that the specimen and lid will turn together. You can avoid this by laying the specimen on one or more shaped card supports held above the cap. (Editor's note: or perhaps use a glass microscope slide to support the subject.)
The microscope can be taken everywhere and is very easy to use. You can make a microscope like this or perhaps improve on it. Microscopes of this design can be made just 4cm tall.
To compute the lens magnifications: Use the formula : Magnification = 250mm / 0.75 * lens diameter. Or : Magnification = 330mm / lens diameter.
Comments to Wan
Yu welcomed.
Editor's note: we were delighted
to hear from a young amateur microscopist living in China. Wan Yu tells
us that he has a good microscope with magnifications from 50x to 700x.
He enjoys studying freshwater algae and protozoa from pools, rivers, lakes,
the city gutters and the eaves of houses. Sometimes he observes insects
or microfossils and likes taking photo's with his microscope. Wan Yu also
likes to make small practical microscopes to take in the open air. One
of these designs he has kindly shared above with Micscape readers.