A Micro-Centrifuge, Cheap
& Easy
by Rosemarie Arbur, Oregon,
US
In Exploring with
the Microscope Werner Nachtigall tells how
convenient a centrifuge is for getting the one drop of
pond-water on your slide to contain the greatest possible
amount of micro-life. He shows a picture of an old
hand-cranked model and says inexpensive centrifuges can
still be bought. My problem is that, after checking some
online catalogs, I find $250+ a bit too costly. So I
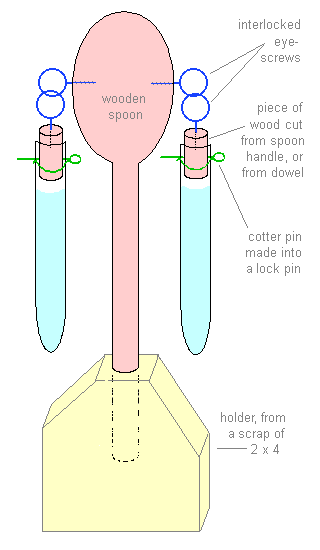
improvised and came up with the truly low-cost
micro-centrifuge to the right, and I built it in two
hours. Since I work slowly and at times needed to stop
and figure out what I was doing, you can probably make
one in the same time—including your trips to the
hardware store and supermarket.
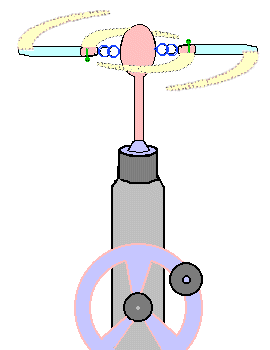
The only prerequisite is a hand-powered drill that will
accept a 3/8" bit —in this case, the handle of
the wooden spoon. (Older hand-drills generally have
1/4" chucks, but shaving the end of a spoon handle
is easy.)
See how simple it is? —you make the little
centrifuge, you put your pond water in the test tubes or
the little plastic jars, you stick the spoon handle into
your drill, and in three minutes or so you have the
"good stuff" concentrated at the bottom of the
containers, ready to be examined or transferred to a
cosier home. |

|
- Materials:
- 1 wooden spoon (handle
3/8" diameter)
- 2 small plastic test tubes
- 2 same-size 4- or 5-oz plastic
jars ("vitamin C, 250 tablets")
- 4 small eye-screws (or cup
hooks to be closed)(eye 1/2" diameter)
- 2 cotter pins (should be
1/2" longer than test tube diameter)
- if necessary, wooden dowel
that fits inside test tube easily
- scrap of 2×4.
- Tools:
- little saw or hacksaw blade
- piece of sandpaper
- drill and bits
- 2 little pliers (or hemostats
or strong tweezers, to bend pins)
- bigger saw to shape the scrap
of 2 × 4 if you want it to look nice
- if necessary, a knife to
downsize the end of the spoon.
| Young people
should get a more experienced person to do the
sawing, the drilling, and the whittling. All
people should be careful making the little holes. |
How to do it:
Cut the dowel or spoon handle to make
"stoppers" an inch long. Sand where you sawed.
Open two of the eye-screws, slip the other two inside,
and close the opened ones. Drill tiny guide-holes for the
eye-screws, to keep the thin wood from splitting. (Don't
use smaller eye-screws than I listed above because the
threads have to be big enough to get a good purchase in
the wood.) Drill little holes in the plastic test tubes,
1/2" from the top, and be careful that the second
hole is 180° away from the first. Then put the stoppers
in the test tubes and drill about half way through the
stopper; stick a pin or pencil-tip in that first hole and
then drill just a little way into the stopper from the
second hole in the test tube. Then remove the stoppers
and very carefully re-align the bit and the holes to get
the second hole to meet the first one (this is touchy,
but if you do it my silly slow way, you'll probably get
it right and be happy). Then you can make the holes a
little bigger if they need to be in order for the cotter
pin to fit.
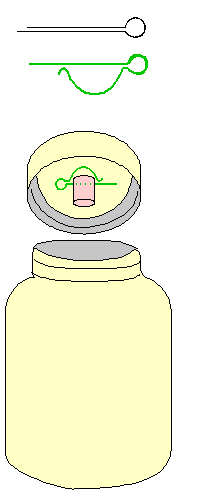
The only non-routine thing you need to do is to bend the
longer stem of the cotter pin as shown, to make it a neat
lock pin. The size of your test tubes determines the
bend. Next, drill a hole into the middle of the cap of
each plastic jar, just big enough to accept the same
wooden stoppers as go into the test tubes. When you want
to centrifuge more water than your test tubes hold, you
simply use the cotter pin and stopper on the jar-lids. No
redundancy, no extra parts to lose!
The rest is easy. Screw the eye-screws into the stoppers,
then screw them into the sides of the spoon. Make a nice
hole in the scrap of 2 × 4 for the spoon handle to fit
in when you need a third hand attaching and detaching
water-filled containers. Sand what needs to be sanded,
and you're all set. |

|
How to use it: (See safety footnote.)
· Carefully!
· Please notice only hand-driven drills are
recommended for this design.
· Don't use glass test tubes or jars; what it lacks
in shock value glass makes up for in potential for blood.
Messy. Too saline for your little pond-dwellers, too.
· Practice once or twice with both test tubes and
little jars. With the hand-drill you'll need to discover
a steady pace. You'll need to develop a firm hold on the
drill, resting it on a table or floor, but preferably
mounted in a vice.
· Fill both containers, even if one is only
ballast. I tried using just one jar, and even a
half-filled little jar develops surprising momentum; when
I thought of something else for an instant, the whole
contrivance almost got away from me.
· Remember that your micro-centrifuge isn't exactly
a high-end piece of equipment when you're using the
little jars instead of the test tubes. The jars don't
have tapered bottoms, so they don't concentrate the
"good stuff" nearly so well as the test tubes
do. But, low-end or not, the jars work quite
satisfactorily for setting up micro-aquaria, where a
little extra "empty" water isn't a problem. |

|
Fruits of my labor:
I have a pint jar of water and algae from a temporary
irrigation pond. Daphnids, copepods, annelids, and
vorticellae are easy to find at the bottom, but at the middle
level the algae is rather dense, and drops of water from the
midst of it don't contain many critters. Just the situation
for a micro-centrifuge, I thought, so I pipetted mid-level
water from the pint jar into my little centrifuge jars, spun
it for about 3 minutes, drew out the bottom half-inch of
water, and put it into a 25-mm-diameter "aquarium."
After it settled a bit, I put two drops from the bottom on a
well slide and took a look.
 That mid-level water
was an entirely different habitat! —and I could easily
spend two weeks identifying the more noticeable
"new" organisms I found. Free-swimmers and smaller
algae predominated. The diatoms were more numerous and more
mobile. There were more gastrotrichs, different (as well as
familiar) rotifers, and all kinds of "new" green
algae. What looked like a beautiful vorticella swam about
without an anchor for 45 minutes (I had to add a drop of
water next to the coverglass to extend my viewing time).
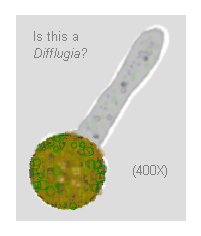
There were 15 shelled amoebae (they looked like Difflugia,
but most had only one thick pseudopod), all on the move, on
the one slide, and several elegant heliozoa, maybe Actinosphaeria.
Now I must order some methyl cellulose to slow down
the swimmers, and then I can try to identify some of the
quick flagellants and ciliates. In the meantime, I can work
on the green algae. (I'm using Thomas H.
Aungst's "tea" to
keep the critters alive; it works wonderfully, providing food
for the bacteria at the bottom of the food chain without
clouding the water.) The little centrifuge has more than
justified my two hours' work already.
Comments to the author Rosemarie
Arbur are welcomed.
Micscape safety
notice: It is emphasised that this design should
only be used with a well supported, preferably clamped,
hand-drill. Electrically driven drills (cordless or mains
powered) could spin this design too fast for safety. Even
with a hand-drill, take care and spin at a steady pace away
from eye level; a protective screen and/or face visor is
strongly advised.
Disclaimer:
This article is offered in good faith by the author. It is up
to the reader using this design to construct and operate in a
safe manner. The author, Microscopy-UK, Micscape, Onview.net,
site administrators and contributors assumes no
responsibility for damage to persons or property incurred by
building and using the project described.
© Microscopy UK
or their contributors.
Published in the
July 2000 edition of Micscape Magazine.
Please report any
Web problems or offer general comments to the Micscape Editor,
via the contact on current Micscape Index.
Micscape is the
on-line monthly magazine of the Microscopy UK web
site at Microscopy-UK
WIDTH=1
© Onview.net Ltd, Microscopy-UK, and all contributors 1995 onwards. All rights
reserved. Main site is at www.microscopy-uk.org.uk with full mirror at www.microscopy-uk.net.


 That mid-level water
was an entirely different habitat! —and I could easily
spend two weeks identifying the more noticeable
"new" organisms I found. Free-swimmers and smaller
algae predominated. The diatoms were more numerous and more
mobile. There were more gastrotrichs, different (as well as
familiar) rotifers, and all kinds of "new" green
algae. What looked like a beautiful vorticella swam about
without an anchor for 45 minutes (I had to add a drop of
water next to the coverglass to extend my viewing time).
There were 15 shelled amoebae (they looked like Difflugia,
but most had only one thick pseudopod), all on the move, on
the one slide, and several elegant heliozoa, maybe Actinosphaeria.
Now I must order some methyl cellulose to slow down
the swimmers, and then I can try to identify some of the
quick flagellants and ciliates. In the meantime, I can work
on the green algae. (I'm using