I'm assuming that you
already have a microscope or even better two; a good compound
microscope and a stereo dissection microscope. Frankly, I
consider that the bare minimum. They don't have to be
elaborate or expensive, but a good quality instrument of each
sort is really indispensable for any serious amateur
microscopist. What we don't tend to think so much about is
all the miscellanea which go along with doing microscopy.
Let's start with a relatively modest instance—dissection. Suppose you want to dissect a
starfish; what tools will you need? Most biological supply
houses sell dissecting kits which are largely useless, unless
you are building miniature ships made out of matchsticks.
Generally they contain a pair or two of scissors barely
suitable for cutting paper; a pair or two of forceps that
work so long as you don't have to pick up anything very
small; a couple of dissecting needles useable to tear the
hell out of a frog that's been sitting in formaldehyde for 10
years, but useless if you are trying to dissect an insect
larva; a probe which is handy for cleaning your fingernails,
but why else it's included is a mystery; an eye dropper,
whose presence is also mysterious, and finally, the one thing
that may truly be of some use, a scalpel, but even here it is
often one with a large curved blade that is not of much help
to the microscopist, unless he or she is cutting sizeable
pieces of material for sectioning. There are student
dissecting kits (a very misleading description—in most countries, dissecting students is
illegal), basic dissecting kits, instructor's dissecting
kits, advanced dissecting kits, and micro-dissecting kits and
these last two can cost over $100 each. Forget it! You might
want to buy one of the empty vinyl folding cases that hold
dissecting tools and then put your own selection in it for
use on field trips.

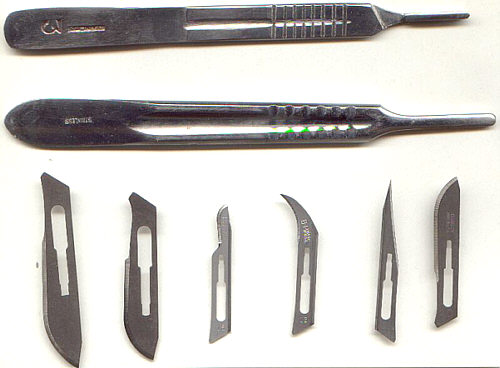
Disposable scalpel
Otherwise buy or make the individual tools that you will
really be using. Make a scalpel?!? Well, there are some
amateurs who take great pleasure in making their own tools
and some have produced very effective micro-scalpels by
cutting and mounting small sections of double-edged razor
blades in wooden handles. This is the sort of work that needs
to be done with considerable caution, otherwise you may end
up with lots of samples of slides of your own blood. For most
of us, it is much more reasonable to buy a scalpel handle or
two and some disposable blades. You can buy a number 3
stainless steel scalpel handle for $1.00 and it will
accommodate #10, 11, 12, and 15 style blades; a #4 handle,
for the same price, will take #20, 21, 22, 23, and 24 style
blades and you can buy the blades for 30 cents each. This is
a real bargain and it allows you to select from 9 different
styles of blades to acquire just what fits your needs.
Steel scalpel handles and
some blade styles
I used to buy some very nice little micro-scalpels, 3
different varieties, and I still use them and have learned
how to sharpen them, but for micro-dissection, nothing beats
a disposable surgical scalpel with a #11 blade. For those of
you who are Internet auction addicts, you can sometimes find
terrific deals, IF you know in advance the regular prices on
the items you bid on. For example, recently I bid on 500
disposable scalpels with #11 blades and got them for about
$45 with shipping. I recently saw the same scalpels in a
catalog for $1.99 each! With shipping that would be over
$1,000 for the same quantity. What am I going to do with 500
scalpels? Well, of course, I'll use some, but my proximate
friends will also benefit when I sell them to them for only
$1.00. Just kidding. For my friends, only 89 cents.
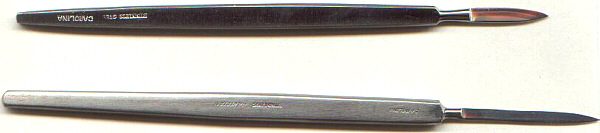
Micro-scalpels
You might also wish to consider investing in a disposable
blade remover or two at $3.95 each. These are a wise safety
move if you are using the stainless steel scalpel handles
with the replaceable blades. You simply insert the blade into
the small box and push the lever to remove the blade and
store it safely. Remember, these are surgical steel blades
and are extremely sharp.
I'm rather fussy about scissors, but I also don't believe in
spending $700-$800 for special micro-scissors made for eye
surgery (nor will I ever be able to afford such an
extravagance.) What supply houses often sell under the
general description of dissecting scissors may not be very
useful for the microscopist. I tend to buy three kinds of
scissors.
1) Iris fine point scissors, which one can get with either straight or curved tips at $1.10 each or $1.00 each if you buy ten. These are stainless steel and made in Pakistan. They are not what one would call "first quality", but they are really quite good and, at this price, one can use a small diamond hone to touch them up and keep them the way you want them.
2) Micro-dissecting scissors—again from Pakistan, but of good quality and the blades are only 11 mm. long with a separation at the tips of just 5 mm. The handles form an elongate bow which when squeezed close the blades for cutting. This provides very nice control and they do work quite nicely and cost only $8.50.
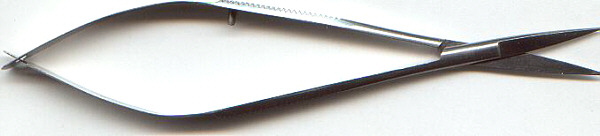
Micro-dissecting scissors
3) Iridectomy scissors—These have a long stainless steel handle which has one of the blades at its end and then the other blade comes in at an angle with a short lever, so that when you push the short blade it connects with the other blade to cut. These are also made in Pakistan, work well, and cost between $20 and $25. The big supply houses used to supply an American made version, but they cost over $100 each! and so they have now gone to the product from Pakistan.
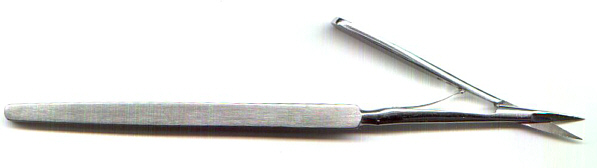
Iridectomy scissors
What about dissecting
needles? Buy some. They are cheap ($1.50 for 10, straight or
curved) and they are handy. However, for serious
micro-dissection, it is best to make your own. I use insect
pins and some very small dowels for handles. I bought the
smallest clamp-on vice (sorry, I mean—vise)
I could find—the jaws are only about 3"
across—and I cut a piece of dowel to the
length I want for a handle and clamp it in firmly. Then I
take an ordinary dissecting needle and push it gently into
the dowel—gently, because if you push too hard,
it will split the dowel—you need to make a hole just deep
enough to comfortably seat the needle before you glue it. Oh,
I forgot to tell you—I take one of those ordinary generic
dissecting needles and I rotate it on a hone until it has an
extremely sharp point. this is the reason for the vise. If
you try to hold the doweling in your fingers you will once
again have an ample supply of material for making blood
slides.
The insect pins are steel and have a small knob as a head.
Determine the length you desire and then using a pair of wire
cutters, snip off the section with the head. It is best not
to carry out this procedure in the bathroom where eventually
these little flying steel fragments will embed themselves in
your feet after showering. Put a drop of glue in the hole of
the dowel and using some sturdy blunt forceps or a small pair
of needle-nose pliers, place the needle firmly into the
handle and hold it for a few moments to let the glue set.
After the glue has firmly set (usually 12 to 24 hours),
carefully remove any excess glue with a scalpel. It is a good
idea to make a dozen or so at a sitting, then you will have
them whenever you need them. These needles are very handy not
only for dissection, but also for moving small objects on a
slide when you are making dry mounts. They take a bit of
getting used to as they are very springy and just when you
are trying to nudge a foram into a drop of glue, the needle
may send the specimen flying off the slide.
The other type of dissecting needle I make is even smaller
and finer. For these I use a kind of insect pin called
"minuten Naedeln" or "minute needles".
These are the type entomologists use to mount gnats and other
very small insects, although now they tend more toward gluing
the specimen on a small triangle of paper and then using a
larger sized pin through the paper for mounting in a specimen
case. What this means is that minuten Naedeln are harder to
obtain and somewhat more expensive, but for $15-$20, you get
a small paper packet with 500 needles—a
lifetime supply. Share the cost with some fellow enthusiasts
and divide up the packet. Beware—these
tiny needles are so thin and so extremely sharp that they can
imbed themselves in your fingers with such facility that you
hardly notice. The procedure for mounting them in handles is
the same as for the larger needles; it just requires a bit
more care.
Next, let's consider forceps, of which there is a wide
variety. You can buy "student forceps", which
usually means that they are cheap and rather poorly made;
"cover glass forceps" which I have always found
rather awkward, "cartilage forceps"—now, how many of us are going to be working
with cartilage?—what this describes is a fairly
sturdy forceps with serrated tips which provide good grip and
that can be quite useful for certain types of specimen
material; and there are fine point forceps, curved forceps,
micro-dissecting forceps, watchmaker's forceps, hemostats,
with scissor-like handles with tips ranging from
"mosquito" hemostats to sizes more appropriately
designated as "tongs', and finally, plastic forceps. I
know that you suspect I'll probably say something sarcastic
about plastic forceps, but you're wrong. Plastic forceps are
ideal for removing specimens from liquids, such as,
formaldehyde and alcohol.
Back to Pakistan. I buy what one company describes in its
catalog as "micro-fine forceps". There are very
interesting as the quality can vary from pair to pair, so I
usually buy 10 at a time for the very reasonable price of
$13.00. Even though they are "micro-fine", the tips
are usually not fine enough nor sharp enough for my purposes,
such as handling minute forams. I examine each pair under my
stereo dissecting microscope and select the best ones (the
others, I use for general purpose work), then I sharpen the
two tines using a pocket diamond hone. This is probably not
something that you can get away with as an engagement present
for your fiance, since these little gems cost less than $10.
I strongly recommend the model the fishermen use with a grove
down the middle which is used to sharpen hooks. This is a
real advantage when you are shaping the forceps tines. I run
each tine along the groove 10 times, then I examine, then
usually another 10 times; occasionally, a third 10 times.
When I'm satisfied, I very gently rub the inside of each tine
to remove the dross from the grinding of the outside. With a
bit of practice and patience, you can produce exceptionally
fine forceps. I have one pair of Swiss watchmaker's forceps
which cost $27.50. These handmade ones are every bit as good
and you don't need to be afraid to give them hard use,
because if they sustain a bit of damage, you can always touch
them up or make another pair at a small fraction of the cost
of Swiss forceps.
You are also going to need some pipets and I generally use
two different kinds on a regular basics and infrequently, a
third type.
1) Disposable Glass Pasteur
pipets—For me, these are indispensable. You
can buy them in boxes of 250 in two different sizes. The
5¾" ones can be purchased for $4.95 and the 9"
ones for $6.20 in flint glass. If you want borosilicate
glass, they're somewhat more—5¾"
for $8.25 and 9" for $10.50. When simply examining
samples, one can use a single pipet again and again, but if
you are looking at special cultures or using them for
chemicals, then they are cheap enough to use once and
discard.
From these Pasteur pipets, you can make your own
micro-pipets. You will need an alcohol lamp. You can obtain a
heavy base glass one for $4.50 and 40 cents for 12
replacement wicks or an aluminum one for $8.50 and $2.50 for
12 replacement wicks or a wickless burner of $9.85. These use
95% denatured ethyl alcohol. [CAUTION: This is highly
flammable and toxic. It cannot be denatured and can be fatal
if taken internally. Avoid inhaling the fumes and if you
spill it on the skin, wash immediately with soap and water.]
If you are sensible, the risks are minimal. Don't use it
around flammable materials or around appliances which might
generate sparks. Also, don't try to use other types of
alcohols—I have, and I ended up with soot
covered micro-pipets.
When I want to make a batch of micro-pipets, I clear off an
area of my lab table and set out a metal tray. If this is
your first attempt, try using the 9" pipets; they have a
much longer tip and you're less likely to burn your fingers—do be attentive, as molten glass can inflict
some very nasty burns. I don't want to make this sound like
you are walking through a chemical factory with a vial of
nitroglycerine, but with the use of common sense and a bit of
practice, you will soon become adept.
Place the center of the tip in the hottest part of the flame
and slowly rotate the pipet. You will quickly learn to sense
when the glass is soft enough to pull. Make the pull firmly,
smoothly and quickly, but not too quickly, as you remove it
out of the flame. Do not pull the pieces completely apart;
leave a narrow, fine tube of glass connecting the tip you are
pulling on and the rest of the pipet. (When this does happen
and the tips seal over, set these pieces aside and use them
for micro tools.) Let the glass cool for a few seconds and
then bend it until the thin tube of glass snaps. This is best
done over the metal tray to try to catch any minute glass
fragments. Then place both the pipet and the broken tip on
the tray to cool. If you have carried the procedure out
properly, you will have a micro-pipet and you may discover
later that the tip is too fine for a particular task, in
which case, you simply use a pair of your micro-forceps to
break the tip at the place you want. I usually make about 50
micro-pipets at a time and when they are thoroughly cooled,
place them in a heavy cardboard box on a shelf next to my
microscope table for easy access. You will also want to
purchase a packet or two of small soft latex bulbs for the
Pasteur pipets.
2) Another type of pipet which is quite handy is the transfer/dropper pipet which is polyethylene, is a single piece and includes the bulb, and they come in 14 different sizes and styles ranging in price from $13.50 per 500 for most types to $13.50 per 100 for an extra long 23 ml. pipet. Naturally, my Scottish ancestry leads me to go for the $13.50 per 500 styles which are, in fact, the ones I like best anyway (Sure, sure, I can hear you saying. One of my graduate students said to me a couple of years ago: "If someone had those old paper pill boxes on sale, you'd buy them. Well, they were only $2.00 per 1,000, so what's $8.00? I have to admit that I am extremely susceptible to bargains, which is why I shall probably have to keep teaching long after retirement age.) In any case, this type of pipet is very useful for a one time use with strong chemicals or stains. When I use one for such a purpose, I toss it in a cheap, plastic, sealable sandwich bag before discarding it, to protect me from possible fumes and the disposal people from coming in contact with any toxic residues.
3) Occasionally you many
want to have a pipet that allows you to dispense very precise
amounts of fluid. A very reasonable solution is to buy a few
disposable serological pipets. These are college educated
pipets—they've graduated. For $2.90 you can
get 10 one milliliter pipets with 0.01 ml. graduations and
for $4.90, you can get 10 ten milliliter pipets with 0.1 ml.
graduations. These can be especially helpful when making up
solutions of vital stains where dilutions of from 1 to 10,000 up to 1
to 500,000 are required. They are also useful if you are
making up solutions of various salts as media for the
culturing of aquatic micro-organisms.
If you are working with larger organisms—something
larger than a rotifer, but smaller than a rhinoceros—then you may want to add some heavier
instruments, such as, bone cutters, a bone saw, large tissue
forceps, and a dissecting pan to two along with a packet of
dissection pins. These pans have a thick layer of wax in them
and as you proceed with your examination of the specimen, you
can use dissecting pins to position skin, muscles, etc. so
that you have a clearer view of the structure and
organization of the organism.
At the beginning of this essay, I mentioned a starfish. If
your local beach doesn't have any—unfortunately,
my nearest local beach is 1,100 miles away—well, then biological supply houses will be
glad to provide these—preserved, of course. If you want to
buy live ones, the air freight costs are phenomenal. You can
get a 3"-4" preserved starfish for $1.20 or if you
feel like splurging, you shell out $1.90 and get a
6"-7" one.
A starfish is an absolute bundle of mysteries and wonders and
I'm going to whet your appetite by mentioning a few of them
and letting you have the fun of figuring out the patterns and
details. Starfish are not, of course, fish; no more than sea
cucumbers are cucumbers of any sort. Some zoologists have
tried to insist that people call them sea stars, rather than
starfish, but people, being stubborn, still call them
starfish and probably always will. Starfish belong to the
phylum Echinodermata or "spiny skinned"
creatures derived from two Greek words, one meaning
"skin" and the other meaning "hedgehog,"
a description particularly apt for sea urchins.
To begin to understand a starfish, you have to observe it
with exceptional care and patience. This is not something you
can learn in an hour or a few weeks; it takes constant
practice. The genius of Darwin, in large part, resided in his
exceptional ability to observe, describe, and contemplate
what he had seen without imposing preconceived models of
interpretation. Pick up the starfish, if you're not allergic
to formaldehyde and/or alcohol, and one of the first things
you will notice is the spiny skin. In some species, there are
literally spines; in others, knobs, plates, and bumps; in
Dermasterias, the so-called "leather star", the
texture of the surface is indeed leathery and the skeletal
plates are imbedded just under the surface; in some other
genera, the surface texture is rough and scaly, but with no
distinct spines—instead the small plates form an
intricate, lace-like set of patterns across the surface.
On the aboral surface, you will find a structure, slightly
off center on the disk from which the arms or rays extend—a round structure which looks like a small
piece of coral. This is the madreporite and it, like the
spines, knobs, and plates is calcareous, that is, it is
composed primarily of calcium carbonate as are the skeletons
of corals. This device is an intricate series of canals
designed to let water in, but stop debris; in other words, it
is an elaborate filter. Why does a starfish need to draw
water in or expel it? The answer lies in an incredibly
elaborate system designed for locomotion, for attachment, and
for food capture. Starfish have what is known as a water
vascular system which controls hundreds of tube feet. Inside
the central disk is a tubular ring which is connected to the
madreporite. At each arm, there are two tubes that branch off
from the central ring and run down the length of the arm. All
along the length of these tubes are little bulbs or ampullae,
rather like pipet bulbs, and attached to each bulb is a tube
foot. In your preserved specimen, the tube foot will be
contracted and the only way to appreciate this remarkable
mechanism, is to observe a live specimen or watch some of the
very fine marine cinematography in some nature videos. In
these instances, what you will observe should surprise and
amaze you—it still has that effect upon me. The
tube feet can extend to several times the length of the
shrivelled artifacts which you find in your preserved
specimen and they seem more like tentacles than feet.
Furthermore, at the tip of each tube foot is a structure
which allows it to function as a suction cup and so the
ampullae (bulbs) control not only the extension and
contraction of the tube feet, but also their attaching and
releasing on a substrate or prey. Since these responses are
likely largely a consequence of tactile phenomena, there must
be some very sophisticated biochemical and biophysical
reactions going on here and at an extraordinary rate for an
organism with a primitive nervous system.
At certain places on the surface—it
varies from species to species, but the area around the mouth
is a good place to begin looking—you
will find tiny, stalked pincers with 2,3,4, or rarely even 5
"jaws". These surreal devices are called
pedicellariae and some of them can even emit a toxin.
Pedicellariae help keep the surfaces of the starfish free of
debris and kill planktonic larvae looking for a place to
establish a foothold.
Another oddity about starfish is that many species have an
eye spot at the tip of each ray. Starfish have eversible
stomachs; they poise themselves over a mussel or an oyster
and attach with their tube feet, using their arms to open the
mussel or oyster shell just enough to create a narrow gap
into which they can evert the stomach, surrounding the soft
parts of the shellfish, digesting it, and then retrieving
their stomach. When you dissect a starfish, or any echinoderm
for that matter, examine samples of the stomach contents
under the compound microscope. You will likely find protozoa,
nematodes, algae, diatoms and other interesting odds and
ends.
Let me mention one last extraordinary feature of starfish. In
the early days of oyster fishing, the fishermen would find
enormous numbers of starfish feeding on their oyster beds. To
combat them, they created great "mops" which they
would drag across the beds and to which large numbers of
starfish would cling. Unwittingly, they were making their
situation worse, for they would chop up the starfish and toss
them back overboard. what they didn't know was that starfish
have incredible power of regeneration and from just a part of
the central disk and one arm a whole new starfish can
develop.
Dissection is both a skill and an art. One must learn the
techniques of working with the instruments, but it is also
essential that one learns to see the relationship of the
parts of the organism and come to understand how any
particular part relates to the whole. The development of good
abilities at dissection desponds upon practice and, above
all, patience, You don't have to have expensive tools; you
must learn how to use well the tools you make and purchase.
If you have doubts about this, go to a major library and look
at a copy of Jan Swammerdam's extraordinary volume with its
remarkably detailed plates. Oh yes, the title of the book is The
Book of Nature; Or, The History of Insects; Reduced to
Distinct Classes, Confirmed by Particular Instances,
Displayed in the Anatomical Analysis of Many Species, and
Illustrated with Copper-Plates Including the Generation of
the Frog, the History of the Ephemerus, the Changes of Flies,
Butterflies, and Beetles, With the Original Discovery of the
Milk-Vessels of the Cuttlefish and many other Curious
Particulars. This volume was originally put together by
Herman Boerhaave who compiled the manuscripts left behind at
Swammerdam's death and published the work under the Latin
title Biblia Naturae in 1737. If you look at the
plates, you will see in the beautifully intricate drawings of
this Dutch 17th Century microscopist, a wealth of detail
derived from his remarkable skill at making sharp instruments
and his patience—he spent a whole month examining just
the intestines of bees!
Endnote
The specific prices which I have cited here are from the 2000-2001 Scientific Equipment Catalog of Cynmar Corporation, 21709 Route 4 North, P.O. Box 530, Carlinville, Illinois 62626; Telephone 1-800-223-3517; FAX 1-800-754-5154; E-Mail: cynmar@cynmar.com; Website: www.cynmar.com. I have no affiliation whatsoever with Cynmar except as a customer and I receive no financial benefit from citing them. I use them as an example, because it is a modest-sized supply house with a reasonable variety of apparatus, items that are mostly of very good quality—I have a strong disagreement with them about the Chinese microscopes, but they still put up with me. I have made eccentric requests for them to find items not in their catalog and they still put up with me. The two main reasons I have used their catalog are: 1) I have gotten good quality items at prices well below the large supply houses and 2) the people are friendly, courteous, and exceptionally helpful and in a world that seems to be working harder and harder to depersonalize us by treating us as a collection of identification numbers and credentials, I find the human touch very appealing.
Comments to the author Richard Howey welcomed.
Editor's note:
The author's other articles
on-line can be found by typing 'Howey' in the search engine
of the Article Library, link below.