| The Poor Man's
Photomacroscope (pt 8)
Wrestling with Nature's Tremblings By Paul James |
"Hold your breath.......keep absolutely still" whispered my father in the dim red light. Suddenly a ghostly grey image appeared on the paper on the baseboard for a few seconds and then it disappeared. Amazingly after a short period of time the same paper sheet grew a picture in a dish of liquid..................
That brief recollection of my first experience of darkroom magic was as a 7 year old, and though the details have obviously been lost in time, that first basic instruction I clearly recollect to this day. So the potential problems created by vibration on imaging were instilled into my consciousness at an early age. My recent efforts to thwart this entirely natural phenomenon in the interests of good image making over the 'scope will be remembered too but for very different reasons.
I freely admit that I'd become complacent about matters of shutter vibration simply because my little digicam's efforts over the years at raising vibrational havoc down the 'scope I now realise were completely ineffective. Its tiny 'leaf' shutter's mechanism couldn't have amounted to more than a few milligrams, as it only needed to cover the small 5 mpixel CCD. I hadn't truly realised the extent of the problem until recently when I ostensibly upgraded to more recent examples of dSLR cameras. Even without the bouncing mirror assembly, the focal plane shutter's action causes surprisingly much more disturbance than I had expected. The mirrorless examples of the DX format I've now realised are little better in this respect simply because their focal plane shutters are basically the same as in their dSLR counterparts. In fact I'd venture to say that the lighter body of the mirrorless cameras are more likely to register more reactionary disturbance simply because their body mass is significantly less than the bigger dSLR's.
The generally successful process of image making in conventional terrestrial photography is mainly indebted to a very much lower level of image scaling on the sensor/film plane than is the case in photomicroscopy. The idyllic prerequisite of having a camera absolutely still during the exposure period is easily conceived but seldom realised principally because vibration can't be persuaded to disappear in the way we would like it to. The following notes describe my efforts and thoughts about this matter as I stumbled across them, as well as some basic physics on the matter.
The Shutter.........the principal culprit
When we hear the shutter action of a camera, we can reason that its vibration has released sufficient energy to disturb the camera body into behaving like a loudspeaker diaphragm. In fact the hard metallic/plastic body of the camera and that of microscopes all too readily transmit vibration. So mechanically coupling the camera to the microscope unavoidably transmits vibration throughout the 'scope's stand and importantly the stage. Thus both the camera body and the stage will actually oscillate over a very short period of time with every shutter firing. The amplitude and frequency of this disturbance isn't visible of course because it is on a minute scale, but it nevertheless in one way or another causes the aerial image to dance erratically over the pixels of the sensor. This disturbance directly relates to the acceleration and deceleration of the curtains and associated mechanisms of the shutter, and their timings before, during, and after exposure.
So the inevitable and unavoidable consequence of shutter release is two fold :-
1) The combined mass of the moving shutter curtain assembly is relatively small but when they move across the sensor plane they impart a force that is equal but opposite in effect ( one of Newton's 3 Laws of motion ). This causes the camera to shift momentarily but very slightly in the lateral plane and it therefore excites the natural resonant frequency of the camera/trinocular port combination. This disturbance albeit small will diminish over a period of about 0.2-0.4 seconds or so in most cases as this oscillation is gradually dampened in that time.
2) In addition to this is another component introduced by the sudden halting of the curtain assembly at the end of its travel, raising a significantly abrupt impact wave of energy which passes throughout the camera and microscope generating the distinct shutter sound we hear. Only the impact of the first shutter curtain's assemblage causes a recordable disturbance on the sensor as it lingers into the exposure period. The 2nd curtain's motion produces exactly the same inertial kick as the first, but its abrupt halting at the end of its run occurs immediately after the sensor's exposure to the aerial image and therefore cannot affect the recorded image. The complexity of disturbance is also compounded by the duration of exposure. Exposures of up to and including 1/2 a second would capture the image during the disturbed period after the first curtain's motion and halting impact. An exposure of say 5 seconds would record this initial disturbance period of around 1/2 second and the much longer period of 4 1/2 seconds or so when the image would be ideally tranquil. The imagery raised from the longer exposure would therefore be more faithfully reproduced because of course the static phase of the projected image greatly outlasted the initially disturbed period.
Loose fittings
Clearly then we can reason that the whole camera assemblage will oscillate about the optical axis for a short interval as a consequence of both forms of the near instantaneous disturbance from the shutter. The projection eyepiece immediately beneath the camera body must also oscillate in synchronisation with this assemblage so long as it is a tight fit in its seating. But if the eyepiece rests in a slightly loosened fitting, which I suspect is commonly found, its motion from the disturbance of the shutter must be at a slight variance with the camera assemblage ? Whilst this might appear to be overly analytical, one has only to consider the size of each pixel on say a 14 megapixel camera sensor to realise the scale of the matter. Of course the vibration of the specimen/stage combination can become a much more serious problem to contend with as the magnification rises, than the disturbance induced within the camera itself, which is reliably constant.
The mechanics of vibration
Noise is simply vibration of the air which in turn has been generated by contact with objects which are vibrating. Vibration is often induced by impacts which also travels through solids and liquids too, but rather more efficiently. The Shutter's mechanical disturbance travels through the 'scope......too efficiently as it ricochets off the inside contoured margins of the stand to raise the familiar ringing resonance until all this energy is transformed into a minute quantity of heat caused by the jostling of molecules.
When an object such as a piece of wood, stone, metal, plastic etc is tapped with a coin for instance, it makes a distinctive sound which is a composite of vibrations generated by the impact between the coin and object plus the modified sound that radiates from the body of the object. This sound is complex and in most cases includes resonant tones which linger for a short time afterwards. Soft materials such as clay, rubber etc absorb impacts by deformation and emit very little of the impact energy as sound. In fact the harder the material the more efficiently is the transmission of the impact energy through it, and if the material is suspended from a thin cord, the more resonant sounds can be heard ringing for a considerable time after. Holding the object whilst it is struck simply transfers this energy into the hand which dampens the internal reflections of vibration very effectively. Hard and dense materials such as metals of symmetric form ring longer than if of complex or random form. The classic bell shape extends this ringing phenomenon for many seconds as we all know, because its circular symmetry maintains the energy of vibration effectively and its thinnish 2 sided wall efficiently transfers this resonance to the air. A microscope suspended from a cord when tapped smartly rings too, but doesn't last too long simply because of its lack of symmetry. With its foot in contact with the surface of the bench the microscope's sonic characteristics would effectively change because the bench becomes part of its structure, at least from the point of view of vibration.
Natural resonance
This tendency of objects both large and small to be induced to resonate by sufficient disturbance is universal. Musical instruments wouldn't have evolved if this was not the case. Even large structures such as bridges have resonant frequencies, and why soldiers need to fall out of marching step when crossing them. Naturally occurring resonant frequencies in very small objects like those we examine on the stage tend to be all to easily excited by the very slightest of disturbances to the stand. Certain minute flower parts, filaments of one sort or another etc are frustratingly responsive especially if they are in partial suspension over the stage. So a directly coupled camera to the microscopes limb will transmit more than sufficient vibrational energy to excite the resonance frequencies of all the foregoing examples with consummate ease and unflagging reliability. Isolating the super delicate specimen from vibration on the stage is nigh impossible, as it is fraught with all manner of counterproductive consequences. I've noticed with amazement how a gentle finger tap on an adjacent wall beside the bench can induce a very delicate specimen to resonate freely, which is all too easily noticed even during low power observation.
Incidentally one of the saving graces in compound microscopy is the dampening effect of water. When certain highly tremulous specimen parts are immersed in water between the slide and coverslip, their hyper-volatile resonance is effectively dampened (in both senses of the word ! ) and is the reason why we can observe pond life so easily. However when flooded to excess the whole assemblage of coverslip/water and specimens trembles like a jelly all too easily. The motion of cilia is of course entirely another matter.
Even if we made a microscope stand from a material which was a very poor transmitter of vibration it would in all likelihood be insufficiently rigid enough to hold its focus............ Nature can be very frustrating.
The Cure(s)
I think there are 3 basic ways of dealing with the consequences of focal plane shutter vibration.
1) Short duration flashed lighting will eliminate the problem entirely, there's no doubt about that, but whether the individual can live with a more complex lighting setup, and one that isn't as easily contrived to suite the observer's purposes compounds the matter. Tweaking a flash unit to output a very brief burst of light of around 1/10,000th second duration is relatively easy to achieve by reducing the capacity of the flash units condenser, but satisfying the aesthetic aspects of specimen imaging is something else. I must admit I do like to be able to image what I can see with more conventional lighting, which leaves little to chance, and is ultimately less complicated in the long term. In the realm of compound microscope brightfield imaging, flashed lighting has no equals when it comes to freezing motion. However for those ultra rapid events the Kerr cell (shutter) can reduce the brevity of exposure to sub 1/1000,000 second levels.................for starters !
2) Increasing mass technique Since the shutter's mass remains constant we can reduce its inertial kick by increasing the effective mass of the camera body. This can be accomplished easily enough by adding dense material in contact with it. Out of sheer curiosity I decided to spend a few hours fashioning a ring like camera support from scrap materials :-
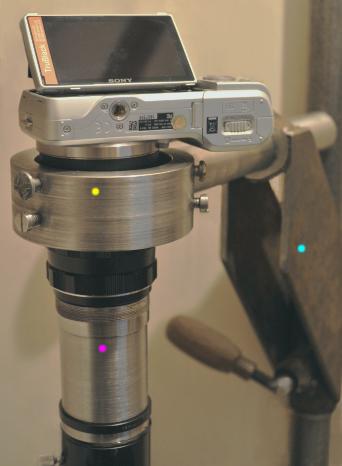 |
The images above illustrate the basic setup. The heavy steel ring ( welded to a steel bar which in turn is clamped into a sturdy, adjustable wall mounting assembly........... previously a heavy duty enlarger support) has an internal diameter that allows the entire camera assemblage to be lowered through it was comfortable ease. Of course this ring initially needed to be roughly centered over the trinocular port and at the correct elevation in the first instance. That done the camera assemblage is passed through the ring and inserted into the photoport of the stand. The camera is thus accurately aligned and ready for normal use. The next step is to bring each of the 6 x 120 screws in the ring into contact with camera assembly's tubing by crossing the internal air gap. These 6 screws are adjusted to take up the 'slack' as it were in a very sensitive manner, without disturbing the alignment of the camera assemblage position. And so in a matter of a few seconds the camera inherits the additional mass of the support apparatus and of course the wall itself whilst remaining accurately located in its original aligned state in the trinocular port.
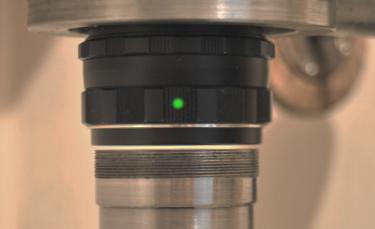
Enter "The Acid Test "
 |
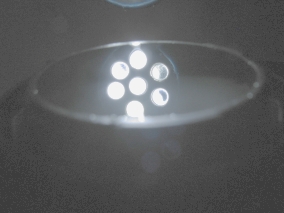 |
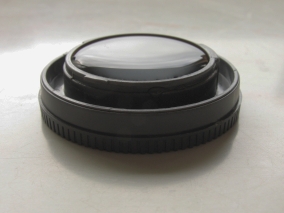
An exceedingly simple yet highly sensitive way of assessing the level of vibration in any situation can be realised by noting the disturbance generated on the surface of a small container of water. It reveals the scale of vibration with alarming clarity. To greatly enhance my perception of the water surface I shone an LED light source onto it obliquely so its reflection revealed a self contained image of the light source . I used an old plastic camera body cap which has a useful annular trough which would conveniently minimise any accidental spillage during use. This setup is extremely sensitive, and its revelations soon had me elevating my attitude towards the whole issue of vibration by a quantum leap to a much more respectful level. At last I had a speedy and reliably dependant method of assessing my anti vibration strategies without wearing out my patience and camera !
However when I employed the water test on my first effort of increasing the mass of the camera assemblage I noted considerably more disturbance than I hoped would be the case. It seems I'd completely over looked a problem relating to the wall support. Its vertical tube's natural resonance was being triggered off by the impact action of the shutter, despite the significant increase in overall mass added to the camera assemblage. I soon realised that the heavy structure from the ring support right through to the vertical tube absorbed the lateral shift of the shutter curtain assembly, BUT aided the transmission of the impact energy of the shutter by virtue of its inherent rigidity. Thus the shutter's impact excited the total support assembly with the help of the vertical tube's relative elasticity. Again fortune lent a hand, and I simply pushed in 2 softwood wedges between the tubing and wall above and below the point were the camera's ring support assembly meets the tubing. This virtually eliminated all the resonance by virtue of it being absorbed much more efficiently by the entire wall....................... It passed the water test.
However the shutter impact energy was still travelling down through the limb to the stage, disturbing my pool of sensitive water there. The next step was obvious, but how to implement it wasn't.
Decoupling the camera.
The concept of detaching the camera from the trinocular port is one of those ideas which is so easily conjured in the mind, but isn't so easily put into practise. The fundamental problem is one of suitable support of the camera which must be very accurately aligned over the trinocular port and remain rigidly in place. It should ideally be isolated from the shutter's vibration, yet it cannot be a mile away. And so another problem arises ? But the answer in my case was already there...........I'd unwittingly contrived a ring support in a way that with no further alteration or adapation could rapidly decouple the camera from the trinocular port and hold it precisely in place too. A case of extremely good fortune indeed !
The Decoupling Ceremony !
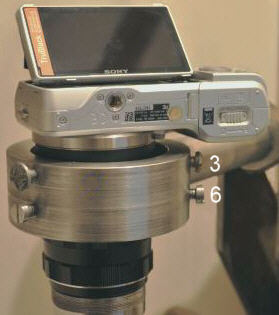 |
One of the intriguing and beguiling properties of the universal 3 x 120 screw adjusting system is the ability to alter the lateral position of an optic very precisely, such as a condenser. But my camera assemblage can also be raised or lowered a few mm's and without misalignment too, and so it soon occurred to me that if the camera assemblage was intially raised above its seated position in the trinocular port by say 3-4mm by slackening 3rd and 6th screw in the ring and then retightening them, I had a potentially very convenient method of accurately decoupling the camera from the stand. Let me explain : All I had to do was to unscrew the tubing from the front of the camera lens and then ease it back down into the trinocular assembly 3-4mm, leaving the former in place. The air gap between camera lens and trinocular port tubing would be about 1.5-2.0mm.. .....perfect, and the alignment undisturbed ! It worked very well indeed. So simple too. The whole process of placing the camera assemblage through the support ring and accurately fixing it within, then decoupling it takes considerably less time than writing this paragraph.
 |
The decoupling does of course increase the spacing between the camera lens and projection eyepiece by a small amount, but this hasn't affected the imaging in any noticeable way in my setup. Yet another fortunate coincidence occurred to me as I realised that I could now precisely regulate this gap to perfection by turning the focus barrel of the camera's own 'relay' lens and thus leave a minute decoupling gap of around 1.0-0.5mm. Such a gap obviated the need for a light screen and brought the 2 optics back to near their original spacing.
The water test confirmed the sensibility of decoupling the camera from the stand. No surprises there, but there was I noted a tiny vestage of disturbance which presumably arrived at the stage from the bench which in turn was disturbed from the residue of vibration transferred to the wall directly from the camera. Nevertheless I was getting very near to the idyllic tranquility required to instill a little more confidence in my image making efforts of the more difficult specimens at higher amplification.
3) Delayed exposure technique : This unconventional method I contrived as a consquence of the frustrations experienced whilst endeavouring to dampen shutter disturbance. I like it because it greatly simplifies matters, and only requires basic skills and a bit of practice......... In principle the exposure is momentarily delayed until the shutter vibration has ceased. This might appear to be contradictory since the sensor's exposure actually begins at the onset of the vibration. Let me explain :-
In its most basic form : The lighting is left as is, but the light entering the objective is blocked off by a piece of blackened card held immediately beneath it. The other hand holds a remote shutter release unit and fires it. After the initial half second disturbance of the shutter has elapsed, the card is smartly pulled aside and the camera's shutter then automatically ends the exposure at the appropriate time. The only drawback is the likelihood of the camera applying noise reduction to the image, though with most cameras this can be turned off. In order to get a workable exposure period of around 1-1.5 seconds in the first instance, the lighting must be withdrawn or dimmed a little. Then all that is required is to button in exposure compensation into the camera which allows for the proportion of the exposure duration which is blanked off. So an actual 1.5 second exposure out of a 2 second curtain opening needs about +0.3/+0.5 of a stop additional light to compensate the slight under exposure caused by the partial blockage of light period. Longer exposures require no exposure compensation as the initial 1/2 second blackout period becomes insignificant, but this is not recommended as the noise levels from the sensor would become unacceptable. Ironically, film is the ideal format here because of course film spends its entire unexposed life in the dark and so another 1/2 second before exposure is of no consequence. Sensor's are active as soon as the shutter opens and generate noise consistently throughout this period including the initially blocked 1/2 second. Therefore keeping sensor noise to a minimum when applying this technique with digital cameras requires that this delayed exposure technique be efficiently executed in the minimum of overall exposure time. I have been able to routinely produce decent imagery within a shutter opening period of 1 second with some practice.
I've only described the very basic technique, so I suspect that this method of capturing the image during the calm after the storm can be tweaked to suit an individual's ingenuity. LED lighting is ideal in this situation because its rise time is virtually instant. Devising an electronic control unit which simutaneously triggers the camera's shutter and precisely delays the switching of the LED lighting seems the sensible way to reduce overall sensor noise, since this would obviate the need of blocking off the lighting by hand if the process is momentarily performed in the dark. The automated sequence of events would thus read as follows :-
Main room lighting off........shutter release............LED switched on after disturbance delay..........shutter closes to end sequence....main light back on.
All this takes place within 2 seconds or less if automatically controlled by electronics. It could be tweaked to perfection by reducing the delay period to the point where image degradation from the tailing off of the apparatus's resonance occurs. By employing brighter lighting for a shorter duration the entire shutter opening period could be reduced to sub second levels which would stop in camera noise reduction processes automatically.
There are parallels here with electronic flashed light techniques, but the principal difference is that the conventional lighting is employed and not a separate flash light unit. This means that the aesthetic appearance of the specimen is precisely replicated in the captured image.
Concluding Thoughts
There's no doubt that my photomacroscope shudders much less than it originally did. There's also no doubt that it still does, but its becoming very difficult now to detect this in all but the most critically sensitive situations. The benchmark imaging standard I depended upon was sourced from the delayed exposure technique that I know has been created in perfectly static conditions.
I'm still mindful of the fact that the recorded image is 2 dimensional regardless of source, and that its lighting is the only principal way of enhancing it to effect besides specimen's orientation, focal planing and framing. These simple facts tell me at least for now, that my setup's imaging simplicity, convenience and effectiveness is easily sustainable and therefore rewarding.
I still like the delayed exposure approach best for sensitive situations....as it seems the most civilised to me especially if an electronic control unit were to take over the actual delayed switching of the LED illumination etc.. I'll be investigating the merits of a more intensive LED light source to reduce the overall exposure period to sub second intervals to minimise the sensor's noise output. So effectively reducing the overal sensor activity during exposure to less than 1 second. I think there is some mileage in this, so inviting some further experimentation. On reflection it really does seem entirely sensible to let the dust settle before capturing the image....it certainly solves more problems than it creates. Trying to solve the vibration problem by mechanically means can introduce more problems than it solves......though decoupling the camera is very effective, but incurrs much work executing a dependably efficient and reliably setup.
However I've absolutely no regrets about picking the Sony NEX body for the photomacroscope. Its shutter's vibration, though surprisingly more energetic than I'd expected, is it seems fairly average for the type. But it does nevertheless make me wonder why the passage of a beam of massless light need's to be controlled by what effectively has the bulk and subtlely of a castle's portcullis........................... For the problems it creates in photomicroscopy the focal plane shutter might as well be.
All being well next month's article will show basic examples of the DIY photomacroscope's imagery.
| All comments welcome by the author Paul James |