|
IntroductionIn this article, I present a few basic concepts of photomicrography with a digital camera. I limit myself to compound microscopes and consumer grade digital cameras. - What is photomicrography? Photomicrography is photography through a compound microscope. The range of total magnification is usually from 10x to 1000x. Of course, total magnification will depend on the magnification of the optical setup, on the size of the image sensor and on the size of the paper print (or on the size of the image displayed on a computer screen). A very important aspect of photomicrography is the illumination, which includes the type of light source, collector lenses, condenser, and correction filters.Sometimes the term "microphotography" is mistakenly taken in this context. Microphotography is the production of a very small photograph. Two important applications of microphotography is the creation of computer chips and was the creation of microdots to hide information. Written secret messages were embedded inside a dot the seize of speck of dirt. Microdots were invented in the 1920s by Emanuel Goldberg. There are many different setups used for photomicrography. As already mentioned, the main focus of this text is about the combination of a consumer grade digital camera and a compound microscope. But the principles apply also for digital cameras, which do not have a non-removable lens. - I am also not going to talk about "semi-digital photomicrography", which utilizes a high-resolution scanner to convert analog image information into a digital file. You might also be interested in reading my recently published paper entitled "Using a Sony Cyber-Shot Digital Camera for Photomicrography". It got published in Microscopy Today, Volume 10, Number 6 (2002).
Outline
The three ways of taking photomicrographsExamples of consumer grade digital cameras are the SONY Cyber-shot cameras (DSC-S70, S75, S85) and the Nikon Coolpix cameras (950, 990, 995, 4500). All these cameras come with a serial link to a computer system (called USB or Universal Serial Bus) and a non-removable zoom-lens.There are essentially three different ways of using such a consumer grade digital camera to take pictures through a microscope. The first one, a very primitive and unsophisticated way of taking pictures, is to use an eyepiece with a rubber ring (called ocular guard), which is intended to avoid scratches on eyeglasses. Using such a protected eyepiece, the lens of the camera can directly be placed on the ocular. It is recommended to hold the camera body firmly with one hand and use manual focusing. With some practice, it is possible to take quite reasonable images with this simple setup. The second possibility is using an adapter that directly mounts the camera to a regular eyepiece. This is particularly recommended if the optical setup requires a compensating eyepiece to fully correct for lateral chromatic aberration. Nikon's CF and CFI60 objectives are corrected for lateral chromatic aberration without assistance from the eyepiece. The third setup is very similar to the second one. Now the camera is mounted on a phototube. The use of a phototube offers the most stable configuration and helps greatly to avoid vibration.
More details about a setup using a phototube
The use of a frame grabber board for photomicrographyInstead of connecting the digital camera's video output to a TV monitor you can also connect the video signal to a video frame grabber board, which is part of a computer system. Together with my Coolpix 990 camera, I am using a computer system with the Osprey-210 frame grabber board.The Osprey-210 works very well under Microsoft Windows 2000. It is a product by ViewCast Corporation. This card supports up to 30 frames per second (fps) full resolution NTSC (720 x 480). You can get more information about the Osprey-210 from http://www.ospreyvideo.com. This card can be programmed with Microsoft's DirectShow (see Microsoft's web page about DirectShow). With such a setup, you can easily use your microscope as a video microscope. You can record the video signal with the Osprey card using various different formats. But it is recommended to use a good analog video camera that supports a higher resolution than the one the analog video output of the Coolpix 990 offers. A decent analog video camera is the Panasonic GP-KR222 (see Edmund Industrial Optics). There are cheaper analog video cameras available, which sell for around US$400 or less. Check out the 2nd-hand markets for bargains on analog video cameras. Of course, you can also use a camera that connects with your computer system via FireWire (IEEE 1394) or USB-2. In any case, try to take a camera for which you get enough software to use it effectively. A reasonable FireWire camera is sold by Vitana Corp. (at http://www.pixelink.com) and is called PixeLink PL-A662. However, a good FireWire camera is not selling cheap.
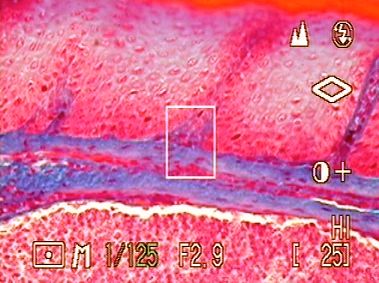
Basic procedure to take digital photomicrographsI am using manual focus and aperture priority mode with the widest possible aperture or smallest f-stop number, which depends on the zoom setting. Quite frequently, I also use manual exposure mode. I adjust the brightness of the illumination to ensure that the camera sets exposure time to be 1/100 second or faster. This fast exposure time avoids "dangerous" exposure times, usually between 1/50 second to 1 second.To ensure the correct color temperature, you should not adjust the brightness of the illumination with the voltage regulator of your microscope's lamp. Use gray filters instead and appropriate blue filters to ensure the right color temperature. I have also successfully used Polaroid sheets (polars) to reduce the intensity of the light without shifting its color temperature. The Nikon Eclipse E400 and E600 microscopes support a nice feature that allows adjusting for the correct color temperature more easily using a special photo-button on the left side of the frame. By switching this button on, the voltage gets increased to create a whiter light. But for observation by eye, the user just has to switch this feature off and a more agreeable illumination for the user's eyes is achieved. The following table is for users of the Nikon Coolpix cameras (990, 995, 4500).
Discussions and resultsDigital photomicrography is rather involved. It requires reasonable equipment, lots of time and skills. If you just started with digital photomicrography and you are disappointed in the quality of your first images, do not feel frustrated. It's normal! Any type of photomicrography, digital or analog, requires a lot of practice to get it right. One of the most troubling steps to successful photomicrography is exact focusing. There are different ways to focus a digital camera. For instance, I am using a computer monitor and a remote cable (Nikon MC-EU1) to focus successfully with a Nikon Coolpix camera.
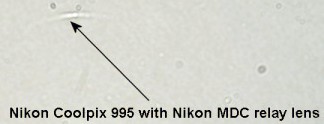
At this point, I want to mention a problem you might encounter when using a consumer grade digital camera. Due to the non-removable zoom lens of this type of camera, certain models exhibit artifacts that might be somewhat disturbing. I have found that these artifacts occur more likely when the image has a high contrast. An example of an image with a high contrast is a whole mount of stained bacteria in brightfield illumination. I have found similar small artifacts with Nikon and Sony cameras. Over the last couple of months, I have heard that some microscopists believe that the older Nikon Coolpix cameras (model 950 and 990) are less likely to show artifacts than the newer models (such as 995 and 4500). The image below shows such an artifact with a Coolpix 995 camera when the condenser's aperture diaphragm is closed too much.
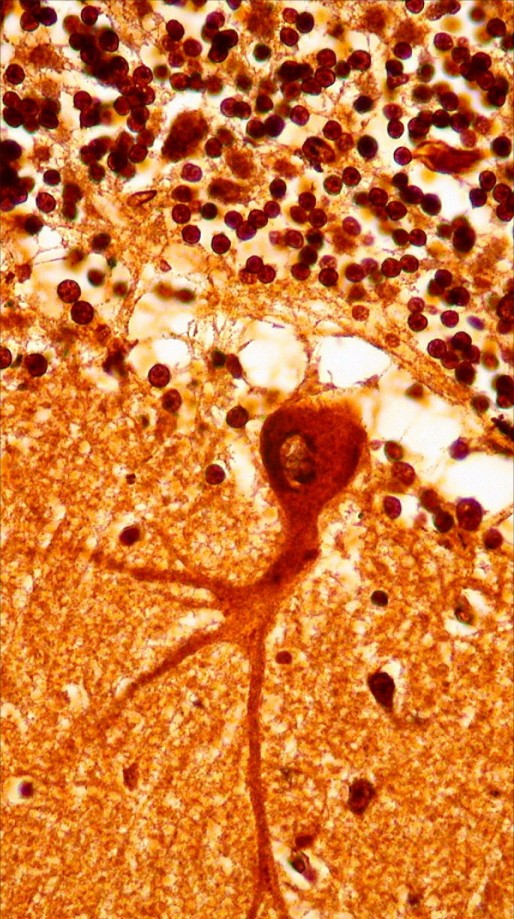
Comments regarding digital photomicrographyIs digital photomicrography better than "classical" photomicrography using film emulsions? No and - yes. Today (2003), if you are looking for maximum contrast, you must take B&W film emulsion. If you require colors, I recommend Fujichrome Velvia RVP (see data sheet AF3-960E for more information about this high resolution color reversal film with an ISO speed rating of 50). But nothing is better than the good old B&W film when it comes to contrast. (Remember, this applies to what we know in the year 2003. I do not believe that anyone can predict how long it will take until we can only find film emulsion in museums and all (but really all) benefits come from digital photography. Unfortunately, many experienced microscopists try to make such predictions.) If you are looking for maximum flexibility you should consider the digital technology.Let me illustrate this with the following example. In a hurry, a histopathologist wants to support a preliminary study by supplying images of stained kidney sections to a colleague many hundreds of miles away. He most certainly should consider the digital camera to take photomicrographs. The color and the somehow limited contrast of stained kidney samples make an even low-cost digital camera a suitable tool. In a limited contrast situation, neighboring sections of an image do not differ much in contrast. An example of a kidney section, which has been photographed with a consumer grade digital camera, is shown here. - But if the same person wants to communicate subtleties of structures in white blood cells with the same remote colleague, he might be better served with the high contrast color film emulsion due to the difficult contrast provided by stained blood samples. Only very expensive digital cameras with a 16-bit analog to digital conversion (A/D) per color channel can provide enough contrast for this kind of application. The low-end digital devices cannot. An example of a hematology study, which has been photographed with a consumer grade digital camera, is shown here. The expert can easily recognize that these images lack contrast compared to high quality digital imaging devices or standard film emulsions. So, once again, it strongly depends on the work you want to do if the digital age has come for you. |
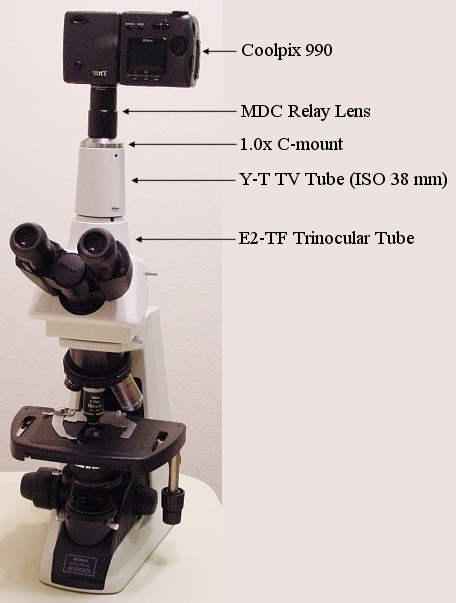
 Instead
of a simple phototube, I am using a trinocular tube. This setup consists
of a binocular viewing body with a phototube that has a 38 mm ISO port.
On top of this phototube, I mount a special part called TV-tube. A C-mount
adapter is connected to this TV-tube. Finally, the camera with the appropriate
relay lens is attached. In case of the Coolpix cameras, I use Nikon's MDC
lens, which is a rather expensive lens. There are cheaper alternatives
available. For the SONY Cyber-shot cameras, I constructed a small converter
that connects directly to the MDC lens. (You can find more details about
this converter for the SONY Cyber-shot DSC cameras in the paper mentioned
above.) See the image above for a complete setup. Of course, a TV monitor,
a power-charger, and a remote cable are very useful accessories (not depicted
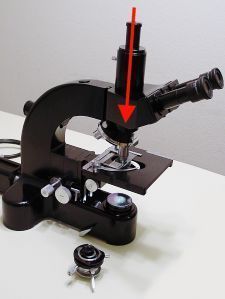
in this image). - If you do not have a 38 mm ISO port but a scope with
a trinocular viewing body similar to the one depicted in the image on the
right side, you can use a regular eyepiece instead of the expensive MDC
relay lens. For my Ortholux, I am using a Leitz Periplan ocular that offers
a thread that fits the one of the Nikon Coolpix camera.
Instead
of a simple phototube, I am using a trinocular tube. This setup consists
of a binocular viewing body with a phototube that has a 38 mm ISO port.
On top of this phototube, I mount a special part called TV-tube. A C-mount
adapter is connected to this TV-tube. Finally, the camera with the appropriate
relay lens is attached. In case of the Coolpix cameras, I use Nikon's MDC
lens, which is a rather expensive lens. There are cheaper alternatives
available. For the SONY Cyber-shot cameras, I constructed a small converter
that connects directly to the MDC lens. (You can find more details about
this converter for the SONY Cyber-shot DSC cameras in the paper mentioned
above.) See the image above for a complete setup. Of course, a TV monitor,
a power-charger, and a remote cable are very useful accessories (not depicted
in this image). - If you do not have a 38 mm ISO port but a scope with
a trinocular viewing body similar to the one depicted in the image on the
right side, you can use a regular eyepiece instead of the expensive MDC
relay lens. For my Ortholux, I am using a Leitz Periplan ocular that offers
a thread that fits the one of the Nikon Coolpix camera.
Comments to the author, Gregor Overney, are welcomed.
Microscopy
UK Front Page
Micscape
Magazine
Article
Library
© Gregor Overney
Please report any Web problems or
offer general comments to the
Micscape
Editor,
via the contact on current Micscape Index.
Micscape is the on-line monthly magazine
of the Microscopy UK web
site at http://www.microscopy-uk.org.uk with mirror site at http://www.microscopy-uk.net.
© Onview.net Ltd, Microscopy-UK, and all contributors 1995 onwards. All rights reserved. Main site is at www.microscopy-uk.org.uk with full mirror at www.microscopy-uk.net.