|
Imaging Protists: Problems and Suggestions by Richard L. Howey, Wyoming, USA |
Digital cameras have made photomicrography easier and more challenging both for the amateur and the professional microscopist. There are a number of obvious benefits:
1) There is no expensive film to buy about which you had to worry regarding expiration dates, storage, speed, and color balance depending upon the type of illumination.
2) There is no need to set up a darkroom with pricey chemicals (some of which were quite toxic) and no need for an enlarger.
3) Few individuals were equipped to do their own color processing which could be very costly, produce highly variable results depending upon the laboratory doing the processing, and cause much frustration when one didn’t get the results one had hoped for.
4) For a brief period, Polaroid photography seemed to offer great promise. One could get nearly instantaneous results, sometimes allowing one to take additional images if the first one turned out not to be acceptable. Special Polaroid microscope cameras were developed and a film that produced both a black and white print and a negative was available. During that period, a close friend of mine who was fascinated with photography, gave me one of those cameras. Through the university, I applied for a small research grant to buy a case of the dual print/negative film and also a case of the then rather new print color film. Some of the black and white prints turned out reasonably well and allowed me to document some things that were of special interest to me.
The color film was a great disappointment and I quickly determined that it was not worth the investment either in terms of time or money.
Some researchers were initially excited by the possibilities of this new imaging technique, but it became clear fairly quickly that it had severe limitations.
Clearly, for almost all serious amateurs, digital photomicrography should be the number one choice. In the last decade, extraordinary advances have taken place in the development of these cameras. However, one needs to select ones equipment carefully; photomicrography makes very different demands than photographs of landscapes, pets, or friends and relatives. So, there are a number of factors that need to be taken into account in considering your initial investment in equipment and it is important that you consider it as a long term investment.
1) Budget: Cameras
If you’re Bill Gates, Prince Charles, or a Wall Street C.E.O. (which stands for Completely Egocentric Obscenity), then you won’t have to worry about the cost, but for those of us who live in a much, much, much more modest economic realm, expense is a major consideration. However, one needs to be careful not to make compromises that one will later regret; it’s better to delay and save up for certain kinds of key purchases.
When I first ventured into the digital realm, I bought a Nikon CoolPix 995 which is what I still use. At first, I was so intimidated by it that I didn’t even try it out for 2 months, but then you have to remember that I don’t even have a cellphone nor do I know how to operate one. While I’m not a Luddite, I guess I could properly be described as a techno-conservative. This little camera does most of what I need; I know the basics of using it (although certainly not all the fine points, and I am comfortable with it and its results. It only has a 128 MB flash card, but for my purposes that is almost always adequate; I can get about 100 JPEG images on the “fine” setting and about 15 TIFF images on the “hi” setting.
The resolution of this camera is “only” 3.4 Megapixels and now, of course, you can buy digital cameras with 3 or 4 times that level of resolution. This tends to create large files which can present special problems when processing the images on ones computer. I’ve heard (probably misheard) that the resolution of 35 mm film is somewhere in the range of 5 or 6 megapixels so, if that’s the case, these new cameras can equal or surpass the resolution of film. If you buy an older, used “point and shoot” camera, such as the NIkon CoolPix 990 or 995 or 4500, then you also have to find adapters to accommodate them. Sometimes on eBay or Amazon, one can find one of these cameras used, but in very good condition, for less than $300, but a good quality adapter may cost that much as well.
The trend now is to use high resolution digital cameras that are “tethered” from the microscope to a laptop or desktop computer. Unfortunately these cameras can cost over $7,000 and then you have to add the computer and the graphics processing software. (Maybe I’ll go on eBay and see if I can find an old Kodak Brownie camera.) However, if you think that’s bad, the director of one of the major laboratories at the university told me not too long ago, that he had gotten a grant for a digital camera for an electron microscope at the bargain price of $35,000.
2) Graphics Software
For many, the standard is one of the versions of Photoshop. Photoshop Elements is often recommended as it is easier to work with than the full-blown system. I have a copy of it on my computer and occasionally “play” with it, but true to my techno-conservative nature, I still use an older version of PhotoImpact for virtually all of my image processing. Again, I know my way around the basics, it serves most of my needs, and I am comfortable with it. At least 2 newer versions have come out, but I like the one I’m using, so I stick with it. Newer is, to my foggy old mind, not necessarily better.
Check with your friends and acquaintances to find out what graphics processing programs they are using and it’s very likely that several of them will volunteer to provide you with a demonstration. When amateurs find something they really like, they usually are inclined to share it enthusiastically. However, at this point, I would urge a major caution: Do Not buy a program simply because it is large, elaborate, and has a myriad of dazzling features. Some programs are so overloaded with features which you will very likely never use that you not only end up paying for needless features, but may find this complexity involves a series of factors which discourage and inhibit your doing productive image processing.
3) Adapters
Here is an area where you definitely do not want to compromise. You can work scrupulously and diligently to produce an image which you find highly satisfactory when you view it directly with the microscope, but if the adapter is of poor or mediocre quality, then what is transmitted to your camera may turn out to be quite unsatisfactory. I have, on the advice of my friend and mentor regarding things microscopic, Nik Berrong, used Meiji adapters and have found them to be of very high quality.
To The Organisms
1) Live, Drugged, or Dead
The approaches you take to imaging will depend on a number of factors including the degree of motility, thickness, size and transparency. Let me give you a sort of introductory example to present just some of the challenges. Suppose you have a splendid, live diatom which you wish to photograph. Initially, you might think that motility won’t be a problem, but some diatoms can be surprisingly fast in their gliding motion and also, of course, it will also depend upon the degree of detail (that is, magnification) which you wish to capture in your image; the greater the magnification, the more that even ‘slow’ motility presents a problem. What may not be an issue at 100x may become a significant challenge at 630x. If you are primarily interested in examining the frustule (shell) of the diatom, then the organic material within may become a major hindrance. Classical and professional diatomists used and use techniques that are much too dangerous for the amateur, techniques involving the use of hot concentrated acids or alkalies. The frustule, as you probably know is made of silica (glass) and can withstand fairly drastic treatment, although there is significant evidence that some of these more drastic techniques may cause some etching on the frustule. A much better approach is to be patient and use a solution of hydrogen peroxide to gradually dissolve the organic material. An alternative is to place the specimens in a solution rich in bacteria and let them slowly destroy the organic material in the diatom. If you are somewhat impatient, you can use a solution of sodium hypochlorite (or household bleach) but, if you do, rinse your specimens thoroughly. If the diatom is a relatively large one, there may be problems about getting an image that is fully in focus. There are several software programs such as Helicon Focus or CombineZ which allow you to take a series of images at different focal planes and then stack or combine them to produce a quasi-3D image in which all (or most) of the parts of the specimen are in focus. If you try using such software, it is absolutely crucial that there be no movement of the specimen!
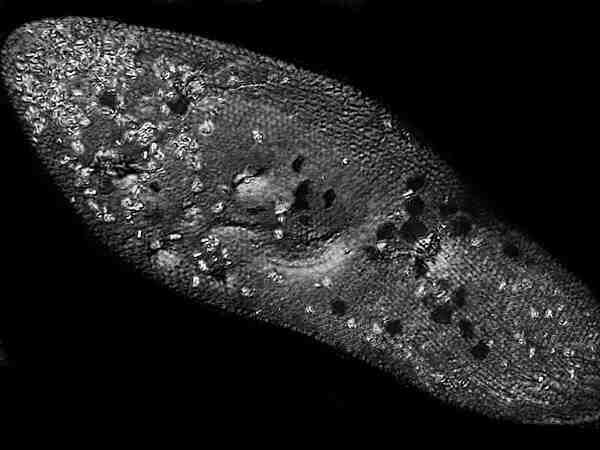
There is a critical point at which the issue arises as to whether one attempts to capture images of live specimens, ones which have been narcotized to the point of being non-motile, or ones which have been killed and fixed with as little distortion as possible. With diatoms, this is a much less difficult issue than with many other protists. If you are dealing with a quite active organism, such as, Paramecium, then you need to be prepared to be patient, willing to experiment, patient, lucky, and patient. In certain respects, Paramecium is a fairly tough critter. For example, you can take a drop of a rich Paramecium culture, mix it with a drop of the stain Nigrosin on a clean slide, let it dry, and a number of the organisms will show relatively little distortion and the Nigrosin will nicely demonstrate the surface sculpturing of the pellicle.
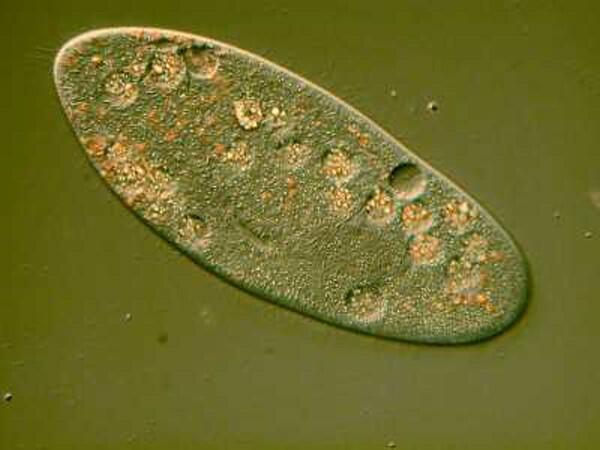
So, if you want to try imaging Paramecium while it’s still alive, place a relatively small drop of culture on a slide and add a cover glass of 1 ½ thickness. This is especially important for magnifications higher than 100x, since those lenses will be corrected for 0.17 mmm and with high quality lenses, this information is etched on the barrel of the lens. If you want to be very precise, you can buy a modestly-priced electronic (battery-powered) micro-caliper and go through a series of cover glasses and select only those which come very close to meeting the specification of 0.17 mm. These can be set aside for those occasions when you are doing photomicrography or critical high-powered observation.
Now, prepare to observe and wait. What you are waiting for is the optimal condition when just enough water has evaporated to render the Paramecia non-swimming, but where not enough pressure has built up yet to distort the organisms other than a degree of flattening which is advantageous for your photomicrography, especially if you are using a technique such as Nomarski Differential Interference Contrast (DIC) where the lenses and prisms perform a kind of “optical sectioning’ thus additionally reducing the plane of focus.
Other protists will not be so cooperative or may have specialized structures that are very difficult to image without resorting to other methods. Highly contractive organisms usually present some major challenges. The larger species of Spirostomum (ambiguum, minus, intermedium) are especially problematic since they have what has been claimed to be the fastest contraction rate of any organism known. They are also hypersensitive to pressure changes (like the cover glass pushing down on them), tactile stimuli, and virtually all chemical agents which makes them incredibly difficult to narcotize or kill in an even semi-extended state. Unfortunately, for instances like Spirostomum, the fast acting killing agents which are effective are highly toxic and especially dangerous for an amateur to try to use and even then the results are often, at best, mediocre. In such cases, the best compromise is often a fast-acting staining agent, such as, Methyl Green Acetic , which will cause contraction and distortion but, nonetheless, produce some specimens which are partially extended and demonstrate the beaded chain macronucleus and the spiral pattern of the myonemes (those pesky fibrils that produce the rapid contraction).
In this discussion, there is another option which I haven’t mentioned at all and which I have never tried and at this advanced point in my career of living probably never will and that is flash photography which from what little I understand gets very complex indeed in relation to digital photomicrography. So, regarding that subject, you’re on your own.
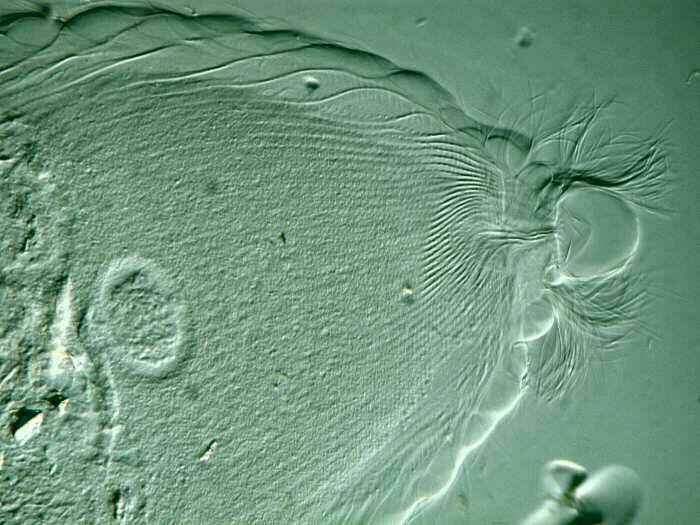
Certain structures associated with motility can also pose special problems for the photomicrographer–flagella, cilia, undulating membranes, cirri, certain “eruptive” pseudopodia in some rhizopods, and highly extensile structures such as the “neck” of Lacrymaria olor. Cirri in the larger hypotrichs are perhaps the least problematic. These may often be captured when the hypotrich takes a brief pause while crawling along the substrate as they are wont to do.
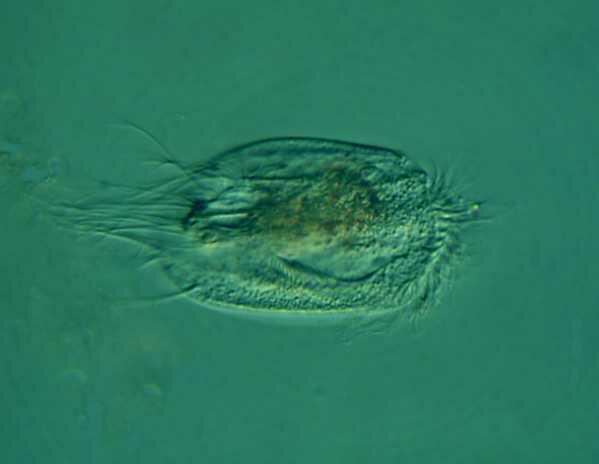
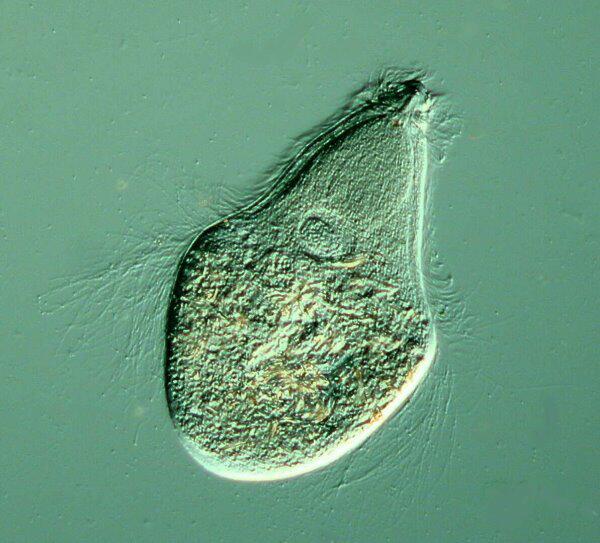
Here is another image of Euplotes which has been left to dry in a drop of Nigrosin. This technique shows the surface detail very nicely.
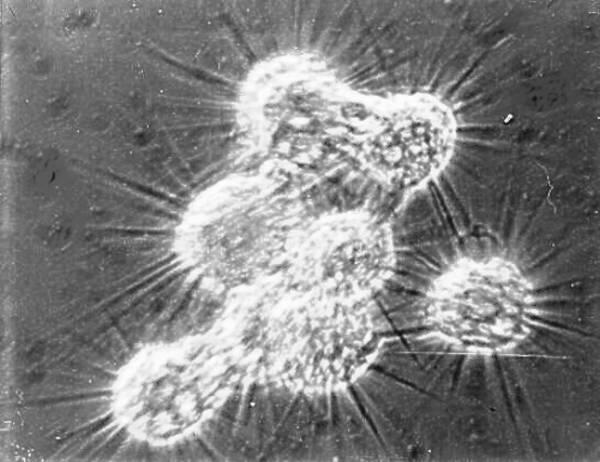
To deal with rhizopods with “eruptive” pseudopodia, the best solution is to take “Before” and “After” images and explain that this change is nearly instantaneous. Cilia are problematic because they are so thin, but they are also often so numerous that, by using a variety of contrast techniques, one can often get images which clearly demonstrate them.
Flagella present special difficulties. Two flagella are very common and frequently one is a “trailing” flagellum which may or may not be readily detectable. The flagellum/flagella responsible for motility may be exceptionally difficult to photograph depending upon the character and intensity of its/their activity. Occasionally, one gets lucky and manages to get a decent image of a flagellum at just the right moment.
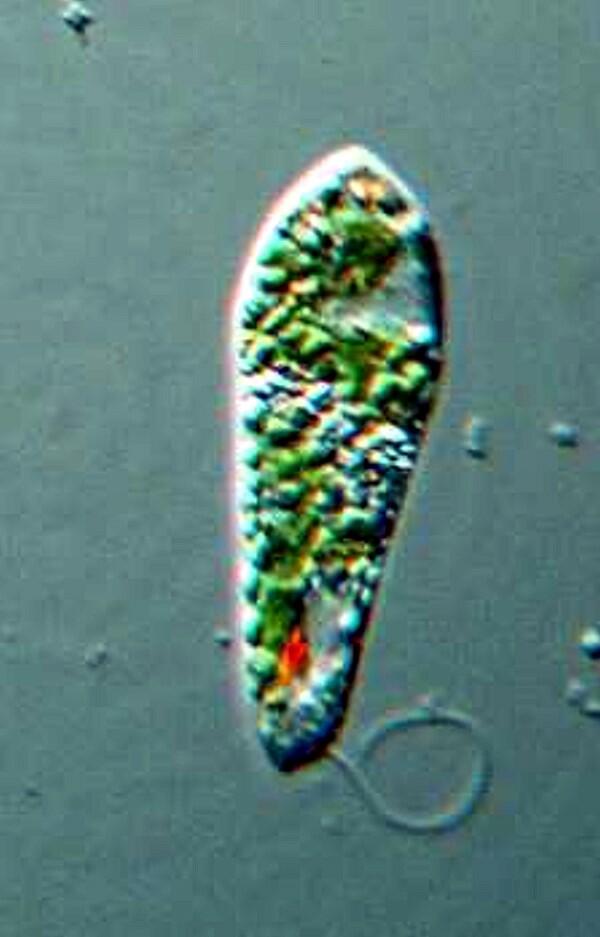
Note that you can also see here the red eye-spot that helps keep the Euglena in a “good” area of the water column where there is sufficient light to provide proper energy for photosynthesis, but not so much as to produce “sunburn”. There are protists that are covered with flagella (the Hypermastigotes), such as, Trichonympha campanula, which are symbionts in the gut of termites. Here the flagella are easily imaged. I’ll give you 2 views.
Often in studying a particular flagellate, and most especially the very small ones, it is necessary to use killing and staining reagents to get the necessary information one needs about these organisms.
Undulating membranes are a special challenge. In trypanosomes, because they are parasitic, the preparations are almost always imaged using killed and stained organisms and the techniques used often produce very good images of the membrane and it’s accompanying flagellum which forms a boundary for the membrane. You can find images by going to Google and typing in trypanosomes. I would include a URL, but they are outrageously long and you have to cut and paste anyway, so I’ll let you do a bit of the work.
With organisms such as Blepharisma, there is no supporting flagellum, yet when viewing its movement, the membranous character of the oral structure is clearly visible under good conditions. The difficulty is capturing an image which shows this since the motion is extremely rapid, even when the organism has been slowed down due either to cover glass pressure or narcotic reagents. Here the best approach is probably a combination of a fixative and a stain–good luck!
I earlier mentioned contraction as an issue in Spirostomum. Clearly, there are a number of other protists which present difficulties in this regard, Stentor being one example and Vorticella another (as well as a number of the colonial peritrichs). On occasion, one can have the good fortune to obtain reasonably good images of these organisms while they are extended, but when they are actively feeding and you want an image that reveals a lot of detail, then you are up against a real challenge. One pleasant bit of news is that when Vorticellids contract, you can often get good images of the stalk which clearly shows the coiled myoneme which is rather like a miniature muscle fiber.
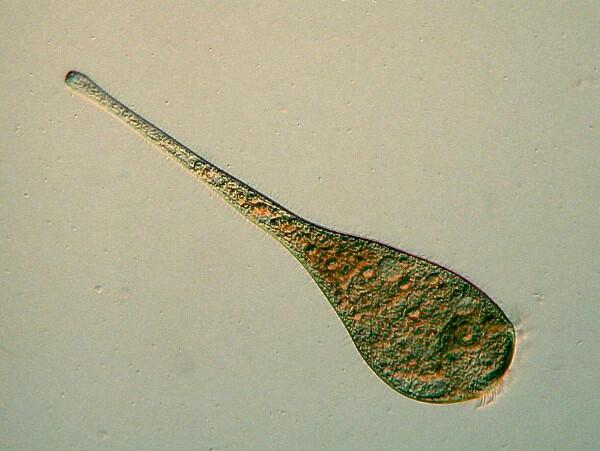
From my point of view, the greatest challenge comes from Lacrymaria olor where, short of flash photography or video micrography, a good demonstration of the extensility of the neck is virtually impossible. It is a waste of time to try to narcotize them, precisely because you want the fibrils that produce extensility to be active. Highly toxic, quick-acting fixatives are also of little use, since the organism is so reactive that such reagents rarely produce acceptable results.
One could easily spend a lifetime studying and trying out anesthetizing techniques for protists. However, for amateurs, there are today major obstacles to such investigations. In the 19th and early 20th Centuries access to a wide range of narcotic substances was not unusual nor especially difficult. Today, the possession of even a tiny amount (which is all microscopists need) of cocaine hydrochloride could result in imprisonment and a disastrous fine, unless you are unfortunate enough to require a prescription for your health. This problem applies not only to a very large number of drugs, but to many chemical substances as well. Governments are afraid that we’ll be out building bombs or poisoning water supplies by possessing a fraction of a gram of picric acid or chloral hydrate. This means that these days, you have to expend extra effort just to get a bit of Nickel sulfate, Cooper acetate, or Potassium iodide if you want to try them out as potential anesthetics for protists. In the meantime, the U.S. is spending billions and billions (apologies to Carl Sagan) of dollars waging a war Afghanistan, one of the major illegal and very profitable byproducts of which, is the production of bumper crops of opium–go figure!
So, I’ll just be optimistic and assume that you do have access to some reagents and medications that might produce some interesting and even unexpected results. Something I haven’t yet mentioned is using mechanical means to slow down active beasties. You can create a micro-maze using cotton fibers which you can tease out in a very small drop of water. The combination of the series of cotton “fences” and the gradual evaporation of the culture fluid causing the cover glass to exert pressure on the organisms, can be quite effective in controlling their activity. Another means is to significantly increase the viscosity of the fluid in which the organisms are swimming. In the 19th Century, microscopists would soak quince seeds and create a sort of mucilage. A drop of this added to the drop of culture on the slide would create a “thick environment’. This is not a method I have tried because, even if I happened into a grocery store that had quinces, I doubt that I would recognize them although apparently they look like golden yellow pears. The modern equivalent is methyl cellulose, a quite benign substance, which some supply companies will be glad to sell you. The big biological supply houses have their own brand which will slow activity, but naturally it costs more because they had to dissolve it in water and mumble magic words over it.
I have little jars of Methyl cellulose #1,2,3, and 4 which all look like bleached, fluffy lint. I assume that these different grades have something to do with viscosity, but I don’t know. What I do know is that you can vary the viscosity of any one of these by the amount of water you put in. It dissolves slowly, so patience and planning are necessary. If it’s too thin, then it doesn’t slow your critters down; if it’s too thick, some of your organisms will make a brave effort to navigate through this muck, like lambs to the slaughter, because when the viscosity exceeds a certain point, the organisms cannot only not move, but the radical difference in osmotic pressure causes them to lyse, that is, self destruct. The membrane ruptures and the contents of the organisms spill out. However, when you manage to produce the right viscosity for a particular organism, the results can be quite good, so: experiment, experiment, experiment.
There are a few common reagents which are rather easy to use that are often utilized to anesthetize protists, ciliates in particular. Treat all chemicals with care!
1) Copper acetate.
This is my favorite. A 2% to 3% solution is usually effective. You can put a drop of culture on a slide, add a drop of copper acetate and put on a cover glass. However, I usually prefer to cover the culture drop and then add a drop or two of the copper solution to the edge and let capillary action, through evaporation, gradually draw the reagent across the slide creating a sort of gradient of concentration. With some organisms, it’s useful to combine techniques and use a drop of relatively thin methyl cellulose and then add a reagent at the edge of the cover glass. Sometimes copper chloride or copper sulfate are used instead of the acetate, but in my experience the results are not as good or as consistent.
2) Nickel sulfate.
This is a classical anesthetic long used for a variety of organisms. To have been recommended over a long period of time by a wide variety of researchers suggests that it certainly has its virtues. My experiences with it have, however, given very mixed results. (Another example of my general incompetence–so there’s hope for all of us.) Finding the right concentration can be a bit tricky, but usually somewhere between 1% and 3% is suitable.
3) Potassium iodide.
One of my colleagues prefers a 1% to 2% solution of this substance. Again, I have gotten somewhat mixed results, but certainly they have been better than what I obtain with nickel sulfate.
For some years now, I have been planning to try out various medications which I have been prescribed over the years to test their effects on a variety of protists. (Whenever I get a prescription I set one or two tablets or capsules aside for making slides of crystals to examine under polarized light.) When I do get around to trying these medications out on protists, you can be sure that that will generate a series of essays which I will inflict upon you, documenting all of my disasters, but hopefully chronicling a success or two as well.
Sometimes, in order to capture the information you want, it is necessary to use staining and/or fixing techniques. On some occasions, one can achieve some very good results using vital staining which does not kill the organisms (or, at least, not immediately). Powdered Carmine is invaluable for demonstrating food vacuoles and India Ink will reveal the gelatinous envelope around certain micro-algae that would otherwise remain almost completely invisible. You can find more information on vital staining in a couple of my earlier articles. Usually staining requires killing the organisms and using stains that are selective, that is, they show up specific organelles and structures. For example, in Paramecia, there are certain granules that show up only when stained with Neutral Red and repeated work has shown that these are not artifacts. A drop of tannic acid on a slide containing Paramecia will dramatically reveal the trichocysts which would otherwise remain hidden or by using a combination of blue and red inks, which you can buy at an office supply store, you can not only cause the trichocysts to extrude explosively, but also stain them.
Perhaps the most difficult stage comes when you have produced some images which you like and which you think have captured the information that you were after. Computer graphics software gives you an enormous set of possibilities to enhance, alter, and even “falsify” images. Beyond certain obvious basics–don’t make a specimen that was originally green bright red and then claim that the real thing was red–there is no clear compendium of which changes are acceptable and which are not nor can there ever be, even in spite of articles appearing in professional journals on the ethics of altering images. If you are a rigorous, professional scientist bent on discovering and presenting “eternal, immutable truths”, then the chances are that you will be a radical minimalist regarding altering or “touching up” an image. If, however, you are an amateur with a creative disposition, you may well feel that it is your obligation to present your images in the most provocative, attractive and interesting way in order to capture the attention of your viewer, while taking care at the same time not to falsify information. Obviously, much depends upon the function which the image is to play and the audience to whom it is addressed. When I process images for Micscape, I almost always want to focus attention on the key content, whether it be an organism, a crystal, or a mineral section. This means that one of the first things I will concentrate on, once I have achieved the best balance I can in terms of insuring that the key elements of the subject are in focus, is to get rid of background clutter or “noise”. If I’m trying to convey something about the morphology of a Paramecium, then I certainly don’t want detritus, random flagellates, bacteria, etc.,cluttering up the background. In other word, it’s a matter of emphasis, editing the image to eliminate extraneous bits that may serve as a distraction. This is one reason why I often “paint” in a solid background, frequently black, to attempt to give the specimen its full due. There are, of course, other occasions when you want to provide a larger context and show what the Paramecia are feeding on and what other organisms are a part of their environment, in which case, you want to perform minimal editing. I’ll give you an example, not of Paramecia, but some very interesting water molds which I came across in an old culture to which I had added some dried soil which had been sitting in a jar for at least a decade.
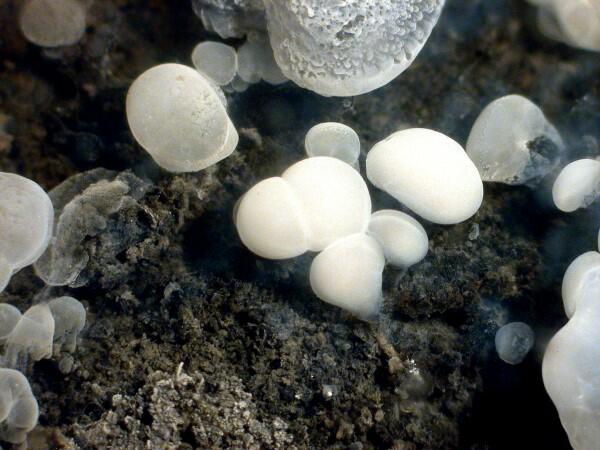
In my view, It would be a mistake in this instance to produce a solid background, because here the natural state provides a context for the specimens.
Cropping an image can sometimes enormously enhance the final result. This technique has a number of virtues:
1) It allows you to select the part of the image which you wish to emphasize.
2) You can us it to get rid of at least parts of extraneous background.
3) It can sometimes permit you to eliminate aspects of the image that are not in sharp focus and this is particularly helpful if you have only a single shot (or even 2 or3) which won’t be improved much by using stacking software such as Helicon Focus or CombineZ.
4) This tool has the further advantage that if you have 2 or 3 items in an image which you wish to present individually as distinct images, it allows you to do so.
These graphic processing programs are enormously powerful and can be intimidating. I strongly recommend learning the basics which you will use frequently and then gradually exploring the more exotic features of the program which catch your interest and experiment in a leisurely fashion. Perhaps the most difficult challenge of all is learning to be your own harshest critic. At first, you will be ecstatic that you captured an image of a specimen that is recognizable; however, you will soon learn that that is not enough. Some images will be so obviously bad–hopelessly out of focus, radically color imbalanced, etc.–that the best fate for them is send them quickly into that great Cyberspace in the sky. Over time, you will develop a sense for which images are worth saving and processing and which should be discarded. Sometimes all the tricks and tools of your software simply cannot make a mediocre image interesting. However, sometimes a mediocre image may contain interesting information for you, perhaps an organism you’ve never seen before or a structure previously undetected–so save those! Some images you may want to archive to process later and since large amounts of storage memory are quite inexpensive now, you can save enormous numbers of images. The challenge then is to organize them in such that you can find them readily. I emphasize this because I am notoriously disorganized, unsystematic, and surround myself with clutter. If there were a Nobel Prize for disorganization and clutter, I would win it hands down; in a way, I’m sort of the Collyer brothers of microscopy. When I was still teaching, my line: “One of these days, I’ve got to get organized” became a standing joke amongst my graduate students.
In deciding which images to keep, another major factor is contrast. I am a firm believer in the concept of photographing a subject using a wide variety of contrast techniques when appropriate for a particular specimen–brightfield, oblique, darkfield, phase, fluorescence, Rheinberg, Hoffman modulation contrast, Nomarski differential interference contrast, polarization–in short, everything that you have available that can provide you with additional information about your specimen. I have been exceptionally fortunate in that over the years, I have acquired access to all of these types of contrast techniques except Hoffman modulation and now that I’m ancient and am no longer seduced by the idea of owning a Rolls Royce, a private jet, an 800 foot yacht, and Buckingham Palace, I have been exploring the idea of adding Hoffman modulation contrast to my arsenal of contrast techniques. On Tuesdays, Thursdays, and Saturdays, I am quite enthusiastic about the prospect. On Mondays, Wednesday, and Fridays, I chastize myself and tell myself that I don’t need yet another microscope. However, on Sundays, the devil appears to me and says: “Of course, you do. And you deserve it,” and at that point I tell my dear wife not to tempt me and I go off to read some escapist literature such as “The Ciliate Parasites and Symbionts of the Eichinoid Strongylocentrotus droehbachiensis.”–which always helps restore my perspective. In other words, I still haven’t decided.
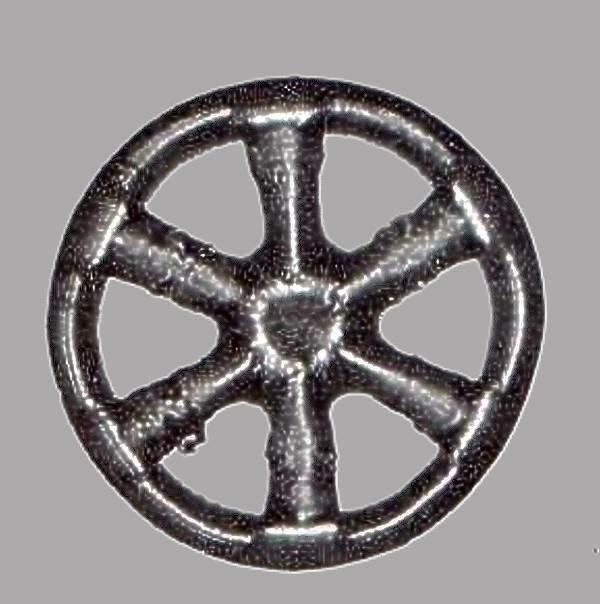
The point of these ramblings is to encourage you to use as many contrast methods as you have available. You don’t have to have access to a lot of elaborate and relatively expensive equipment. Brightfield is, of course, a given and here contrast can be achieved by staining techniques–but more of that later. Oblique illumination can be achieved by cutting different shaped filters out of pieces of construction paper. Rheinberg contrast can be achieved by using colored plastic sheets and cutting them to create a variety of fascinating contrasts. Darkfield–again you can go back to black construction paper or invest in an inexpensive old metal Darkfield stop that was widely used in the late 19th and early 20th Centuries. Polarization, you can obtain, either by buying a sheet of good quality material from a supply house and cutting it to meet your needs or by buying a couple of filters from a photography shop, although these are usually hard to adapt to your microscope.
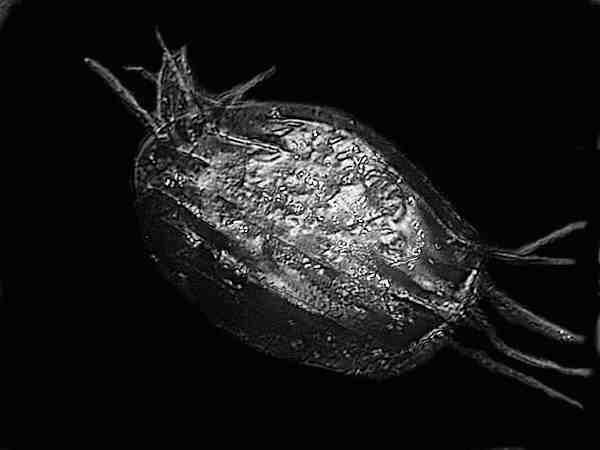
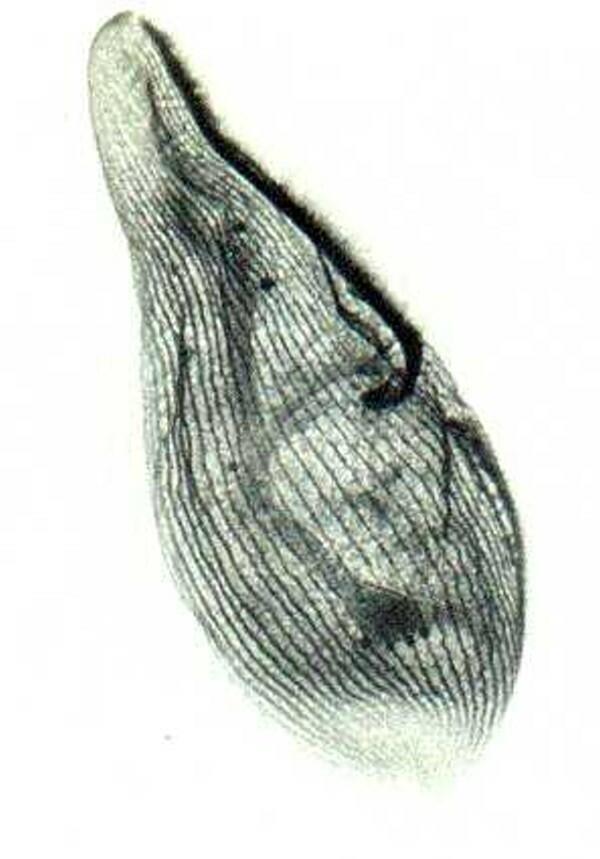
I mentioned staining in relation to brightfield. Stain technology is a science unto itself (or stain science is a technology unto itself–your choice). Many protists are difficult to photograph because they have relatively little contrast. There are vital stains which are very useful, but, in general most useful stains are toxic and are either immediately or gradually lethal to the organisms. (See the Vital Staining article in Micscape, February 2000.) There are significant instances where only by using staining techniques can you get the information you desire. One of the most striking examples is that of the silverline system (a system of fibril that is involved with the structures which coordinate ciliary movement). Here is an image showing the silverline system of Blepharisma.
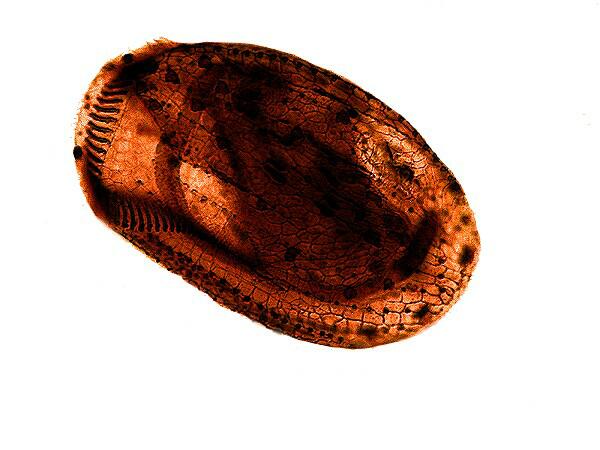
And here, using a different silver staining technique one can see the silverline system of Euplotes. These specimens have a distinct reddish brown cast which is absent in the first Protargol technique which uses an organic form of silver.
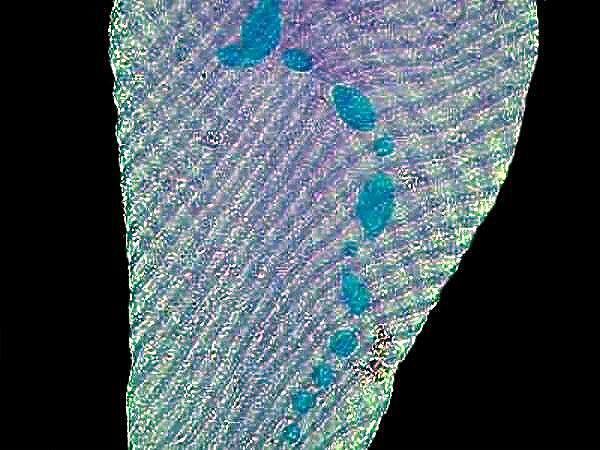
Using other sophisticated staining techniques, one can reveal structural aspects that would otherwise be very difficult or impossible to see as is shown below in this remarkable slide of the hypotrich, Stylonychia mytilus using a combination of Nigrosin and Feulgen stains.

I am sad to confess that this is a slide which I didn’t make, but purchased from a supply house.
Clearly, enhancing the contrast through the use of stains provides a wide range of remarkable possibilities for investigating the micro-structure of protists and when coupled with digital photomicrography, one can, at least in many instances, avoid the time-consuming complexities of making permanent slides. A significant series of images using a variety of contrast techniques can reveal a great deal about an organism and provide you with a miniature visual reference library. And finally, DO remember to make backups! I have two external hard drives, so that I even have a backup of my backups (when I remember to use them).
All comments to the author Richard Howey are welcomed.
Editor's note: Visit Richard Howey's new website at http://rhowey.googlepages.com/home where he plans to share aspects of his wide interests.
Microscopy UK Front
Page
Micscape
Magazine
Article
Library
Please report any Web problems or offer general comments to the Micscape Editor .
Micscape is the on-line monthly magazine of the Microscopy UK website at Microscopy-UK .