Science Heritage Ltd [SHL]
Study & Preparation of Antique Microslides.
A lecture/workshop for 17th, 18th, 19th Century Natural Science Micrology.
A review by Ian Walker. U.K.
For Micscape magazine 200th anniversary edition.
Introduction.
I purchased this slide-making kit some time ago, I am already familiar with the SHL website and their books which are well made and liked the presentation of the subjects and overall look. Recently prices for Victorian prepared slides on websites such as eBay have climbed to dizzy heights with 'big name' slides reaching anywhere up to Ł20+ pounds or more each, just a few years ago the same slide would have been typically less than 1/2 of that so for a kit with the man hours for assembling and sorting parts it seemed fair value to experiment with and something a little different to try rather than the usual prepared slides.
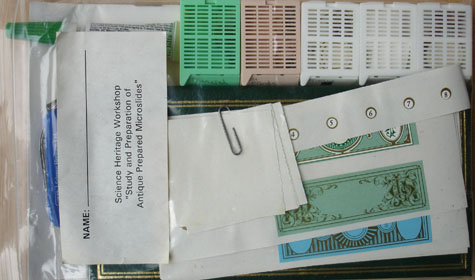
The price of the kit including 8 various slides plus smart presentation case is currently $50 [June 2012] or $75 if you purchase it with CD which includes a visual guide to assembly and also some historical background to the slides. Mine in the UK didn't attract customs from the U.S. but I couldn't guarantee this for others in the U.K. as it sometimes seems hit or miss whether they come through without duty to be paid. What you get is a sealable plastic bag of parts as shown below in Fig 1.
The slide kit.
Fig 1.
The slide kit arrives in an unassuming sealable plastic bag.
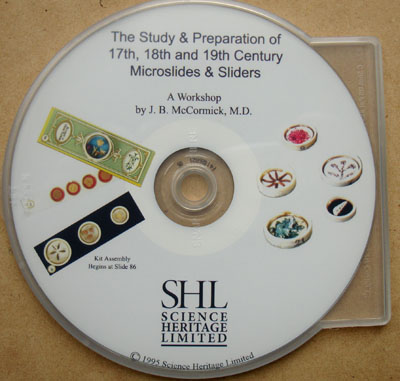
Fig 2.
An optional $25 and you will receive this CD.
The CD comes in a thin plastic 'snap case' and is in 'PowerPoint' presentation. Pages 1-85 contain a rather un-structured mixed history of the microscope, specimen preparation and presentation of other SHL products and pages 86-176 gives a detailed step by step guide for making the slides to augment the paper manual if further guidance is required. Compared to the cost of the slide-making kit I don't think this CD offers good value.
Getting started.
With all the parts set out as shown in Fig 3. it is easier to see just what we are getting; the plastic colour-coded boxes contain the smaller parts including the objects for the slides like cloth and wood samples for example along with small clear plastic disks to mount the subject matter and brass 'snap-in' rings to hold the disks in place on the slides. The thinner white plastic slides represent those found in the 18th and early 19th centuries which in those times would be made of ivory and typically had mica as a 'coverglass' if supplied or used for mounting the subject. Although I see the connection with 18th and 19th centuries I am less certain of these or the other slides in the kit being used in 17th century as suggested with the manual and CD although SHL seem to correct themselves as shown in Fig 10. [the cover of the presentation case], now it says 18th and 19th century!
The larger black plastic slides are for the deep cell subjects like seeds and shells and then there are two standard glass 3" by 1" slides which will be paper covered representing those typical of late 19th century. The self-adhesive papers used are very sticky so care has to be taken to get the paper lined up accurately on the slide as trying to re-position afterwards can be tricky. I would have liked the paper to have been thinner grade and not so glossy as many of the time were matt finish.
I think it would have been better for the paper not to have been self-adhesive but dry and use an application of water based glue for instance, this would have been more authentic and allow easier 'fine tuning' of placement or even re-use of the papers although increasing costs, so a trade-off is reasonable I guess.
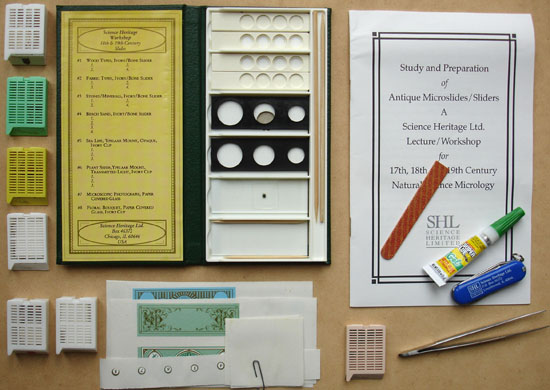
Fig 3.
The kit includes a rather small and not particularly sharp pen-knife as seen above, I didn't use this and rather than this a sharper 'safety' blade would have been more useful for those without a good hobby knife already at home.
However, I had no reason to use any knife throughout assembly although my little scissors came in handy.
Instant 'super-glue' is used in the kit for fixing the subject matter but I prefer clear 'rubber' solution glue such as UHU or Bostik as this doesn't set immediately allowing easier fine placement of subjects and doesn't leave the white 'vapour' like deposits on the clear mounting disks. The long wooden 'tooth picks' are for applying tiny blobs of glue for fixing the subject matter to the slides although I used my own technique for this.
The finger nail type sander is useful for smoothing the edges of the small clear disks on which the subject matter is mounted. The good quality tweezers are just right for picking up and placing the items on the slides, any thinner tips would have made things more difficult to use, so a good choice here and a useful accessory for the 'toolbox' afterwards.
Instructions supplied.
The 14 page paper manual is well written in large font and takes you through the various stages of preparation, I didn't need the CD for further details as everything is straight forward. The colour coded plastic boxes allow quick finding of subjects and the quality of the slide parts on the whole is good, especially the choice of subject matter and the finish of the 'ivory' style slides which look excellent on completion being my favourites of the collection.
In general it is a simple matter of sanding the edges of the clear round mounting disks of burrs, applying the colour 'roundels' if desired, dropping these object holders into the slides and pushing home the spring brass clips. Once this is completed the subject/s are stuck on with a tiny drop of glue, I like to keep the subjects orientated like the wood grain and fabric pattern as shown in the photo's. Finally the self-adhesive number 'roundel' is stuck to the slide.
The total length of time for me to complete all the slides was a single afternoon at a leisurely pace. Although various self-adhesive colour paper 'roundels' are supplied to make subjects into opaque slides it is up to the end user whether they wish to use these or indeed change from the supplied colours, I decided in part to use some of the 'roundels' but not all as I preferred some as clear mounts, you can see this for example on the rocks/mineral and fabrics sets where I have left the base clear.
Completed slides.
Four 'Ivory' slides.
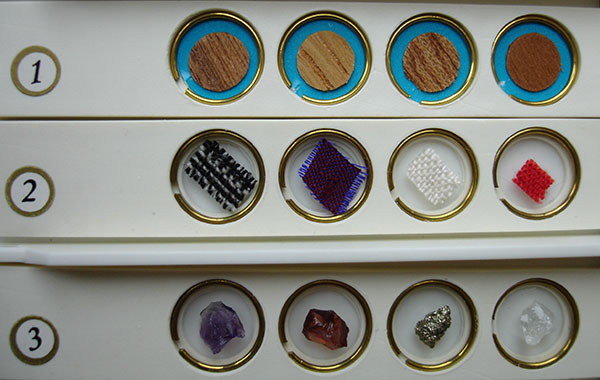
Fig 4.
Close-up of completed 'ivory' Slides 1. to Slide 3.
The small 'roundels' are stuck on the slides for numbering.
Slide 1. Four thin wood sections.
Slide 2. Cloth samples of wool, silk, cotton and linen, these have been trimmed and shaped using small scissors.
Slide 3. Stones/minerals, amethyst, garnet, pyrite and crystal.
Slide 4. [not shown, see later] has four selections of prepared sand from various locations.
Two deep cell slides.
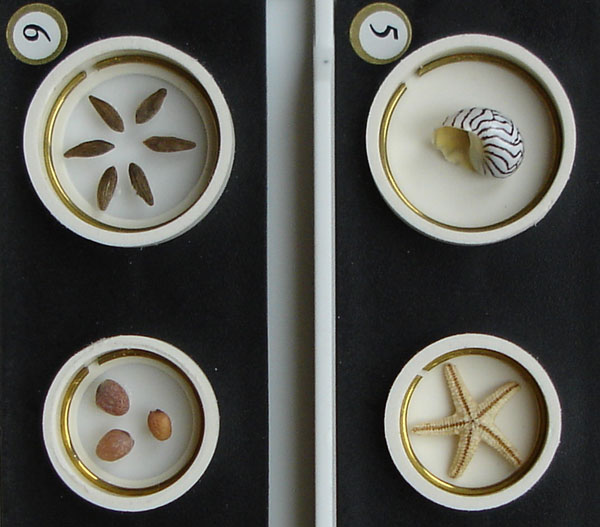
Fig 5.
Fig 5. shows a close-up of the two deep cell slides in the style of the 18th-19th century mounter Ypelaar, subjects included on the two slides are shells, bay star and seeds. Here again I have not used the supplied colour 'roundels' for application below the subjects but left it as a clear mount, this is up to personal preference. See later picture for full presentation of slides.
Two paper covered slides.
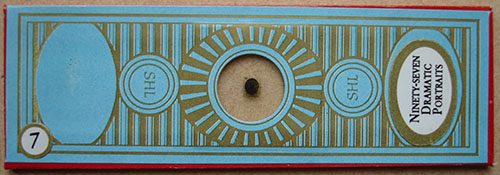
Fig 6.
Slide 7. A facsimile of microphotograph, after Dancer : 'Ninety-Seven Dramatic Portraits'.
An original Dancer micro photograph slide would cost a considerable amount, even hundreds of pounds in some cases depending on subject matter; this is a little gem as far as I am concerned, it is well copied and the overall finished slide being a pleasing blue and gold top on a red base. The slide papers come in two parts, first applied is the underside plain red wrapped around the edges and then overlaid on top is the blue, the photo is already supplied complete with cover slip.
Slide 8. Supposed to be a floral bouquet that you make up yourself out of small parts of dried plant material in a deep cell, sadly I didn't like the effect of this as the deep cell is applied after the paper is applied which looks very odd to me and I have never come across a Victorian slide made like this, so after finishing the slide and not liking it I re-used the paper covers [with difficulty and some wrinkle damage] as a dry mount under cover glass of a butterfly wing which is a typical subject for the 19th century slide makers.
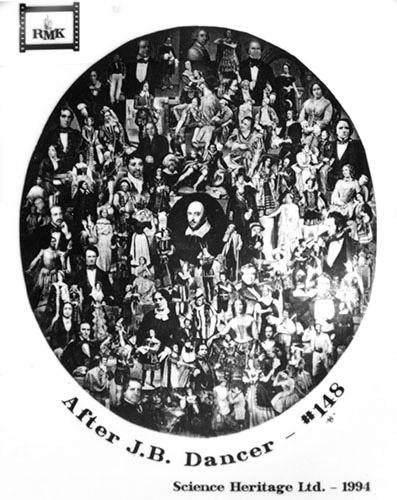
Fig 7.
After Dancer microphotograph 5x objective.
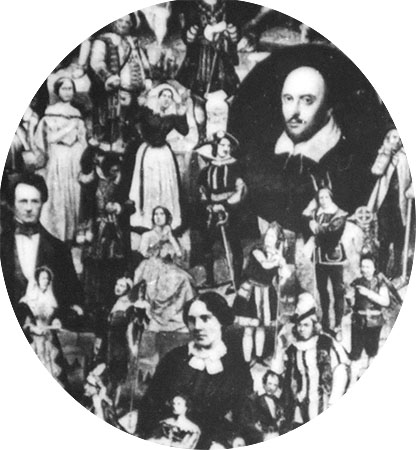
Fig 8.
Close-up of part of the microphotograph.
Presentation.
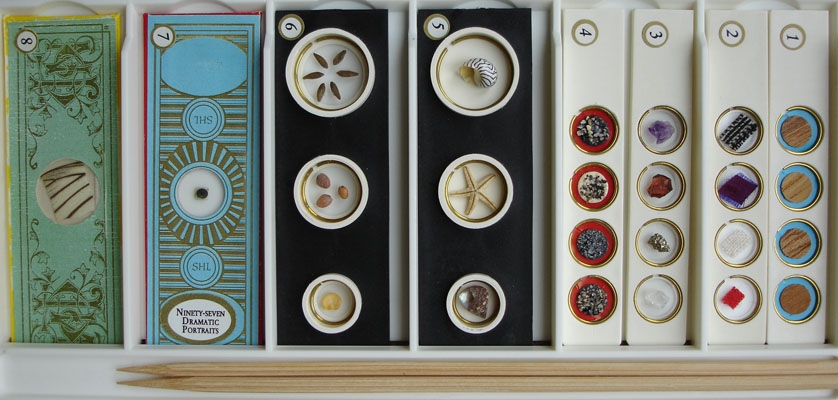
Fig 9.
Overall view of the completed slides compartment, these are housed in an attractive flip top case with further views of the case as shown below in Fig 10 & Fig 11 below. Note: Slide 4. Sand selection 'ivory' slide and Slide 8. Green and yellow paper slide not shown earlier in the article.
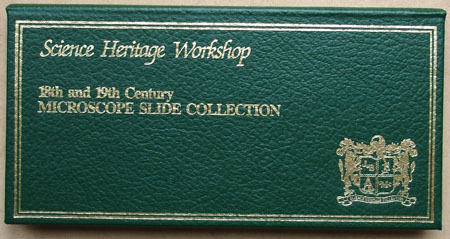
Fig 10.
Top of slide case finished in textured green and embossed gold block lettering.
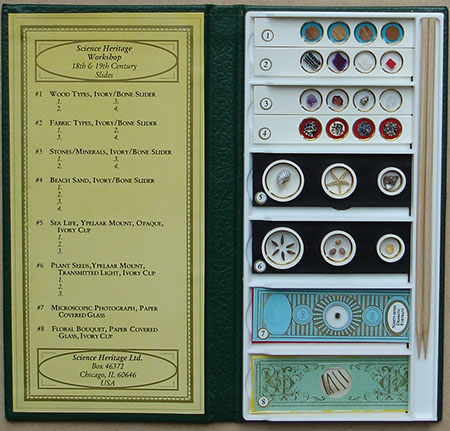
Fig 11.
Complete opened case for slides showing slide written details on left.
In use.
Much as it would be nice to use an example of some authentic 'brass' to view the slides such as a Dollond, Carey or Jones 'much improved', these are for deep pocketed collectors only these days of which good samples of these microscopes can cost thousands of pounds. Even original simple hand lenses of this period can reach tidy sums at dealers.
As most of the subject matter is large a microscope as such isn't really needed except for the microphotograph Slide 7. I have found a good 10x lens works well with these slides and I can recommend a triplet I bought some time ago direct from China via eBay as shown in Fig 12. below (an achromatic-aplanatic 21mm, Ł12 with free shipping). Various styles of hand lenses and loupes can be found on eBay to suit the pocket but even the simplest lens around the house will give adequate results. This loupe [I would call it a hand lens] is very well built and finished and is pretty hefty for its size, it includes a leather wallet, strap eyelet and presentation box.
Fig 12.
21mm loupe with LED ring light of white and low power U.V.
The loupe costs considerably less than say a none illuminating Zeiss or Nikon equivalent and the built in illumination has already been used many times for inspecting microscope optics and small subject matter in poorer light conditions, being an optical triplet good edge to edge definition and colour correction is assured.
Not certain why U.V light is included specially with the eye placed so close to the light source, I have not used this.
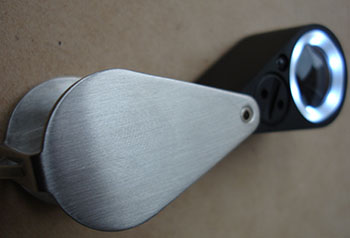
Fig 13.
Fig 13. shows the underside of the loupe, you can just see the small circular battery compartment with coin type removal slot [tool supplied] and presently with white LED ring illumination turned on consisting of six tiny led's around the perimeter of the lens, alternately a low power U.V. light also consisting of 6 led's can be used, these are spaced between the white ones.
A tiny three way slide switch [seen as a thin silver strip against the black in Fig 12.] is placed on top of the case for the illumination including a central 'off' position. The difference a self illuminating loupe can make over a normal one is quite marked, bringing out the colours very well on the rocks/minerals, fabrics and seeds, these all can be 'modelled' as you angle the loupe around the subject.
I have also used the slides on my [20th century!] microscope using some simple illumination with 2.5x and 5x objectives allowing closer examination and finer detail compared to the hand lens. The sand, wood and fabrics look attractive under improvised top lighting techniques.
Conclusion.
I enjoyed building this kit of slides, nothing was missing parts-wise and the final product looks very presentable, some leeway of how the user puts the slides together allows a different look from that specified if wished and that's part of the fun of it. Recommended.
Comments to the author Ian Walker are welcomed.
Published in the June 2012 edition of Micscape.
Please report any Web problems or offer general comments to the Micscape Editor .
Micscape is the on-line monthly magazine of the Microscopy UK web site at Microscopy-UK
©
Onview.net Ltd, Microscopy-UK, and all contributors 1995
onwards. All rights reserved.
Main site is at
www.microscopy-uk.org.uk.