| The
Oil Immersion Objective
If you are thinking about getting one, read on...... A basic introduction plus some personal thoughts By Paul James
|
| The
Oil Immersion Objective
If you are thinking about getting one, read on...... A basic introduction plus some personal thoughts By Paul James
|
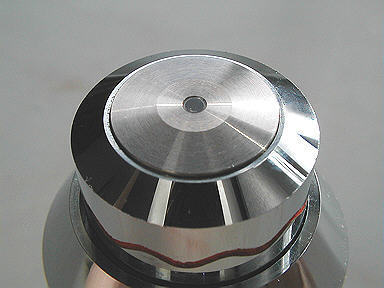
The modern oil immersion objective seems a little different from the rest of the 'dry' optics found on the objective changer, and for several reasons it is .In a typical achromat battery of optics found on many 'scopes, the oil immersion objective is the most complex and most expensive of them all. They yield the highest powers of magnification of around x60 to x130, and highest resolution also, which averages at 0.2 um (130,000 dpi) from an aperture of approximately 1.3na., and with a x10 eyepiece the combined magnification can be up to x1000+. Its effective focal length is tiny at just 1.8-2mm, and so its working distance is exceedingly small at only about 0.25 mm.
 |
|
|
Its peculiarity however is its requirement for a special fluid to fill the tiny gap between the front element and the coverslip. Without this 'oil' the objective could not operate at its maximum aperture, and would be restricted to less than about 1 na., and if used in this 'dry' state the image would be dull and worthless. It has been specifically designed to employ this oil as a part of its optical train. The optical principle involved is fairly straight forward, at least in theory..........
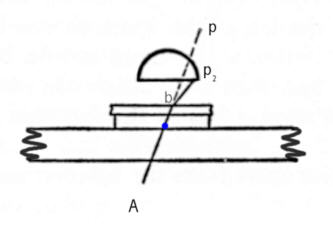 |
The diagram above shows the section of a front element from an oil immersion objective focussed above a section of a slide etc. but is not to scale, yet demonstrates the principles involved.The extreme ray AbP2 leaves the coverslip surface at b in air after passing through the slide, specimen / mountant and coverslip. The deviation is caused by the different refractive indices of glass and air from b to P2. For this particular objective lens, its working distance and diameter constrain the angle of the emerging light to its edge at P2. Thus this represents the maximum angle of cone of acceptance in this instance......which might be say 0.95 na. ( NA in air = Sine of half cone angle.......So 0.95 na is the sine of 72 degrees. In air this is about the maximum possible). Now if we want to increase the angle of acceptance in this particular example we must make the refractive index of the medium between the lens and coverslip the same as the glass, which is were the 'oil' comes in. By placing a drop of this oil between these two glass components the entire space between the undersurface of the slide and the back of the first lens element becomes homogenous, and of the same refractive index. Hence the extreme ray would travel in an undeviated straight line AbP.
Yet the objective lens is now working at a reduced aperture, having only the central zone admitting light from the specimen. In order to expand this cone and increase the obliqueness and fully utilise therefore the resolving ability of this lens, the ascending light cone from the substage must be made using a suitable condenser whose aperture is well above 1.0 na. When oiled to the undersurface of the slide an oil immersion condenser will be able to provide the necessary cone which will illuminate the specimen with the necessary angle required to flood the objective's lens completely and thus satisfy its aperture of 1.3 na.
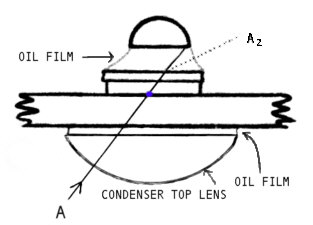 |
Note that the extreme ray 'A' can pass through the entire optical train from top condenser's lens into the objective without deviation, and so a larger cone of light can now be utilised by the objective with subsequently higher na. and therefore final resolution. The dotted line emerging toward A2 shows the actual light path of the extreme ray if no oil is present, therefore all the emerging light from the high na. condenser is captured by the front element of the objective when oil film is in place.Considerations of Design
In actual fact the design of the oil immersion objective is complex, because there is not much leeway regarding working distance, front element diameter and recess depth in objective mount, as well as all the other factors such as achromatism, spherical aberration and field flatness etc., that are just as important in lower power objectives.
The physical handling and fashioning of at least 6-7 elements of glass varying in size from approximately 7 to 1.5mm is a highly skilled and expensive process, as is the accurate mounting these tiny optics.
Immersion Oil
These lenses are designed to be used with cedar wood oil, a naturally occurring product from the tree. Its refractive index of approximately 1.52, is almost identical to that of the glass used for slides and coverslips. Synthetic oils have been formulated which are more stable, and can be obtained in various viscosities. Other fluids such as glycerine, and also mineral and vegetable oils work , but their refractive indices and dispersive powers vary somewhat from that of glass, and hence cannot be expected to elicit the best imagery from the specimen.
Other Immersion Types
Many oil immersion lenses have been made, most are of the standard type with 2mm focal length, some at 3-4mm fl. Others are designed to operate with a water film instead of oil, so they can be used directly without a coverslip for aquatic observations. They are known as water immersion objectives, and they usually have lower na. and longer focal lengths and working distances for rather obvious reasons. Carl Zeiss have made water immersion objectives with ceramic bodies so that no electrolytic currents generated by conventional metal mounts can disturb the living specimens. Nikon produce oil objectives with aperture values up to 1.6 na. utilising higher refractive index immersion fluids, but these also require higher na. condensers too etc.. Objectives in these categories are invariably very expensive.
Using the Oil Immersion Lens
Since this objective has the smallest working distance of all, its manipulation is altogether rather critical and is therefore the most demanding of all the objectives in normal use.
Assuming that it belongs to a family of optics from one maker, its parfocality and parcentricity with the x40 dry objective is assured, and is highly desirable too. The first requirement is to oil the top of the condenser to the undersurface of the slide, because we want the maximum aperture potential of the condenser. So having set up the slide and substage, the specimen is centred in low power, and then the x40 objective is brought into play to its best advantage . The next step is to swing with great care and introduce the front element of the oil immersion lens over the specimen. Care is essential here, for it is quite possible that the mountant/coverslip thickness exceeds that required by the design of this lens, with the resulting clash of glasses! Though most now have retractable mounts, oil immersion objectives should always be very carefully aligned over the specimen in a dry state, in the first instance. When satisfied that there is some working room above the coverslip we can swing the objective away and then introduce a small drop of immersion oil directly over the specimen. It is quite instructional to observe the field before and after the oil has been introduced to the slide, because we can see the dramatic effects on the intensity of the illuminated field when the oil is applied, verifying the increased quantity of light passing through the front element.
A little fine focussing will be required of course, depending upon the accuracy of the parfocality, and maybe some adjustment of the specimen's position too.
At this high magnification, the microscope's adjustments will be amplified considerably, so this is THE test of the design and stability of your stand. Not least will be the tweaking of the substage, who's condenser needs careful focussing and iris closure, to bring out the best of the image.
Observation of Back Lens of Objective
Removing the eyepiece and observing the back lens is again instructional, because we will be able to see if the condenser is actually doing a proper job of providing a solid cone of light. The iris can be seen opening and closing, but importantly the circle of light within the iris as seen in the back of the objective should be uniformly bright at all settings of the iris. If not there can be two causes.:-
1) Condenser not properly focussed or centred, or illumination train not centred properly.
2) Condenser fails to provide a geometrically accurate cone, probably because it may be a simple Abbe design with much spherical aberration. There is nothing we can do save adjusting the condenser's focus position carefully to fill the objective's back lens as completely as possible.
A focussing telescope like those supplied with phase contrast stands can be used here to advantage.
Cleaning Up
Soft tissue will remove 95% of the oil on all the surfaces quite easily, and the temptation to use solvents is obvious. The only real objection is when any of this solvent is used on the face of the objective, because of course solvent can work its way into the interior behind the front element if used neat. So if it is used it must be very sparingly applied to a cloth first, and carefully drawn across the front element. I cover the objective's front element for quite some time with a layer of clean tissue after cleansing to make sure that all the volatile components are continuously absorbed from the front lens by capillary attraction.
Solvents such as xylol/toluene and isopropanol (isopropyl alcohol) are used for cedar wood oil and synthetic immersion oil respectively.
Personal Thoughts on Oil Immersion Lenses
So the basics have been covered, but for those who still feel that this lens will be of use, I will make a few comments gleaned from personal experience, which I know are shared by others.
There is no doubt that using these lenses is not a speedy process, and coupled to the fact that administering and removing oil from the underside, coverslip, objective front element and condenser, is a messy and timing consuming activity, which doesn't get any easier.
The notion, for instance that this oil lens with an aperture capability of about 1.3 na will reveal twice as much detail as a x40 dry objective with a na of say 0.65 is not born out in practice. The assumption is understandable, but the fact is that the increase in detail at the level of 0.34-0.2 um which corresponds to the x40 and x100 oil objective respectively, is not to be found in great abundance amongst microscopic life. Of course it IS there, but restricted in the main to the realms of bacteria, diatoms and tiny protozoan life. But the actual visual improvement in the image is less than one would expect, and whilst the image scale is significantly increased by a factor of x2.5 over the x40 objective, the actual detail present in the image might be somewhat short of your expectations.
Resolution of Light Limitations
One simple fact rarely given an airing, is that this region of resolution and power comes close to the limits of resolution of light. The imagery therefore can never be as sharply perceived as with lower powers, and added to this is that the depth of field is at its minimum with this objective....... being exceedingly small. Any improvements in resolving power can only be gained using shorter wave light, ie going into the blue and violet regions. But the advantages are only slight and hardly worth implementing. As it is we cannot be certain that the finest details present in the image are accurately portrayed because of this limitation.
Pro's
1) Capable of delivering the largest scale images and highest resolution.
2) Insensitive to coverglass thickness, and therefore will always perform at its best compared to the dry x40 objectives, who's sensitivity to coverglass thickness requires ideally, the incorporation of correction collars for na.'s above about 0.7 especially in apochromats.
Con's
1) Tiny working distance demands great care in focussing, especially non parfocal combinations. Coverglass/mountant thickness is very important as there is the real possibility of coverslip/specimen/lens damage if a little careless, even with spring recoil objective mounts. Cannot be focussed therefore over thickishly mounted specimens.
2) Very small depth of field.
3) Requires skill and experience from the observer when setting up illumination, substage centration etc.. to yield the best imagery.
4) Messy, time consuming setup/cleaning.
5) Best used with 1.2-1.3 na. achromat condenser of the oil variety to utilise the full aperture capability of the objective.
6) Frustratingly hard work when alternating between oil objective and dry lower power scanning lenses, requires top slide clean-ups every time.
Conclusion
The achromat oil immersion objective is the most economical solution to high resolution, large scale imagery for observations at the near limits of the resolution of light.
If money permits ....................the alternative option with speed and convenience on its side, is the acquisition of a dry x40 apochromat 0.95 na. with correction collar and a pair of x15-20 compensating eyepieces.
It is not an easy choice, especially if you have not experienced either combination. Fortunately for me, and no doubt many others, the vast wealth of microscopical subjects can be scrutinised without the need of the oil immersion objective. If photography is a high priority, then the convenience of having the larger image scale from the x100 oil lens could be a major factor of choice.
You might consider a phase contrast outfit too? There's one slight advantage here, most standard phase condensers seem to have an aperture of less than 1.0 na. ie. they are dry, non oil condensers, so there's less messiness involved overall. This happens to be my particular favourite avenue with the immersion lens.
I strongly suspect that many oil objectives lie dormant in their canisters or hang unused from the objective changer because of the rigmarole involved in their use ??
Gallery
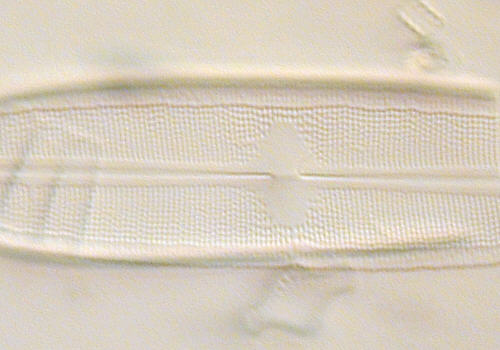
A selection of images with oil lenses, chosen to show the detail and scales of imagery that can be expected. The actual detail resolved is less than these lenses can reveal, as a x40 fluorite (0.75 na) or apochromat (0.95 na) objective will demonstrate, albeit on a smaller scale. All these images are unaltered crops from the small central section of the original image file.
 |
|
This is not an easily rendered object in Brightfield |
 |
|
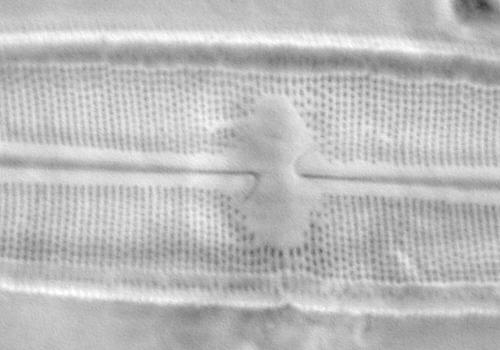
A combination of flourite Wild x100 objective illuminated with substage annulus to bring about increased contrast. |
 |
|
|
 |
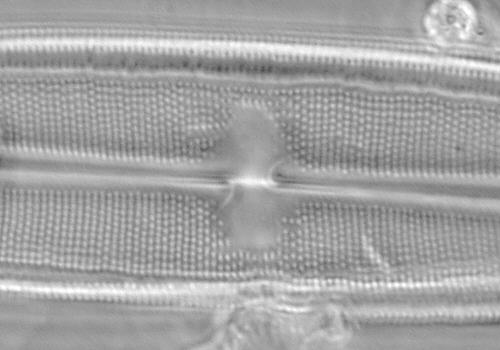
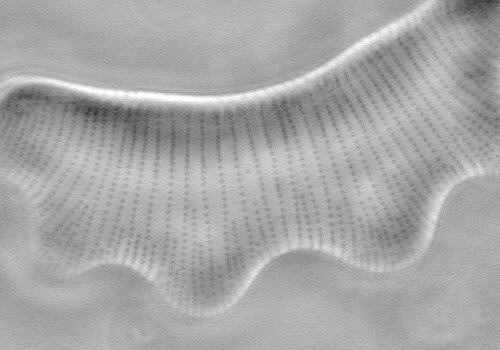
| Diatom Eutonia
sp. x1750 ( Wild x 100 )
Phase contrast black dot focus |
 |
|
|
 |
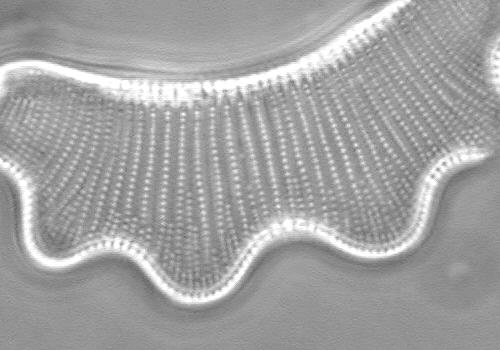
| Ditto. Leitz
DF 1.2 na.condenser providing 50/50 DF/Brightfield
The condenser was also offset. This unusual combination yielded sharpest direct observation. |
All images captured with Nikon Coolpix 800 and Wild M20 stand.
|
|
Please report any Web problems
or offer general comments to the Micscape
Editor,
via the contact on current
Micscape Index.
Micscape is the on-line monthly
magazine of the Microscopy UK web
site at Microscopy-UK
WIDTH=1