|
Basics of photomacrography by Chuck Huck, USA |
Micro and macro are closely related. Photomicrography requires a microscope and camera while photomacrography requires a camera and special lenses and/or special attachments. When objects or specimens are too large for the compound microscope, we then must use either a low-power stereo microscope or a magnifying lens.
Photomacrography is usually defined as any magnification at the film plane of 1X (life size) and higher. Anything below life size is considered a closeup. Simple diopter lenses placed in front of the normal camera lens, or sometimes a small extension tube between the camera and main lens, usually result in magnifications below a 1:1 ratio.
Special macro lenses are available but also very expensive. Extension tubes, bellows units, teleconverters, focusing rails and similar devices can be used quite effectively to achieve the desired magnification of a specimen. Variable magnifications, say 3 to 10X, can be obtained by using a bellows unit and focusing rail. Extension tubes can only achieve a single magnification. In the field, the use of a standard 50mm or 100mm lens, macro teleconverter and small electronic flash unit are very helpful in photographing plants, living insects, etc., up to about 1X.
Some knowledge of math is helpful in photomacrography. If you use a bellows or extension tubes, determine magnification by dividing the distance from the center of the lens to the image by the lens-to-object distance. If the distance from the lens to the image is 6 in. and the distance from the lens to the object is 3 in., then the magnification is 2X at the film plane.
Exposure is determined by through-the-lens metering, otherwise a hand-held exposure meter can be used. In this case, let's say the lens extension is 4½ in. The meter reading is taken. The f/stops on the meter are inches. Opposite f4.5 reads 1/200 sec. Move the speed (1/200) opposite the lens focal length (f2 for a 2 in. or 50mm lens). Now read the meter for the exact exposure. I read this procedure in a photography magazine about 40 years ago, and it works fine!
When shooting macros with electronic flash, use the following formula: D=GN/EF. D is the distance from flash to subject in inches. GN is the guide number of the film. EF is the effective aperture (marked aperture X magnification + 1). Rather than delving into more formulas, I have developed a simple flash-to-subject distance technique through experimentation: When using a portable electronic flash unit, such as a Vivitar Model 283, the unit should be between 6 and 10 in. from the subject if the magnification on the film plane is anywhere from 2 to 4X and the film ASA is 100. Use this is a starting point for whatever combination you develop. You will have to experiment. Use up a roll or two of film, bracket your exposures by several stops and keep notes on each exposure. When you examine your slides or prints, note which exposure is best and use that exact exposure and flash distance from now on. After your initial tests, you should be very accurate in the future and will not need to bracket.
The above applies only to the use of film. Digital photography is a different matter, and much simpler since you actually see your results after each exposureand you don't waste any film.
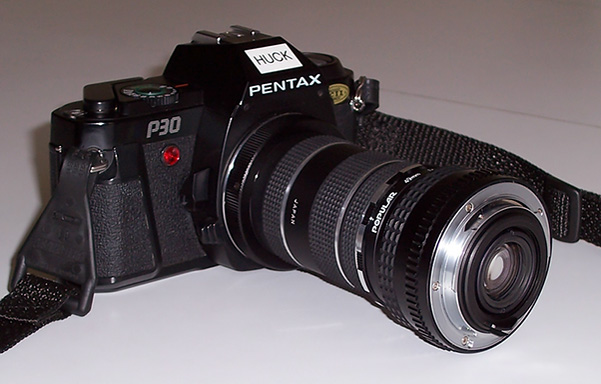
Here are photos of some of the film equipment I use for photomacrography. The pictures were taken with a Kodak 4-megapixel digital camera with flash and transferred to Kodak EasyShare software on the computer.
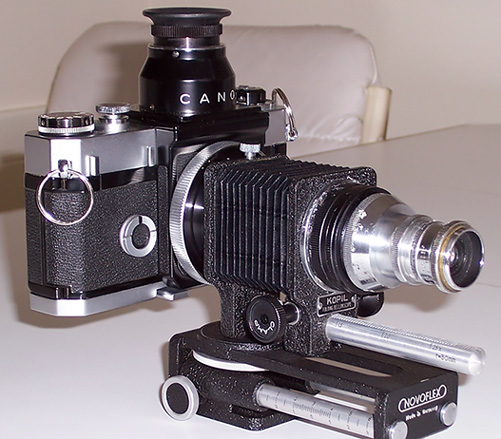
The cameras shown include a Pentax 35mm SLR with a complete set of extension tubes connected to the camera with a T-mount adapter, a 49mm reverse ring on the extension tubes and a reverse 50mm fl.8 Pentax lens, providing a magnification of 3X. (For macro work, normal lenses provide the best image when reversed.) The Canonflex 35mm SLR is equipped with a waist-level finder replacing the prism for macro work. A Canon breach-lock mount with a Leica/Canon screw thread is attached to the camera, followed by a Kopil folding bellows unit with a short Leica extension ring cemented to the bellows unit and a C-mount ring cemented to another small Leica ring, which in turn is screwed into the first Leica ring. A 1-in. f2.5 Wollensak 16mm movie camera lens, reversed, is cemented to a short Bolex extension tube that is screwed onto the C-mount ring. The whole system is attached to a Novoflex focusing rail, and magnifications range from 4 to about 10X. All cementing is done with Amazing Goop.
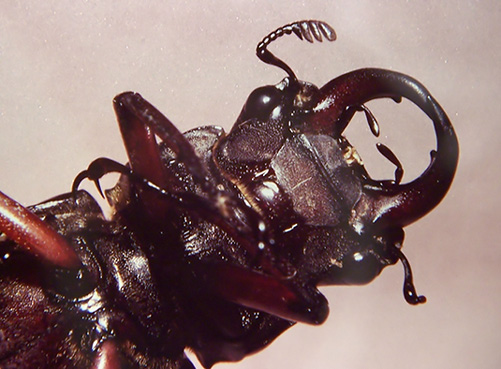
The photo of the underside of a male stag beetle was taken with a Pentax SLR equipped with a Vivitar 2X macro teleconverter and 50mm f1.8 Pentax lens with a Plus-1 closeup lens attached. Magnification is approximately 1.2X at the film plane. Film was Fujichrome Selsia ASA 100. A Vivitar 283 electronic flash unit was placed 10 inches from the subject and right next to the lens. The original color slide against a lighted ground glass was shot with the Kodak digital camera using a supplementary closeup lens.
Comments to the author, Chuck Huck, are welcomed.
Please report any Web problems or offer general comments to the Micscape Editor.
Micscape is the on-line monthly magazine of the Microscopy UK web site at Microscopy-UK.