Hybrid
Polarizing Microscopes
Michael
Reese Much
Bethlehem,
Pennsylvania, USA
Cross-Polarization
microscopy has intrigued many amateur microscopists because it opens
new avenues of pictorial realization. Brian Johnstons articles
featuring stunning images of chemical melt and evaporative slides
inspired me to explore cross-polarization techniques. Unfortunately,
the prohibitive cost of a true polarizing microscope demanded that I
find alternative approaches using the equipment already on hand. In
this article Ill demonstrate how I set up a standard
trinocular compound microscope and a stereo microscope for
cross-polarization photomicroscopy.
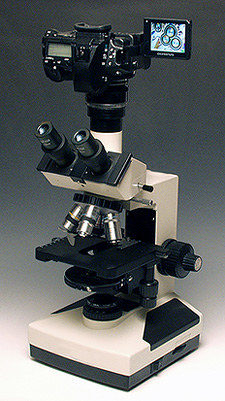
Trinocular
Compound Microscope
 Basically,
in cross-polarization microscopy the light illuminating the specimen
slide is polarized below the slide and then the image of the specimen
is polarized again after it exits the objective. In a true polarizing
microscope, the polarizer is incorporated in the sub-stage
condenser to polarize the light source. The second polarizerthe
analyzeris positioned in the optical path before the
eyepiece and/or the camera.
Basically,
in cross-polarization microscopy the light illuminating the specimen
slide is polarized below the slide and then the image of the specimen
is polarized again after it exits the objective. In a true polarizing
microscope, the polarizer is incorporated in the sub-stage
condenser to polarize the light source. The second polarizerthe
analyzeris positioned in the optical path before the
eyepiece and/or the camera.
To
set up a standard microscope for cross-polarization microscopy you
will need two polarizing filters, which can be purchased at any
camera store. Polarizing filters come in two typescircular
and non-circular.
Circular
when applied to polarizing filters does not refer to the shape of the
filter. A circular polarizer has a quarter-wave filter incorporated
into its construction. This type of filter is required for use with
autofocus and auto-exposure cameras that may have beam splitters or
semi-silvered mirrors in the autofocus and metering systems of the
camera that rely to some degree on reflections to function correctly.
The quarter-wave filter built into a circular polarizer will allow
the camera systems to function normally. A non-circular polarizer in
such a camera may cause autofocus and metering errors because it will
reduce the effectiveness of the beam splitters and semi-silvered
mirrors by reducing the reflections needed much as a polarizer does
when taking the reflections out of a store window.
Using
circular polarizers may reproduce some of the effects produced when
using lambda plates in a polarizing microscope because of the quarter
wave filter, and a circular polarizer polarizer combined with
a circular polarizer analyzer might have a cumulative
half-wave filtering effect, but I havent pursued this
investigation as yet.
 In
the setup on my trinocular, I simply place the polarizer on
the light source. It is not screwed onto a thread or otherwise
secured to the microscope. The polarization of the light source is
changed by rotating the filter by hand and visually assessing the
effect on the cameras monitor or through its viewfinder. An
inexpensive polarizing filter can be used on the light source because
the optical quality of the filter is not that vital to image quality.
Not all polarizers are the samesome may have a more profound
polarization effect and some may produce variations in the colors
produced depending on the brand. I was in a camera shop the other day
that had a bin each of used circular and non-circular polarizers at
very affordable pricesa very good opportunity to stock up.
In
the setup on my trinocular, I simply place the polarizer on
the light source. It is not screwed onto a thread or otherwise
secured to the microscope. The polarization of the light source is
changed by rotating the filter by hand and visually assessing the
effect on the cameras monitor or through its viewfinder. An
inexpensive polarizing filter can be used on the light source because
the optical quality of the filter is not that vital to image quality.
Not all polarizers are the samesome may have a more profound
polarization effect and some may produce variations in the colors
produced depending on the brand. I was in a camera shop the other day
that had a bin each of used circular and non-circular polarizers at
very affordable pricesa very good opportunity to stock up.
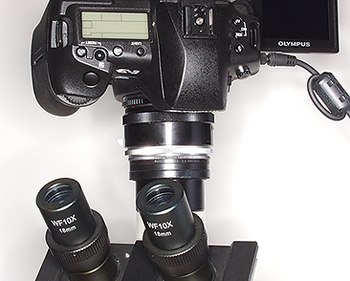
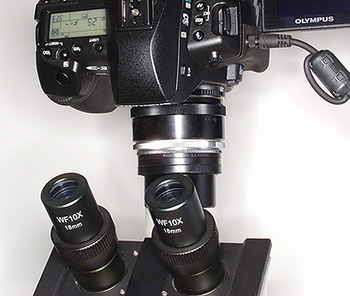
In
my trinocular setup, the analyzer is located in the photo
portpast the binocular eyepieces and before the camera. This means
the binocular eyepieces can only be used for finding the subject area
on the slidethe polarization effect cannot be seen through the
binocular eyepieces; only through the camera viewfinder system.
When
I first started using my hybrid cross-polarization setup, I was using
an Olympus EVOLT E-500 with a Hoodman right angle viewfinder adapter.
I found fine-focusing using the Hoodman finder at 1x very difficult
and at 2.5x totally impossible. I switched to the Olympus EVOLT E-330
for the Live View on the LCD screen and the 10x magnification on the
LCD in Live View Mode B and have found the viewing and fine focus
superb. Plus, the E-330 has an articulated LCD screen which further
enhances image assessment. The Olympus E-3 also has an articulated
LCD screen which offers the same benefits.
The
camera mount is custom-made from old Nikon and Pentax extension
tubes. I have found that every time I fabricate a microscope camera
mount I am starting from scratch. I recommend that anytime you see
used extension tubes in a camera shop, snap them up. They are very
handy to have around for building camera adapters. The eyepiece is an
Olympus 2.5x photo eyepiece.
One
surprising benefit of the Four-Thirds Standards sensor size is
that using the 2.5x photo eyepiece provides full-frame imagesnot
a circular image that requires severe cropping to make a standard
print.
The
analyzera 30mm Hoya non-circular polarizeris simply
set on top of the eyepiece. Because the image exits the eyepiece
through the analyzer to the camera sensor, it is vital to buy a
top-quality polarizer for this component. I have tested rotating the
analyzer to different rotation points, and have found no difference
in effect in relation to the rotation of the polarizer at the
light source, so the analyzer can remain stationary.
The
camera adapter is topped with an Olympus MF-1 OM Adaptor to mount the
Olympus EVOLT E-330 or Olympus E-3 DSLR bodies to the microscope for
photomicroscopy. I have built the rings from a punched-out polarizing
filter into the mount so that I can rotate the camera freely while it
is mounted to the microscope. This facilitates connecting cables and
changing batteries without removing the camera. In addition it allows
me to rotate the camera for
compositional
purposes in pictorial photomicroscopy.
I
have read some discussion of the practicality of mounting a digital
SLR to a microscope because of the vibration caused by the
mirror/shutter cycle during exposure negatively affecting image
sharpnessparticularly at higher magnifications. I am getting
very satisfactory results with my setup.
I
use the ANTI-SHOCK option provided in Olympus E-System cameras which
enables from 1 to 30 seconds of mirror lockup before the shutter
trips. I use the RM-1 infrared remote control to trip the E-330
hands off and the E-3 also allows the use of the RM-CB1
Remote cable for remote shutter tripping. The cameras can also be
remotely tripped and controlled using Olympus Studio Camera Control,
which also saves the images on the computer automatically.
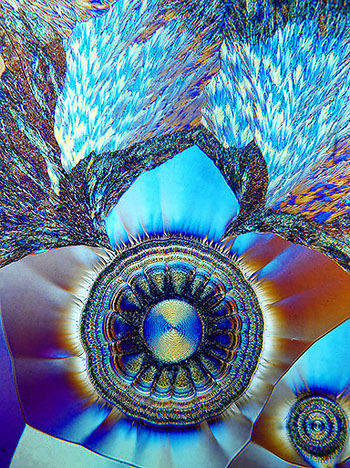
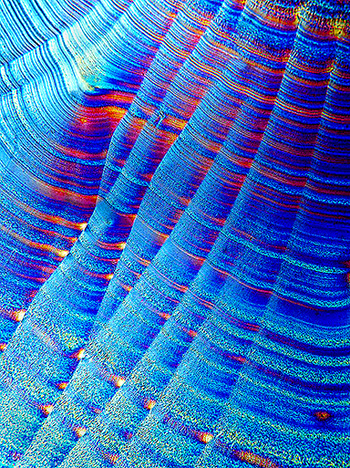
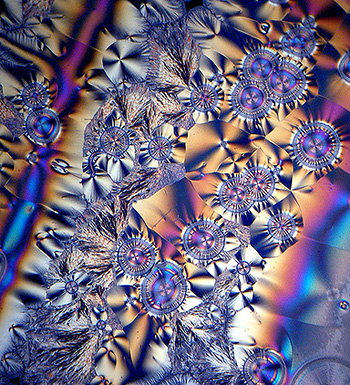
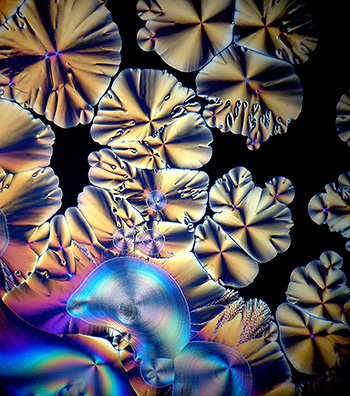
Below
are two cross-polarized images of Ascorbic Acid shot at high
magnification which can attest to the sharpness when shooting with a
directly-mounted DSLR.
10x 40x
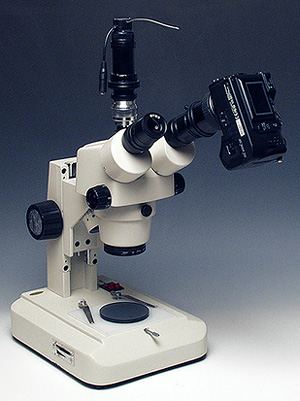
Stereo
Microscopes
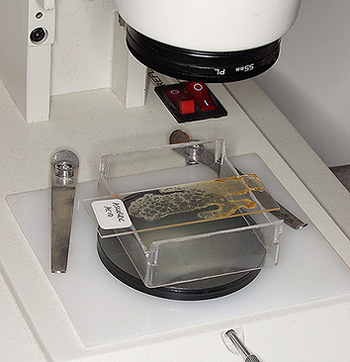
Stereo
microscopes can be very easily be set up as polarizing
microscopesall that needs to be added is an analyzer
and a polarizer. On the microscope shown, an Olympus C-4040Z
is mounted on the right eyepiece. A wireless color CCD television
camera is mounted on the photo port in a custom mount fitted with a
10x eyepiece. The video signal is sent to a receiver that is
connected to the VIDEO IN jack on a combination TV/VCR. I found the
photo port on this model microscope wasnt giving me the
quality I was looking for when I mounted the C-4040Z or an Olympus
SP-320. I found mounting the camera on the eyepiece yielded better
quality, though I dont know why.
Stereo
microscopes may be more suitable for larger specimens than a
high-magnification compound microscope. I found that some of the
larger clusters of chemical crystals offer pictorial images of great
beauty when cross-polarized. Shown below are cross-polarized images
of Ascorbic Acid:
The
setup I am using uses a rather large polarizing filter (77 mm)
removed from the rotation rings used to mount the filter on a camera
lens. I did this for two reasons:
- Ease
of handlingI can put the specimen on the filter and move it
around the viewing area very easily.
- Prevent
scratching the white Plexiglas I have clipped to the work area.
In
addition, I use a small plastic stage on which I can put a slide or
small glass plate to hold a specimen. The gap introduced by the stage
results in any dust on the Plexiglas or polarizer to be out of focus,
meaning less clean-up in post production.
This
polarizer is not rotated. Also, this need not be a high quality
filter since the image is not passing through it.
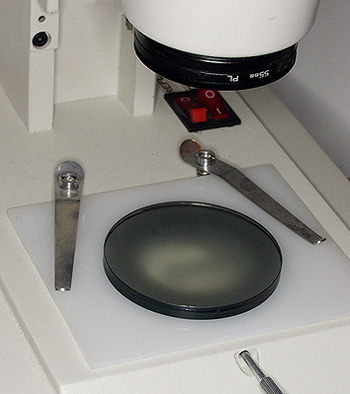
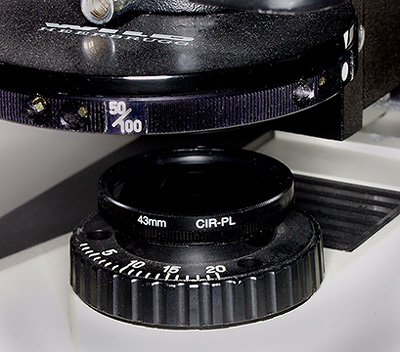
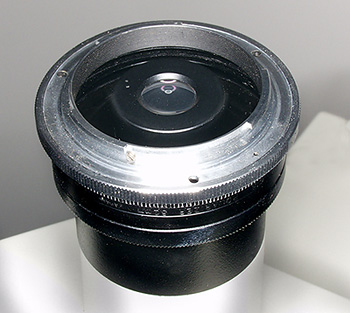
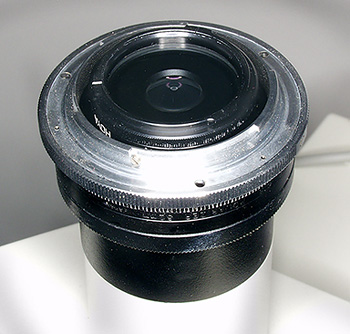
The
Analyzer on the stereo microscope setup is positioned just
below the objectives. I glued a filter ring to the opening of the
objective cone on the scope. When I choose to use the stereo
microscope for cross-polarized microscopy, I mount a polarizer in the
filter ring.
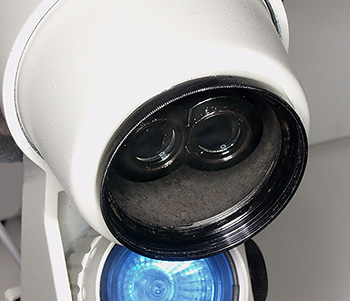
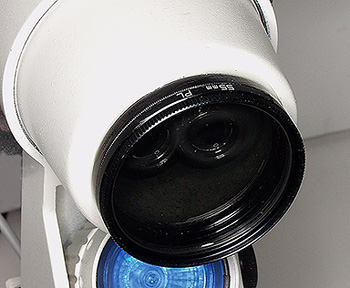
The
Analyzer is rotated to control the cross-polarization effect.
Since the image passes through this filter it should be a
high-quality polarizer.
Since
users microscope setups tend to be unique, this article doesnt
presume to be universally applicable. My intention is to demonstrate
solutions I have developed for my own cross-polarization techniques.
Hopefully, I may have presented some ideas for your own pursuits in
this fascinating microscopy technique.
Michael
Reese Much is a senior digital technical support representative for a
major manufacturer of digital products. He is also a fine art
photographer and amateur microscopist.
All comments to the author
Michael
Much are welcomed.
Microscopy UK Front Page
Micscape Magazine
Article Library
© Microscopy UK or their
contributors.
Published in the March 2008 edition of
Micscape.
Please report any Web problems
or offer general comments to the
Micscape
Editor.
Micscape is the on-line
monthly magazine of the Microscopy UK web
site at
Microscopy-UK
© Onview.net Ltd, Microscopy-UK,
and all contributors 1995 onwards. All rights reserved. Main
site is at
www.microscopy-uk.org.uk
with full mirror at
www.microscopy-uk.net.