 |
| Diffuse
Sourced Lamphouse Modification A DIY guide to the process By Paul James |
Intro
Despite the fact that the simple Abbe substage condenser has received critical analysis over the years, it still remains the most commonly used substage optic worldwide. Ironically, the other 'substage' condenser, the one that is out of sight within the lamphouse, usually escapes the niggling commentary the Abbe often receives, yet it is as much to blame for its part in helping to project a less than ideal cone of light onto the specimen. It is therefore doubly unfortunate for the Abbe that it usually receives the full brunt of any criticism whilst his 'partner in crime' hidden in the bowels of the lamphouse remains unscathed!
The simple reality is that many lamphouse condensers are not capable of projecting a decent image of the lamp filament to the substage condenser in the first instance. Since the production of a theoretically perfect Kohler system would be prohibitive the majority of manufacturers have adopted for some considerable time now , a simple procedure which involves frosting one face of the lamphouse condenser's optic, with the result that the lamp filament's structure is formed into an amorphous source that even the flawed lamphouse's 2 element condenser can cope more easily with. The virtues of this simple strategy are many, but aside the manufacturer's interest in economy a more robust and easily managed substage lighting system ensues.
The Situation
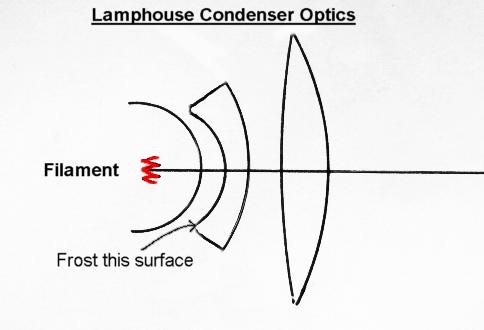
My universal light source is an Olympus external Kohler lamphouse and its 2 element condenser is wanting of better corrections for spherical aberration. I eventually took the bull by the horns and followed the practice of most manufacturers inbuilt illumination systems of 'frosting' the inner first optical surface of the lamphouse condenser. Of course this is an irreversible procedure, so the decision to do so was not taken lightly, though the urge to get on with it was becoming irresistible. So having convinced myself of the virtues of a diffuse sourced 'Kohler' based system, I concentrated on the job at hand.
Which surface to 'frost' ?
The nearer the lamp the better......... is the short answer. If needs be you could frost any of the other glass surfaces, but frankly your chances of generating an evenly lit field diminishes as this gap gets larger. In fact the upper central zone of the lamp's surface can be frosted easily enough, and you might therefore like to experiment if the bulb is a cheap one and easily replaced! Much depends on your lamphouse configuration and though the diffused lamp surface might work in your circumstances the frosting process will have to be repeated each time you replace the bulb. Best therefore to grind the first glass surface of the condenser itself :-
|
The Grinding/Frosting process
The process of trying to create an evenly frosted surface on glass requires that the surface becomes evenly pitted but not 'scratched'. Though this may seem a contradiction in terms there is a distinct difference: scratches can be more difficult to lose in the field of view, but a myriad of evenly spaced pits are more easily accommodated. In trying to maintain an evenly lit field it is in the interest of DIY frosting that we consider the grinding process before we even attempt it.
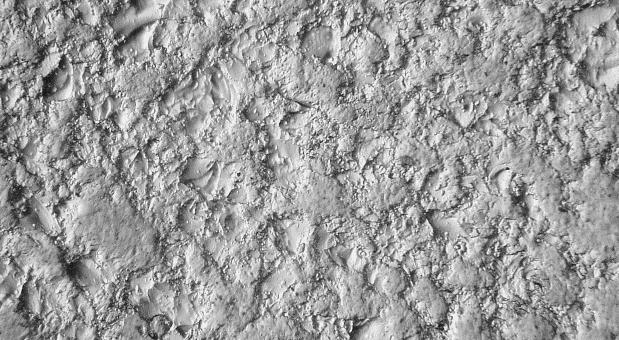 |
| Oblique
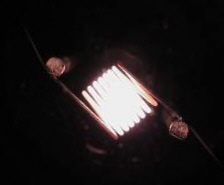
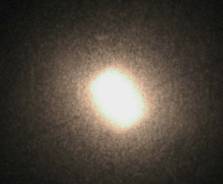
BF view of ground surface of glass (x200) . Note the haphazard pitting which guarantees random diffusion of light throughput as demonstrated in the second image below which depicts the diffused filament's grid as seen through one sheet of ground glass placed next to the bulb's surface. |
 |
 |
The 'Nitty Gritty'
First, the pitting or breaking up of the surface of glass is brought about by the action of carborundum powder of a particular grade ie., particle size. The grinding action is the result of mating a 'tool' whose surface coincides perfectly with that of the glass element. The actual grade of grit is fairly critical, and should be finer than 120, preferably around 180, with 220 being uppermost to bring about a degree of frosting suited for a diffuser. Finer renderings of the ground surface simply reduce the effectiveness of diffusion. However, should you find that the surface you have ground is either too fine or coarse, it takes only a few minutes at most to rectify this using the preferred grade of grit. Since a pinch of carborundum powder is all that is required and a drop of water, the process is a simple and economical one to implement. The only problem is finding a small enough quantity to purchase, as the cost of the grit tends to be high in normal quantities. Common sources are the telescope mirror kit suppliers and the like.
Trials using grit ground between a couple of old microsocope slides will prove helpful when assessing the effectiveness of a particular grade of carborundum powder. Testing the frosted slide over a naked lamp should ideally show no sign of the structure of the filament when viewed directly by the unaided eye.
The Tool
A 'tool' for the grinding process to mate with the concave glass face will have to be fashioned. It should ideally be as hard as glass such as hard metals so that the grains of the grinding grit tumble in a wet film between the two intimate surfaces. This tumbling action of the abrasive particles fractures the brittle surface of the glass into shallow pits or craters all over. If you decide to try this using shaped plastic or hardwood tools instead, the action will differ markedly as each grain will tend to become embedded in the softer tool material and cause long score marks as well as pits. The former will tend to show up in the field of view as 'whisps of hair'.
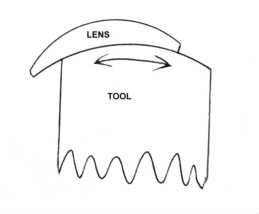 |
| The too & fro motion shown will result in an evenly ground surface providing the lens is slowly revolved as well so all parts of each surface meet at some time. Initial results might show the centre of the lens getting frosted more than the edge...this is normal. In the course of undertaking this action the danger of scratching the lens's upper surface is ever present. Though a few light scratches will have absolutely no effect on illumination efficiency, the scratch may nevertheless be visible in the field. PVC taping this surface will protect it and any adhesive that might remain after the job is finished and then it can be carefully removed with solvent. |
For the perfectionist, the cast iron/hard steel tool is best, but requires a lathe, or a slowly revolving drill press to make it. The face can be turned and then smoothed to a perfect curve to fit the lens. The grinding is then achieved with a slow turning spindle speed and smooth but firm oscillating motion of the hand held lens against the cast iron lap which is charged with a dab of slurried carborundum paste. The lens should be reheld in different positions often so its orientation to the lap is never quite the same. After a few minutes the whole surface of the glass should have an even frosting which appears after the surface is rinsed and then dried off. To the eye the entire face should be evenly ground without obvious variation.
Last tip: is to refrain from touching the freshly ground surface with your fingers. When you are satisfied that the grinding is thoroughly done and looks even, give the surface a scrub with a nail brush to remove any loosely embedded particles of grit. Its cleanliness is of paramount importance, as it is now the new source plane of the illumination system, which if less than ideal will still lose the filament's grid effectively enough, but at the expense of a rather blotchy field!
Diffused Source Usage
Little needs saying regarding the setting up of substage controls which broadly follow traditional Kohler or Critical illumination techniques. Making sure that the illuminating cone looks even and fills the back lens of the objective is the principle tell-tale of good illumination in BF. The lamphouse condenser still needs to be focussed and centred effectively as you will see, but the Abbe condenser's focus will have to be adjusted slightly to lose the pitted surface of the new 'source'.......... but this is not going to alter the effectiveness of the substage lighting. However, what could appear to be of more immediate concern is the dust you might have left on the lamphouse condenser lenses that decorates your field of view with spots and blemishes !
Next month's follow on article : "Optimal output from the Abbe "
| All comments welcome by the author Paul James |
Microscopy UK Front Page
Micscape
Magazine
Article
Library
Please report any Web problems or offer general comments to the Micscape Editor.
Micscape is the on-line monthly
magazine of the Microscopy UK web
site at
Microscopy-UK