A STAGE AQUARIUM FOR THE EXAMINATION OF SAMPLES IN FLUIDS
by Brian Darnton, UK
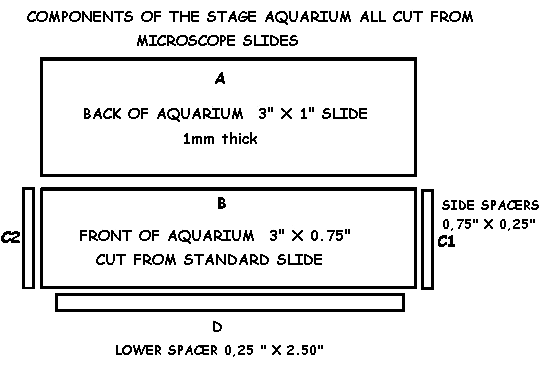
The method involves the use of a cheap roller glass cutter, glass bond adhesive and a few standard 1 mm thick microscope slides.
It is important to use slides of equal thickness although if a thinner cell is required the spacers can be cut from a much thinner material.
METHOD OF CONSTRUCTION
The 5 components are cut out as per diagram on a hard flat clean surface covered with a single sheet of newspaper, using a straight edge to enable the cutting of a good line. If the wheel sticks, a drop of oil works wonders if applied to the wheel. With practice the quarter of an inch required for the spacers may be reduced to be as thin as can be cut. After each cut, the cut surface can be tapped with a light hammer or the reverse of the cutter from the underneath until the section can be broken off. The side spacers C1 and C2 can be glued onto the back A (the complete slide) and the lower spacer D can be fitted in at the same time.
Only use a minimum of glue and
place the work in direct sunlight for 10 seconds. In dull light,
keep testing the bonding until it is firm. It is the ultra-violet
light that cures this glue. Next the front of the device B is
glued on in similar manner. Give the completed work an hour in
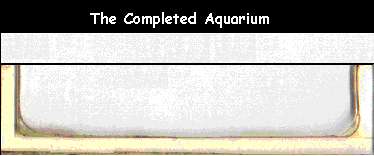
reasonably bright light, a thorough wash and it is ready for use.
Even at this stage it will be evident why the front B is lower
than the back. The space allows the direction of a stream of
water from a tap or pipette into the cavity and without this
precaution the cell is difficult to manage.
USE
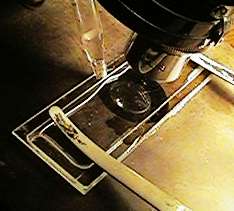
The completed aquarium can now be clipped onto the stage with both clips. The older tilting stage can be moved to the vertical position or because of the effect of surface tension one can operate quite well if the cell is not too full up to 45 degrees. Some of the modern microscopes like the Biolam can be laid down so that the stage is vertical and the eyepiece assembly can be rotated upwards to a comfortable viewing position.
Very high powers can not be used but one can benefit for the full effect of a mechanical stage and most regular styles of illumination such as transmitted light, dark ground, and Rheinberg illumination providing the sub-stage is of modern type. Being inexpensive the device can be left in a pond suspended by a clip from a float and cleaned off externally and examined at intervals.
Safety notice
Please take appropriate precautions when handling and cutting glass and also when using glass bond adhesives. Younger readers should not atempt this project without adult advice and supervision. No responsibility is accepted by On.View Ltd., Microscopy UK or Micscape and it's contributors for any harm to persons or damage to property.
Published in March 1999 Micscape Magazine.
Please report any Web problems
or offer general comments to the Micscape Editor,
via the contact on current Micscape Index.
Micscape is the on-line monthly
magazine of the Microscopy UK web
site at Microscopy-UK