 |
| Large
format B&W
Photomicroscopy by Paul James, UK |
| A purchase of Kodak Aerographic film led to the realisation of some latent ideas |
Some time back I bought some very cheap aerial reconaissance B&W film stored in large 35mm style cassettes. The film is 9.5" wide and about 65 feet in length in each cassette, with a speed of 200 ASA.
One project was to construct a pinhole camera using the film's potential and produce 12" by 9" negatives. The results from this large format size were remarkable, and now thoroughly spoilt by the beautifully toned and grainless contact prints from the camera, I wanted to see if a large negative area would yield microscope images in similar vein.
Why such large film ?
|
Good question! Anyone who has seen a large format photograph contact printed will know why, and larger negatives can produce images with greater tonal ranges with more detail, and less obtrusive grain.
In short, I wanted to produce grainless photo's yielding good detail and tonality from the microscope's image at minimum expense.
Normally, negatives are enlarged so that the resulting prints can be viewed comfortably, but if the negative is large enough, it can be contact printed, obviating the need for an expensive large format enlarger, whilst eliminating any artefacts introduced during the enlarging process. A size of about 12" by 9" ( see below ) was decided upon, which could be viewed comfortably in print, and yet able to fit into a document scanner for digital transfer.
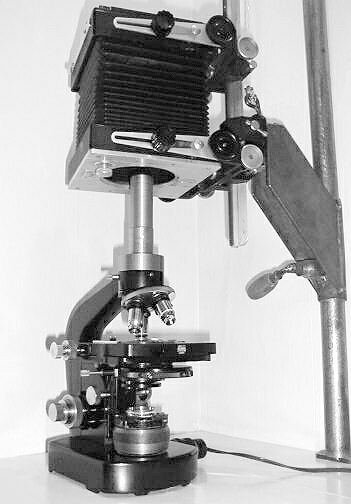
The Set-up
|
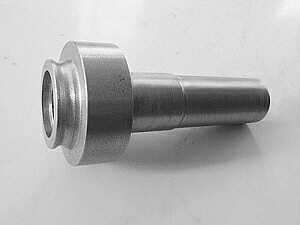
| This home-made phototube replaces the binocular head and allows the use of a vertically supported camera. |
Luckily I have always been able to machine my ideas into shape as it were both in metal and wood, as I possess lathes and general tooling which enabled me to make a phototube for my Wild M20, allowing the imaging light to pass directly from the eyepiece to the film plane. As a precaution, a 'light' thread was cut internally along the exposed length of the tube and then blackened to suppress reflections.
Problems and solutions
 |
My initial requirements were simple, in that photographing prepared slides allowed the simplest of exposure techniques, and importantly would fall within the range of an average camera shutter. As I do not intend at present to photograph living subjects, the use of flash was deemed unnecessary, so the simplest of shutters would suffice.
I thought about the pitfalls of shutter vibration for some considerable time, and chose a simple method utilising an old large format lens whose open shutter aperture matched the opening of the substage condenser. This interesting and convenient coincidence was the main factor in siting the shutter in a machined block covering the field lens on the base of the microscope. The lenses were removed from the shutter body as they were not required, and so the three leaves of the shutter, now without their protective lenses, were 'sheltered' from dust by the covering of a UV photo filter which slips over the external rim perfectly. The heavy ensemble of shutter and mating block, together with the mass of the base of the microscope ensure minimum image disturbance, and is an ideal place where it could be adjusted and fired via a shutter release with great convenience. The placement of the shutter allows much freedom regarding the design and type of film holder/camera, and can still be used with ordinary focal plane cameras if necessary too, and so the ensemble can be left permanently in place as the shutter leaves can be left open without harm to the internal mechanism, ( a feature of old lenses like this ).
So I simply machined a block of steel to fit over the field lens, allowing some clearance for a soft gasket to protect the field lens's housing, and bored a hole to receive the lower part of the large format shutter body. I'd thus made a solid unit, heavy enough to absorb any shutter vibration and yet still able to be laterally 'tweaked' in unison with the field lens, as the latter was designed to do when aligning the optical system.
Procedure
Before thinking about making a film holder for the wide aerial film, I took some sample shots using the 5" by 4" conventional camera utilising the same film ( cut down ) and image scale so as to have a good idea of what to expect from the larger format.. The results from the 5 by 4 confirmed the suitability of the film and that the set-up and shutter were working well.
|
| 5" by 4" trial set up on my
"universal enlarger" support.......light baffle not shown. |
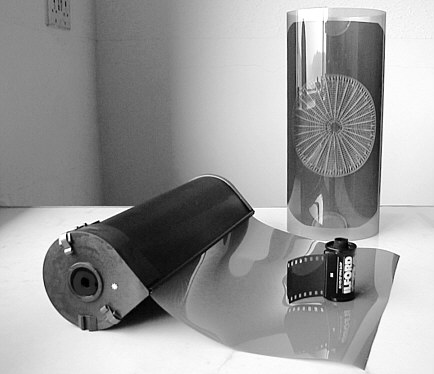
Larger format.........Film support
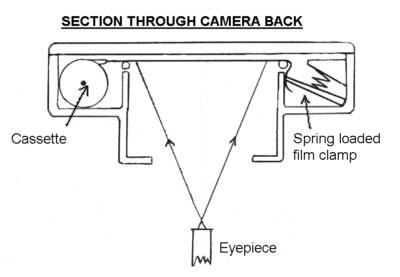
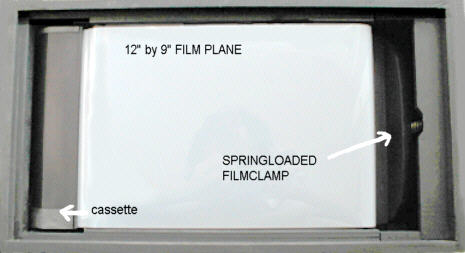
I had originally intended to make a film support frame for this project, but soon realised I'd already had the ideal contraption ready made with suitable alterations. So I converted my original 12" by 9" pinhole camera body which already housed the cassette, film plane rollers and blackened internal body into a multi purpose device for pinhole/microscope photo's. The simplified diagram and photo below show the basic details :-
 |
 |
Methodology
The camera body was supported above the microscope at a predetermined height. Compositional, focusing and exposure procedures were carried out as with normal photography. After focusing using a ground glass screen, the film was pulled from the cassette across the film plane in the dark and clampled over the far roller, the back was replaced and the exposure given using the shutter in the microscope's base (all this took place in my small 27 " by 54 " darkroom ).
Once exposed, the film was cut from the cassette and developed in a tray for 5 minutes in diluted Kodak D19 ( sold cheaply by the bucketful in the past ), and then treated like any other piece of film. Successful negatives were contact printed to provide images straight from the eyepiece with no intervention of any other optical device. The print was then scanned in an ordinary document scanner, and downloaded images were dealt with in the usual way regarding resampling, sharpening and any tonal alterations deemed necessary.
Results
The following images give some indication of the benefits of working with large film sizes, though it must be said that the original prints are understandably superior to these web examples. These are the first examples to result from this method, and which I hope to improve in the ensuing months ahead. The scanning of the prints was done at 300 dpi which brings about an approximate fourfold increase in size of the image on screen ( detail examples ), the main photo's are similar to the life size print/negative .
|
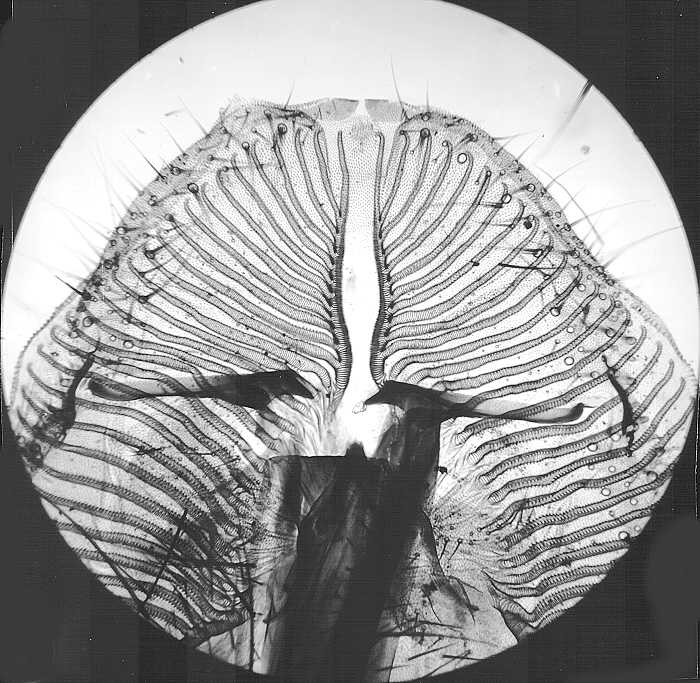
| Proboscis of Blow Fly ( CM Topping ).Times 100 achromat .... resampled etc.. 1x negative image. |
|
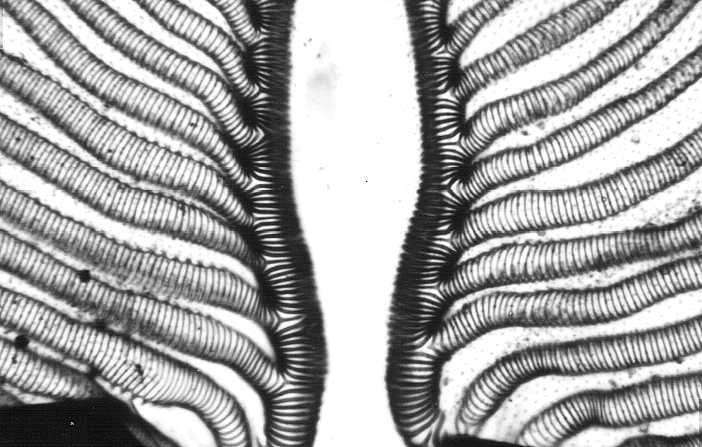
| Detail. Untouched, straight off scanner but cropped. ( About 4x size on negative. ) |
|
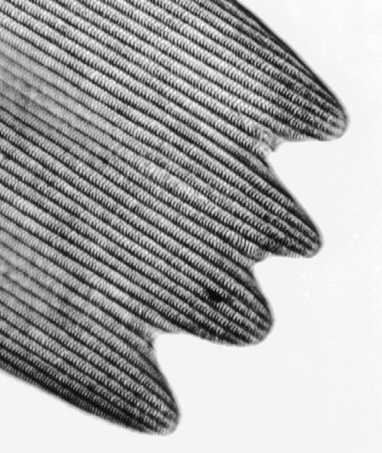
| Wing Scale from Red Admiral. Fluorite times 400 ........resampled etc., 2x size of negative image. |
|
| Detail. Untouched, straight off scanner but cropped. ( About 4x size of negative image. ) |
|
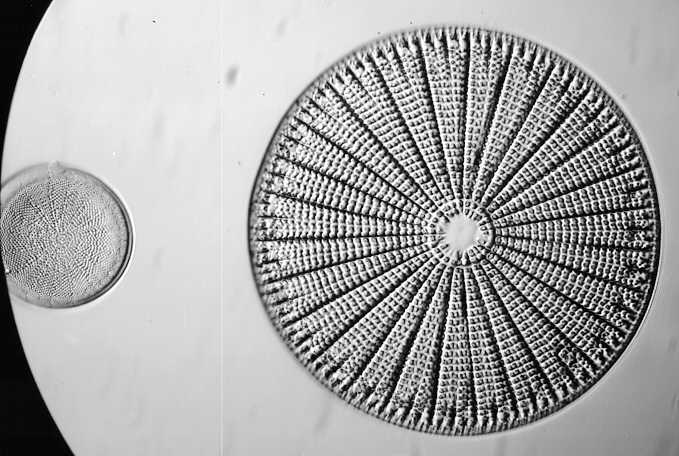
| Diatoms.......fluorite times 400 ........ resampled and cropped etc.. 1x size of negative image. |
|
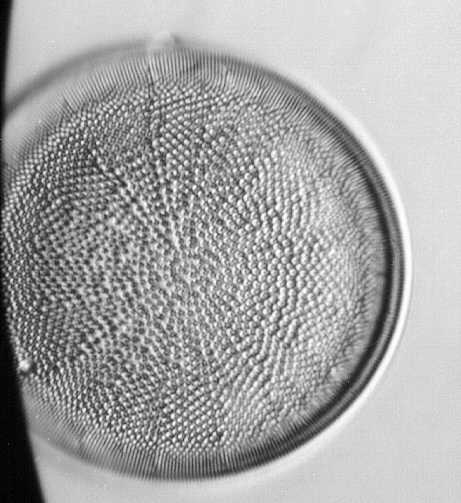
| Detail. Untouched, straight from scanner and cropped.
( About 4x size of negative image.) NB. At this scale the field diameter would be about 3 ft across ! |
PRO'S
1) The ability to produce large, comfortably viewable contact prints without using an expensive large format enlarger.
2) Great potential regarding quality over small formats, with total absence of grain and smooth tonality.
3) Dust is not a problem as with 35mm.
CON'S
1) Cost, unless outdated or cheap sources of materials are available.
2) Not the fastest system in the West !
CONCLUSIONS
Much fun was had from this excercise, especially when the cost of the materials was taken into account. The cassettes cost 4 pounds each, which translates into 6p per 12" by 9" negative! Doubling that to cover for errors in exposures, adding developer and printing paper amounted to a total of approximately 22p per print! I repeat the fact that I used slightly outdated materials which are always on offer if you look for them.
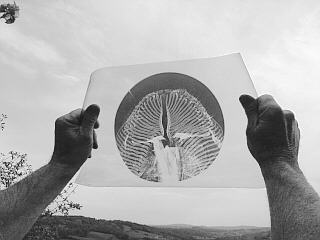
It made a very pleasant change holding up these large negatives to the light and be able to see everything without squinting through a loupe !
 |
| Comments welcomed to Paul James. |
Published in the May 2000 edition of Micscape Magazine.
Please
report any Web problems or offer general comments to the Micscape Editor,
via the contact on current Micscape Index.
Micscape is
the on-line monthly magazine of the Microscopy UK web
site at Microscopy-UK