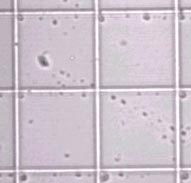
Appearance of the MALASSEZ slide, used for counting blood cells
Introduction to
quantitative microscopy or |
by Jean-Marie Cavanihac, France |
Many microscopists use all kinds of cameras: photographic film, 'security' style video camera or camcorder ... to take pictures of the subjects they study. However, one image feature is often missing: the scale of the picture. Indeed, we know very well the objective magnification, but the camera field of view is sometimes smaller than the field of view given by the eyepiece, and for digital cameras the field also depends on the CCD sensor size. Total magnification on the sensor is often greater than the visual, and just mentioning the objective power is not sufficient to report the size of objects. We are amateurs, (in the good sense of the word: in French, 'amateur' has the same grammatical root as 'aimer' (love)!) but it is interesting to have a scientific approach, to document our pictures. So the question is: how to measure objects by simple means? The classical solution is to have an objective with a micrometer grid fitted, (a micrometer on the eyepiece is not useful if it must be removed when using the camera!). But this device is expensive, and often not available for our old microscopes. I use a CCD low cost security B & W camera, fitted on a lateral prism tube on my old WILD M25. This device introduces additional magnification: with a 15x objective it reaches around 500x ! |
|
Appearance of the MALASSEZ slide, used for counting blood cells |
I have been lucky: I rediscovered
an old engraved slide (MALASSEZ slide shown left). The
center (circled left) is engraved with little squares of
0,05 x 0,05 mm in size (detail below). It is easy to
calculate final magnification by measuring the size of
squares on the computer screen with a desk ruler!
However, many people don't have this type of slide; but
no problem, we just need to find a small object of known
size. This object may, for example, be the edge of a
coverslip.
|
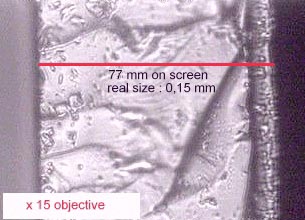
| Coverslip thickness is usually
between 0,15 and 0,17 mm, but we can obtain a more
accurate measure of it. Make a stack with 30 coverslips
(or more if you can) and if you have a calliper rule,
measuring is easy. In the adverse case, place the stack
against a desk ruler with fine millimeter divisions: if
the total height of the stack is, for example 4,5 mm the
real thickness of ONE coverslip is: 4,5/30 = 0,15 mm. (If
necessary interpolate the measurement if the size is
between two ruler divisions). Put one (or more) of these coverslips perpendicularly on a slide, using a mastic pellet (or simply bread pellet!). Focus on the edge of the coverslip with each objective you have and take pictures. Measure the magnified thickness of the side on the computer screen (or on the final picture on photographic paper). For example; if the thickness is 77 mm on screen, magnification is 77/0,15 = 513x. |
|
|
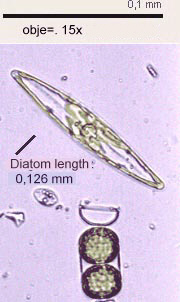
It is then easy, using
a drawing tool within image processing software, to draw
one line on the screen picture. The length of the line
"L" must be a simple measurement unit: for
example corresponding to 0,1 mm. L= ( 0,1 x 77 ) / 0,15 = 51,3 mm on screen. You can save a copy of the line (using the function 'COPY') as it will be useful to 'PASTE' into future pictures (as long as future images were taken under the same conditions i.e. same size of window capture, same objective etc). Repeat this process with all the objectives you have. With the diatom picture shown left, you can measure the actual diatom length with the ruler: for my screen the length is 65 mm and the 0.1 mm scale bar is 51.3 mm, so the diatom's real size is (65/51.3) x 0.1 = 0,126 mm or 126 µm (microns). (1 mm = 1000 µm or microns). You can divide lines into sub-divisions (e.g. 2, 5 or 10) to measure objects smaller than the line length. (A mark at 1/100 mm has been made on the black line in the picture below). |
| On the picture shown
right, superimposed on a white background, are the
precise lines obtained with the 0,05 x 0,05 mm squares on
the Malassez slide: its length is 53 mm on my screen for
a true length of 0,1 mm. With this scale, the 77 mm
screen length for the coverslip edge gives an actual
length of (77/53) x 0.1 = 0,145 mm. Measurements made
using the coverslip are good (better than 5% error vs.
the Malassez squares). Don't forget: you can CROP pictures and the magnification factor remains the same, BUT it will NOT be the same if you RESAMPLE or RESIZE. In this case, it is necessary to paste the line into the picture BEFORE resampling or resizing, to have a reference scale in the new picture. |
|
| Notes
: 1) Measurements with a ruler MUST be made with the picture at the CENTER of the screen. In the corners, geometric distortion can introduce errors (more than 4 mm on a 77 mm screen for mine!) 2) For readers interested in quantitative measurements e.g. of length, area, counting the number of objects, picture summing, visit the National Institutes of Health (NIH) web page at http://rsb.info.nih.gov for a true scientific image analysis software. (Click on the 'NIH Image' link, the software is available for free download). Postscript
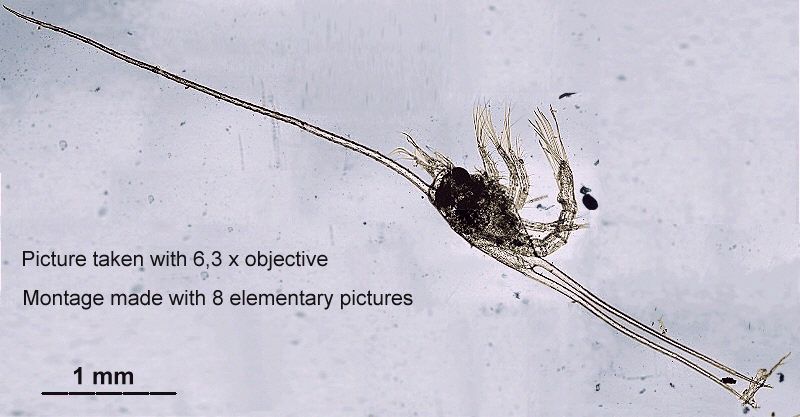
(by the Editor). To illustrate the importance of adding a
scale to an image, Jean-Marie has sent this additional
splendid example which we thought was worth adding.
Without a scale bar, there's no way of appreciating just
how long this organism is. In fact, it is so long it
required a montage of eight images to illustrate it! The image shows the first
zoea larval stage in dorsal view of Porcellana
platycheles (Class Crustacea,
Order Decapoda). The common name of the adult is the
broad-clawed porcelain 'crab' although it is not a crab.
A zoea is a larval stage in higher Malacostraca, P.
platycheles has two zoea stages.
(Thank you to Jan Parmentier for identifying the
plankton).
|
|
Comments to the
author Jean-Marie Cavanihac are welcomed.
Editor's note: Many thanks to Jean-Marie for offering these very practical guides for measuring scale. As well as coverslips, an item the Editor has found useful is a microscope eyepiece graticule which aren't too expensive and the graticule is often large enough to calibrate off microscope. The glass disc I possess has a graticule which is precisely 10 mm long and is accurately sub-divided into 1 mm and 0.1 mm marks.
Quite often just a reasonably accurate indication of scale is required rather than very accurate absolute measurements, and for the former these 'on-screen' approaches are usually more than adequate.
Microscopy UK Front Page
Micscape Magazine
Article Library
All photographs © Jean-Marie Cavanihac 2000
Published in the May 2000 edition of Micscape Magazine.
Please report any
Web problems or offer general comments to the Micscape Editor,
via the contact on current Micscape Index.
Micscape is the
on-line monthly magazine of the Microscopy UK web
site at Microscopy-UK