Equipment
I am not endorsing specific brands or products except indirectly, in that, after doing some investigation and talking with some friends and colleagues, the items which I bought seemed to me to be optimal, given the amount of money I felt I could invest. I purchased a Nikon CoolPix 995 digital camera with the battery charger. This is a highly sophisticated piece of technology with up to 3.2 megapixel resolution. A friend of mine told me just last week that one company has now produced a digital camera with 6 megapixel resolution, and, according to him, this is a significant breakthrough, as 35 mm film has resolution of about 5 megapixels. However, this camera costs 3 times what one can buy the Nikon 995 for. The microscope adapter is one that is manufactured by Meiji and seems quite satisfactory and will fit on all standard microscope phototubes.
The camera comes with a 16 MB memory card, but I purchased a 128 MB card in addition. This allows me to capture slightly over 100 images on a card at the next to the highest overall image quality setting, out of 5 possible settings. On the Nikon this setting is designated as FINE and each image is nearly or slightly over 1 MB!
The camera also comes with a rechargeable battery and Nikon changed the type of battery for this model and for their model 5000. Apparently a number of users do not regard this as an improvement and the camera, especially if one uses the monitor extensively, tends to be energy hungry. So, I decided immediately to add an AC adapter which I regard as an essential. When you are using the camera on the microscope, the adapter allows you constant use of the monitor and the full range of features of the camera without worrying about battery recharging.
However, outside in the field, one either needs the battery or an enormously long extension cord. I ordered a second battery as a backup, but it has been repeatedly backorderedone of the constant risks of high-demand, high-tech accessories.
A final bit of hardware was a SanDisk memory card reader. This can be acquired for $25-$30 and is a great time saver. You can leave your camera attached to the microscope and simply remove the memory card, take it to your computer, insert it into the reader and download the images. When my card is full, that is, when Ive used the whole 128 MB, it takes about 6 minutes to download approximately 100 images. I have a 250 MB zip drive, so I download to these disks which make a very convenient and expandable archive. Of course, one can also simply use the computers central harddisk drive, since most systems come with a minimum of 10 gigabytes.
Software
The proper processing of digital images is an essential part of preparing them for a website or for printing. Here it is crucial not to be penny-wise and pound-foolish. You need a program thats powerful enough to bring out the hidden detail and information that the camera has captured and yet something that is sufficiently user-friendly so as not to make you feel that every time you call up the program, you are entering a realm wherein you could do an entire simulation for a lunar landing. In other words, you require a program which is sophisticated enough to provide you with a wide range of options for tweaking your images, but not one that is overkillloaded with all kinds of features which you will never use. Some of the very large programs cost $500 or $600 (on up); in other words, nearly as much as I paid for my camera. I was, however, fortunate enough to have a friend and colleague who recommended a program called PhotoImpact 7.0 at a cost of only $100 and yet it has virtually every feature I can imagine using and a lot of others which I dont need right now, but may in time be glad to have. In fact, the versatility of the program is such that even after several months, there are many features which I have yet to work out, partly because of time pressures and partly because of laziness. In any case, I am very well pleased with this program and there are times when I am quite astounded by its ability to bring out hidden information. My friend, former student, and fellow microscopist, Mike Shappell, who teaches mathematics and computer science at a high school, was astounded by the sophistication of this program and now wants to use it with his advanced students.
For me, an experience that in my notes, I described as magical had
to do with an image which I took of a desmid on a permanent slide which
I had made 6 or 7 years ago. The initial image in the camera monitor
was sufficiently drab that I nearly discarded it without running it through
the software. However, being a curious sort (in every sense), I decided
to give it a try. Ill let the images speak for themselves in terms
of 2 picturesBefore and After:
 |
 |
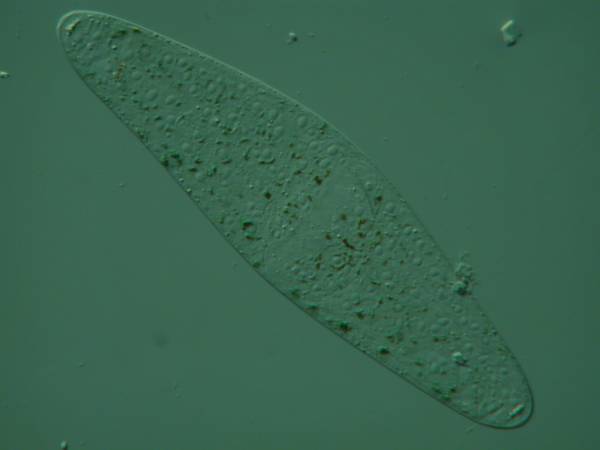
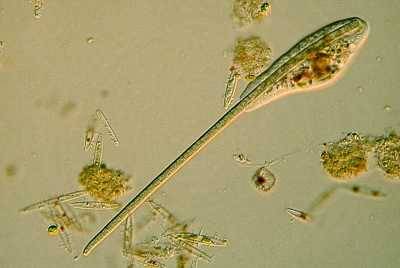
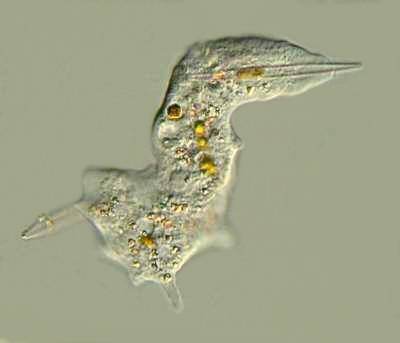
The magic of the software is, however, limited and if a specimen is badly out of focus, not much can be done to salvage the image. Also, it is one thing to have a permanent mount which allows you the time to carefully consider lighting, contrast, composition, and focus, but it is quite another matter when you are dealing with active, living specimens. Recently, I came across a small specimen of Dileptus which fit fairly nicely into the frame of the camera monitor at 125x, that is, when it would hold relatively still, which it hardly ever did.
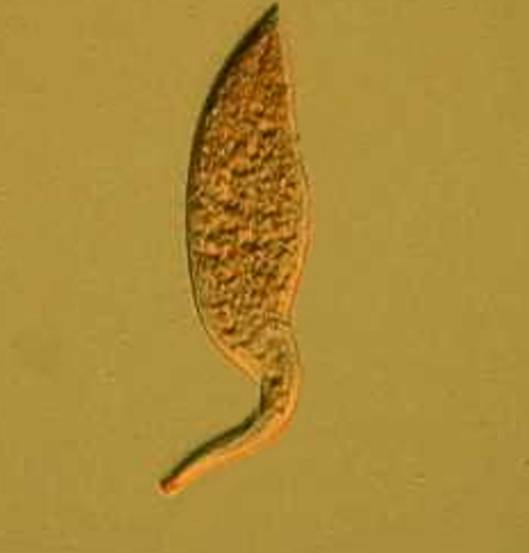
So, your mission, should you choose to accept it, is to keep the Dileptus in the field of view by moving the mechanical stage with one hand, focusing with another hand, adjusting the illumination with another hand, pushing the button on the camera with another hand. Then if you want to put in a filter and adjust contrast youll need a fifth and sixth hand in addition. Here you have 3 choices: a) Religionif you can metamorphose into the Hindu deity Durga , who sometimes has 4, 8, 10, or 20 arms and 3 eyes, youve got it made; b) Biomedical technologyhave some extra arms grafted onwell, they do it with trees; or c) digital technologytake 20 images of the Dileptus and see if any turn out to be useableyou may get lucky. I got a couple of fair images, not first class, not even second rate, but useable. Here the issue is very much like that when one is making permanent slide preparationssome slides just dont turn out in the proper mannerthere may be an air bubble to two or some crystals may have formed in the mounting medium from an interaction between a mounting medium and a fixative insufficiently washed out of a specimen. However, sometimes the slide may provide interesting and important information about the specimen and so it turns out to be worth keeping. So it is with digital images as well.
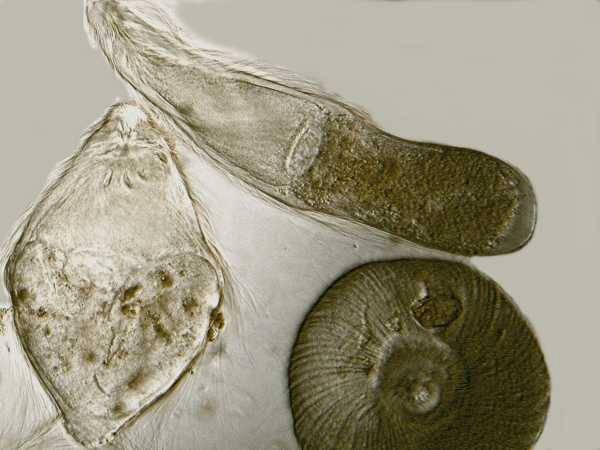
During my first 2 weeks of digital chaos, I was trying to capture images of some living termite flagellates, Trichonympha campanula and Streblomastix strix in particular. These are fairly active organisms and as luck would have it, I managed to get an image with 3 views of Trichonympha in one frame. The lighting is not very good but, nonetheless, I find the 3 perspectives together quite intriguing.
And, of course, there are some organisms which are not so speedy and sometimes one can capture them at moments of considerable interestamoebas, for example. Below are two images which I find quite intriguing: the first (Amoeba_alga1624) shows a fairly small amoeba ingesting a piece of a filamentous alga giving the odd appearance of feeding through a long straw and the second (Amoeba_diatom1596) shows a different species of amoeba enjoying a feast of diatoms.
'Amoeba_alga1624' |
'Amoeba_diatom1596' |
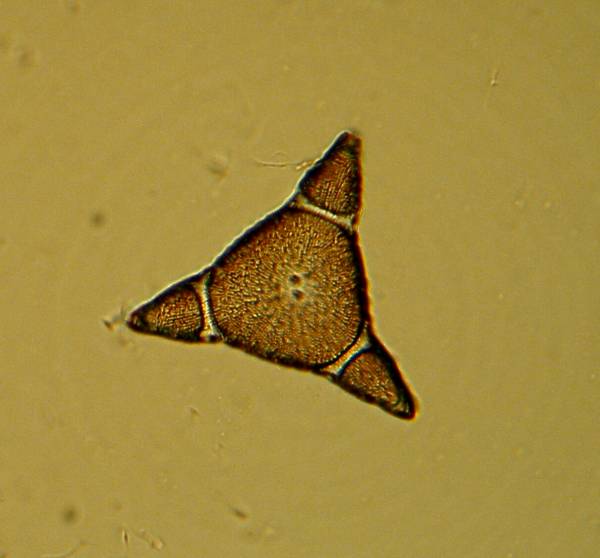
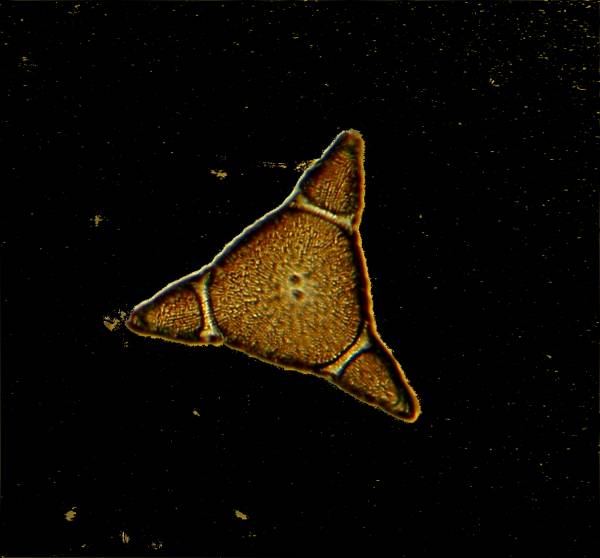
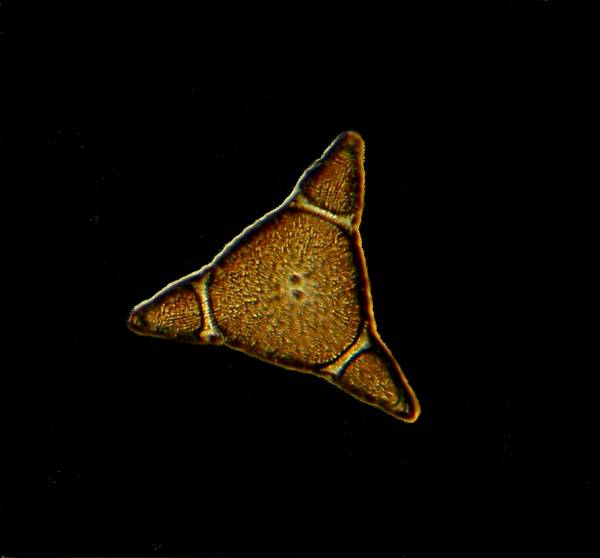
PhotoImpact 7 has some powerful auto-processing features and, at first, it is very tempting to rely on these ready-made helps. However, I quickly discovered that sometimes I didnt like the results of the auto-processing, yet, at other times, they were quite good. So, I began exploring the program which allows one to tweak images in some quite remarkable ways. I do, however, almost always try out the autofocus algorithm, sometimes at the beginning of processing, sometimes after having made other adjustments. Here, Ill show you a progressive series pair.
The first image (Diatom163) is unprocessed. The second image
(Diatom163_focus) is after the application of the autofocus algorithm.
The third image (Diatom163_contrast) is after some minor adjustments of
contrast. The fourth image (Diatom163_crop) shows how cropping can help
improve the composition of an image. The fifth image (Diatom163_fill)
shows that altering the background using the fill tool can sometimes
enhance contrast. The fill tool is not always useful, since sometimes
it will also intrude into parts of the specimen; however, in this case
it worked well and saved time. When this tool cannot be utilized
and one wishes to alter the background, there are other alternatives.
Sometimes one of the many options available under the style tool is suitable,
but on some occasions, one has to employ the very time- and effort-consuming
(not to mention eye-straining) tools, such as, paint. These tools allow
one to do very precise work at increased magnifications, but, as mentioned
can be labor-intensive and tedious. The sixth image (Diatom163_touchup)
shows how, by using a combination of two tools, one can get rid of undesirable
spots and other distractions from the image proper. In many instances
I alter backgrounds in order to remove extraneous elements, so that full
attention is focused on the specimen being presented.
 'Diatom163' |
 'Diatom163_focus' |
 'Diatom163_contrast' |
 'Diatom163_crop' |
 'Diatom163_fill' |
 'Diatom163_touchup' |
As you begin to experiment with such features as brightness, contrast, gamma, color balance, style, hue, saturation, and various special effects, such as, converting a color image to monochrome, you will discover an increasing sense of creative control of the image. This program comes with a printed manual (for which I am enormously grateful, being a print- oriented creature), on-screen help, and, once you register your copy, on-line help as well, including some tutorials.
Unless you are capturing many images that are very nearly the same, such as, serial sections of a frog embryo, you will quickly find that virtually each specimen presents a new challenge and allows you to test yourself in a variety of areas, such as, specimen preparation, finding ways to cope with active living organisms, and adjusting various features of your microscope in order to get optimal results. Such adjustments will include factors like the intensity of illumination, contrast methods, the use of filters and, to a certain degree, the composition of the image, although a significant part of that can be accomplished with the computer.
The contrast techniques which, up to this point, I have found most satisfactory are ones which require a great deal of light. I use a quartz-halogen light source and tend to push it to its limits. This shortens the life of the bulb, but fortunately, these are reasonably price at about $10. My first images were done using traditional brightfield, which is a valuable means of dealing with some specimens, especially deeply stained organisms or stained sections. In general, however, I prefer having a bit more control of contrast and so I have, up to this point, largely been experimenting with Nomarski Differential Interference Contrast , oblique illumination, and polarization. My one attempt at phase contrast was disastrous and, so, Ill have to think about new approaches, which is one of the things that I most appreciate about my venture into the technology of digital imagingI am constantly being tested, challenged, made to feel a need to come up with better techniques and strategiesin short to continue to learn and further develop my mind and imaginationas well, as increasing my amazement regarding the productions of both Nature and human beings. I hope, in the relatively near future, to once again tackle phase contrast, but I also can hardly wait to wrestle with Rheinberg illumination and darkfield.
In the course of my experimentation, I have saved some of my earliest (and some of my worst) results. These are important, because they can provide me with a basis for determining whether or not I am making progress in specific areas. Some sessions are very frustrating to me and there are times when I feel a bit overwhelmed by the complexity. I am fortunate enough to have been able, over the years, to acquire several large, used research microscopes with very sophisticated accessories, but the more possible adjustments there are, the more readily one can forget to slide out a filter or readjust a contrast diaphragm or reset a prism. There are days when I want to haul out my 1913 Bausch and Lomb monocular, simply because it has the least number of things to adjust. However, I persevere and I get enough things right to make it worthwhile and perhaps, in the meantime, Ill sign up for a memory courseif I dont forget.
A Digital Camera On A Stereo-Dissecting Microscope
I have an Olympus Stereo-zoom trinocular microscope and the phototube is the same diameter as that on most compound trinocular microscopes. If, however, you have a standard binocular Stereo with the larger ocular diameter, then you will have to purchase a special adapter and possibly fix up some sort of support stand for the camera when its inserted into one of the eyepiece tubes. These cameras are very light and one may be tempted to use them without a support stand, but that can be rather risky, unless your oculars are of the very old style that are not inclined. Most better microscopes manufactured in the last few decades have prism arrangements allowing for inclined eyepieces which makes for much more comfortable viewing. However, the alignment of such systems is critical and it is perhaps best not to risk any added weight that might eventually lead to misalignments or worse, increase the possibility of accidentally knocking into the instrument with a distracted elbow. I am in the process of adapting a camera stand that I used for macro-videography to use with an old Leitz Stereo.
The most immediate and obvious advantage of using a Stereo microscope for imaging is that one can photograph opaque specimens with the asset of a greater depth of field. With these microscopes, parfocality and parcentrality become more of a problem than with a properly adjusted compound microscope. However, these are relatively easy problems to solve by using the monitor on the camera. Move the specimen on the stage so that it is framed in the monitor to its best advantage, then using the focusing knob, move it slowly up and down until you get maximum scintillation of the image, almost a shimmering pixelationat that point, you will have best focus. Vibration, when you are taking a picture, can be a problem when you press the button to trigger the shutter. The Nikon has a nice feature for minimizing this difficulty, namely, a delay setting which allows you to press the button and the camera waits for either 3 second or 10 seconds (you have a choice) before capturing the image, thus allowing ample time for vibration to settle. The one apparent disadvantage is that one has to set this option for each image (if that is not the case, Id certainly like to know), which means if you want to take a rapid series of images of an active organism, this option is not viable.
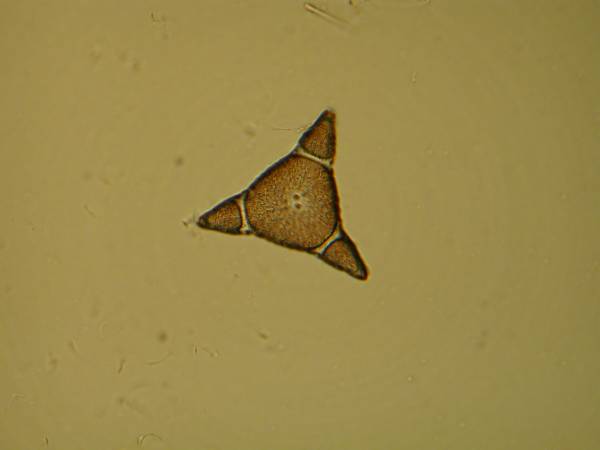
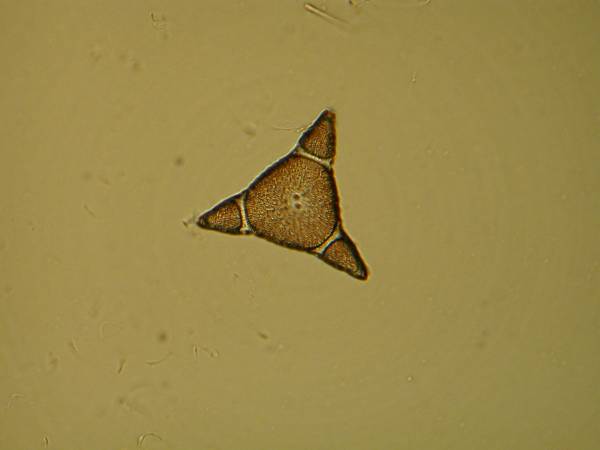
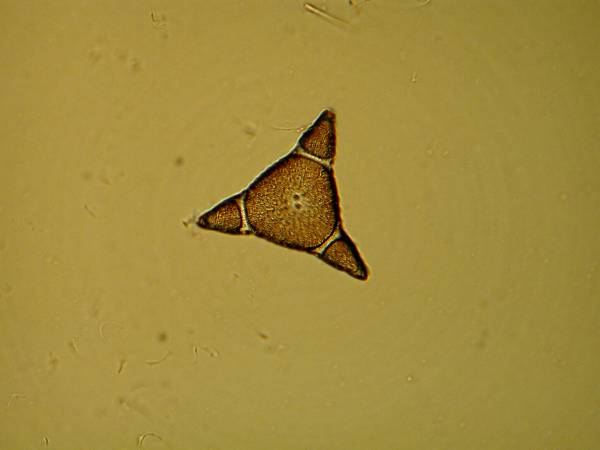
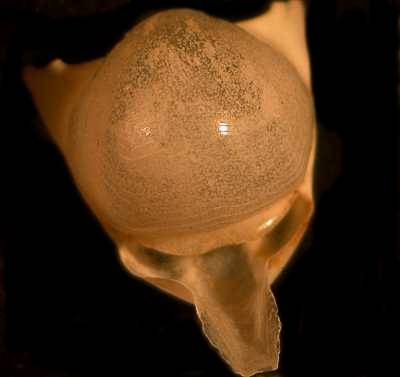
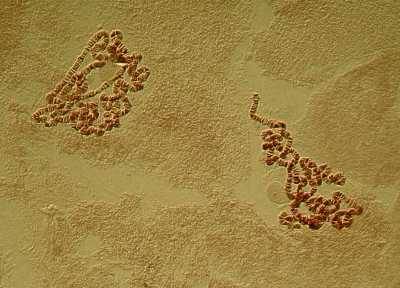
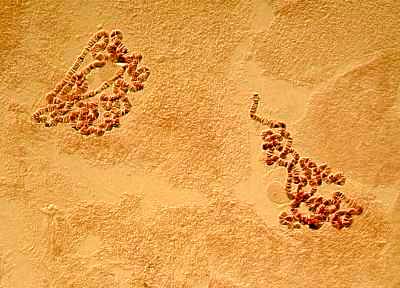
Some of the larger forams are a particularly good specimen type to begin with; because they are so elegant, they provide an incentive as well as a challenge, to capture high quality images. Feathers, sections of butterfly wings, insect parts, crystals, seeds, echinoderms spines and plates, bits of plant leaves, flower petalsthe list goes on and onare all suitable objects for photographing. Below are 2 images taken through a Stereo microscope; the first is a quite elegant foram which rather reminds me of a piece of sculpture by Henry Moore and the second, which looks quite sinister like some sort of strange skull, is actually the shell of a fossil pteropod or sea butterfly.
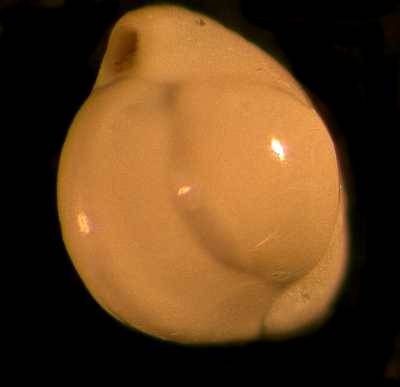 |
 |
With the Stereo microscope, illumination is critical, but here one has considerable flexibility. For transparent sections, you can use your substage illuminator and by adjusting the mirror carefully, you can achieve subtle variations in contrast. If you dont have a substage, but your microscope has a glass stage plate or a removable opaque circular stage plate, then with a bit of basic carpentry and a little ingenuity, you can build a substage. It is worth purchasing a concave mirror to mount in the base. Attach rods to each edge of the mirror at 90 and 270 degrees, bore hole in the side of the base and allow space to insert the rods through the holes. You can then attach knobs to the outside of the rods to adjust the position of the mirror relative to the light source. Sometimes, even with transparent specimens, you may wish to use a small lamp to provide side lighting.
With opaque specimens, side lighting and/or top lighting is essential. Small, low voltage desk lamps with flexible necks (like the old goose-neck lamps, but much smaller) can be used effectively. My preference is a dual fiber optic illuminator. It is highly adjustable, provides light from more than one direction (thus helping to control shadowing), and it doesnt create a heat problem when you are trying to photograph small living specimens. If you are working with a Stereo-zoom instrument, then each time you alter the magnification, you affect the focus and I have found it most convenient to adjust the focus by watching the camera monitor as I turn the focus knob on the microscope until I get maximum scintillation. Another class of objects suitable for photomicrography of this type is prepared slides where the specimen is too large to image properly with the compound microscope, as is often the case with certain types of plant and animal sections, or where there is considerable thickness in the specimen as is frequently the case with whole mounts. Nonetheless, there are certain objects which simply do not lend themselves to these techniques and so one may have to experiment with photomacrography, but thats another whole realm.
Expense, Convenience, and Quality
Expense
Technical photography has never been inexpensive and photomicrography can get very pricey indeed, quite apart from the equipment. If you already have a film camera for your microscope and use it only occasionally, then a significant investment in digital technology is probably not worthwhile. Only in the last few years have I acquired microscopes equipped with 35 mm camera systems and I admit with shamemea culpa, mea culpa, mea maxima culpathat I was too busy, too lazy, too undisciplined to ever learn how to use them. About 25 years ago, a friend of mine gave me a Polaroid microscope camera, which is a useful, if rather limited, accessory. For years, I relied upon this for any photo-documentation until I finally acquired a video camera for the microscopes. However, before that acquisition, I relied on the Polaroid images and about 15 years ago I had a small grant from the university, part of which I used to buy some special Polaroid film of the type that produces both a print and a negative. It was black and white and did have the advantage of being very fast filmas I remember, it had an ASA of 2000 or 3000. Two other advantages were results within 45 to 60 seconds and no processing, unless you wanted additional prints of a given image. The images were small and fairly primitive, but they did succeed in capturing some important information and preserving it for reference. However, the major drawback to this process is the price of the film which runs nearly $20 for 8 exposures!
In just a few months, digital photomicrography has opened up a whole series of new dimensions. I have now taken approximately 3600 images. Many were discards due to problems of contrast, illumination, or focus, especially when I was trying to get images of active, living organisms. However, I have gotten some good images and continue to slowly improve and I can now try things that I could never have risked or afforded with traditional film. In effect, I have already paid for the camera, accessories, and software in terms of what it would cost for the film and processing for 3,600 images So, if you want photo- documentation and if $1,000 is a reasonable investment for you, then digital photomicrography is worth very serious consideration. As market agents would sayJust think, over the course of a year, all of this can be yours for only $2.74 a day.
Convenience
From what Ive already said, the advantages are fairly obvious, but let me give a brief summary here:
1) No film or film costsI am delighted, amazed, befuddled, astounded and a bit overwhelmed by this technology which I am sure will be improved and replaced long before I can afford to move to the next stage.
2) No processing or processing costs
3) The ability to see the results almost instantaneously
4) The ability to convert a color image to monochrome which sometimes enhances detail
5) The ability to adjust contrast, brightness, color balance, hue, saturation, position of the object by rotation or flipping, and the wonderful possibility of cropping the image to improve its composition.
Quality
From what I have seen, it is possible to produce some superb images and as further refinements come along, I suspect that more and more first-rate images will appear. The images I have produced are certainly improvements over my old Polaroids, especially in terms of the information which is captured.
Is The Image True?
This is one of those deliciously convoluted and complex questions which philosophers love to wrestle with because it pushes into both epistemological and ontological dimensions. Philosophically, the answer isof course not! However, lets go for a more practical approach. What I think most of us want to know is whether or not the rendering we get from a digital image is as faithful as an image captured on film. The main reason this becomes an issue is a consequence of the manifold ways of manipulating a digital image using a computer. This becomes a serious consideration when we consider the powerful ways in which the information in the image can be modified, selected, and emphasized.
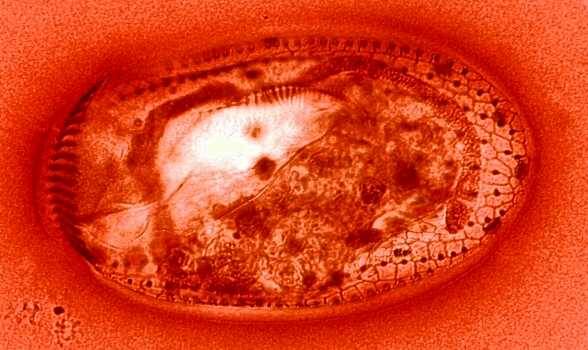
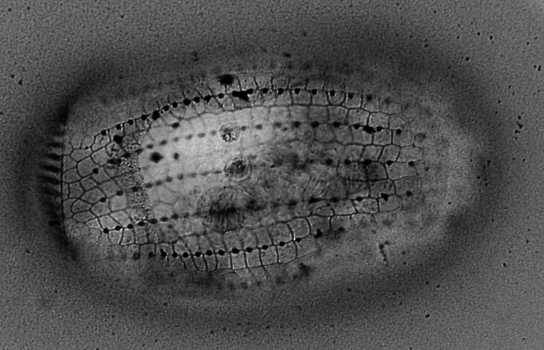
1) Conversion from a color to a monochrome image: the two images below
show first, a Euplotes which has been stained using a protargol
silver staining technique which produces the reddish color in the image
and the second image has been converted by the imaging software to monochrome
which, to my eye, provides a more pleasing and somewhat clearer view of
the silverline system.
 |
 |
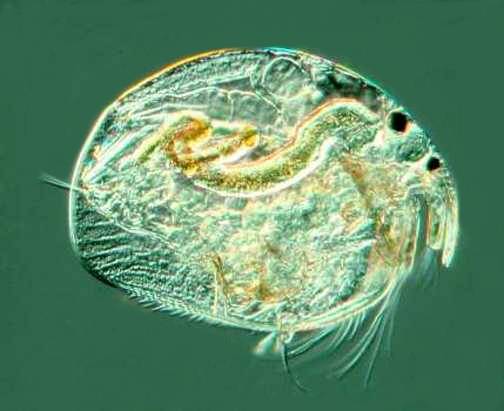
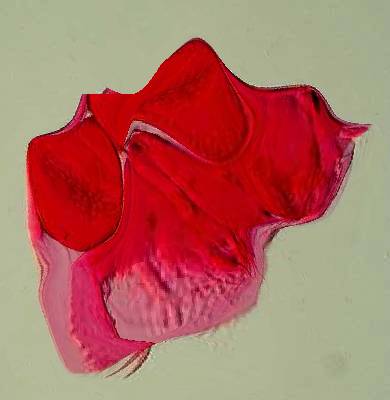
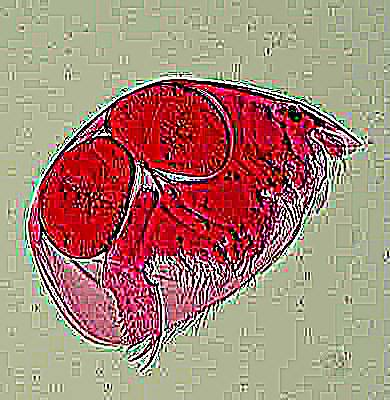
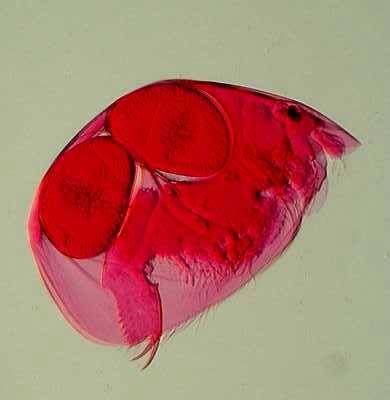
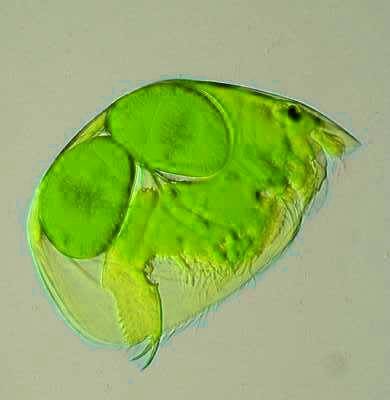
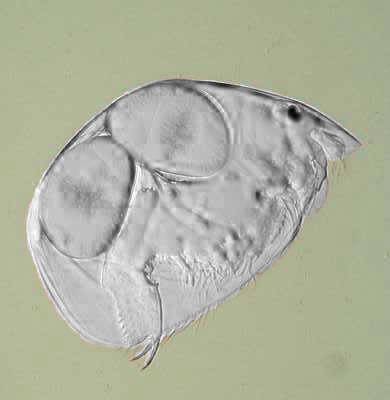
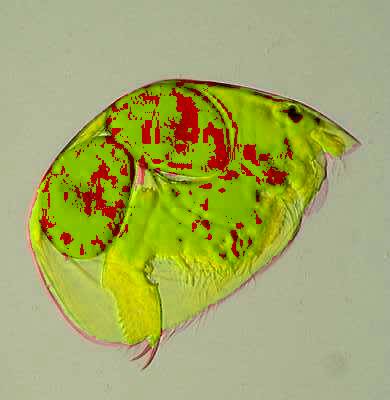
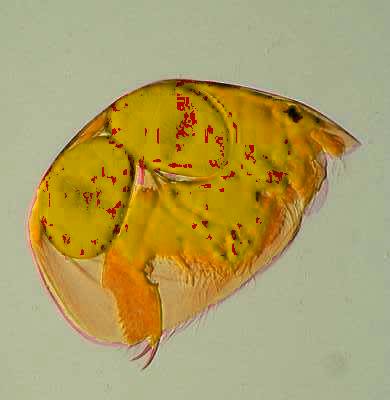
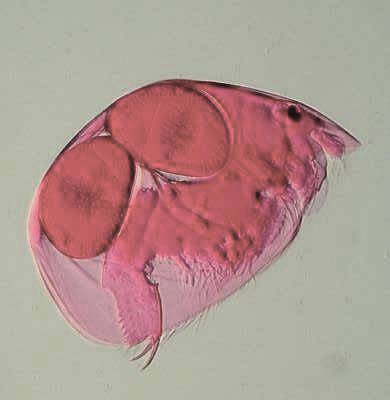
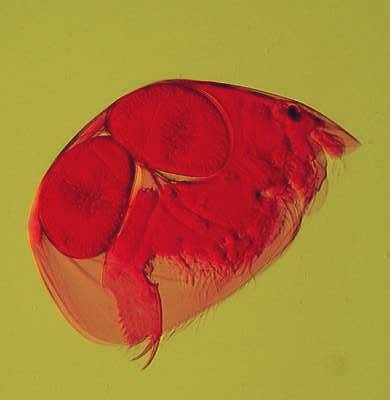
2) Conversion of a multi-color image to a 2 color image: These
images are of a freshwater cladoceran which is common in this area.
The eyespots show up clearly in both cases and both images give us detail
in such a manner that there are features which one might notice more readily
in one image rather than the other. This is one of the reasons that
contrast and background color can play an important role in the presentation
and interpretation of an image.
 |
 |
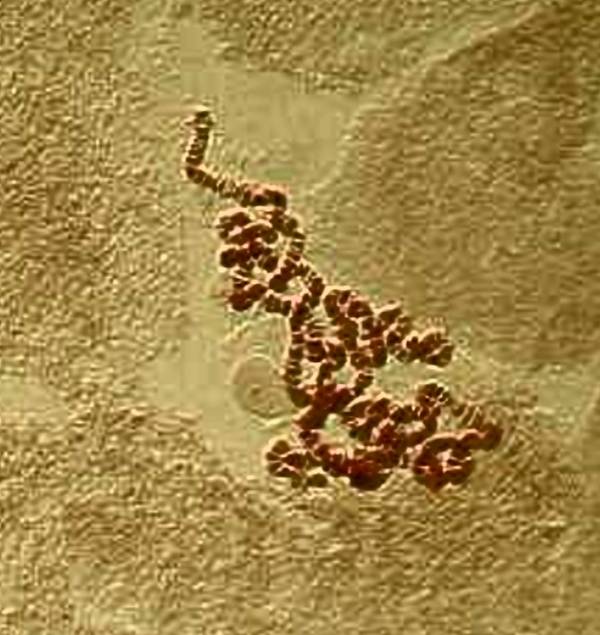
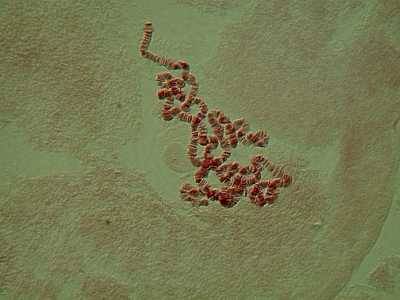
3) Alteration of contrast: In this case, the chromosomes stand out more immediately against the lighter background and give us the impression, at least, of providing more detail.
 |
 |
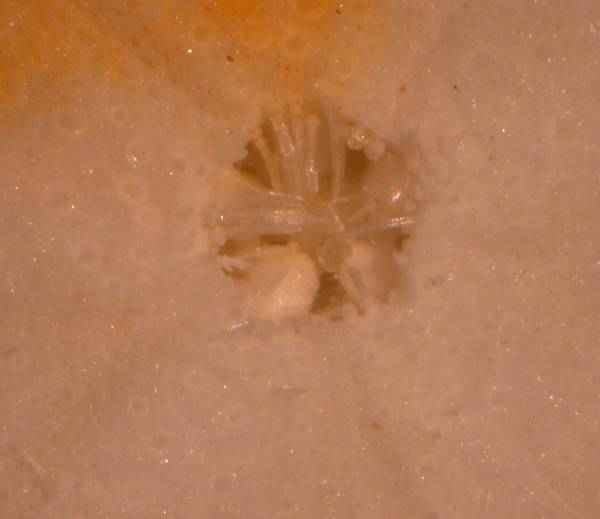
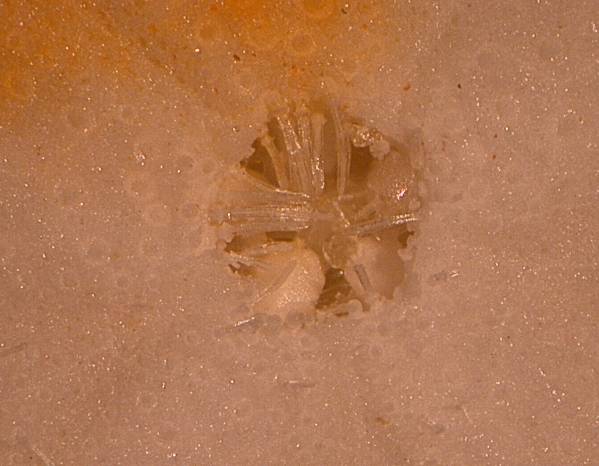
4) Alteration of focus: Careful examination will show that the
image on the right (SAND1270f) is significantly sharper than the first
image. Part of this is accomplished by the insertion of a kind of
scintillation at certain points in the image. The software has a dual feature
of Undo/Redo and it is very instructive, after having used the autofocus
algorithm, to go back and forth between the unprocessed image and the focused
image. The images show the teeth of a sand dollar.
 |
 |
5) Alteration of brightness: Sometimes the application of a single
function, such as brightness in this case, can produce results which
alone are not particularly desirable and in this case the first image is
better, although with the application of other modifications the second
image could be improved to the point where it would be better in quality
than the first.
 |
 |
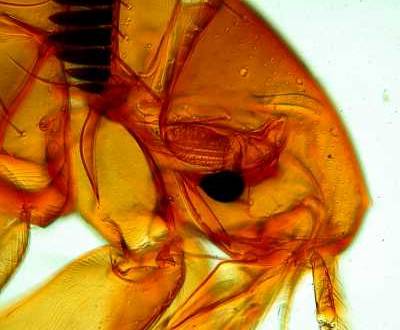
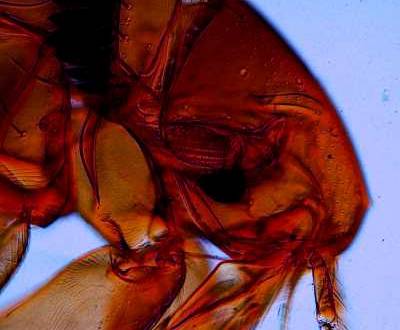
6) Alteration of background color: Background color can make an
enormous difference in the presentation of a specimen. I tend to
prefer backgrounds which provide significant contrast and that often means
dark or black backgrounds. In this instance, the head of the flea
is, I think, better defined in the first image and the light blue background
adds little. Notice that there are spots in the image background.
These can be cleaned up using some of the touch up tools.
 |
 |
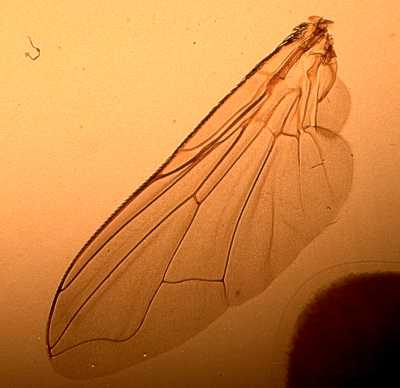
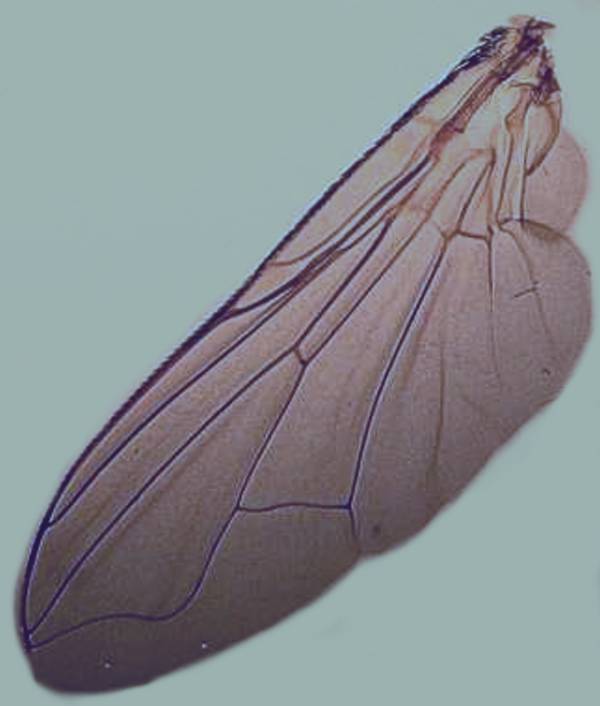
7) Alteration of composition by cropping: In the first image there
is a lot of extraneous material in the background which detracts from the
image of the wing. By cropping one can eliminated a certain portion
of it. The rest was removed by using the paint tool and altering
the background.
 |
 |
And, this is just the beginning. If you have artistic leanings that incline toward the cubists, then you might produce this image:
Or, if you are fond of the Impressionists, it might look something like this:
Or this might be the result of a pointillist (or should we say pixellist) leaning:
![]()
Here, however, we need to take note that a really good photographer can perform all of the operations listed as 1 through 7 using film as a medium. Such techniques require skill, experience, and a good eye, but with the use of chemical, special papers, enlarging, and lighting, absolutely wonderful things can be accomplished using film.
Consider also that every time you employ a contrast technique, you are modifying the information which is presented to your eyes and brain, whether its phase contrast, Rheinberg, darkfield, Nomarski DIC, polarization, or oblique illuminationeach of these methods is giving you a different glimpse of your specimen. We are most likely inclined to regard brightfield as a kind of norm or standard that is somehow truer or more faithful to the specimenbut this notion is also problematic and to obtain really good brightfield images, one must create contrast with a substage diaphragm and/or use stains. Staining frequently produces a radical modification of the specimen and can even introduce artifacts. By using a variety of approaches and accumulating a series of images, we are best able to achieve a kind of composite which deepens our understanding. Clearly, when we are involved with playfully distorting an image, then we have largely left the realm of scientific investigation, but there is no need to chose one over the other. In fact, common sense goes a very long way in telling us what is scientifically useful and what is an imaginative creation. One of the joys of being an amateur is that one does not always have to be precise and terse. I am reminded of one of my favorite remarks of the philosopher Nietzsche: The maturity of manto have reacquired the serious that one had as a child at play.
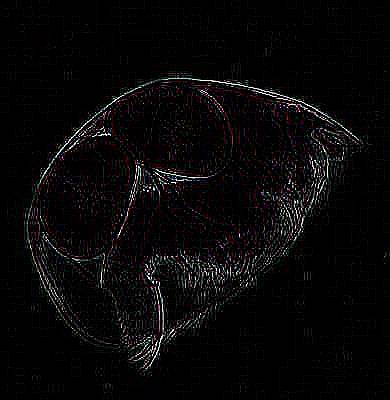
Below are a few more examples of ways in which one can play with an image.
All comments to the author
Richard
Howey are welcomed.
 |
 |
 |
 |
 |
 |
 |
 |
 |
|