Macrophotography of Soap Bubbles
Michael Reese Much
Bethlehem, Pennsylvania, USA
For centuries, soap bubbles have been one of the most popular toys—they are fascinating and mysterious. They are marketed in various forms—from the basic bottle of soap bubbles for children to catnip scented bubbles for cats to chase around.
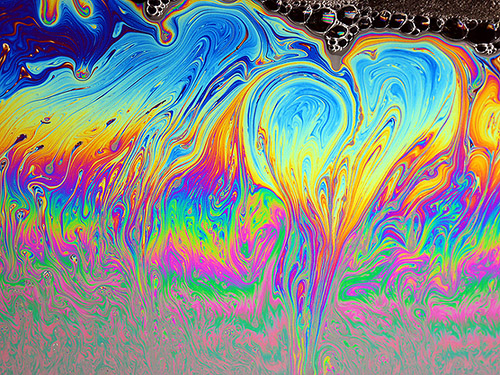
Upon closer examination, they are filled with swirling rainbows of color—chaos at its most beautiful. These interference patterns are caused by light bouncing into and out of the walls of the bubble.
I won’t go into the physics of soap bubble interference patterns in this article—I’ll provide some links to references at the end of this article. What I will describe here is my setup for photographing small sections of soap bubbles with digital cameras.
I had known how to photograph soap bubbles for many years and had done some tests using 35mm color transparency film. But testing with film was very time-consuming and costly. Digital imaging made testing and shooting soap bubbles much more practical and accessible—there is immediate feedback during the test (rather than going back and forth to a photolab while watching your bank account grow smaller) plus the freedom to shoot hundreds of images of these chaotic patterns.
There are many published formulae for concocting all manner of soap bubble solutions, but I prefer to use the tried and true solutions—off-the-shelf toy soap bubbles.
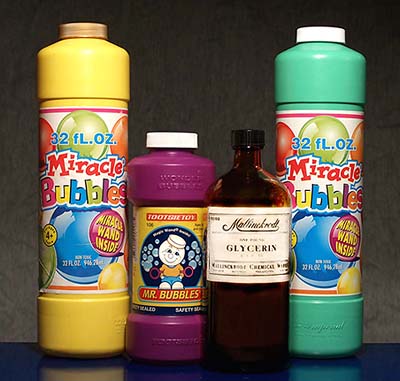
I had first tried the following techniques about six years ago and decided to revisit the process and refine it. Back then I was getting a bubble with a life of about 40 seconds. This time I decided to take the stock bubble solution and add 20% Glycerin to prolong the life of the bubble by reducing evaporation. In these tests I was getting a bubble with a life of 3 to 4 minutes.
To photograph bubbles, one needs a flat or “sheet” bubble to address the issue of depth of field in macrophotography. I found a 4x5 inch sheet bubble was a practical working size, and constructed a 4x5 inch frame on an arm wrapped in foam rubber.
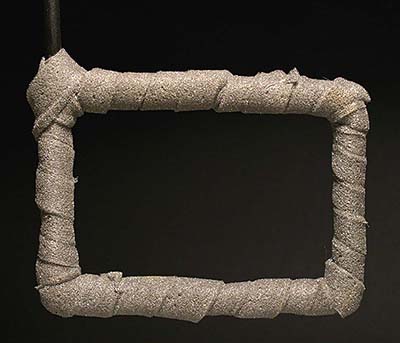
The foam loads up with the soap solution to extend the life of the bubble by feeding the soap solution into the top of the bubble by gravity, thereby constantly recharging it.
The frame is mounted on a light stand, with a tank filled with the soap solution resting below it in a tray. The tank is raised up around the frame and slowly withdrawn, leaving a large (and very wet) bubble in the frame.
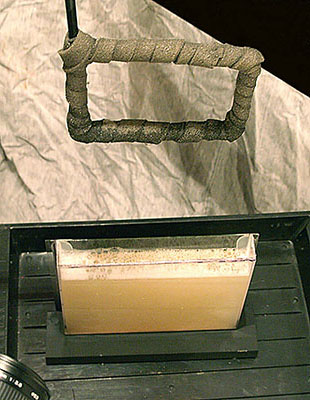
The photographic setup looks like this:
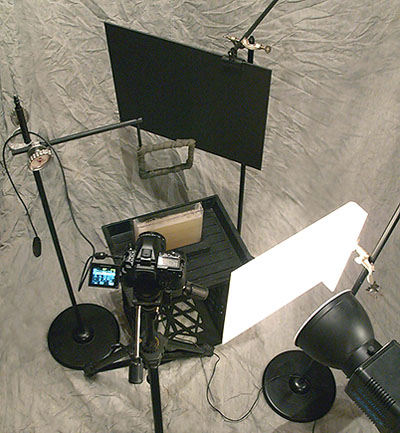
The camera is aimed and pre-focused on the bubble area of the frame. The camera should be set to manual focus and a small aperture should be used to maximize depth of field. The Manual shooting mode should be used so that the shutter speed and f-stop can be tested and pre-set. The White Balance should also be pre-set to agree with the color temperature of the flash. If AUTO White Balance were to be used, variations in the color of the bubble’s interference pattern would constantly skew the color balance.
I prefer to use the Olympus E-3 and E-10 digital SLRs because of the articulated LCD screens and that they accept an electronic cable release—the Olympus RM-CB1. On the E-10 I zoom the lens to maximum telephoto and use the MCON 35 Macro Extension lens with the camera set to f11. On the E-3 I use the 35mm f3.5 Zuiko Digital Macro set to f16.
Instead of normal three-legged lightstands, I use these mono-columns which I make out of floor lamps I buy at tag sales. They have a smaller footprint and are easier to use in close-quarters.
The camera/frame angle is set to a minimum through testing to obtain better depth of focus across the width of the bubble.
Behind the frame is a black sheet of foam core, positioned at a steep angle so that light from the strobe unit glances away from the bubble. This provides a black field behind the bubble.
The strobe light is diffused through a pane of white Plexiglas so that the bubble is evenly illuminated.
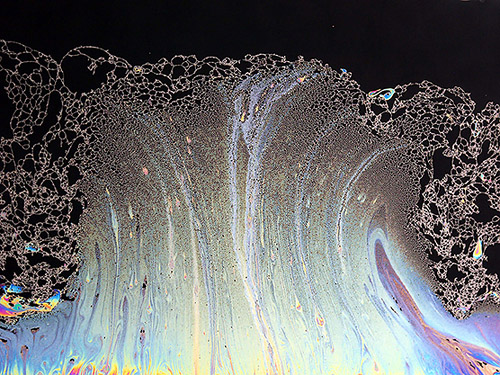
The frame is charged with solution and a sheet bubble is created. In this setup the camera is covering the area about the size of a business card. At first the sheet bubble appears as a somewhat colorless field with some streaks of liquid running through it. This is because the soap and water are evenly distributed and there are no variations in the thickness of the bubble.
After about 30 seconds the bubble starts to slow down and very fine interference patterns start to appear.
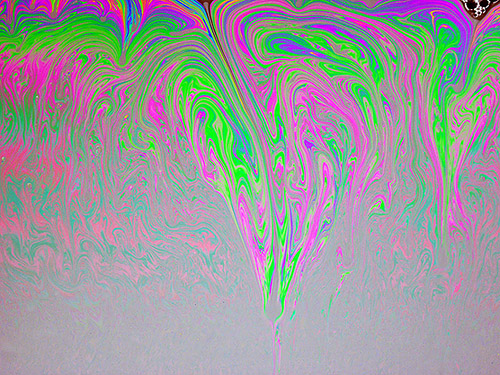
As the bubble settles down, gravity starts creating striations in the color patterns of the bubble.
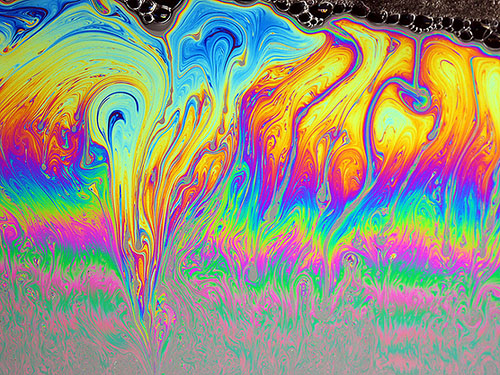
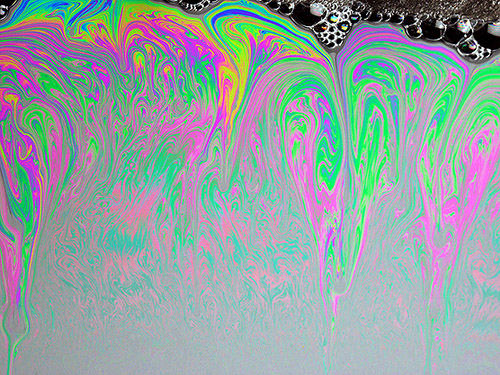
As the soap solution moves downward due to gravity, the beautiful blues at the top of the bubble start to become with a reddish-ochre color.
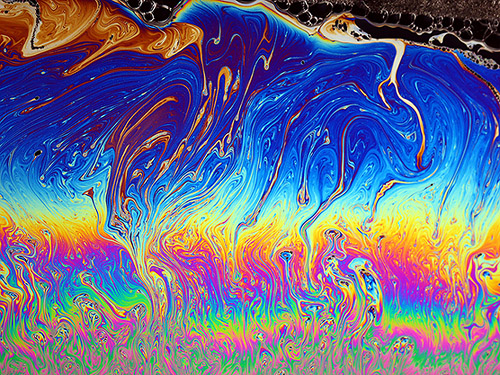
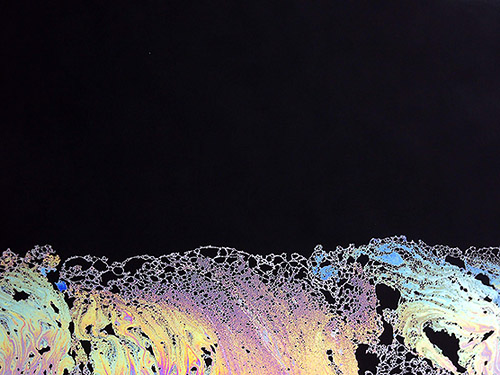
The reddish-ochre becomes more pervasive and the colors of the interference patterns diminish.
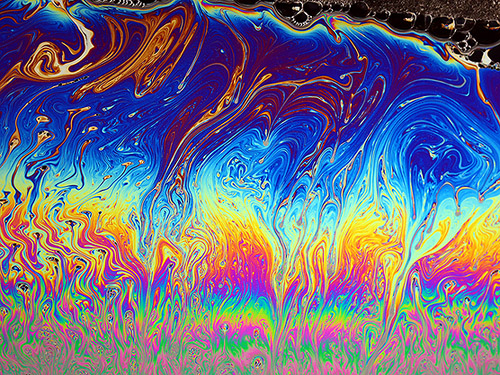
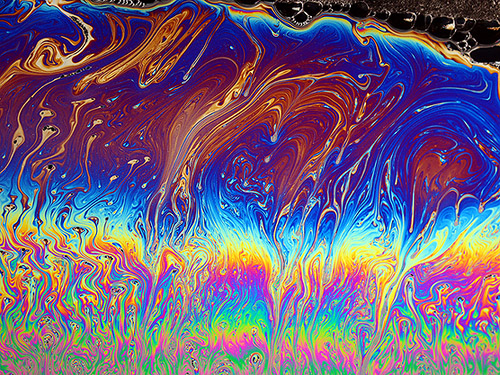
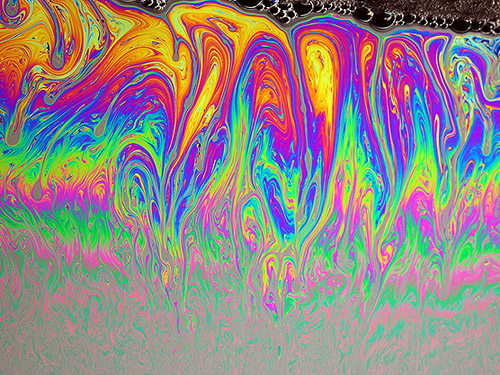
At this point the swirls in the bubble become somewhat static. The motion can be and patterns can be affected by gently blowing on the surface of the bubble.
Toward the end of the bubble’s life, it becomes almost colorless as the soap flows downward and out of frame. This is because the sheet is now mostly water and does not affect the phase differences in the various light frequencies.
Just prior to bursting, the sheet is almost entirely water and glycerine and what is seen is the blackness of the sheet of foam core behind the frame with a small quantity of the soap bubble solution remaining. In a few seconds the bubble will burst
Chaos photography can be continued as long as the photographer’s curiosity can be engaged. Techniques that can be employed to expand upon soap photography include adding bubbles to the center of the image, using an eyedropper to add more fluid from the top, or puffing dust particles onto the bubble to create new flow patterns.
Michael Reese Much is a senior technical support representative for a major manufacturer of digital products. He is also a fine art photographer and amateur microscopist. All comments to the author Michael Much are welcomed.
References about the Physics of Soap Bubbles
http://en.wikipedia.org/wiki/Soap_bubble
http://laser.physics.sunnysb.edu/~ett/report
http://demo.physics.uiuc.edu/lectdemo/scripts/demo_descript.idc?DemoID=70
Microscopy UK Front Page
Micscape Magazine
Article Library
Published in the May 2008 edition of
Micscape.
Please report any Web problems
or offer general comments to the
Micscape
Editor.
Micscape is the on-line
monthly magazine of the Microscopy UK web
site at
Microscopy-UK
© Onview.net Ltd, Microscopy-UK, and all contributors 1995 onwards. All rights reserved. Main site is at www.microscopy-uk.org.uk with full mirror at www.microscopy-uk.net.