|
Quartz Wedge Project by Alex Cummins, Maryland, USA |
A quartz wedge is an elongated wedge of quartz precision ground and mounted between two pieces of glass. It is used in polarizing microscopy to change the wave pattern of the polarized image in a semi quantitative fashion (based on the thickness of the quartz) to assess how birefringent a sample is. They are an expensive an useful piece of equipment when working on a polarizing microscope.
I started with a six wavelength quartz wedge slider. I got it on eBay and was delighted as this was a really nice piece. However when it arrived the quartz wedge was opaque/delaminated! From the color and pattern of separation I thought it was probably glued with Canada Balsam.
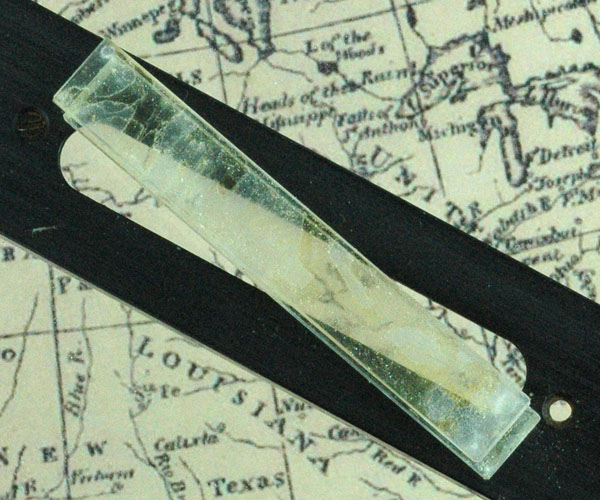
Figure 1
After seeking advice, which was unilaterally dont try anything, and as it was completely unusable as it was, my choices were simple throw it away or give it a try. Well what do I have to lose! First step was to clean a work area. When working with optics, cleanliness is extremely important. A small piece of grit can ruin your whole project.
The next step was to remove the plate from the holder. I removed the screw from the retaining plates and gently removed the quartz wedge. As soon as the plate was in my hand I set the plate and the holder onto my work surface oriented EXACTLY as the plate came out relative to the holder. Note the orientation of the holder and where the upper right hand corner is (you can define any corner as the upper right corner as long as everything is kept aligned). Now comes the part that will make all the optic people cringe. With a diamond scribe mark the upper right hand corner of the unified (before separating) wedge with a SMALL scratch being sure that things are still aligned with the holder. Now turn it over an mark the other side so that the scratches are on top of each other (if the two pieces are of different size precise location of the second scratch will be important to get things back to alignment. Next separate the two plates of the quartz wedge. Before I started I looked at another (not as nice) quartz wedge that was easier to see. Look at the short edges of your wedge. One end should look like two glass plates glued together but if you look at the other side you will see two glass plates and maybe a thin layer of quartz in between. If you can see a separation at the end with three thick layers you can try with a razor blade at that end. If not approach the wedge from the end with just two glass plates carefully you dont want to chip the fine edge of the quartz edge. If you meet ANY resistance STOP! If the plates are held tight together it may need soaking in a suitable solvent until the solvent dissolve or loosens the plates. My first choice would be xylene. Mine was so bad that I could slide a razor blade between the plates and it came apart easily.
Once you have separated the plates clean them carefully with xylene and rub and dab to remove all the old glue. Be careful with the actual wedge of quartz as you dont want to chip or scratch the edges as the fine end of the wedge is VERY thin. Once you start cleaning you can identify the quartz wedge because it will be frosted not shiny like the glass alone. My suspicion is that a piece of glass is epoxied to the quartz and then ground down to the desired size. Mine at any rate wasn't securely attached to one plate and glued with something similar to Canada balsam to the covering plate.
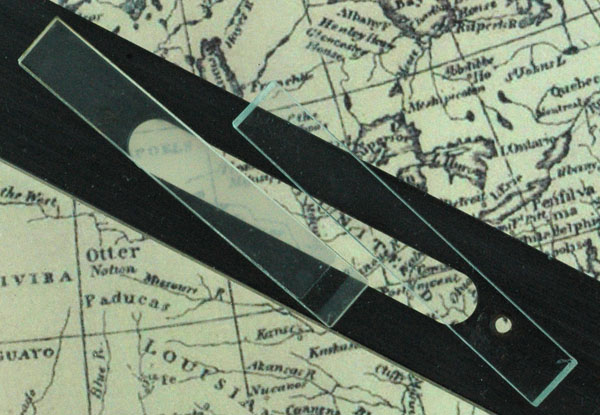
Figure 2
When all the surfaces are as clean as possible you are ready to reassemble. Lay out a work area of plastic or aluminum foil to provide a clean work surface you can make a mess upon. Check the location of your scratches! Flood the quartz wedge with Canada balsam. Gently lower the glass plate on top lowering it from one end to the other as you would a coverslip being careful not to create any air bubbles. Ensure that the plates are aligned, the registrations scratches line up and are top of each other. Gently seat the two halves together. There will be excess balsam leaking out the sides and puddling around the plates. DO NOT CLEAN UP! Let it sit and dry for 3-4 days up to a week. As the balsam dries up it may contract around the edges and it will suck the excess balsam to fill the gaps rather than air.
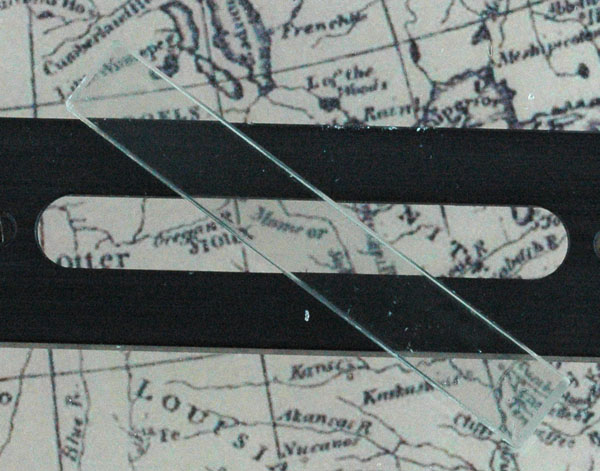
Figure 3
Once it has dried thoroughly the plates will be covered in balsam and need to be cleaned up. Clean the excess off being careful not to move or dislodge the plates. Once the plates are clean and crystal clear you are ready to mount it back into the holder. Align your holder so you know where the upper right hand corner was. Insert the cleaned wedge into the holder so that the registration marks are aligned with the upper right hand corner. Re-attach the retaining screws to hold it in place and you now have a working quartz wedge!
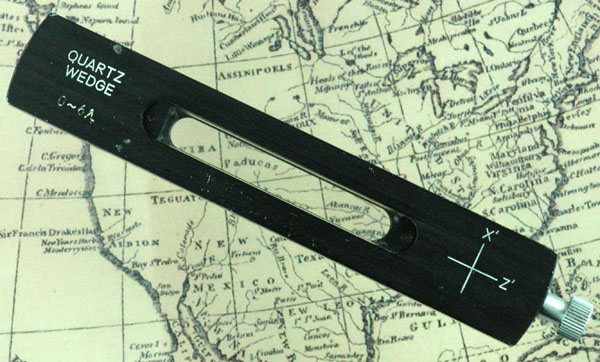
Figure 4
NOTES:
1) I am not a microscope technician so proceed with caution as your experiences may be different than mine.
2) My wedge was not calibrated along the edge so I didnt have to worry about that. If yours is you will need to mark on the holder precisely where the wedge should reside after mounting. This is done BEFORE you take it apart.
3) My quartz wedge was firmly glued to its plate so separating it from the coverplate was not a problem. If your quartz wedge is glued with the same glue as the coverplate then you need to be much more vigilant and register its location as you go.
4) My Quartz wedge was completely useless as it was so I had nothing to lose by trying. So if yours works as is I would not recommend repairing it until it degrades to the point of uselessness.
Comments to the author are welcomed.
Microscopy UK Front Page
Micscape Magazine
Article Library
© Microscopy UK or their contributors.
Published in the May 2011 edition of Micscape Magazine.
Please report any Web problems or offer general comments to the Micscape Editor,
via the contact on current Micscape Index.Micscape is the on-line monthly magazine of the Microscopy UK web
site at Microscopy-UK
© Onview.net Ltd, Microscopy-UK, and all contributors 1995 onwards. All rights reserved. Main site is at www.microscopy-uk.org.uk .