| The
Poorman's Photomacroscope (pt6)
Concerning Cameras By Paul James |
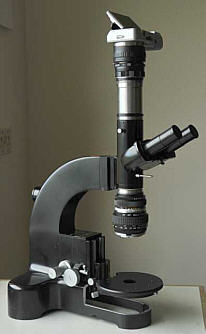
It all began when my aging Minolta F300 digicam began to show signs of retirement. What would I replace it with? A modern equivalent with a noisier pixel packed sensor? I didn't what that option. Besides these matters my 5 megapixel gem of a camera's ergonomics and slow focussing exposure evaluation were features that actually helped to capture photomicrographs in the way that suited me. I had eventually evolved an ultra simple system of camera support/exposure taking which on paper reads dreadfully, yet in reality was a joy to use. A modern digicam simply couldn't perform the same way because its focussing/exposure evaluation time would be too fast. Let me explain : The camera's tubular support column ends up with a horizontal platform above the trinocular port. Around the circular top edge of the imaging aperture of the platform is a rebate that conforms exactly to that found around the base of the extended lens of the camera. The latter therefore simple 'drops' into precise registration in relation to the eyepiece everytime. The exposure is initiated by pressing the shutter button with the camera in situ. By the time its tiny leaf shutter fires, all the components of disturbance induced by pressing the button will have fizzled out. The post shutter button delay is about 1.5-2.0 seconds, which is ample in the circumstances. So what was once perceived as an undesirable impediment to normal picture taking has now become an unfailing and very convenient way of capturing images over the 'scope. It might be perceived by some as being too primitive, but it WORKS perfectly, allowing also speedy removal of camera to change settings ad nauseum if necessary.
I thought therefore it would be a sensible idea to get another F300 which I luckily managed to accomplish for only £17 at eBay so I could carry on for a while at least with this camera. But I'd also decided to look into the APS-C sensor format a little closer, with the object of buying a dual functioning camera....... ie terrestrial plus over the 'scope imaging.
Finding a camera..........
What followed was a crash course of experiencing various dSLR's of DX & FX formats either borrowed or bought...........the reality of low interest rates in the UK made the latter entirely possible! The choice of camera, especially one which has to perform dual roles of terrestrial and 'scope photography, is ultimately one about how we personally relate to its handling etc.. I therefore see no point in writing here about my pet likes and dislikes of cameras, save to say that some excellent imagers were not necessarily easy to operate, and also that the idea of a dual purpose imager wasn't such a good idea for me. I therefore decided to choose a camera which I could justify keeping permanently over the 'scope, which had to be affordable and easy to operate, and last but not least a credible imager. Ironically I chose the very camera which I found the most difficult to use in conventional photography, which was also the cheapest and most suited over the 'scope of all...............the SONY NEX.
|
|
The Sony NEX 3
Its compact lightish body, DX cmos low noise sensor, 3" tilting high image quality 900k LCD screen, Live view, capacity to employ M42mm thread adapters/lenses with auto/manual evaluation of exposure in the PASM modes with all the trimmings, and relatively low price (£175 post paid for body only) settled the matter. It is basically identical to the significantly more expensive NEX5 which has an infrared remote controller and an external alloy casing. The infrared shutter release would have been convenient on the NEX3 but I'd make do with its timer delay instead. The reviews of this sleek imager suggested that its menu system was unintuitive which I feared might become so frustrating an experience as I had with a contemporary mobile phone that I would refuse to use it. Not so. The Sony NEX's operation I found easy to become familiar with and to my surprise and welcome relief took only several minutes and a few exposures to understand. It is certainly novel yet a welcome change to the usual menu systems which can be bewildering and somewhat akin to walking down a series of symmetrical streets in a city where you would soon lose your whereabouts if there were no obvious landmarks. Sony have included a rotary dial and matching screen display which provides the central landmark reference in its menu system. It is refreshingly uncluttered and straightforward as a camera should be, unlike the pretentious Windows operating systems that have evolved into tiresome multi optional entertainment features and not tools.
Without a mirror, vibration is of a low order when the focal plane shutter curtains are activated. And so I started imaging by direct coupling of the camera body to the trinocular port over the converted Metallux stand. The camera's tilting LCD screen enables clear inspection of the image and the body buttons and dial are easily manipulated. Its on/off lever is the best I've experienced in years. In short it is the cheapest body around that unites the traditional digicam's facilities of live view to a curtain shuttered DX sensored body. It can either sport an alien lens with suitable adapter OR image without a lens utilising the output from an eyepiece directly onto its impressively capable 14 megapixel cmos sensor.
If there is an issue with this camera when used over the 'scope then I'd say that its LCD live view image is decidedly spiced up in brightness, contrast and colour saturation, which is understandably necessary to provide visible imagery in bright daylight. In the dimmer confines of my den these images positively stand out when previewing the live image prior to exposure, which clearly aids focussing and composition. I mention this because the reviewing of the captured imagery on the same LCD screen can be a little disappointing because of the comparison to the brilliant live view image. I suspect many cameras like this are tweaked in similar fashion? Nevertheless the mind soon assimilates this apparent flaw and the matter conveniently disappears. Sony also include a very easily operated RAW software facility as well as another to convert the saved RAW files into high compression jpg format. In short the NEX body is a very capable imager well suited for over the 'scope mounting.
Another potential issue with this well designed and crafted body that some readers might baulk at will probably be concerned with the method of firing the shutter. The only way to operate the shutter of NEX3 without fear of vibration during exposure is to employ its delayed action (10 seconds). There is no 2-3 second option. Despite this apparent inconvenience I simply utilise the count down time by making any last second adjustments of focus and composition via inspection of the LCD screen. Which reminds me that its video facility, a rather good one at that, is easily brought into action by pressing a single button and its LCD screen again allows simultaneous controlling of specimen focus and position. A few seconds of video footage of those critters which defy to be captured on still imagery can be caught in full motional glory. It couldn't be simpler nor more convenient, leaving again the assessment of exposure to the camera which it does automatically and rather well too.
Of course the Sony's NEX3/5 models are not the only mirrorless examples for potential over the 'scope situations. There are several excellent Panasonic G series models to choose from, as well as those of Olympus all sporting the 4/3rds sensor which is arguably even more suited to circular field imaging than the NEX sensor. But on the issue of cost the NEX3 is without peers.
Trinocular Port Mounting
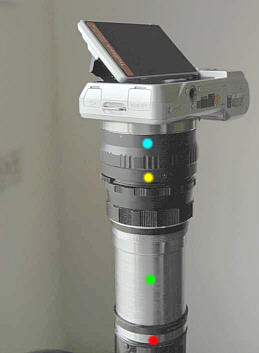
The cheapest as well as easiest approach to mounting I thought was to obtain an M42 adapter for around £15. It would enable the camera to be mounted over the 'scope, and also usefully employ M42 lenses with extension rings for conventional macro photography. Importantly too from my perspective, I could image over the 'scope with an M42 lens in situ between the camera's sensor and microscope's eyepiece. This unconventional method of imaging with a 'standard' lens in front of the sensor/film plane would be considered taboo by many a photomicrographer. It does however work extremely well and importantly comes with some advantages. The image below shows NEX3's body coupled to the M42 threaded Pentax 35mm f3.5 film camera lens which in turn is engaged by its 49mm filter thread to the phototube. A 'spacer' ring was necessary to bring about simultaneous focal unison between the binocular and trino ports.
|
|
The origins of this approach came from the time when digicams imaged over the 'scope with their unremovable lenses ........(which is still happening every time I image with my trusted F300). Providing that the camera's lens wasn't too physically long the full field could be captured. Larger zoom lenses were of no use as the Ramsden disc from the eyepiece didn't extend to the iris plane and so vignetting of one form or another occured.
This emphasises the need of an eyepiece with a large exit pupil index and consequently large eye relief distance. Fortunately they can be found quite frequently these days because of the trend towards wide field imaging as well as spectacle wearer's needs too. 30mm barrelled eyepieces are on average more capable than standard 23mm versions when employed in this way, though the latter can just as easily project an image directly onto the sensor without recourse to the 'relay' camera lens.
The one I use almost exclusively is the large 30mm Reichert x6.3/24 which can easily cover the entire area of a FX sensor with a standard f2 50mm camera lens, let alone the NEX3's DX sensor with the 35mm camera lens both without any vignetting.
Advantages of using an in situ standard camera lens
The options available for imaging flat fields directly onto sensors are very limited. It seems that there are no commonly available purpose made projection eyepieces that can truly fill the sensor with sensibly amplified flat field imagery. Those that do work best have very low magnification orders, so it makes sense to try alternative methods of achieving the desired effect.
Employing a regular 35mm film camera lens (35-40mm works nicely for DX format) in close proximity to the eye lens of a wide field high eyepoint eyepiece will raise a sensibly flat image across 90-95% of the FOV with NO visible artifacts. Of course this will vary slightly from one setup to another.
Additional advantages of this unorthodox imaging technique include ;-
1) A long term dust free environment for the sensor.
2) A very convenient measure of adjustment of the field's size on the sensor is automatically available in the form of the camera lens's focussing barrel. At the camera lens's infinity setting the image from the 'scope will be at its smallest on the sensor, which in my setup reveals the 4 arcs of the field in the 4 corners of the camera's sensor. By turning the focussing ring of the camera lens the image gradually expands so the entire sensor is covered. When a 50mm camera lens is used the field enlarges noticeably and may be used to affect better compositional aspects of the subject. The 50mm lens will also respond to its barrel adjustments in similar vein to the 35mm lens. So a fair degree of sizing of the field from the 'scope is available, which would incur much more inconvenience to simulate with a single projection/normal eyepiece when used in traditional fashion to project its image directly onto the sensor. In this latter scenario the camera body would have to be extended by varying distances from the projection eyepiece, which clearly makes for a more complex array.
3) Further manipulation of the image to sensor sizing can be brought about by inserting a x2 converter between digital camera body and camera lens which at a stroke approximately double's the image's dimensions on the sensor.
4) A minor advantage but one that I rather favour is that the eyepiece's field boundary is imaged as it would appear to the observing eye. This allows the field boundary to be included in the displayed image if deemed as suitable.
Mating the Camera relay lens to the phototube/eyepiece
Though commonly available fitments such as the M42 adapters can achieve union of the camera body and camera lens, the coupling of the camera lens to the photo port ideally requires a matching filter thread. Failing a diy screw cutting facility, it can be accomplished by epoxy bonding of a suitable filter rim to the photoport port, or the acquisition of a made for the purpose fixture. Of course there are any number of ways of achieving this depending on the materials available, so long as the resulting union of camera lens ensures its axial alignment to that of the 'scope's output as well as the accurate glass to glass spacing between camera lens/eyepiece to achieve the ideal placement of the eyepiece's Ramsden's disc at the iris plane of the camera lens. This can be easily verified by stopping down the camera lens 's iris. If the distance between the eyepiece and camera lens is correct, then the image on the digital camera's LCD screen will be unchanged....it may temporarily vary in brightness, but no vignetting should occur. Camera lenses which have deeply inset front elements have lesser chance of achieving the ideal, but may still yield usable, evenly lit image fields.
Direct coupling of a mirrorless digital camera to a strong and rigid stand like a Metallux causes no discernible disturbance effects to the recorded image. The mass of the camera body is doubled with the addition of an M42 adapter and camera lens, which ultimately increases the inherent inertia of the upper limb so aiding the damping effects of what little vibration the NEX3 creates when tripping its shutter.
A word about sensor size
Though sensor arrays have grown significantly in the last 10 years or so, the monitor we use to inspect their imagery hasn't changed a great deal. The consequence of this is that a lot of captured detail from the more pixel populated sensors is dumped during the down sizing processes to fit to screen. Consequently I find that some of the imagery from my old 5 megapixel digicam can be easily confused with those taken with either a DX or even an FX format camera, though the tonal superiority of the larger sensor is usually in evidence.
Conclusion
I find the Sony's NEX3 a genuine joy to use over the 'scope..........indeed I can't fault it, though of course its delightful handling in this situation is somewhat addictive . So it will be used to image the bulk of my photo requirements, with occasional sessions of imaging with the D700 when the subject/lighting warrants it. That said the Sony NEX3 most certainly earns its place as a permanent imager over the 'scope. My slightly ignored F300 is still itching to demonstrate its capabilities every now and then just to keep the Sony and Nikon on their toes !
| All comments welcome by the author Paul James |