|
The Quest for Spicules Part 1 by Richard L. Howey, Wyoming, USA |
Since I was a teenager (back in the 12th Century), I have been fascinated by invertebrates and most especially by their skeletal structures. At first, it seems odd to talk about invertebrates and skeletal structures in the same breath. However, when we stop and think about it, virtually every organism has developed some kind of strategy to provide itself protection from its environment, defense against predators, some kind of framework to support it, either in an attached mode or to provide support and help in the process of locomotion and, in some cases, even create offensive weapons some of which are used for food capture and others as a deterrent. These structures are usually calcareous (basically calcium carbonate), siliceous (predominately silicon dioxide, that is, sand), or complex protein compounds, such as chitin or keratin or occasionally as with the sessile ascidians (attached tunicates), of cellulose compounds and with Acatharians (close relatives of Radiolaria), Strontium sulfate.
The calcareous and siliceous structures are generally rigid and strong even though the crystals that form them are almost always deposited in such a way that there are lots of tiny holes or fenestrations. Take a sea urchin spine and think of it as a modern high-rise skyscraper filled with tiny rooms; this design reduces the weight significantly, but also provides quite a strong structure.
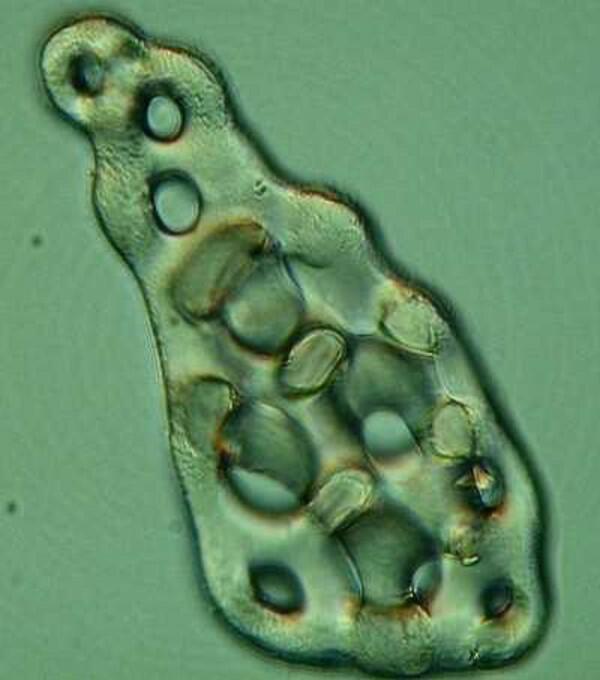
Our concern here, however, is not spines, tests, shell plates, bristles nor polychaete scales, but rather spicules. (The other structures I’ll deal with in other long-winded essays.) So, where do we look for spicules? If we want to start with the very “simplest” organisms, we might begin with some wonderfully strange symbionts which live in the guts of ruminants, such as, cows, elk, bison, etc. I don’t know, but I suspect that other such interesting symbionts occur in yak, caribou, eland, kudu, and so on, but we’re so busy as human beings trying to kill each other for odd and dubious “reasons”, that we don’t have the time or money to research such “trivial” issues. The organisms I am referring to are some of the most complex of the protozoa and in Epidinium eucaudatum, there are a series of tiny calcareous plates arranged in such a fashion that they do suggest the disks of a spinal column. A very detailed composite drawing of this organism can be found in the 5th Edition of Kudo’s Protozoology, p. 72, figure #16 While there are many kinds of “houses” among the protozoa, tiny spicular plates such as these are extremely rare.
However, when we move up a phylum we find a great abundance of spicules both calcareous and siliceous. Here, I am, of course, referring to the Porifera, the sponges. There are some sponges that have no spicules, such as the bath sponges ( in those days before the synthetic, factory-manufactured “sponges”). If you are bathing, you certain don’t want scratchy bits of hard, chalky or glassy stuff abrading your skin.
Sponge spicules are a micro-universe unto themselves even though taxonomists tend to regard sponges as a kind of evolutionary dead-end–but, what a dead-end! They have survived for hundreds and hundreds of millions of years; they have developed a range of patterns, forms, and colors that are truly breathtaking, furthermore many produce toxins that make them unappealing to many would-be predators and they may well survive long after we have disappeared as a species.
Sponges are an excellent group of organisms with which to begin a quest for spicules and if you don’t live near a suitable sea coast to collect some, you can fairly easily obtain some either preserved in alcohol or dried. Badger your friends who do live near the ocean and threaten to descend on them for a prolonged visit if they don’t send you some specimens. Scientific supply houses often have several types of preserved and/or dried sponges for sale as do shell and craft shops which can be readily found through the Internet. Avoid specimens preserved in formaldehyde because: 1) formaldehyde is nasty, toxic, irritating stuff to work with and 2) more importantly, unless it is carefully adjusted to a neutral pH, it can turn acidic and dissolve the calcareous spicules.
The next issue you will face is that of isolating the spicules by dissolving away the surrounding tissue. First of all, you need to cut a few small, thin sections of the sponge material. With a bit of practice, you will be able to get some that are thin enough so that you can mount them in a drop of oil on a slide and then examine the spicules in situ so you begin to form an idea of how these structures are positioned and oriented in the living organism. In sponges with the simplest sorts of spicules, this is often fairly readily observable and can be very instructive. In other forms with complex and multiple types of spicules, some of which are fused into lattices, it can be very challenging indeed to understand how the individual elements are combined to form the larger skeleton.
To isolate the spicules, you will need a reagent that will attack the tissue and this is usually accomplished by using a caustic such as Sodium hypochlorite (or a household bleach) or Potassium hydroxide. If you’re more patient than I am, you can use a readily available 3 % solution of Hydrogen peroxide which you will have to replenish several times. Another option is using bacteria to degrade the tissue, a rather time-consuming and smelly process. Nevertheless, the advantage of these last 2 techniques is that they do not present the risk of etching the surface of the spicules which caustic chemicals may do. However, unless one is doing highly critical light microscopy or electron microscopy, this is rarely a problem.
Tubes or slides? Slide preparations are a quick and easy way of conducting some simple tests and also, when properly done, they provide some good opportunities for digital imaging. The major problem with making slide preparations is that the caustics tend to evaporate and crystallize rather quickly unless one adds a drop of distilled water every few minutes. However, so long as you carefully label your slides, letting them dry with the crystal deposits is not necessarily a problem. If you store them properly in a relatively dust-free environment, then you can take them out, add some distilled water which will dissolve the crystals and allow you to further examine the spicules or take some digital micrographs of them.
If, on the other hand, you wish to create an organized archive of spicules, then I recommend using small test tubes to extract the material you want to study. Some years ago, I discovered some small polypropylene tubes which have caps that operate in 2 positions: 1) if you push the cap all the way down, it creates a relatively well-sealed tube 2) if you pull the cap up slightly it provides venting for gases that might be generated. These can be acquired from Cynmar Scientific. These are especially useful for our purposes, since dissolving tissue with caustics or Hydrogen peroxide will inevitably generate gases which require venting. Another option is to use plastic or glass tubes and plug them with small wads of cotton. These require a bit more monitoring as evaporation takes place more rapidly. Whichever method you use, it is important to check fluid levels and the activity of the reagents regularly.
When you think that the sediment has been reduced so that you have only the spicule material which you want to work with then, using a micro-pipet, extract a tiny amount, place it on a slide and check to see that you have indeed removed the organic matter to your satisfaction. If not, remove the extraneous fluid from the tube and add some fresh caustic or Hydrogen peroxide. If so, then you can begin the process of rinsing the material if you used a caustic reagent. If you used Hydrogen peroxide, then you just need a single rinse with distilled water. With caustics, remove as much of the fluid as possible without disturbing the sediment by using a disposable Pasteur pipet and then use a squirt bottle to send a jet of distilled water into the tube to stir up the sediment thoroughly thereby facilitating the rinsing. This will need to be done several times to insure the removal of any significant amounts of residue of the caustic. If you think you have achieved this, again take a micro-pipet and put a tiny amount of the sediment on a slide and let the droplet dry. Examine carefully with the microscope; if you find any hint of crystalline deposits around the spicules or on the slide, resume the rinsing process. Tedious? Yes, but if you want good results, it’s worth it and while you’re doing all of this, you can be listening to Bach or Mozart or Nine Inch Nails or Stockhausen depending upon your taste or lack thereof.
So, now we have some nice clean samples of sponge spicules in distilled water. At this point, you might want to know whether your spicules are calcareous or siliceous. A very simple test will tell you. Put some on a slide, add a drop of 10% Hydrochloric acid and if it starts bubbling and the spicules are dissolving, then they’re calcareous; if the solution doesn’t bubble, then it’s either siliceous or a very complex protein which is not much affected by ordinary caustics or acids, but the likelihood is that it’s siliceous. [CAUTION: When using acids or alkalis on a slide which you are observing, be sure to have sufficient ventilation so that the vapors do not attack the lens.] Why does it make a difference whether the spicules are calcareous or siliceous? It matters because, if you want to make permanent slides, it may very well affect the type of mounting medium you select. It is a matter of refractive index and pH. Remember that siliceous spicules are essentially glass so, if you mount them in a medium that has a refractive index of 1.515, then they effectively disappear; they become invisible. This is the very same reason that diatomists have for over a century and a half been seeking mounting media with a high refractive index and have even gone to the extreme of vaporizing realgar (arsenic!) to get a mountant with an R.I. above 2.0. It goes without saying that this is a very dangerous undertaking and is not to be recommended! There are other mountants with a reasonably high R.I. which are commercially available, but they are quite expensive and often employ toxic and highly flammable solvents, such as, toluene or xylene. Whenever one uses a mountant, there are inevitable tradeoffs in contrast and resolution in relation to R.I. However, the primary concern must always be safety and the amateur can with a bit of ingenuity find reasonable and safe compromises. Here I would strongly recommend Walter Dioni”s articles in Micscape on making and using safe mountants.
With calcareous spicules, one doesn’t have to be as concerned about R.I., but you do have to be concerned about using a mountant that has a neutral or even slightly alkaline pH which means that you can’t use the very handy and convenient aqueous mountants that contain lactic acid (usually combined with polyvinyl alcohol.) Some researchers have reported that over time, even glycerine will produce some damage to calcareous material. However, the time frame involved is such that for most of us this need not be an overriding concern unless the intent is to produce preparations for long term archival and reference purposes.
One of the reasons that I am so fussy about having clean spicules when I make mounts is that I can then put a drop of the sediment on a slide, let it dry, and not have to worry about precipitates. I can then add a drop of mountant, put on a cover glass and leave it to dry. I use a fairly thick large drop so that fairly often I get some excess flowing out around the edges. If the mountant is insufficient or too thin, then one is likely to run into problems with air bubbles as the solvent evaporates and the mountant begins to dry and contract. I would much rather deal with the problem of trimming a bit of excess mountant than trying to remove recalcitrant air bubbles. If the spicules are calcareous, it is often a good idea to add a drop of mountant, let it sit for a while in the hope that the mountant will penetrate all tiny fenestrations and not then later produce tiny air bubbles. When you are ready to add the cover glass, add another drop of mountant and carefully lower the cover onto the drop.
Whether I am using a relatively safe mountant or one that involves some toxic solvent, I place the completed slide in a compartment in a plastic box. I bought several such boxes which are about 8 x 12 inches and have compartments into which slides fit quite nicely and will lie flat. From my point of view, this has 3 significant advantages: 1) It protects the slides from dust, 2) It minimizes the solvent inhalation problem, and 3) It slows down the hardening of the mountant. What? Heresy! Slows it down? We want results in nano-seconds! I’m afraid I’m not a believer in the” fast is better” philosophy as a general principle in microscopy or in life. The slower evaporation process enhances the penetration of the mountant into the spicules. This allows you time to do Yogic breathing exercises while practicing Zen meditation and producing better slides. (Well, it might.) Or you can invite a friend out for a 3 martini Nirvana lunch.
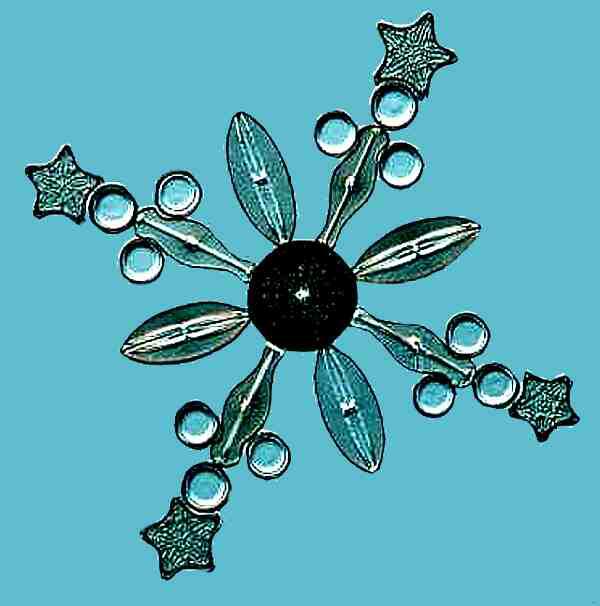
If you are aesthetically compulsive and want to make slide arrangements of spicules, my advice is to begin by going through a regimen of training by mastering the cello, the piano, and then becoming a Grand Master at chess. This should provide you with the basic skills and patience. If you are serious about making arrangements of spicules (or diatoms or desmids or butterfly scales), then use a drop of thin mountant on a cover glass. Start with relatively large spicules and keep the arrangement simple until you gain some confidence in the entire process. When you have a satisfactory design and the solvent has evaporated sufficiently for all the pieces to be firmly in place, then place a drop of thick mountant on a slide and carefully invert the cover glass and lower it onto the drop taking great care not to create any air bubbles. Here is a modest arrangements using diatoms and, no, I didn’t make it. I can’t afford a psychiatrist.
For me, it is generally sufficient to insure that the spicules are not clumped together and I am satisfied once they are spread across the slide in a manner such that it is possible to get good images of individual spicules and small clusters.
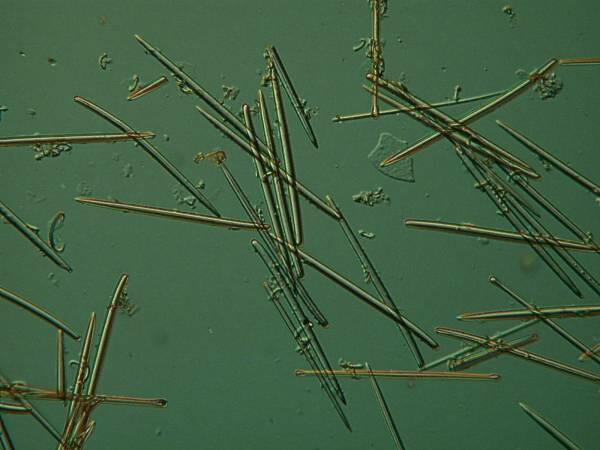
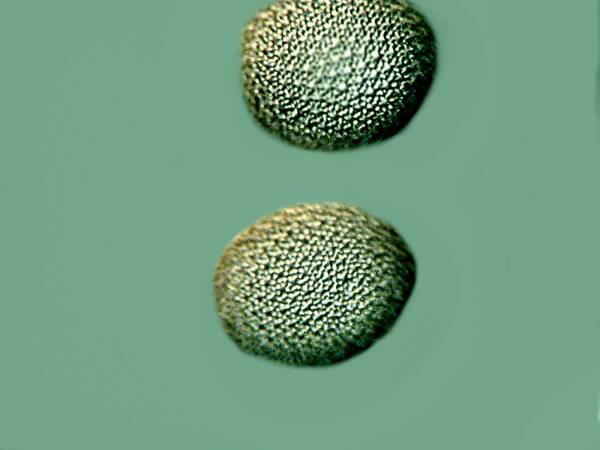
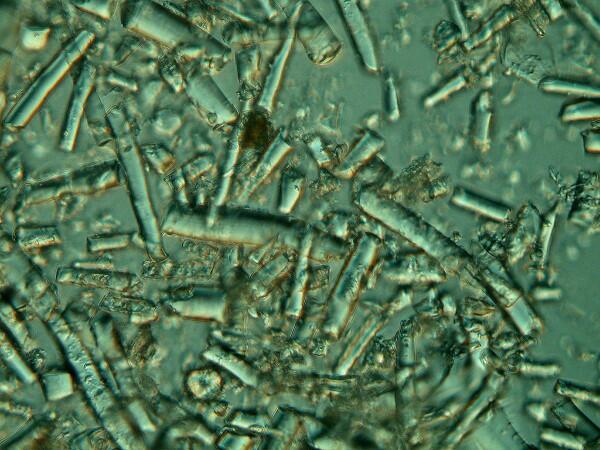
Many of you have, I am sure, examined a slide of sponge spicules which quite likely consisted primarily, if not exclusively, of monaxons, that is, needle-like structures that either had two pointed ends or one pointed end and a rounded end.
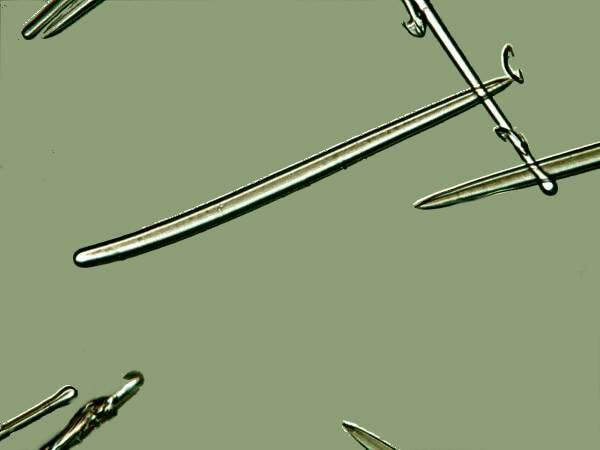
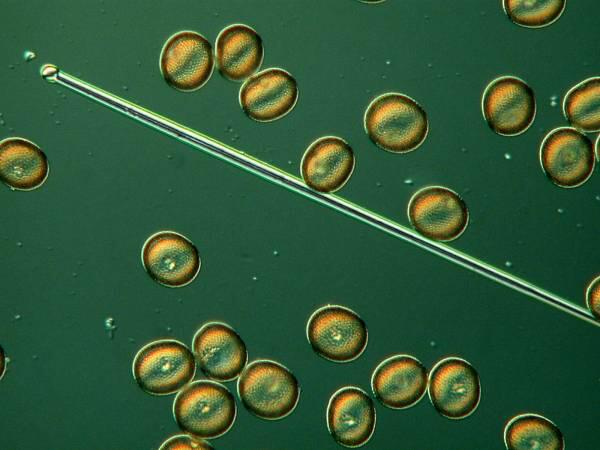
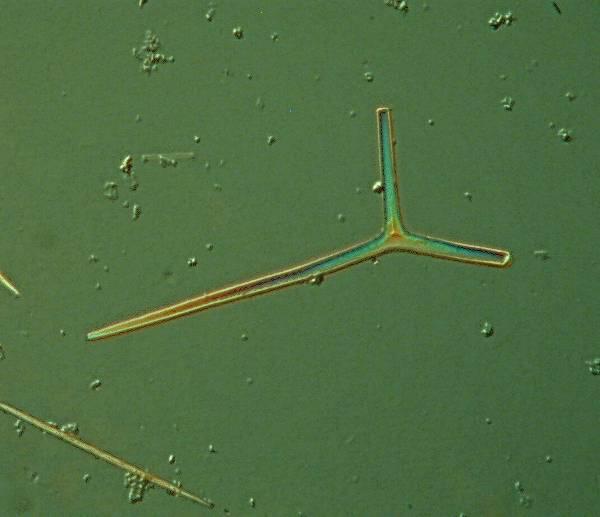
If these are the only sponge spicules you have encountered, you might well ask: What’s the big deal? As it turns out, sponge spicules take on a variety of forms and when they fuse can produce some magnificent structures, as we shall see. There are 3-pronged, 4-pronged, and even 6-pronged spicules, not to mention, ovoids and spheres, some of which are smooth whereas others have tiny spines.
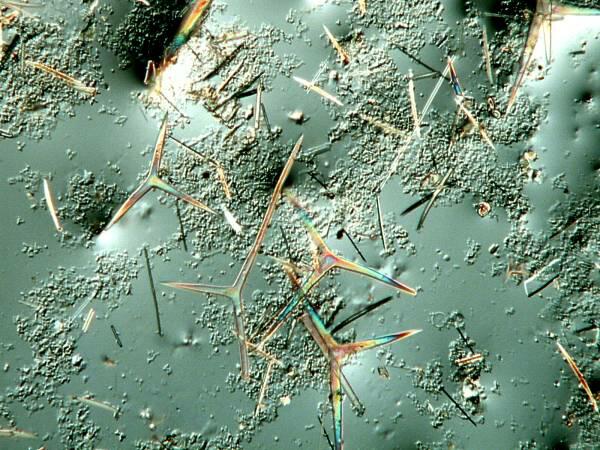

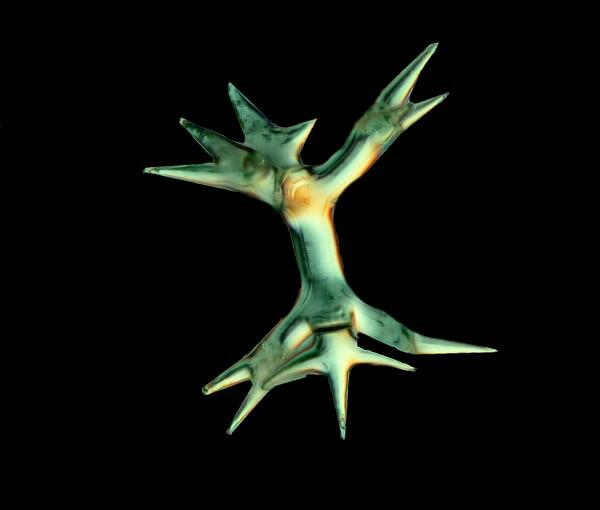
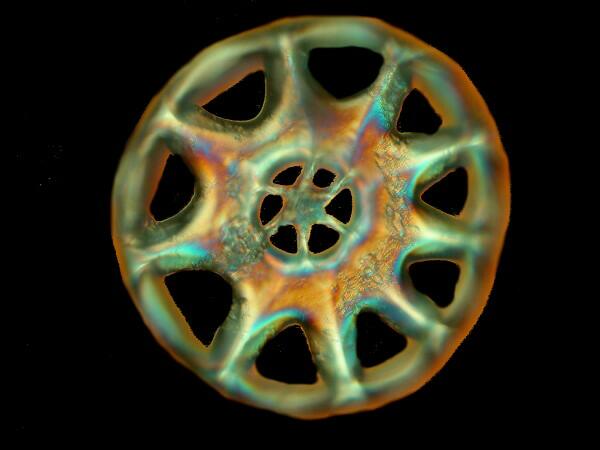
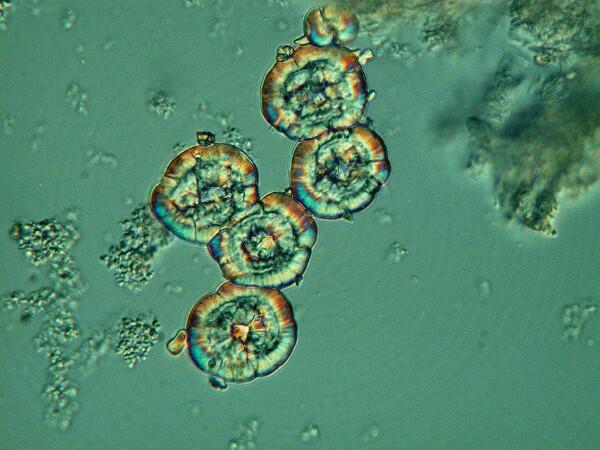
You all know the phrase “busy as a bee”, well some sponge cells are also amazingly busy creating lattices. Here are a few examples of such lattices:
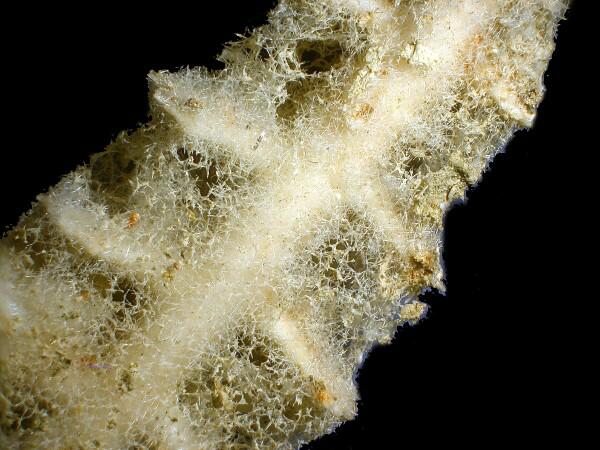
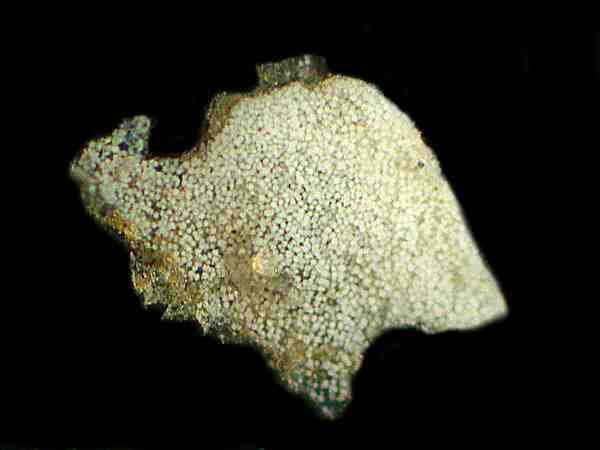
In the specimen above, the sponge has grown like a thin web over the surface of a spiny, tropical sea urchin spine.
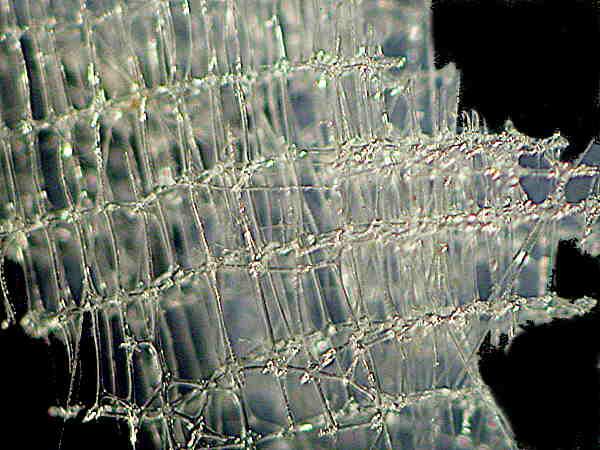
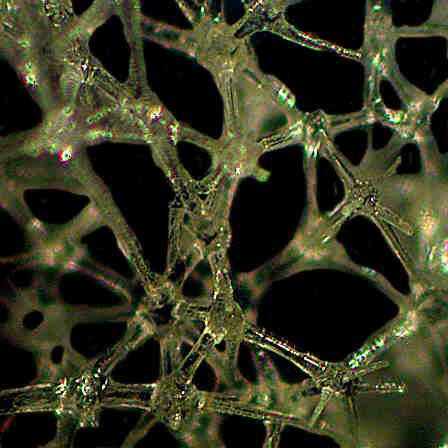
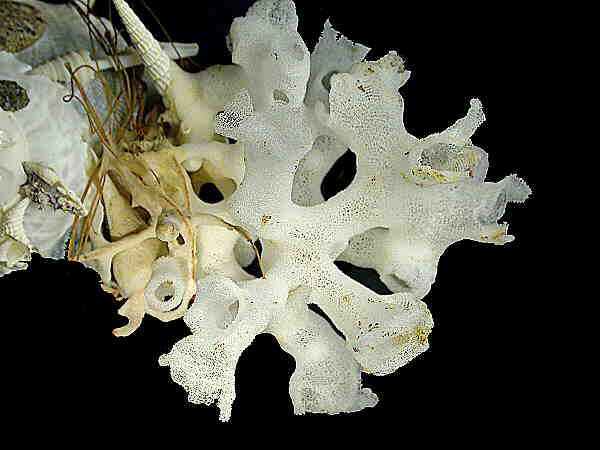
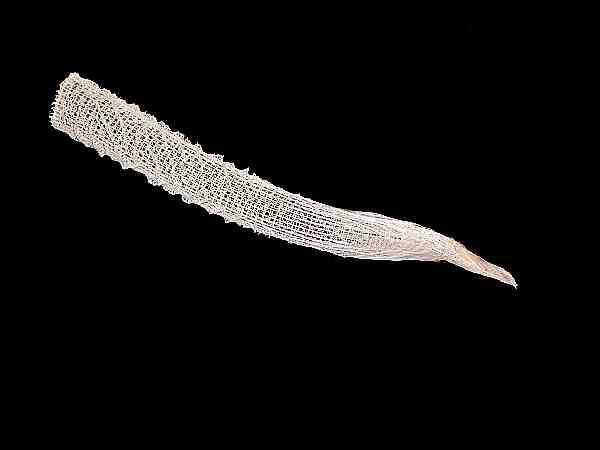
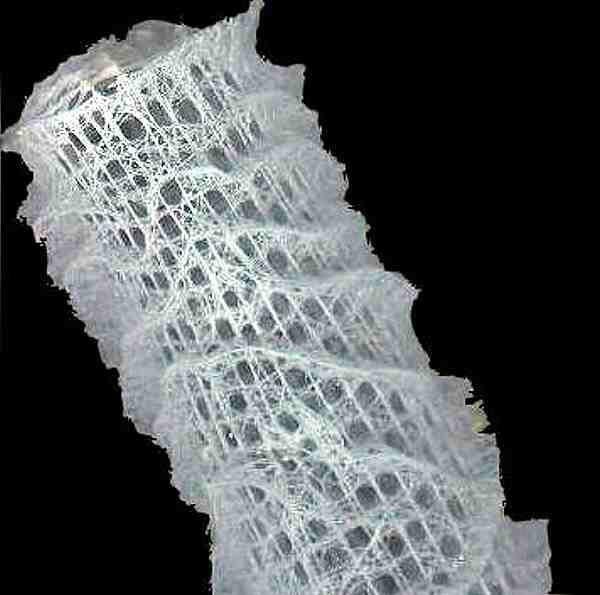
Even more astounding are instances where these cells manage through the alchemy of biochemistry and biophysics to produce such dazzling constructions as the Venus Flower Basket. (Euplectella–in the second and third images. The first one is of another type of glass sponge which has a lovely structure and is often found growing on the mollusk shell Xenophora also know as the “carrier shell” since it is almost always populated on its surface with other organisms.)
There is, in fact, a rather elaborate terminology which Poriferists (?), Spongologists (?), Ossiclists (?) have constructed to create a typology of sponge spicules. Here, I’ll just show you a few different examples to give you an idea of the variety. If you get hooked on these wonderful structures (and I hope you do), you can learn more about spicule classification in Libbie Hyman’s volume 1 of The Invertebrates and Patricia R. Berquists’s book Sponges.
Where else should we look to find spicules? I’m going to suggest 3 other groups of invertebrates which I have found rewarding, if not always cooperative in this regard: 1) Holothuroids (sea cucumbers), 2) certain types of Nudibranchs (sea slugs–truly beautiful, dazzling creatures. Check out the sea slug site which you can find here: http://ugsite.tierranet.com/ However, since I am working on separate essays on each of these groups, I shall just give you a few images and brief commentary in the hope of whetting your appetites.
1) Sea Cucumbers.
As with the sponges, we find a sufficient variety of forms that a rough sort of morphological typology has developed but it certainly could be beneficially revised, systematized, and generally better organized. I’m going to pique your curiosity by showing you just 3 types.
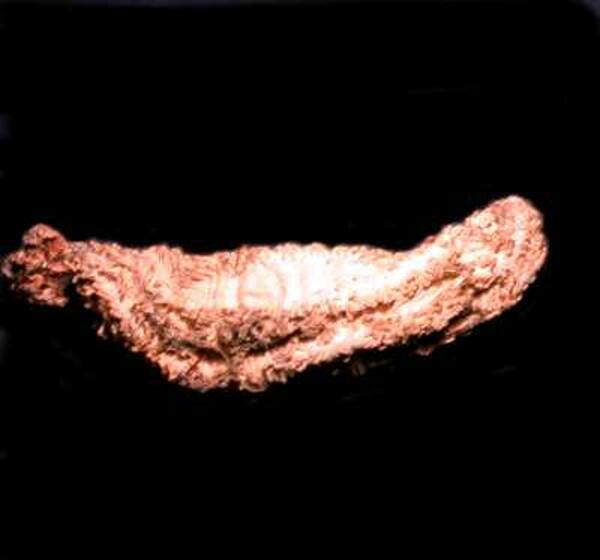
This is a dried specimen on a small sea cucumber of the genus Eupentacta. It is about 3 inches long.
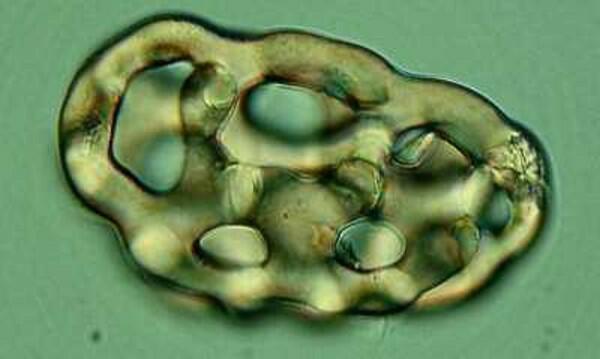
This type or variations of the two below are fairly common in a wide range of species. These particular ones come from Eupentacta pygmaea.
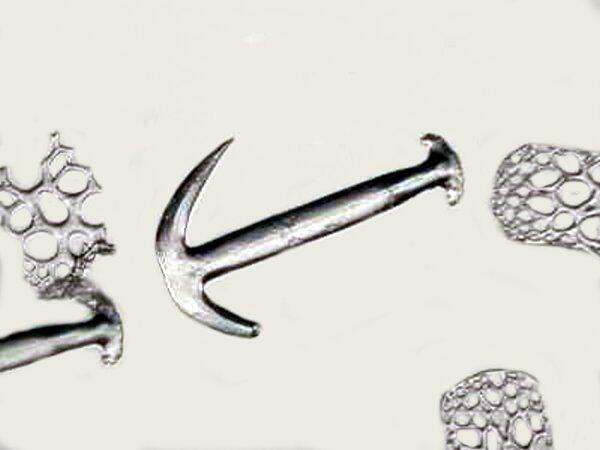
The next type is distinctive to a particular small group of species and is a morphological delight demonstrating that it’s not always important to be a “big wheel”. This particular example comes from Chirodota.
The third one may prompt you to sing “Anchors Away” as you observe it. It is from a species of Synapta.
A word of caution: if you are working with dried marine specimens as I frequently am. I was doing some scraping from the surface of a thin, burrowing sea cucumber which I haven’t yet been able to identify. It had been preserved in fluid at one time and the fluid had evaporated leaving a very white relic. Another different large species had gone through a similar ordeal with similar results. From the small species, I obtained a powdery residue but, from the large species, I removed some hydroids, nematodes, an interesting worm tube which appeared quite like that of the so-called bamboo worm and, of course, some white powdery residue. When I started looking around, I noticed what might have been a cluster of minute sponge spicules which clumped together in beautiful aggregates. However, something seem to me not quite right. Over the years, you develop a sort of warning sensor that advises you against jumping to conclusions because you might make a significant mistake. I took a cluster of this material, delicately transferred it to a slide, added a drop of distilled water and–poof!–my “spicules” disappeared, leaving behind only a small shred of sea cucumber epidermis. Spicules are, of course, crystalline, but they don’t dissolve instantaneously in water.
You can likely guess what had happened. When the preservative, which I strongly suspect was formaldehyde, evaporated and reacted with the minerals in the sea water it formed precipitates which displayed themselves as this lovely cluster of needle-like crystals.
This reminded me of the story about the great 19th Century German biologist and illustrator, Ernst Haeckel and the British biologist Thomas Henry Huxley, Darwin’s great defender. Huxley was studying a sample of mud taken from the sea bottom and decided to preserve it by adding alcohol. He later found a strange, gelatinous deposit on the bottom and associated it with Haeckel’s theory of Urschleim or “primordial slime” and he called it Bathybius haeckelii as a tribute. The significance of such a substance is that it would provide a kind of bridge between the inorganic and the organic and bolster the idea of all life having evolved from this peculiar quasi-protoplasmic substance.
The Challenger expedition which provided Haeckel many specimens from which he produced stunningly elegant drawings had taken many deep sea samples, but found no such Urschleim. However, some examples of it were found in some older samples that had been preserved and analysis showed that this “protoplasmic wonder” was really a precipitate produced by the reaction of the sea water and the preservative.
2) Nudibranchs.
These creatures, also known as “sea slugs”, are among the most beautiful found on the planet. I’m not kidding; go to the sea slug sites on the Internet and feast your eyes. Many species have odd structures called papillae which extend from the dorsal surface or sometimes from around the edge between the dorsal and ventral surfaces. Some of these contain small spicules; I have found them in Dorids which I collected in Maine and more recently in a dried specimen which I got from the Philippines. Here are some spicules from the latter and an image of the dried creature seen from its underside and the projecting strip in the center part is its “foot”.
A lot of species have a marvelous trick. They graze on hydroids which have nematocysts or “stinging cells” (rather like microscopic harpoons). The nudibranchs then perform the astounding feat of managing not to trigger the nematocysts as they move them through their tissue into the papillae where they can use them for their own defense! Now, if that kind of legerdemain doesn’t impress you, well then, you should take up hunting snarks. If you practice and get really good at micro-dissections, you might even manage to isolate a nematocyst or two from the papillae.
However, back to spicules. Here are some spicules from a specimen which I collected off the coast of Maine.
3) Sessile Ascidians.
These tunicates are so bizarre that they might make you think that some alien beings deposited them on Earth as a joke to confound us and deeply disrupt our theories about phylogenetic trees. Their outer “coat” or tunic is largely compose of cellulose compounds (and remember these are animals, not plants!, even though some of them like Styela montereyensis look very much like plants.
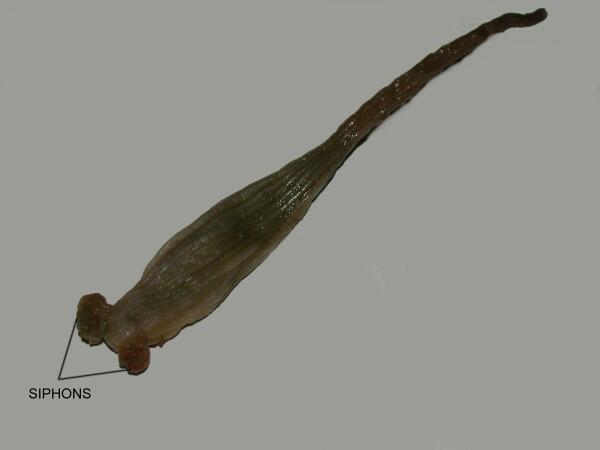
This specimen is about 8 inches long. These often hang down from rock faces, pilings, and even boats.
Ascidians have a heart that beats first in one direction and then after a bit reverses and beats in the other direction; this is controlled by 2 “pacemakers”. Some species extract the rare element Vanadium from sea water and, as a consequence, have green blood. (For you UFOlogists, clear evidence that they’re Martians.) Some species have spicules, but they are often difficult to isolate because of the composition of the tunic. You can’t use strong acids because the spicules are calcareous and will dissolve out. Caustics, such as, household bleach or Potassium hydroxide which are often very effective in removing animal tissue are not really effective on cellulose compounds. There is the enzyme cellulase which will dissolve a number of cellulose compounds but 1) it is not easy for amateurs to obtain, 2) it is not inexpensive, 3) it has a relatively short shelf life, 4) it has to be stored refrigerated, and 5) its effectiveness with ascidians is rather hit-and-miss. The best approach is to make some very thin sections and then, using micro-tools, do some very delicate micro-dissection. (ADVERTISEMENT: Watch for my article on The Joy of Micro-Tools which will appear in the miniature theater of Micscape on computers all over the world sometime in the next few months. Here I shall try to make the case that one can never have too many micro-tools.) I have found spicules in the leathery tunic of Styela plicata and in the colonial Didemnum.
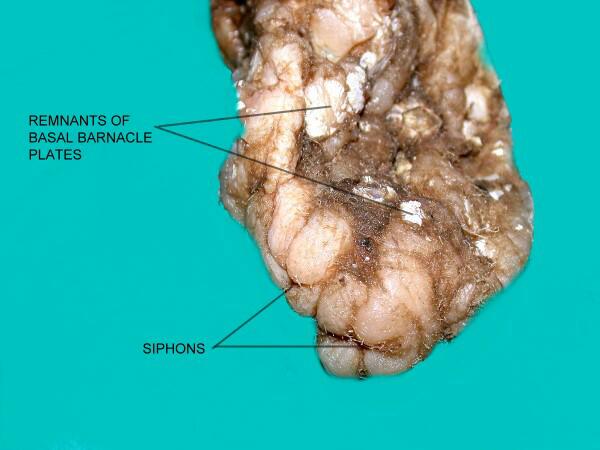
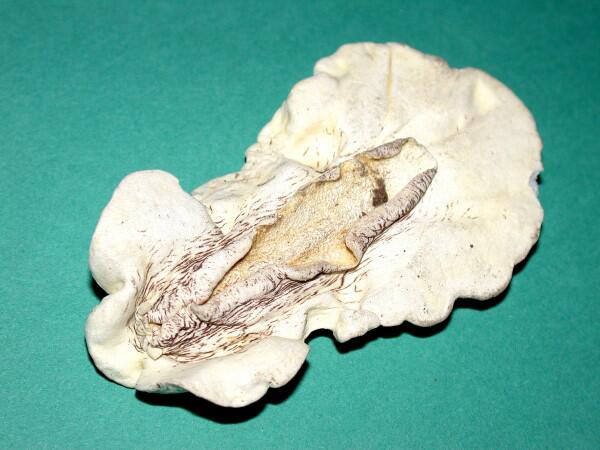
This rather unattractive creature is Styela plicata (the “chunk of brain tunicate” which I obtained from Florida and it is about 4 inches in length.


The 2 images above were taken about 30 years ago when I had only an old polaroid camera. The spicules, however, are clear enough. It’s amazing what microscopists will hang on to. These were sufficiently difficult to isolate that I haven’t had time to try again recently.
This is a small piece of a colonial tunicate called Didemnum of which there are over 20 species. The are an invasive organism which can be a significant nuisance since the form large sheets which simply overgrow substrates and other organisms.
It really isn’t clear how common spicules are in ascidians since 1) they are generally regarded as a fouling organism which can become a major nuisance, 2) they have little positive commercial importance, and 3) few researchers are interested in spicules, so perhaps it falls to us amateurs to fill in the gaps.
The quest for spicules is a quietly exciting one. It won’t win you any Nobel Prizes, but there is something highly satisfying about revealing a bit of beauty hidden away in the tissue of marvelous creatures which share our planet.
Oh, one last note. As I was writing this, I came across some additional images which inspired me to make this essay Part 1 and next month, you’ll get Part 2. One of my Catholic friends thinks I am not only obsessed, but possessed regarding the issue of invertebrate skeletal structures and has been quite annoyed with me that I won’t cooperate with his plans for an exorcism.
All comments to the author Richard Howey are welcomed.
Editor's note: Visit Richard Howey's new website at http://rhowey.googlepages.com/home where he plans to share aspects of his wide interests.
Microscopy UK Front
Page
Micscape
Magazine
Article
Library
Please report any Web problems or offer general comments to the Micscape Editor .
Micscape is the on-line monthly magazine of the Microscopy UK website at Microscopy-UK .