So here I am, in my final year of a Masters degree in Materials Conservation, wondering what on earth I am going to do as a specialist project. Then I remembered the microscope and slides.. Little did I think they would send me on such an interesting journey.
I first remember the microscope in the 1950s. I was a child, living in England and this instrument plus four boxes of slides was given us by an old family friend. I say 'old' because Ethel Jones (nee Ellams) always appeared old to me though as she died in 1988 aged 93 I realise she was then younger than I am now. She was a widow (and the story of this is interesting in itself) who was headmistress of a girls school and even at that time had no living relatives. We as children looked through the microscope a few times at the slides and left it alone. My father, a Methodist minister and always champion of the underdog, lent the microscope to a student and, according to him it was returned much later with 'bits missing'. He could never remember which bits and certainly of the various wooden clips inside the case, only the ring which would hold the brass container for another objective is empty though there are threads for a condenser which may never have been fitted.
When I went to university in the 1960s I did get out the microscope, realised that its low-power objective (its magnification is about 55X) was not really useful as I was doing microbiology with then state-of-the art oil immersion lenses and also that it had no condenser. And so the microscope stayed with my parents, through house moves and retirement to Norfolk whilst I lived in South America, Canada and Australia, coming home at intervals. On one such interval my father asked if I would like it, me being the only one of his four children who had studied science. Once more the microscope was hauled out, looked at, the odd slide put on the stage, and we discussed how we could look at the few 'for the Polariser' slides by using sunglasses lenses. The microscope case had no key so we strapped it up with transparent sticky tape and took it back as cabin baggage on the airline to our home in country Australia. The slide boxes travelled in a suitcase. For a few months we had the microscope out as a talking point and I even made a start at cataloguing the slides but then once again it went back into its case. And there it stayed till earlier this year, 2000.
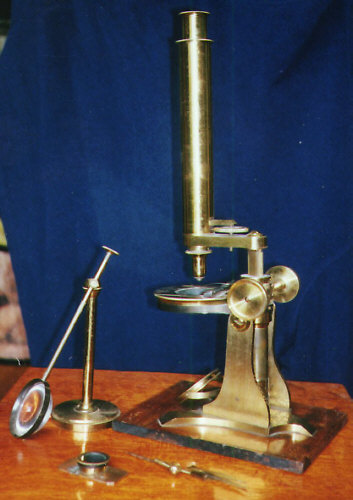
So now, for the first time, I really looked at the collection. We had always assumed that, as Ethel Jones was at Southlands College London early this/last century that the microscope dated from then or maybe slightly earlier. I seemed to remember she had been given the instrument but by whom? She herself was not a scientist and indeed had little interest in science subjects. Now if you could have studied Renaissance art with it, that would have been different! It was surprising to learn from searches on the Net that this model is around 1860-1870. Therefore when we played with it in the early 1960s we were probably playing with an antique. It is a Baker model with a circular stage but there are no serial numbers to help me any further and unfortunately there are no early Baker catalogues in Australia that I can find. Anyone out there with any further information?
As a conservator I do not recommend you hoe in to your antique microscope and take it apart but I will tell you how I went about it in case you want to make minor repairs without damage. I am indebted to Carey Ward of the Powerhouse Museum, Sydney, Australia for showing me the way. Often various pieces, in my case the fine adjustment screw and the stage turning screw threads, are stuck and these were freed with penetrating oil which was wiped off straight away once things were moving. These brass instruments are held together with screws which were often individually threaded and the metal is soft. Therefore jamming a screwdriver into the slot and trying to force things will only result in the metal giving way. The method is to get a series of old screwdrivers and to grind them down (I used a grinding wheel and carborundum) so that their heads fit neatly into the screw slots. Remember the screws may not fit elsewhere so make a diagram of where they went as you take them out if you remove more than one as you need to replace them exactly! I also noted which ground-down screwdriver I used. The brass of these instruments is lacquered, generally with shellac so you can gently wipe with cotton buds (that ever-useful tool of the conservator) either dry to remove surface dirt or dampened with distilled water (that used for steam irons is all right). Solvents such as methylated spirits will dissolve shellac and so any attempt to dissolve dirt should be made with petroleum spirits (white spirit) but again it's not a thing to slosh about. However as microscopists are used to dealing in small quantities and making slides, you are I'm sure, deft enough to handle small amounts of liquids. In this instance, in case anyone accused me of overcleaning and destroying historic dirt, I have kept all the swabs. There were small quantities of black lubricant on certain joints and this was cleaned off and replaced with white petroleum jelly on reassembly. (White is the purer kind).
I have heard of people who polish their brass instruments with various metal cleaners. If you have things covered with lacquer you have an uphill task as you'll need to remove the lacquer before you have any effect. However if you do have an instrument which is unlacquered for any reason then I would recommend Autosol rather than Brasso as it is kinder. Use cotton wool to apply and polish with cotton wool too. To keep it shiny you will need to lacquer again and there are special lacquers for brass. However you need to remove ALL the residue of the metal polish before you lacquer and with an instrument such as a microscope this is a very fiddly job with acetone keeping it well away from the lenses so I don't advise it unless you are very dedicated. Also remember that to remove the old lacquer may well reduce the instrument's value if you should wish to sell it. A museum also would prefer to see the original finish. Who knows what they may be able to find out in future by analysis of old lacquers? One other point to remember against excess elbow grease is that every time you polish you remove a tiny layer of the metal. Do you want to wear away your microscope just to keep it shiny?
Finally lenses. This is like coals to Newcastle, as I'm sure you microscopists are very well aware that when you take things down they go together exactly as you took them apart, matching up scratches or any other marks. Having said that I'm sure you also know that compound lenses which may get mould, water etc in-between are a job for an expert so PLEASE don't go unscrewing things all over the place and cleaning madly. You might end up with a very expensive bill to right your enthusiasm.
The base and case of the microscope were polished wood. Both were very dirty so were cleaned first with cotton wool swabs and distilled water then the residue of the transparent tape was attacked. The cellulose-type 'carrier" easily came off but the remaining adhesive proved a little more difficult. As it is a polished surface you can't use many of the solvents and I found that it yielded to gentle scraping with a blunt knife/spatula, Again let me emphasise that transparent tape on other objects such as paper or photographs cannot be removed this way. Conservation looks at the whole object - what is to be removed and from what (and if necessary!). After removal of the tape I then cleaned the case and base with British Museum Furniture Cleaner or Furniture Reviver. This concoction has varying names and proportions but I used the following. 1 part linseed oil, 2 parts each of vinegar, turpentine, and industrial methylated spirits (not the purple stuff!). It's put on with cotton wool and gently wiped off. Again don't be liberal with it and also don't rub madly. Change swabs when they get dirty. It will take layers of old polish off and really does revive wooden objects but be warned. If the wood is scratched through the polish the mixture will soak into the raw wood and leave a red-brown stain. Not unpleasing and maybe an improvement on the scratch but almost impossible to remove! Often after using BMFC you merely need to wipe over the wood with a cloth but other times a light polish brings up a better lustre. Today's conservators are often using Carnuba wax instead of beeswax as the latter can crosslink and go a different colour with age. However conservation is an evolving science so maybe something else will become the flavour of the month in the future.
 |
 |
|
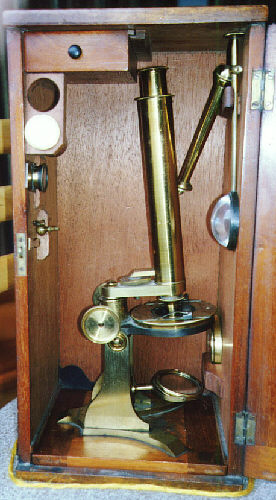
When stored as shown, the microscope is 38cm high from the base to top of the eyepiece. |
|
The slide collection consists of three converted wooden cigar boxes and one polished wood slide box purpose built. The latter has wooden trays with compartments, the former have hand-made trays of cardboard edged with matchwood. Everything was dirty though the lower trays were cleaner. I decided to catalogue the collection first.
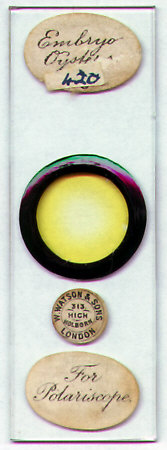
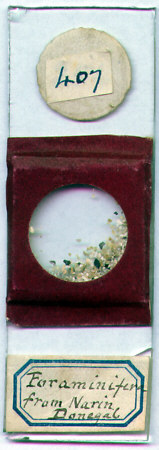
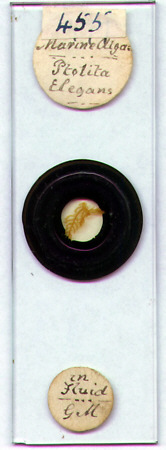
There I came upon a very interesting piece of information. Every slide had two numbers, one on top of the other. The tops ones were in blue/black ink and the lower ones, which in most cases could be seen in a raking light from the underside were in a black ink and a different hand. Neither handwriting matches that of Ethel Jones. (I am beginning to sound like a detective novel and of course archaeology does follow up clues and draw conclusions). Due to the efficiencies of a spreadsheet I was able to record both numbers, assign a location to each slide and comment on its condition. Though the 'top' slide numbers go up to the late 400s there are in fact only about 270 slides in total. The blue/black numbers I found had put the slides in order in rough categories - all seeds together, all spicules together, all zoophytes together etc. There were gaps in these groups and one large gap of about 200 numbers corresponding to one or maybe two boxes of slides. Remembering the teaching background of the previous owner it is interesting to wonder if these missing slides were used for students in her school and so were left there when she retired. The black numbers put the slides in any order which seemed to imply that the original owner had assigned the next number when he/she either made or bought a new slide. As the boxes bear the remains of labels in this person's hand showing the numbers which should be (but aren't) inside I assume that originally there was a catalogue. Of the few slides with makers marks the addresses correspond with a date of 1860-1870. Of course this is not proof, the makers could have sold 'old' slides or they could have come from another older collection. Most of the 'black' numbers of these professionally made slides are consecutive which could either mean they were bought together (though they are not all from the same maker) or were given to the owner as a batch. There are about ten slides labelled 'for Polariscope' or "P" though there appears to be no space for fitting the Nicol prisms needed for viewing them. Perhaps again these slides were given to the owner from a previous collection and never used?
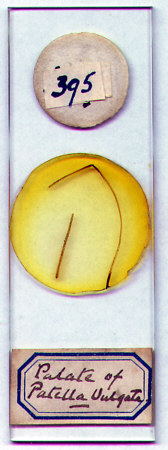
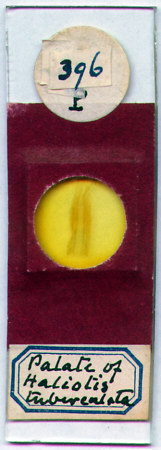
The slides are mostly hand made. One method used a coverslip directly over the specimen which we think was mounted in Canada Balsam. I have done infrared spectroscopy on samples of this mounting medium and compared it with modern Canada Balsam and the trace is very similar. Unfortunately I have not had time to investigate this fully as I live miles from a spectrophotometer. Also I would need to do ageing tests too as the mountant will doubtless change chemically over a century.
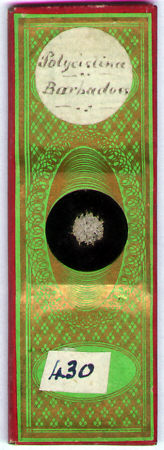
Other slides have cardboard mounts with either the specimen free to roll, soaked in mountant or glued to the back of the slide (the glue has not yellowed unlike the Canada Balsam). Almost all these slides have maroon mounting tape over them
There are a few paper covered slides and we all know that you could buy sheets of patterned paper so these too could be hand made.
Three slides are smaller which has been suggested means they are foreign as the slide size was standardised very early on in England.
The labels are all hand lettered - the professionally
made ones in better handwriting than the home made ones. At times I had
difficulty in reading them and I know that in the past century classifications
have changed even if the owner spelled them correctly in the first place.
I have not yet had the time to check up on all these names but I think
of it as a project for the future. If anyone has a specialised interest
in classification then I would be delighted to send them the list of names
on the slides.
How I cleaned them
With conservation of something which might be put
to use there is always the problem of how much you clean it. If this slide
collection were to be put into a museum then only enough cleaning would
be done to ensure things did not deteriorate any further. Thus would consist
of proper storage in correct light levels and humidity, removal of surface
dirt (generally) and protection of the object by some sort of package or
cover. With more and more study being done on the background of objects
you always have to wonder if the dust you are taking off could be analysed
in the future to yield much valuable information. However in the case of
a slide collection which might be used then such cleaning is not enough.
You all know you cannot look through a dirty slide! So each slide was cleaned
with cotton wool swabs, distilled water and a tiny drop of detergent, then
wiped dry otherwise I found tide marks were left. I realise that often
slides are swabbed with alcohol before being put under a microscope but
this I felt might be too damaging to the tape and labels. Again I kept
all the swabs.
So what now?
This project has opened more lines of enquiry that it closed. Who did own this microscope? Why did he/she collect the various specimens they did? How often did they look at the slides or did their main interest lie in collecting and making them? How did the microscope get into the hands of Ethel Jones? Maybe some of you can help to answer these questions.
Meanwhile I plan to make a short description of
the processes I have done and the information I have found out and put
it, folded up, in the empty slide drawer in the microscope case. My gift
to the future!
Acknowledgements
I am indebted to all the following people for sharing their knowledge. The mistakes are my own.
Mike Dingley of the Australian Museum, Sydney,
who is president of the Australian Postal Microscopy Club.
Bill Ells, a regular contributor to Micscape who
has been very encouraging all through this project.
Julian Holland of the Macleay Museum, University
of Sydney.
Jean D Portell of the New York Microscopical Society.
Dr Richard Thomas organiser of the Masters in
Materials Conservation programme at the University of Western Sydney. We
study by distance education and meet twice a year for intensive courses.
I also thank Prof Samuel B Adeloju of the University's Civic Engineering
Dept for giving me permission to use this information which was done for
a university course.
Carey Ward of the Powerhouse Museum, Sydney
Comments to the author Hilary
Wright are welcomed.
Illustrations
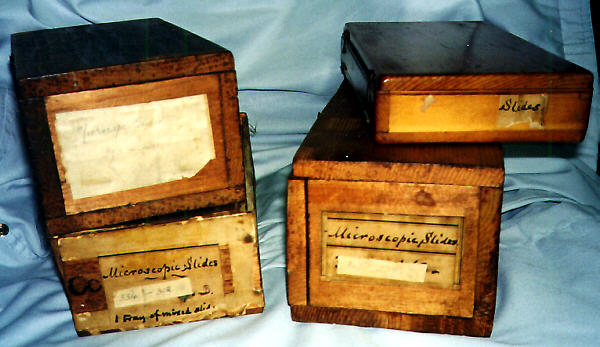
The slide boxes closed.
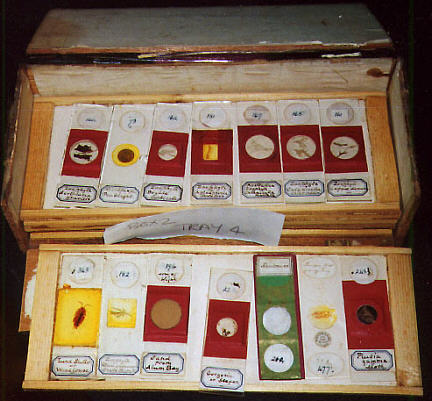
One of the boxes open during cataloguing
-
shows the slide types.
Examples of the slides
| A slide with a makers name and address. |
 |
A paper covered slide |
 |
| A simple coverslip mount |
 |
Slide with cardboard mount and mounting tape. |
 |
| Slide with cardboard mount, specimen free to roll. |
 |
Slide with ring mount. |
 |