 |
 |
 |
This highly
enlarged imagery reveals
compounding effects of compression artefacts after several 'save to disc' operations in jpg format |
| Post
Photographic Improvements (2)
JPEG/BMP image storage/White Balance/Resizing/Sharpening By Paul James (UK) |
The following observations and tips have been simplified, but should provide some useful information for beginners.
Image Storage/Compression
If an image is to be manipulated
in any way, it should be saved as an uncompressed
copy to disc in a format such as 'tiff'
or 'bmp'. The reason is that artefacts resulting from compression, using
'jpg' and to a lesser extent 'gif', will be compounded every time the image
is saved in the compressed state :-
|
|
|
This highly
enlarged imagery reveals
compounding effects of compression artefacts after several 'save to disc' operations in jpg format |
The golden rule therefore is :-
Always save uncompressed after manipulation, then compress a copy if necessary.
I stress copy because it is entirely possible to 'lose', or ruin an original image.
Thus when a digital camera's image, which is normally compressed to make maximum use of card space, is downloaded to a PC's Hard Drive, it will still be in that compressed jpg format. It is after manipulation in imaging software that the golden rule applies, and when stored on Hard Drive it should be left as such ie 'bmp' etc.. Since the PC's HD memory capacity is far greater than the camera card, it is of little importance.
I use 'bmp' for storage prior and after manipulation, and only compress if absolutely necessary, either for web use or because of HD space problems, and then the compression is usually light, say between 50-70%.
White Balance
Digital images can often suffer from white balance problems, sometimes caused by forgetting to alter the camera's settings in the image capturing stages. White balance is simply the correction the camera applies to a captured image, which it might need in certain lighting conditions, to yield an unbiased white in a particular light, such as tungsten or daylight.
In other words if some part
of the image is white, the camera's white setting should reproduce white
in the saved image. But even when left in AUTO mode the white balance can
be biased. This can have a most pronounced effect on colour balance, so
it ranks as being an important issue.
 |
 |
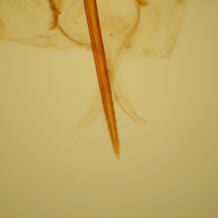 |
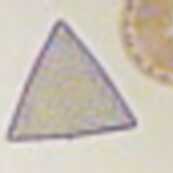
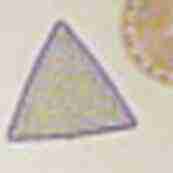
The image of a bee sting above (left), is one taken with tungsten setting in the camera because the microscope's lighting is of the filament type producing a larger proportion of red, so the image processing in camera needs to de-emphasise this . The in-camera white calibration has been set too. The result is an accurately portrayed field etc.. To demonstrate the results from different white balance de-emphasis in other settings, I include the other two images which were taken using the 'flash', and 'sunny' settings.
It is extremely important to attend to the white balance setting in your camera, because failure to choose the appropriate setting will elicit colour effects which, like those above, can be very hard to correct without significantly altering the colour rendition of the specimen.
The main problem with microscopic imagery, and in particular in brightfield, is that any colour adjustments in the PC will also affect the field hue. My first digital camera had no manual provision to alter white balance, and it was difficult to correct, as some images in my first few articles will attest !
Resizing and Sharpening ( And compression for Web use )
I have combined these three operations because they are somewhat interlinked.
If an
image needs reducing OR increasing in size, it is best to use the re-sampling
feature of your software, because the results are generally of better quality
(left). The resizing operation is quite different, and often, but not always,
leads to a pixelated image (right) :-
 |
 |
Often, large megapixel digicam images can be successfully 'resized' when requiring smaller images, which involves a speedier process in which unwanted pixels are simply 'thrown away'. The resulting image can be quite good, and requires little or no sharpening.
Resampling
involves more complex mathematics in the software program, and will yield
a pleasant yet softish image which can be successfully sharpened to restore
to its original condition before resampling. A word of caution .............try
not to over sharpen an image, which is tempting and easily done, especially
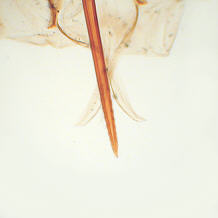
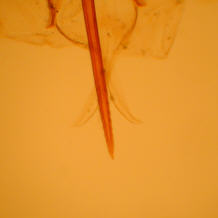
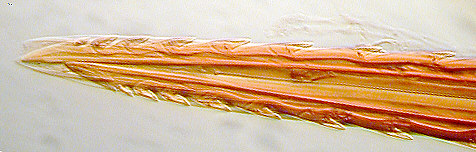
in the first few trials of image manipulation. Here is a close up of a
bee sting image in oblique lighting:-
 |
Resampled from 1600 x 1200 pixels
to 800 x 600 pixels, then cropped, tone balanced, and then sharpened very slightly to retain original view. |
 |
Note coarser texture of this over
sharpened version. Too much sharpening yields 'chalk dust' like that seen here. |
Web Imagery
Images sent via e-mail to friends etc. need special consideration. Since 56K modems are still the norm, it is a matter of Web etiquette that images sent for illustration purposes only are of reasonable size. File sizes will depend on the image's dimensions, number of pixels, sharpness and detail density, and finally the degree of compression. This a complex operation to do well, and by that I mean to produce the smallest file size commensurate with the best quality, allied to the speediest uploading/downloading on the web.
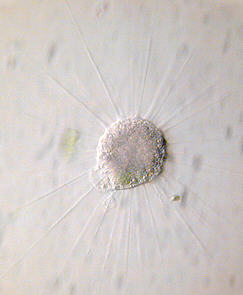
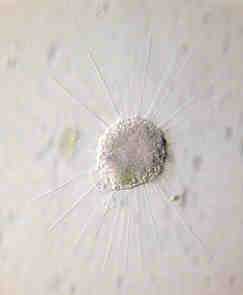
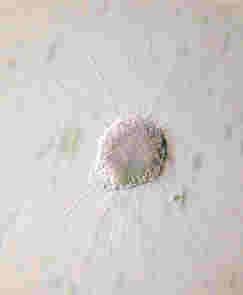
Here
are the results of what jpg compression did to a small 50k bmp image (Actinophrys),
when compressed to different jpg file sizes :-
 |
 |
 |
|
Just about acceptable |
Showing definite degradation |
Useless. |
The 10k is almost identical
to the original 50k image ( not shown ), but the 5k version is showing
definite signs of degradation, particularly with the radial axils. The
2k image is of course no use. Therefore it seems that for an averagely
detailed image, the resulting jpg image can be no less than about 10% of
the original. This should be taken as the limit for most purposes, but
the detail density will make very large differences to the final
file size. Here's an example of what happens when the image has low overall
detail density :-
 |
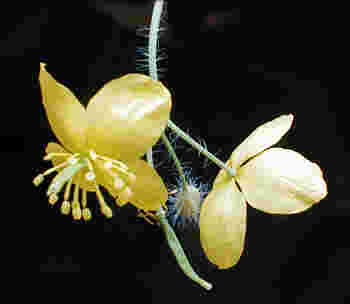 |
The image left of Greater Celandine was compressed from a 312k bmp file to 21k jpg, and is quite acceptable because there is no detail in the background and therefore the overall quantity of detail is low. At even a tiny 5k jpg file size the image right shows remarkable information, though obviously far too coarse.
Important Tips
1) Care must be taken during manipulative operations to save repeatedly any changes made to hard disc. The reason is that if your PC crashes during manipulation, all your unsaved manipulative work will be lost. Therefore make a conscious effort always to save each stage of the operation to hard disc. There is nothing more frustrating and annoying, after having spent much time making many changes to your image, than to make an irreversible mistake which affects all the previous operations, because you have to revert back to the original image. Saving to disc every time, especially when operating the airbrush/drawing tools to remove flaws etc., pays dividends. Remember that the Edit menu's 'UNDO' feature cancels only the last operation, and not previous ones.
2) I have installed a second hard drive on a spare IDE channel, which I use for back up, and I keep uncompressed copies on it of the most important images. It is unwise to keep any important files in the 'C' drive partition only, as failure of the operating system will require re-formatting of that drive with the loss of all you work. Partitioning of main hard discs is now quite common (or should be), and even dumping imagery and other files to a spare partition is preferable, should the operating software fail. CD burners do have their advantages, especially for imagery, though I prefer a second hard drive for speed and convenience in editing.
| All comments welcomed to Paul James |
Please report any Web problems or offer general comments to the Micscape Editor.
Micscape is the on-line monthly magazine of the Microscopy UK web site at Microscopy-UK