 |
| Tube length, Coverslips and
Correction Collars A brief skip through the theory and some tips for those embarking on higher power imaging By Paul James (UK) |
Basics
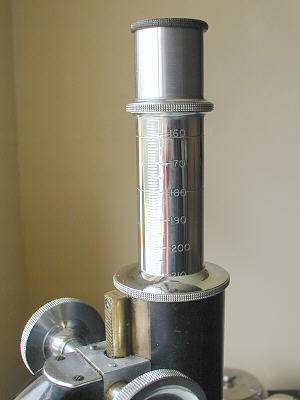
In days of old, in brassy microscopical terms anyway, the microscopist would have owned a monocular stand which sported a drawtube : a simple tube length altering device which housed the eyepiece :-
|
This telescopic like fitment was originally developed to increase the overall magnifying power of the instrument, which it certainly did, but its singular and true purpose in more recent times is to place the eyepiece at such a distance from the back of the objective that the spherical aberration from the latter is kept to a minimum. In short, objectives started to be manufactured with a specific light path length which governed the distance between the back of the objective and the eyepiece. Of course initially there were different light path lengths ( tube lengths : TL's ) but eventually the now standard 160mm TL was adopted by the vast majority of microscope manufacturers. Former figures of 10"/250mm 210mm 180mm and 170mm have been used and now remain history, though there are hundreds of 170mm TL Leitz Objectives still imaging healthily from amateurs' objective turrets !
Presently, objectives are made to DIN standards which requires adherence to the 160 mm TL and also that they can be used on any stand also manufactured to DIN standards, thereby assuring parfocality. Infinity corrected objectives are the norm in most professional applications but this need not concern most amateurs.
The light path through a binocular head is usually more than 160mm, so optical compensation has to be either built in to the stand or binohead itself. This results in most binocular heads having an amplification factor of x1.25 , as a direct consequence of having to have an internal 160mm TL correction optic.
Coverslips
The 160mm TL designed into the bright field transmission biological objective takes into account the very important principle that a coverglass is part of the optical system. The sensitivity to variation of coverslip thickness intensifies when objectives of high powers are used. Low power objectives have little or no sensitivity to varying coverslip thicknesses.
The most sensitive is the dry x40 high aperture apochromat and fluorite objective. Here we have a situation where the coverslip thickness is a very critical part of the optical lightpath, and if it deviates from the standardised 0.17mm then the image will not be at its best. The mountant thickness too makes differences to the quality of the image in much the same way. (Almost immune from the vagaries of all this are the immersion objectives, and unless working over an unusually thick or thin coverslipped preparations they perform well).
To resolve this coverslip thickness problem which is ever present in day to day observing, the manufacturers have installed in the sensitive objectives a device known as a correction collar. It is essentially a revolving collar that adjusts a part of the internal optic block in relation to the rest. By so doing it is possible to correct the objective's spherical aberration to a minimum for that particular slide under observation. Adjusting it accurately however is another matter !
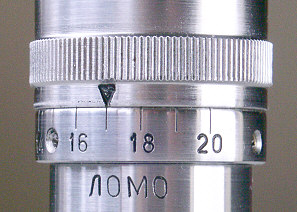 |
A Lomo correction collar set at 0.17mm |
Correction collar adjustment
There are basically 3 methods of adjusting the correction collar :
1) By simply setting it to the estimated coverslip thickness on the barrel.
2) By observation of the image's change in quality of detail.
3) By observation of the image's 'out of' focus condition of a speck of dust.
1) Adjustment by Observation.
If your slide under observation has a coverslip of known thickness and the specimen is directly beneath it with virtually no intervening mountant thickness , then just set the collar to this thickness ie '17' ( 0.17mm ). Check however the collar's accuracy using the next method if you have your doubts about the collar's calibration accuracy.
2) Adjustment by change of image quality
Simply alter the collar's setting till the detail is as sharp as it can be, which will entail constant refocussing with the fine focus. Can take time to get right.
3) Adjustment by observation of dust speck etc..
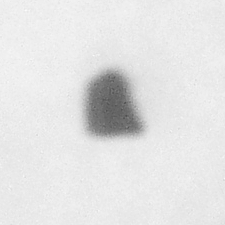
This method is not easy but when performed properly is the most accurate. Choose a tiny speck in the field you are currently observing....... the darker the better. Make sure it is in precisely the same plane of focus as the detail you want to optimise. Bring it to the centre of the field and examine the change in the out of focus image of the speck on both sides: that is, raise and lower the stage with the fine focus control just sufficiently to compare the two images.
Ideally they should be identical, but more than likely one image will show a more persistent central zone and also possibly a dark smoky ring, and the other a vague foggy resemblance of the original speck :-
Highly enlarged view of typical unequal out of focus images of speck in BF.
 |
 |
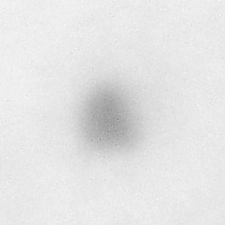 |
| Speck in focus | Slightly off focus up | Slightly off focus down |
If this is the case the collar needs altering to correct this condition, so both images on both sides of the focussed position look identical
Limitations of the drawtube in a monocular stand.
In a monocular instrument the tube length can be altered to nullify this. If for instance the smoky ring is seen when the body is raised then the drawtube needs extending because the coverslip's too thin. The reverse is of course applicable, though the drawtube in most monoculars it seems is limited to about 150mm so not much can be done with very thick mountants or coverslips ? This is a moot point because it is much more likely that the total coverslipped thickness including any intervening mountant be greater than the standard 0.17mm in which case the draw tube needs reducing. Since this is severely limited in the conventional monocular instrument it appears that the microscopical community and the manufacturers in the earlier days have overlooked an important feature of microscope construction which beggars belief but it is unlikely that a thinner coverslip/mountant thickness less than the 0.17mm will be encountered. Fortunately an objective with a correction collar can be used on the monocular too.
The correction collar is capable of encompassing greater degrees of coverslip thickness variation than a draw tube and is therefore the better method of nullifying spherical aberrations, but comes at a price.
The amateur binocular user is restricted to using either 160 or 170mm TL objectives depending on the stand, but this is no inconvenience since very few non 160/170mm optics are in current use. Whilst it seems a little improper to ignore the difference of 10mm between the Leitz 170mm and standardised 160mm TL, in reality the difference is even less than this, and therefore the 'blending' of both optics on one microscscope whilst imaging the light through varying coverslip/mountant thicknesses can be ignored for all practical purposes. Put in another way the variations of mountant /coverslip thicknesses encountered in general use require more corrective adjustments than the '10mm' difference between the two types of objective.
Care of Correction Collared Objectives
Correction collars have been in use for over 100 hundred years now, some appearing on the early Zeiss apochromatically corrected high power x 40 objectives and the like. One common problem is that the collar can become stiffer or turn irregularly. If this is the case the very last thing we must do is oil or grease the mating surfaces without giving thought to the consequences. There is a great likelihood that the more volatile fractions of the oil or grease will creep into the internal optics. If needs be then the grub screws can be loosened and the collar should be turned/raised to reveal the 2 rubbing surfaces which will need cleaning. NB. always make sure the original orientation of the collar with the inner body is retained when reassembling which has to be done extremely carefully. Lubricating the surfaces with the tiniest portion of a suitable none creeping grease is recommended as the last ditch cure. Two brass or bronze mating surfaces should slide smoothly if they are clean and free from aged lubricants. It is certainly a good idea to rotate correction collars now and again so as to keep them free, as they can become slowly seized up with neglect and lack of use.
If in doubt sending it to a competent technician for repair is the safest option.
General usage of collared Apochromat and Fluorite Objectives
Setting the collar to around 0.17-0.18mm will satisfy the requirements of most slides and unless severely testing detail is encountered, this can be left as such. I have found that I forget to alter the collar occasionally which tends to demonstrate that this tweaking is only noticed in difficult situations as in the rendering of diatomic structures.
Objectives such as the ubiquitous x40 na 0.65 achromat do not require a correction collar since they are much less sensitive to coverslip thickness variations.
Conclusion
The understandable desire to possess the best resolving optics should be tempered by the worldwide experiences of countless microscopists who have found that moderate aperture in most objectives yields very good imagery for easier all round use for a given cost as they work well without correction collars in situations that present varying coverslip and mountant thicknesses etc. The simple fact that manufacturers have reduced the popular x40's achromat's aperture to 0.65 na over the last 50 years or so (formerly as much as 0.85 na in Victorian times) reflects this trend.
Coaxing the best from any objective is the priority for any microscopist, and there is no getting away from the simple fact that substage illumination and manipulation in its fullest sense is so crucial to success. The problem of coverslip thickness in general usage for the majority of microscopists can safely be ignored for all medium/low power use, but those keen to reveal the ultimate in diatom detail etc. must pay the price both financially and in time consuming adjustments, to satisfy their quest.
In the final analysis, my personal thoughts on this matter suggest that of all the choices of x40 dry objective that are available, the most satisfying in all respects is the standard x40 fluorite whose aperture at around 0.75 na, excellent colour correction and relative insensitivity to coverslip and mountant variations scores highly in imaging quality and convenience of use. Lacking a correction collar has rarely ever been an issue in its use.
| All comments welcome by the author Paul James |
Microscopy
UK Front Page
Micscape
Magazine
Article
Library
Please report any Web problems or offer general comments to the Micscape Editor.
Micscape is the on-line monthly magazine of the Microscopy
UK web
site at Microscopy-UK