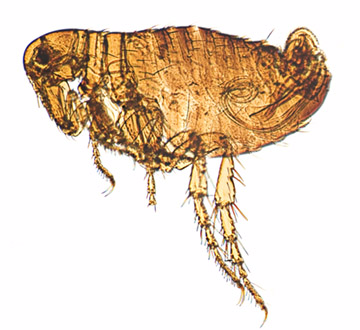
Pediculus humanus,
Magnified 7x
Pediculus humanus,
Magnified 7x
Investigating alternative imaging routes by Jesse Sommerlatt
|
|
Very well, indeed. This page is not about microscopes, per se, though it is involved with the same general initiative as those of earlier investigators of the microscopic world. With this page I intend to canvass the materials, processes, and procedures I used to achieve the results I have without using a microscope. As well, I think it would be wise to discuss what did not work, so that the reader may avoid repeating similar mistakes, and further the photographic yield. Below is an example; all of the photographs, including the image below, were taken with a Nikon D1-X using a PB-6 bellows, and a Zeiss 25mm thimble lens. |
|
Pediculus humanus,
Magnified 7x
|
|
What didn't work The initial attempt at lighting failed; I used a light box. This light box is a large rectangle, inside of which is a tube of fluorescent bulbs that wrap around the perimeter. On both front and back surfaces (top and bottom), there are white diffusion screens. The light box failed for several reasons: First, the total light output required a shutter speed over a second, even with the aperture wide open. This invariably led to camera vibration, and therefore produced unacceptable images of inferior quality. Second, the white balance feature in the camera adapts more readily to tungsten sources, rather than fluorescent lights. Simply put: since slides tend to be of one specific hue, fluorescent lights are not a wise choice for lighting microscopic slide samples. Third, the light boxs diffusion panels have a plastic base. This meant there was sagging when focusing or adjusting delicately, and this is simply troublesome and laborious. While I have used a light box in the past, with great results, I think that the results from this experiment are mottled, and the whole process is quite tedious. |
|
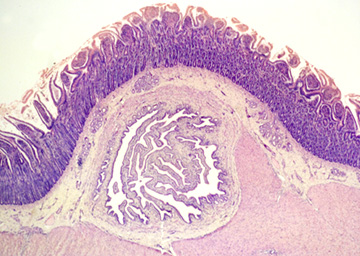
Examine the image to the right to see an example of the quality produced by the fluorescent light setup. This is a cross section of a small intestine housed in a slide. This image lacks the true dynamic range possible with the subject, as well as lacking the finite detail possible with a more powerful light. |
|
|
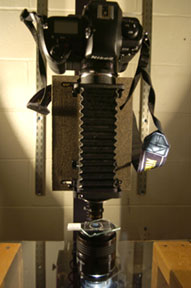
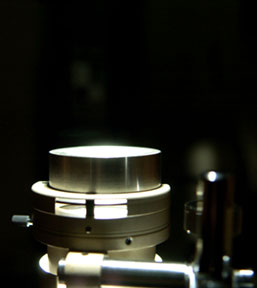
What did work The next day, after spending the majority of the night entertaining equations and formulas, I abandoned the fluorescent lighting technique. The next setup I attempted worked, after some finessing and fine-tuning. The idea was simple: increase the light to avoid longer exposures, introduce a more palatable light source for the white balance to adjust to, and devise a system that I can repeat. The solution was a tungsten light, which is used as a microscope light. The options available with the microscope light allow the photographer to change the focus of the filament, the voltage of the light, and the intensity size of the beam (using an aperture on the front of the light). Below, a picture of the lighting arrangement. |
|
|
|
|
The whole arrangement worked on the same principle as a common microscope, but without the device itself. If the procedure is deviated from (uneven illumination due to off-axis lighting), it will decrease image quality. My aim within this project was to investigate alternative means of imaging. I am in no way purporting that this setup is optically pure, since there are three to four lens elements, and two to three pieces of glass before the light enters the lens. Yes, there is bound to be some refraction present that one will have to allow for. A needle allows the handler to gently move slides.
|
|
|
|
|
|
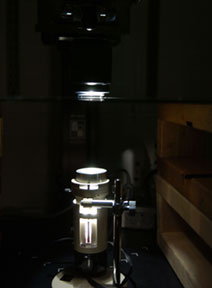
The process and set-up I shall review the steps necessary for creating the lighting set-up. To achieve this setup several factors must be monitored for absolute effectiveness: everything must be on axis, from the light source to the film-plane; everything that should be level, must be level; everything that is translucent should be clean and dust-free; any piece that can be mounted or anchored should be. Vibration is not welcome in photomacrography set-ups. A microscope light is placed on the bottom of the arrangement, pointing up (on axis); this should be verified with a bubble level. Next, build a stage high enough above the light to eliminate heat as an issueafter all, cooked eggs wont yield new hens. The filament should be focused below the base about one centimeter to achieve a modified form of Kohler lighting. |
|
Once focused, one must place a lens on the base. I placed the lens facing up, and opened the aperture to its widest setting. There are several reasons why one would choose to use a photographic lens. If the lights have been set up prior to the placement of the lens, and the lens is level on the bottom (screw mount lenses tend to have a level surface), then one has an excellent stand for the actual slide itself, a stand with a fine focus adjustment. In addition to finer focus, the combination of the microscope light/lens lighting system reduces flare in the whole system, as most of the light is parallel; less light escapes through the light-to-lens setup, and any light that does will be blocked by a mask. |
|
|
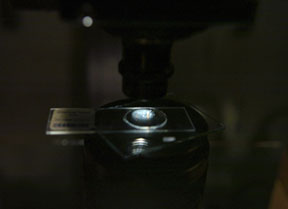
The next step involves visual analysis of the illumination in the viewfinder. Always check the camera system to see if it is level; both the x and y axis. A simple solution for all of this requires fastening a plumbob to string, and tying it to the camera mount. Where the weight falls is a good indicator of where to place the lens, (though one may have to move it forward or backward). Once the system appears on axis; a slide is placed on top of the lens and the camera is focused to a rough measure on the specimen. Once done, examine the illumination in the viewfinder: Is it even, are there any color aberrations present, can you see the image of the filament? If the illumination is not even, then one may need to open the aperture on the microscope light or adjust the light/lens relationship. The power voltage control on the microscope light should allow for one to raise the light levels. A simple way to check for even illumination requires one to trip the shutter, and examine the results, though it may seem pertinent to check the exposure for the subject. I have found that over and under exposures allow me to check for even illumination with a finer precision. If even illumination is achieved, then shooting may commence. Of course, one should take note not to bump the light source, the glass, the lens, or the camera; each element in the set up is in a delicate relationship with each other element, even a sneeze could be a hurricane. |
|
Lastly, I would like to note the use of a condenser. The images of my lighting setup presented here have included a condenser, this allowed me to work at lower magnifications and still achieve even illumination in the field of view. The condenser widened the cone of light. One might want to consider keeping a condenser ready in the event it becomes necessary.
|
|
|
Throughout this project I have learned several
things: I now realize that one subject has
many charcteristics that a photographer may
wish to highlight or emphasize, and by doing
so define the subject according to that
particular lighting technique and perspective.
I learned that alternative methods do exist;
not in a stockroom warehouse, nor in a closet
in the rear of the lab, but within the means
of those who have the need to explore and the
mind to investigate alternative methods for
the clarification of subject samples. |
|
|
|
|
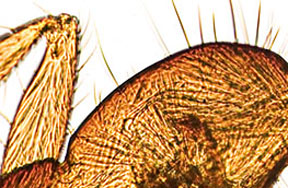
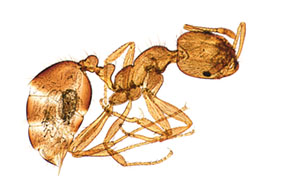
Ant: Lefthand image (5x). Righthand image, a close up (13x). This article was written by J.Sommerlatt, a student of the medical imaging world and fellow traveler. To Contact Mr.Sommerlatt: jds2047@rit.edu |
Return to index of articles by
students on the 'Principles and techniques of
photomacrography' course, November 2004,
Biomedical
Photographic Communications (BPC) program at the Rochester
Institute of Technology (RIT).
Article hosted on
Micscape
Magazine (Microscopy-UK).