Renovating Zeiss Pol Objectives
J. Gregory McHone, Grand Manan, Canada
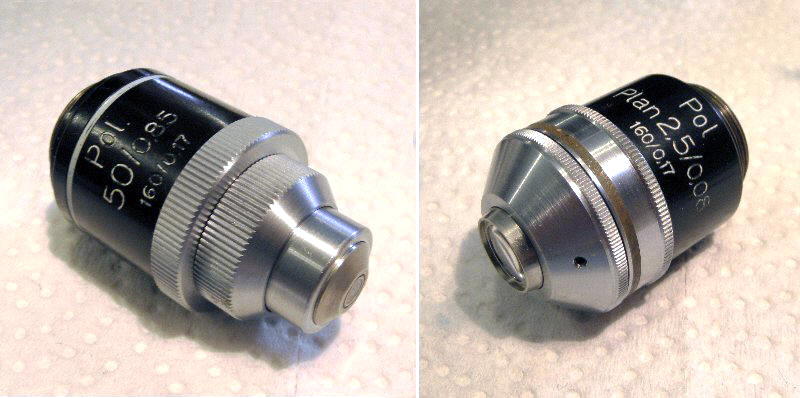
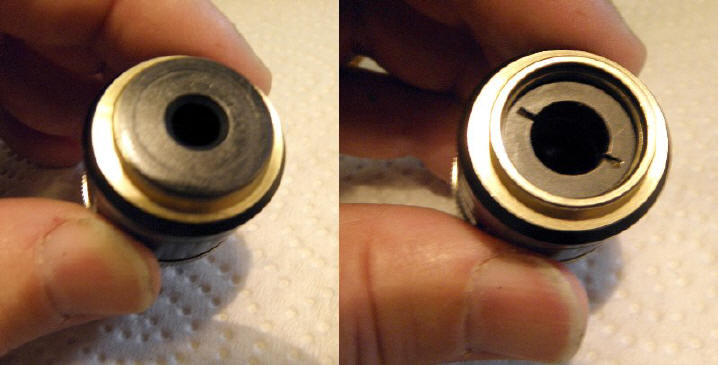
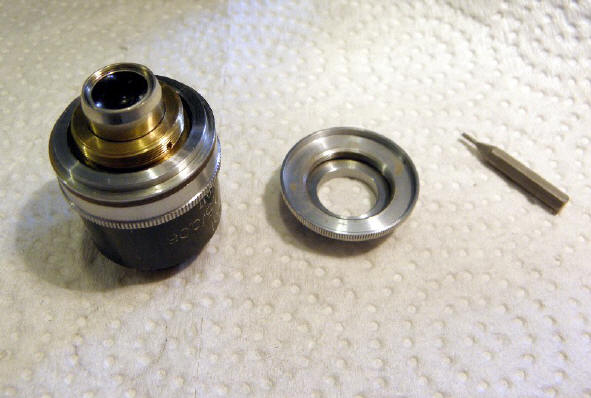
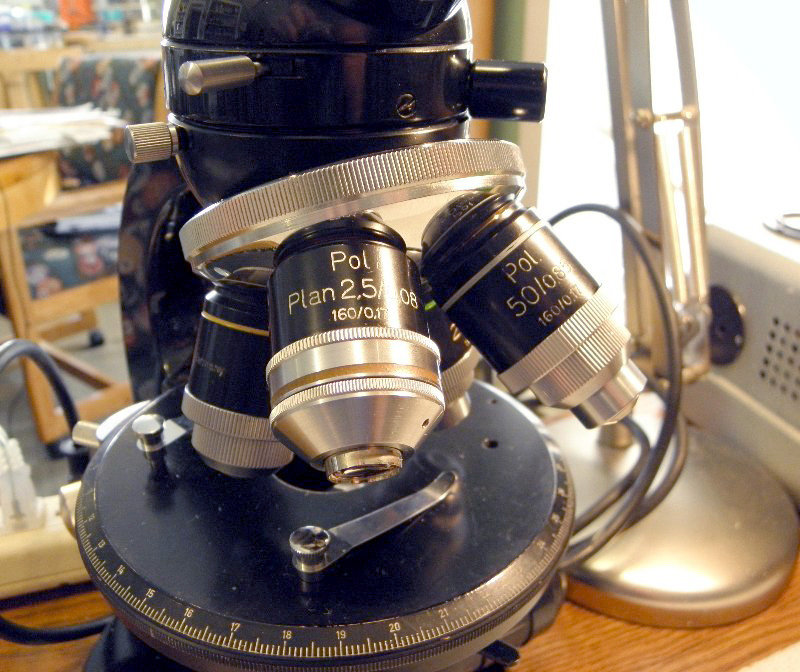
My latest microscope renovation project involves a Carl Zeiss (West Germany) black enamel Standard Junior Pol, which was a popular lab and student model in geology programs of the 1960s (my era). As always with Zeiss, the same fine quality found in their high-end research scopes also shows in the design and construction of this simpler model, including the same optics. I had on hand a set of four older Zeiss pol objectives that are appropriate for this instrument, and like the stand, these also needed work. Because their problems are common and might be something you also encounter, I will describe the steps I used to renovate two of these objectives: a 50x and a 2.5x (photo above).
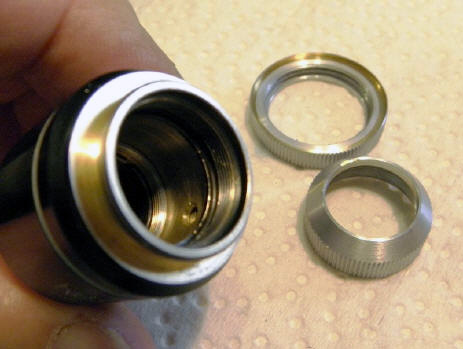
Zeiss often included the name of Winkel in their earlier pieces, which was true of three of my objectives. Their style is slightly different from newer versions, with wide stepped serrated rings and straight tube ends, as seen in the cutaway below and in my top left photo. Lettering on the older tube exteriors is in white, with a color band to signify the power. Later versions of Zeiss polarizing objectives have cone-shaped ends and narrow serrated ring bands, with red tube lettering. My 50x objective is the old style, but my 2.5x objective has the newer shape although still with white lettering (top right photo). Their construction is slightly different as well, which is why I am describing both. As far as I can see, the optical quality of both styles is similar, and very good.
This is more hobby than business for me, and it is usually enjoyable, but it sometimes happens that I do more harm than good when I get in over my head! And as you may know, these objectives are rather expensive. I don't worry too much about damaging a part that is useless as is, and not cost effective to send away for servicing. If your Zeiss pol objectives need repair or maintenance, and you lack enough tools or time or foolhardiness, by all means send them to a professional technician. Also note the warnings in instruction manuals that objectives are not to be opened or repaired by users, but must be sent away for service. However, if like me you are stubborn, tight with your money, and enjoy the challenge, this can be a useful learning experience, and it is very satisfying to convert a part from low value back to high. Just remember, if a disaster occurs you must blame yourself, not me!
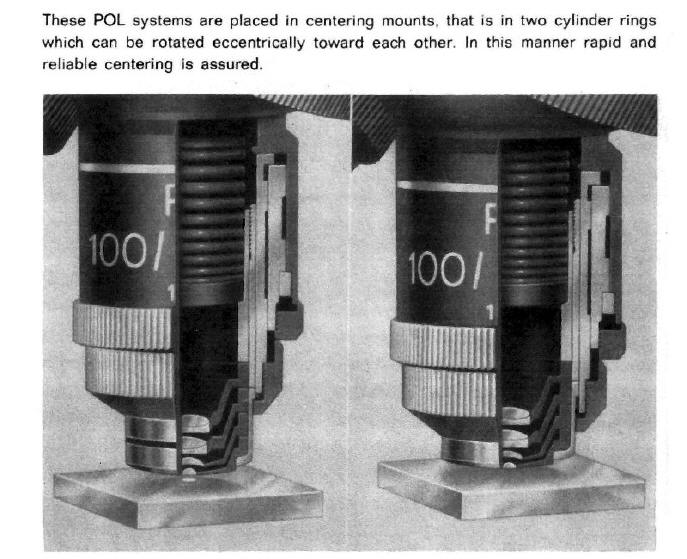
From the 1960s through 80s, 160 mm tube length Zeiss polarizing microscopes used special strain-free achromat objectives that could be individually centered to the circular stage. Their mechanics involve internal coaxial brass tubes with ridges that are slightly canted, so when they are rotated, they act as cams to slightly move the lenses in two directions. Serrated rings attached to the tubes turn them against one another to move the view until it is centered. The cutaway view below is from a 1960s brochure describing Zeiss polarizing microscopes. It is a clever and useful design, although not without some negative aspects, as I will discuss below. The higher power objectives have an internal spring to cushion the nose against accidental contact with the slide, which happened frequently in my student petrology labs!
It is certainly very convenient to be able to center each objective at any time, without looking for little wrenches that so often get lost, or messing with the stage. When they are like new the centering rings move smoothly, but as you turn the nose turret to switch objectives, it is all too easy to rub your hand against them so that the centering you so carefully set is ruined. As you can see in the cutaway diagram, there is a lot of contact between the internal brass cylinder tubes, so a thin layer of grease is necessary to provide proper lubrication. As for most microscopes of this era, the original grease gradually thickens over the years, so that movement becomes stiff and difficult. Unless it has been taken apart for cleaning and new grease, it is common now for Zeiss pol objectives to be difficult or impossible to center. Given the large contact areas of these internal tubes, solidified grease caused one or both rings to freeze tight in all four of my objectives. You can sometimes get them moving again with some solvent injected around the ring bands, some gentle heat, and a lot of effort. But a good long-lasting fix requires disassembly, cleaning, and new synthetic grease of the proper viscosity. This became my task, and I will illustrate the work performed on two of my objectives.
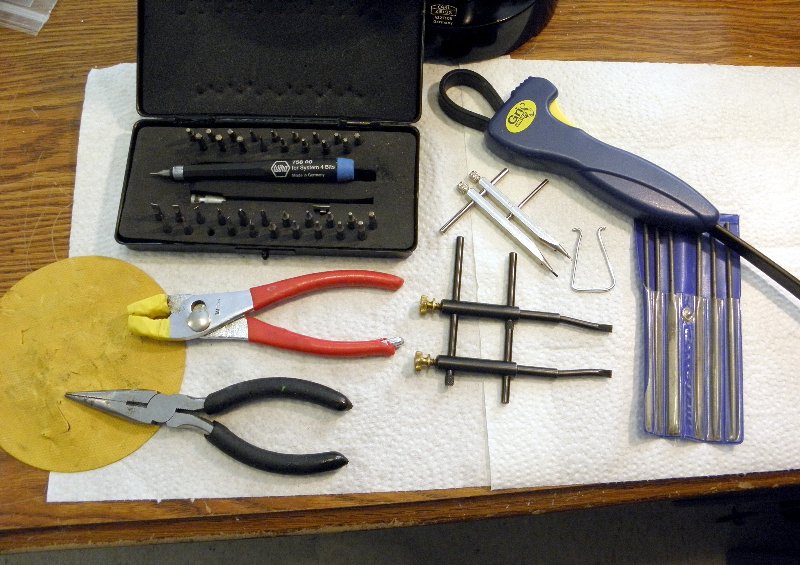
Preparation. Proper tools are a necessity as well as a convenience. They are not all that expensive, and good ones will last, so if you wish to maintain your microscope yourself, you really should invest in the right tools and materials. I bought some of mine from a small tools internet store in the USA. Brands will vary in different countries, but you can probably find similar tool and materials wherever you are.
My small bit set is by Wiha, a fine German brand. It has a good variety of tiny driver bits, which you will need. I used two sizes of spanner wrenches to engage slots on ring nuts, but I had to make another from stiff wire cut and bent from a large paper clip, to fit inside the objective. The yellow rubber pad is borrowed from the kitchen, where it helps to loosen jar caps. The small files plus fine steel wool are needed to smooth small nicks and burrs caused by me when my tools slip a little against the brass tubes. Be very cautious with pliers. Brass tubes are soft and easily deformed, and while it is not too hard to smooth a small burr, it is very difficult to make a bent tube perfectly round again, or to heal the mangled grooves of a brass or aluminum thread. The reader might suspect that I have had to try such repairs -- I ain't saying. The rubber band wrench is much better for gripping the tubes and external rings. In fact I can't make do without that "Grip Wrench."
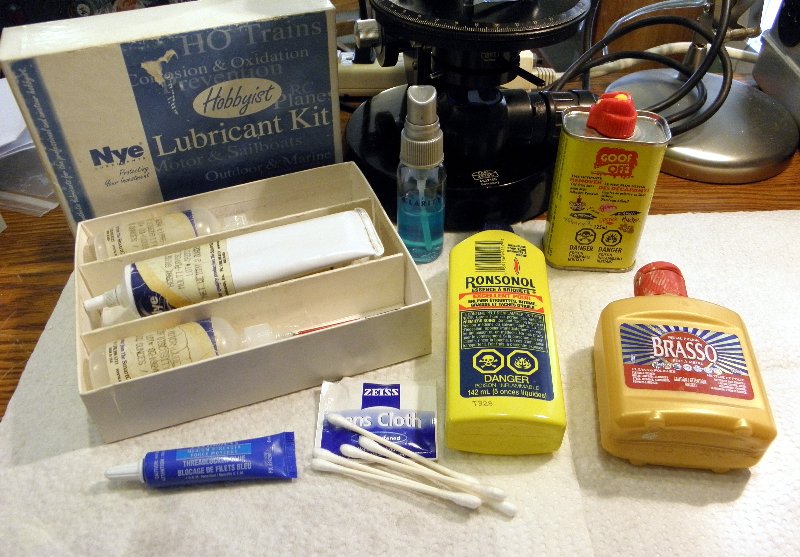
Solvents and lubricants for this project included "Goof Off," which used to be mainly xylene and toluene but now has a more alcoholic formula, and naptha (or naphtha), commonly used for lighter fluid. I used the middle weight grease from my Nye lubricant kit for the brass cylinders, and the heavier of two oils for the optical tube in the 50x objective. Zeiss lens cloths come already saturated with isopropyl alcohol, and I use many cotton swabs (real cotton, not synthetic). Brass tarnish can be removed for a smoother finish, assisted by a fine grade of steel wool. The little blue tube contains a medium-strength thread locking fluid (methacrylic ester), which I used for some of the threaded rings. Old thread locking goop that Zeiss apparently used was so solidified that some parts were very difficult to remove. So, go easy with that blue stuff!
My 50x Pol Objective. I knew this one had a spring that should be removed first. Zeiss pol objectives have a flat screw-in cap on the back end, which you can usually remove by twisting a finger against its surface. Inside is a ring nut, where a small spanner wrench is used. With that off, the spring and its front ring plate will come out. The optical lenses are in their own interior tube, and don't worry about them falling out yet.
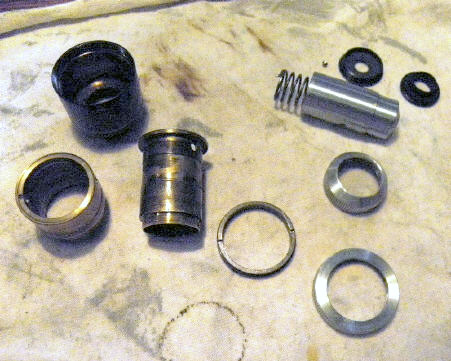
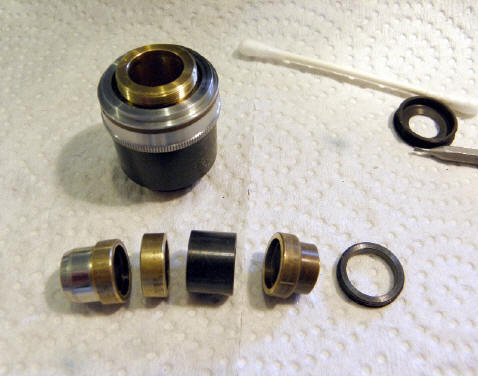
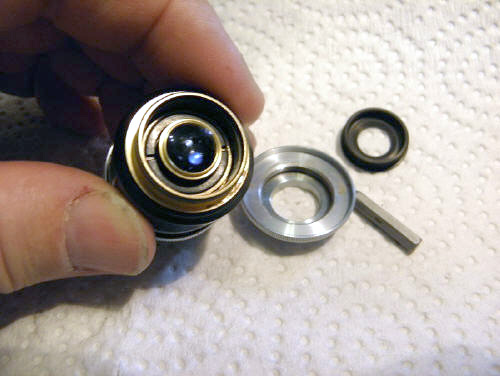
The two front serrated rings are threaded onto the ends of the two interior cylinders that center the optics. They have some sort of thread locker to hold them in place, but the first end ring broke free after some gentle warming with a hair dryer, and a little naptha (ring off on the left photo below). After removal, a small screw became exposed in a slot that guides the optics tube as it depresses against the spring. Take out the small screw and slide out the chrome plated optics tube. The next, inner threaded ring was very difficult to remove, even with heat and solvents (not used at the same time!). This is where I had the make the wire spanner wrench, which fitted into two holes in the cylinder attached to this ring, inside the back end (right photo below). Probably a Zeiss technician has a special tool to fit these holes. By jamming in a plastic-coated pliers handle to hold the wire spanner tight, and tightening the rubber grip wrench on the serrated ring nut, I was eventually able to break it free, and then it meekly unscrewed.
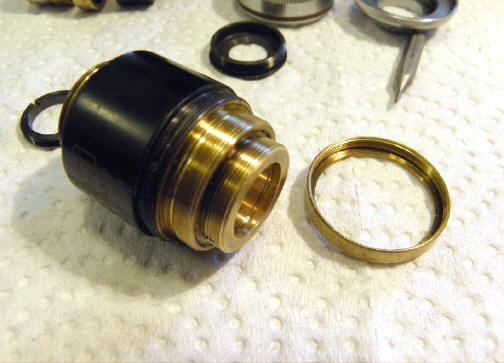
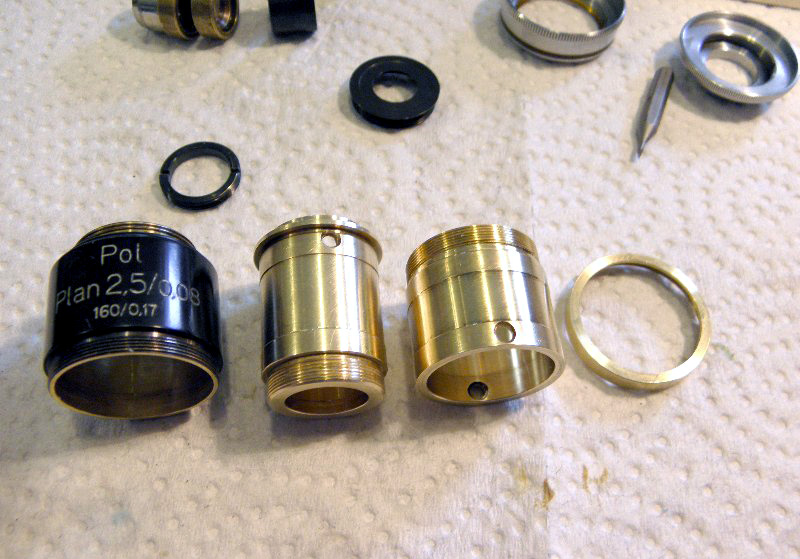
I didn't actually leave the optics tube in place when straining so hard to remove the ring — it is in the photo because I was making sure it still moved easily inside the tube. In fact I had to smooth down the inside of the tube a little, using a small round file and steel wool. Next was a collar ring, also threaded, which holds the centering cylinders in the objective tube. You can see it in the left photo below, with the slots. Some solvent and my small spanner wrench made this easy to unscrew. With some effort, I pushed out the two interior cylinders. They were strongly stuck together, but after warming it again, I pressed the inner brass tube out of its surrounding cylinder. The photo on the right below shows all the parts, before cleaning.
Cleaning the parts involved solvents to remove the hardened grease, followed by scrubbing with an old toothbrush dipped in Brasso, the tarnish remover. That was washed off with soap and warm water. Threads on the tubes and rings had some off-white solid material in them, which I assume was ancient thread locker. I used my fingernail for removing some of that, plus a small brush and solvent. The optics tube, of course, was kept away from solvents and water, but I used ipa lens cleaner and cotton swabs to clean the lens surfaces. The results are shown below. A thin coating of medium weight grease was applied to the cylinder surfaces, except I found that to be too stiff for the spring-loaded optical tube to move easily enough. For that I used the heavier of my two Nye oils. Reassembly was fast, with a very small amount of new thread locker to hold the outer serrated ring nuts in place. No thread locker for the interior ring for holding the spring, or for the cap on the back tube, of course.
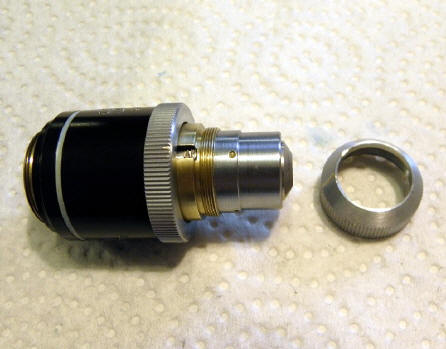
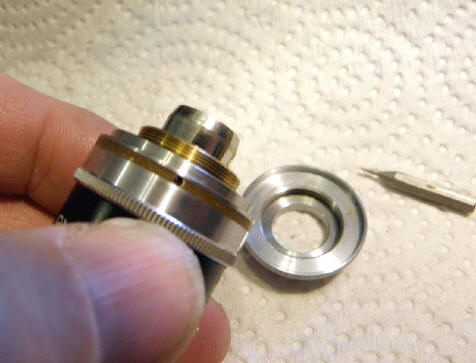
My 2.5x Pol Objective. This newer style objective uses set screws to hold the serrated end rings to their respective interior centering cylinders. I backed out the top one (no need to remove it), and the conical end ring screwed off very easily. The cylinder it screws to has a small indent hole for the set screw (lower right photo), so be sure to match that up with the screw when it is reassembled.
Next I removed the back end cap (it unscrewed with finger pressure), then the interior ring nut using my small spanner. The optical pieces had to be pushed down from the front with cotton swab sticks to get them out. The optical tube pieces need their correct orientations when reinstalled, so take note of how they come out. It's pretty obvious except for the smallest ring, but it is not hard to change it if necessary. The hard part was yet to come.
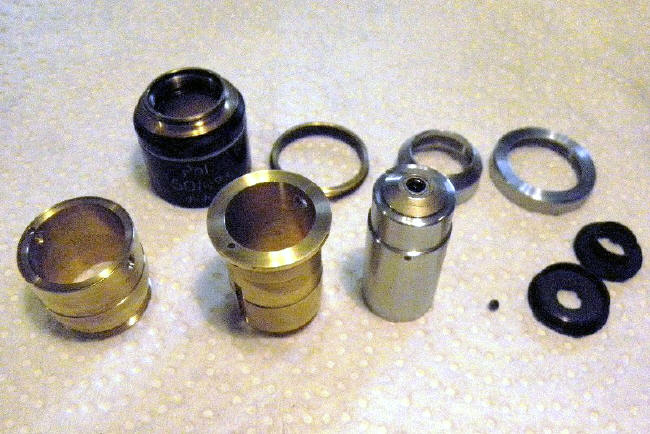
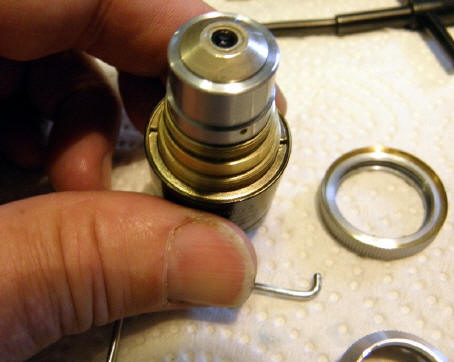
The second screw ring also uses a small set screw, located in the color band (below left). When loosened, this ring also came off easily. No original Zeiss thread locker was used here, thank goodness! However, the two centering cylinders were still frozen solidly in place, without any obvious way to remove them from the objective tube. There was a brass band around the barrel between cylinders and outer tube, with no set screw, so I realized it must be screwed onto the outer barrel to contain the cylinders. It was very well cemented on by hardened thread locker, and it would not budge. Finally I heated the tube assembly in a toaster oven for 20 minutes at 250 degrees F (120 C), then added solvent, followed by much pressure with my trusty rubber grip wrench, and at last it slowly turned off. Here it is on the right, below.
Nor was it easy to push the combined centering cylinders out of the objective tube. I had to be careful to not damage those soft brass threads. More solvent, more heat, and then pushing on the end finally released it. Same deal to get the two interior cylinders apart -- dried grease is a strong cement! With it all apart at last, the tube pieces could be cleaned and polished. Here they are below.
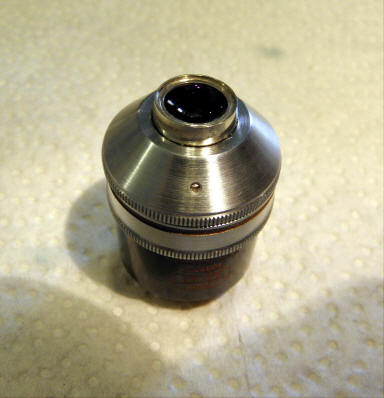
Notice that the color is mostly gone from the lettering on the barrel. It was not good when I started, and worse when I finished. The lettering is not printed on the surface, but instead slightly engraved into the black enamel and filled with paint. Using my finger, I smeared a thin layer of white enamel paint over these engravings, and after the paint set up, wiped the surface clean very gently with a paper towel dampened with a few drops of solvent. Enough white enamel was left in the engravings to restore the lettering pretty well. Reassembly took some time to be sure the cylinders moved smoothly, then I reattached the barrel nut using some of my thread locker. The two serrated screw rings needed a little tweaking as well to keep them smooth after the set screws were tightened. Finally done, and the objectives are working like new. Here they are on my project scope. The other two objectives needed similar attention, so I have been working on all of them for portions of several days now. It is not a job I would like to get paid for, but being a hobby, I can work on it when I feel like it.
I am a great admirer of Zeiss and its microscopes, but it is unfortunate that instruments so well made have such difficult problems due to nothing else but age. Stuck centering rings, however, are more easily fixed than delaminated optics! When their parts are in good condition, Zeiss microscopes are a great pleasure to use, and over the years, many students have gained confidence in applying petrographic methods with them, and more easily and quickly than they would have with most other brands, in my opinion. And they still can, if they have a Zeiss pol scope in the condition for which I aim!
Feel free to contact me with questions or comments (even criticisms if they have future value).
J. Gregory McHone
Grand Manan (the Bermuda of Canada), New BrunswickWebsite http://earth2geologists.net
Microscopy UK Front Page
Micscape Magazine
Article Library
© Microscopy UK or their contributors.
Published in the November 2010 edition of Micscape Magazine.
Please report any Web problems or offer general comments to the Micscape Editor .
Micscape is the on-line monthly magazine of the Microscopy UK website at Microscopy-UK .
© Onview.net Ltd, Microscopy-UK, and all contributors 1995 onwards. All rights reserved. Main site is at www.microscopy-uk.org.uk .