 |
 |
| The Poorman's
Photomacroscope (part3) The Implementation of Lighting etc.. By Paul James |
The last few weeks have been for me a period scattered with minor revelations of various matters relating to things macroscopic, which it must be said have been not only of great interest but also confusing as well. I mention this because it would seem perfectly normal that I should have come by now to a few conclusions and in particular the 'scope's preferred configuration. The actual problem was that I naturally expected to choose a suitable option, then get on with finishing the project. Now, at long last I'm resigned to the obvious: that the stand can be used in any configuration I find suitable for a given task. So if I want widest fields the finite system is best, or using the infinity system either for general usage and or highest magnification and resolution. Even the flagship photomacroscopes of the leading manufacturers have add-on components to alter or extend viewing limitations etc.. Besides which, the stand which requires us to do nothing but peek through the eyepiece might seem the ultimate viewing device but I suspect it might also incur complacency and ultimately a lack drive or interest. It seems therefore that a little bit of struggling maintains the appetite and keeps the mind active.
So I conclude this series with the subject of lighting and image capture.
Macro Illumination in General
Whilst I acknowledge that there have been some ingenious lighting arrangements on various stereomacroscopes over the years, others seem to err on the side of convenience of operation than towards attainment of effect. So I decided to concentrate on what I find best to suit my particular range of subjects through my individual perception of things macrowise.
Transmitted Lighting
Armed with some ideas about brightfield illumination in compound microscopes I thought about installing an inbuilt lighting unit along similar lines. After struggling to fill a wide macro field of around 30mm with a cone of light of around 0.2na ( the minimum necessary in a 'scope of this sort ) without having to employ large, long focal length optics, I decided to change horses and utilise the external sub-bench lighting unit I already had. This is a simple through the bench Olympus Köhler lighting unit which I modified a few years ago so it could be hung magnetically from the bench's undersurface being out of sight as well as ridding cables off the bench top too. As a light source I used a single contemporary LED of around 12000 mcd light output housed in an old tungsten bulb's socket from the Olympus external lamphouse. Since the bulk of LED's light output is directed straight out of the top of its moulded capsule, its mounting onto the old pair of filament supports was straightforward in both senses. The centering device which controls the alignment of the light source worked just as effectively as it did in its original role with the tungsten lamp. I found however that the LED capsule's axis needs to be perfectly aligned to that of the lamphouse, so when centered by use of the latter's controls the LED is not only located on the axis between lamphouse and 'scope, but that it is longditudinally aligned too. Failure to attend to this can result in an uneven field. LED's seem to have a highly coherent light output which eminently suits the compound microscope, being in the first instant a circular source and somewhat larger than many tungsten filaments.
Despite having a concoction of lenses and diffusion screens I could not satisfactorily generate an illuminated field beyond 15mm for the eye and of course even less for the camera which never lies about tonal variations across the field! Nevertheless I was able to start observing and would attend to this restriction in the near future. My immediate concern was rigging up the 'scope with reflected lighting.
Reflected Lighting
A quick peek at many a professional stereo low power microscope will reveal what might appear to be the ultimate light source for things macrowise: the 360 degree ring light at the lower end of the objective. I dare say that for some purposes it is ideal, but the majority of things I've scrutinised benefit from more directional sources. Maintaining the all important naturally occurring shadows that bring about the realisation of form and detail, particularly so in this particular macroscope which is almost bereft of the traditional stereo effect. Of course this is an approximation which often needs some sympathetic adjustment dependent upon the subject. For every observer there is a personal view of things though the eyepiece, so the importance of mobility of the lighting units is paramount. Partial masking of the light output from the ring light might be a practical proposition especially since the LED source is a cold one.
The occasional need for diffuse lighting stems from its ability to suppress greatly those myriads of tiny beads or highlights generated at edges and corners of material science specimens as well as some intricate biological subjects too which proliferate with diffraction plagued highlights. The use of a polar filter can aid this suppression of reflections too.
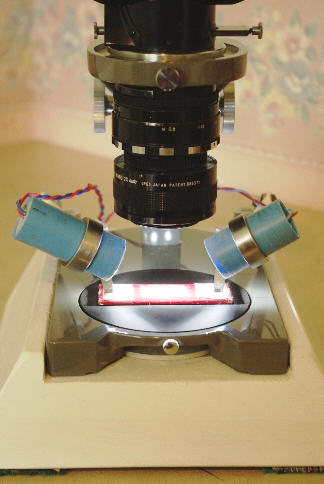
The Multi-LED Module For Reflected Light
I thought I'd utilise the favourable properties of LED's emitting a very slightly blue cast light which I find a welcome relief to the inherently red cast of the filament, as is also the absence of heat generated from them. LED's can be housed in the smallest of containers for this purpose and of course remain cold whether they be battery powered or wired from a low voltage DC mains unit.
I thought that 2 lighting modules would suffice, each containing 7 LED's wired in parallel which could be fitted into the bore of some scrap plastic 25mm water pipe:-
|
|
Here can be seen the preliminary stacking of the LED capsules into a rosette of holes drilled into circularised plastic scraps which were forced into a circular rebate machined into both ends of the plastic pipe. Note the plastic sleeves on one each of the pair of wire leads which helps to simplify identities whilst insulating and so preventing short circuiting. Each group of tails both positive and negative were held captive in standard miniature connection blocks. The 7 LED's with captive tails in terminal blocks were then pulled out of the rosette and reinstalled from the open end. The circular endpiece with its hole for the power leads was then finally fitted into the open end and thus sealed the lighting unit.
The DC power would come from a mains low power DC unit I had which has an outlet of around 3.4 volts which seemed ideal since the output resistance of it would cope easily with the 14 LED's, each receiving a tad less than the 3.6 volt recommendation.
Mounting the LED Lighting Capsules
I made 2 simple lighting extension arms each consisting of a ring sleeve to hold the light capsule. The ring was welded to a short rod which was engineered to be a smooth sliding fit in a tube, the opposite end of which was flattened and drilled so a bolt would hold it captive at the rear corner of the base unit. At this point a small right angled bracket was fashioned which when fitted to the main stub at the rear of the base unit would ensure the lighting units freedom to be swung right/left/up/down whilst positively staying put when stationed at the intended spot. The tube itself could also be rotated to any position and pushed/pulled fore and aft about 20mm by virtue of its sliding fitment into the tube. The friction required to keep the LED units from twisting from the desired position was imparted by the old but reliable method of a cutting a single slit down the underside of each tube about 50mm., which when crimped a little raised the friction just enough so the rod end is held partially captive but able to be twisted easily.
 |
To facilitate a smooth but firm overall motion of adjustment for each lighting arm, I made several plastic washers from scrap DPC then placed them beneath the normal washers used in bolting up the parts. Each lighting arm was supported by an embedded threaded stub, protruding just enough to hold the brackets and provide the necessary motion in the horizontal axis.
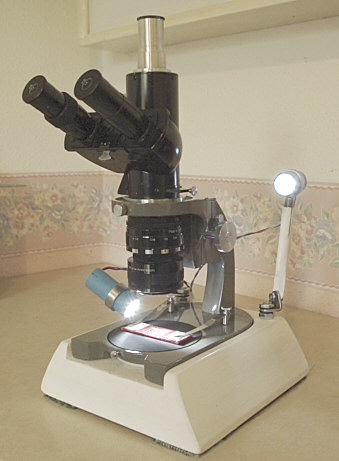 |
The lighting arms work very well, enabling any reasonable configuration of lighting to be employed over the specimen. They may look a little 'mechanical', but then I didn't want a pair of mini fishing rods with trembling fairy lights dangling over the stage! The additional benefit of this method is that they can be both rapidly swivelled to the vertical at the rear of the stand and so well out of the way when not required or using Brightfield. Eventually I might house a battery unit within the base. Presto!....no bench strewn cables.
Photography
Since the phototube outlet was already an integrated part of the trinocular head rig, little if anything needed to be done to improve an already well established system. This subject has been well covered in Micscape in the past so I shan't duplicate here many of the ideas previously published. The only alteration I felt necessary on the Leitz trinocular head rig was to fashion a separate insert so as to house a 30mm eyepiece, which can satisfy the Ramsden disc appetites of the more difficult digicams. The narrower 23mm eyepieces could still be used as I'd made a sleeve for that purpose.
The following images are typical examples captured on a Minolta F300 5 megapixel digicam now getting old in the tooth but still doing the business. They were all taken using the Helios 58mm film camera lens mostly at around f5.6 employing the infinity tube lens. Capturing the detail from this macroscope wasn't easy, and was for me a frustrating exercise for a number of reasons, some stemming I hasten to add from misalignments and unsuitable photo eyepieces, but they do at least yield some indication of the capability of a 'scope of this sort. The post processing was conjured to try to emulate as accurately as possible the visual experience rather than anything else. The real experience of live observing is as we all know entirely unique.
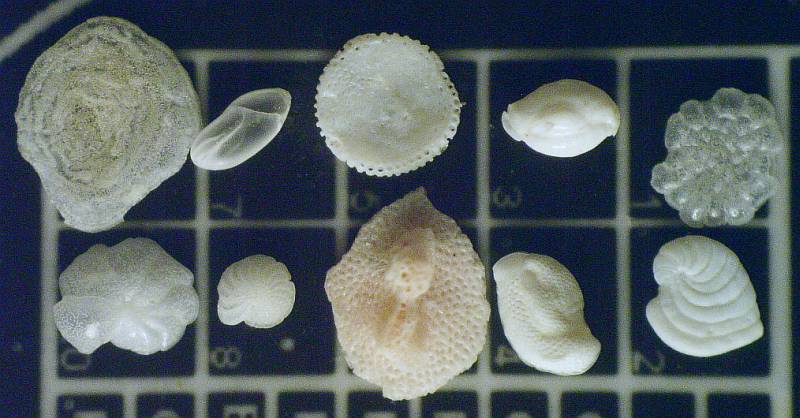
I'm indebted to Brian Darnton who's very fine Foraminifera slides have given me much pleasure on many occasions, and of course throughout my venture with this photomacroscope.
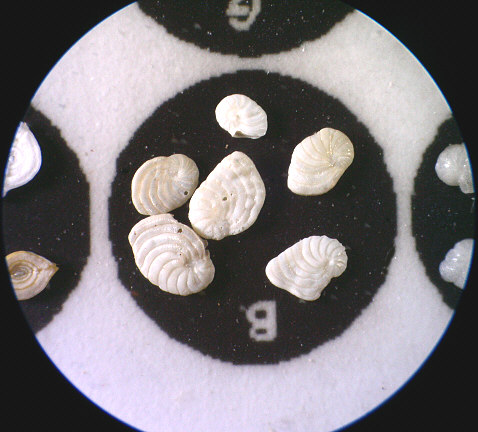 |
(X25) Forams. Prime lens + Converter showing flat field capability of combo.. |
 |
| (X40) Forams. Prime 58mm objective solo. Low angle LED revealing surface tonality etc.. |
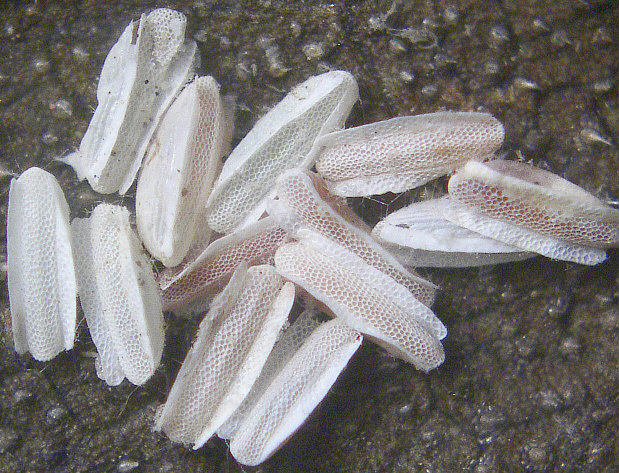 |
| (X45) House Fly eggs. Ancient Victorian slide. Prime Objective solo. Again single low angle LED light. |
 |
| (X40) Human Flea. Unable to process to represent original live view. Pity. |
 |
| ( approx.X 35) Forams. An earlier image when I only had a desktop lamp to hand! Finite system. Optic assemblage unknown. |
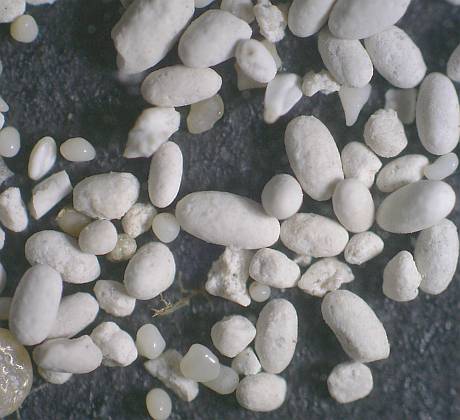 |
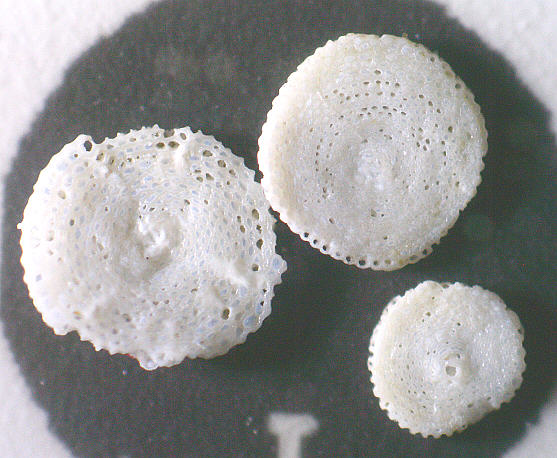
(X30) Bermuda sand. Another example of an old Victorian slide. |
Conclusions
It seems a long time ago now since I first toyed with the initial ideas concerning the DIY photomacroscope. Far more positive things have emerged from this venture than I'd previously imagined. It is by no means perfect BUT it is a durable, long lasting instrument which raises quality visual imaging in both transmitted and reflective modes, and will no doubt end up in the hands of my grandson. Its forte I guess lies in that zone of microscopy where the average compound microscope's resources are scantily provided : the low power realm of imaging specimens deserving of either BF or reflective lighting, many of which have been mounted for observation with a monocular instrument.
However I've had a few frustrating problems with the processes of image capture, which indirectly led me to think about designing a purpose made stand along similar lines but with a fundamental difference : The entire body would be a fixture solidly attached to the base, apart from the stage which would be the focussing platform. Thus the mounting for a camera could then be very substantial and include all the niceties of alignment, without the fear of disturbing settings either caused by the intrinsic weight of camera gear or focussing slide creepage.
But whether I'll remain stereo-photomacroscopeless in the sense that I won't buy a professional instrument remains to be seen. There is as it happens to be one particular system, a feature of stereo microscope design which seems to be making a resurgence : 'the Greenough', modified I suspect but offering better fidelity in live stereo imagery than the single objective design..........now that might be very tempting indeed. The fact is however that no matter which type of low power photomacroscope is used visually, its photographic output is definitely 2-dimensional......regardless.
| All comments welcome by the author Paul James |
Microscopy UK Front Page
Micscape
Magazine
Article
Library
Published in the November 2010 edition of Micscape.
Please report any Web problems or offer general comments to the Micscape Editor.
Micscape is the on-line monthly
magazine of the Microscopy UK web
site at
Microscopy-UK